![How to Lock Shapes in PowerPoint [A Comprehensive Guide!]](https://artofpresentations.com/wp-content/uploads/2021/09/Featured-Image-How-to-Lock-Shapes-in-PowerPoint.jpg)
Isn’t it annoying when you have put in so much effort to design a slide, and then when you share it with your colleagues, there will be this one person who will move elements on a slide around before sending it to the management team and ruin the design in the process!
Well, the best way to fix that problem is to lock the shapes and elements in PowerPoint!
In this article, I will be showing you two different ways in which you can lock objects on a slide, and prevent this problem from occurring again! Plus, in the end, I will also show you how you can lock a complete presentation from being edited!
So, let’s get started!
1. How to Lock Shapes in PowerPoint?
In Microsoft PowerPoint, there are two methods in which you can lock shapes in your presentation. The first method is to use the “Slide Master” viewing option and the other is to use the “Shape Locker” add-in.
Both of these methods are described in the following section.
1a. Method 1 – using the Slide Master
The first method uses the slide master to add shapes. You can use the slide master in PowerPoint to add shapes in the background that can’t be removed.
Follow the easy steps described below to lock shapes in your PowerPoint presentation, using the “Slide Master” view.
Step-1: Go to the “Slide Master” View
The first step of the process is to go to the “Slide Master” viewing option. [Check out my other article to know more about view options in PowerPoint!]
To do that, click on the “View” tab, which is located in the ribbon of your PowerPoint presentation, and then select the “Slide Master” view from the “Master Views” section.
Step-2: Insert the Shape
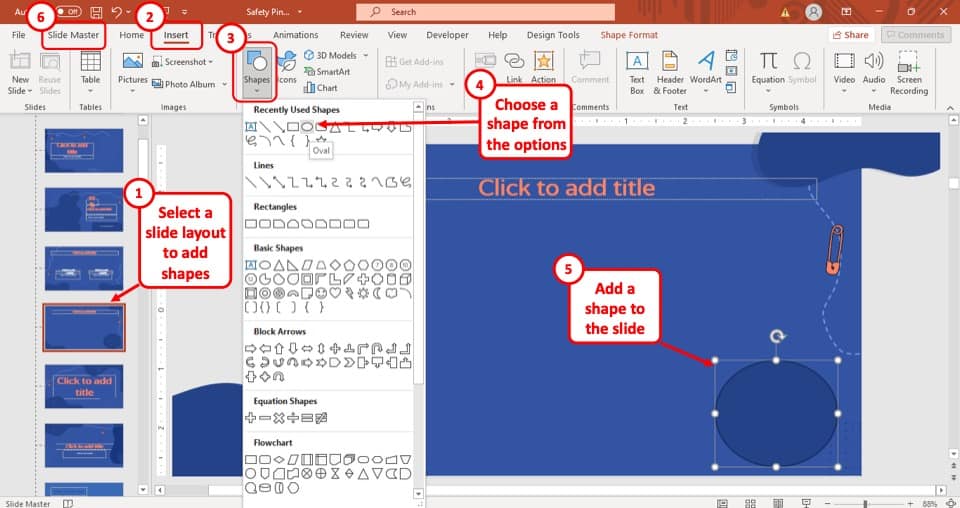
After you have accessed the “Slide Master” view, select the layout in which you want to lock the shape and then insert the shape in your preferred location on the layout.
You can insert the shape using the “Shapes” option in the “Insert” tab. When you click on the “Shapes” option, a dropdown will appear. Simply choose the desired shape from the dropdown.
After you have placed the shape in your preferred layout, all the slides using that layout will have the shape locked in that position.
Step-3: Exit the Slide Master
Once you’ve added the shape, go back to the Slide Master. To do that, simply click on the “Slide Master” tab in the menu.
Then click on “Close Master” to exit the slide master and go back to the normal view in PowerPoint.
When in the normal view, select the layout that you just edited using the “Layout” option under the “Home” tab. You will notice that the shape has been added to the slide and it can not be edited!
1b. Method 2 – Using the Shape Locker Add-in
While using the slide master works great in ensuring that the shapes don’t move, but it can sometimes create another problem – the editing of the slides can become really difficult since you can’t move the shape.
Furthermore, people often end up moving the text box that is present on the slide!
One way to partly fix this problem is to use placeholders in PowerPoint! However, that still doesn’t give you complete control over things that are present on the slide!
A better way to fix this issue and lock objects and shapes on the slide is to use the “Shape Locker” add-in in PowerPoint!
The shape locker add-in comes with many features and a 10-day trial period wherein you can test out the application! You can easily download the software on your Windows computer. They currently don’t offer a solution for Mac.
To use the “Shape Locker” add-in, download and install it first. Then, to lock shapes in the slides of your PowerPoint presentation, follow the simple steps described below.
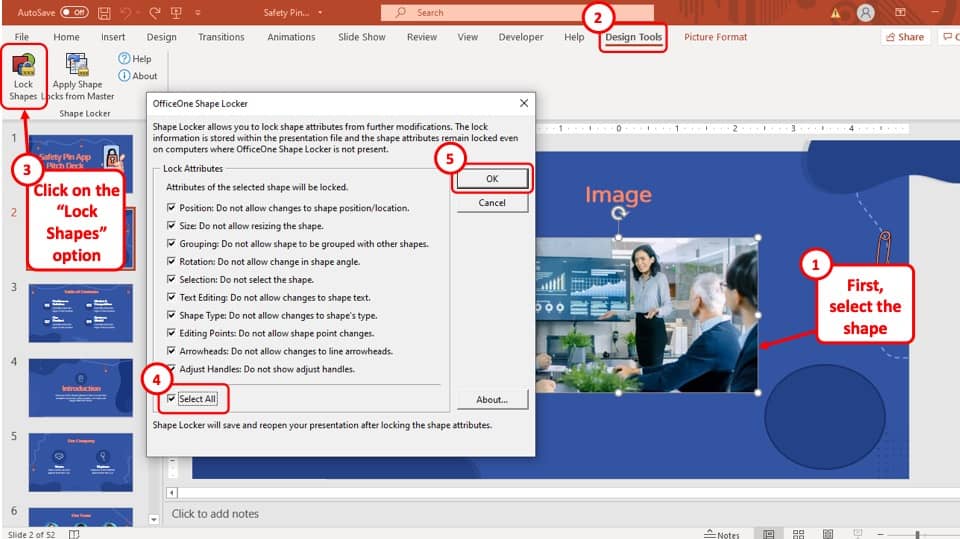
Step-1: Click on the “Lock Shapes” Add-in
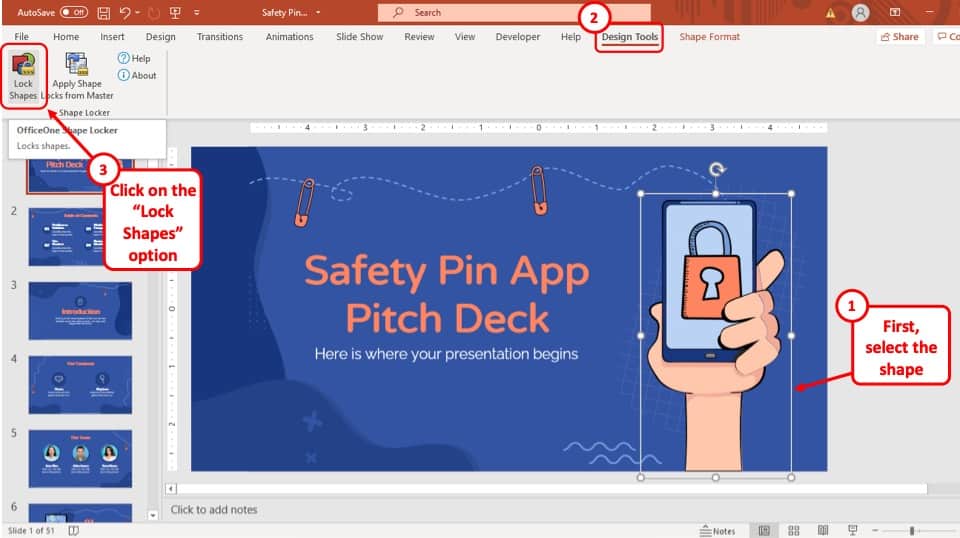
The first step of the process is to select the shape that you want to lock and then go to the “Design Tools” tab and then select the “Lock Shapes” option from the “Shape Locker” section.
This will open a pop-up window.
Step-2: Click on the “Select all” button
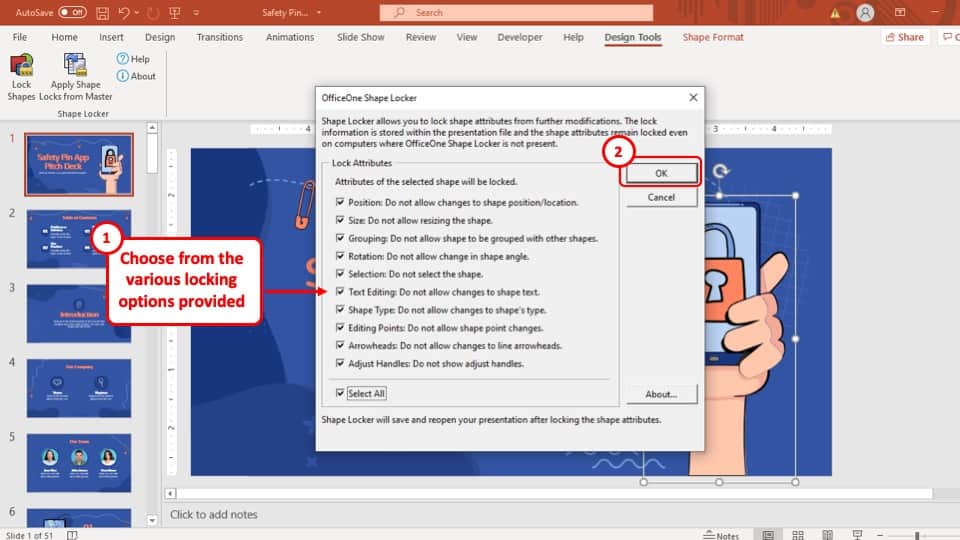
After you have opened the pop-up window, click on the “Select All” button at the bottom of the table to checkmark all the criteria in the pop-up window.
After that hit, the “Ok” button and the shape will be locked to the slide and will not be editable by any means.
You can also lock just one or two aspects of a shape individually such as shape selection or resizing instead of enabling all the attributes.
2. Shape Locker Features
Shape locker add-in comes with several features to lock a shape in PowerPoint. To use these features, make sure you download the software first on your PC. It comes with a 10-day trial.
Once you have downloaded and installed it on your PC, you can start exploring its many features. But, what are the features that it provides? Let’s explore them further –
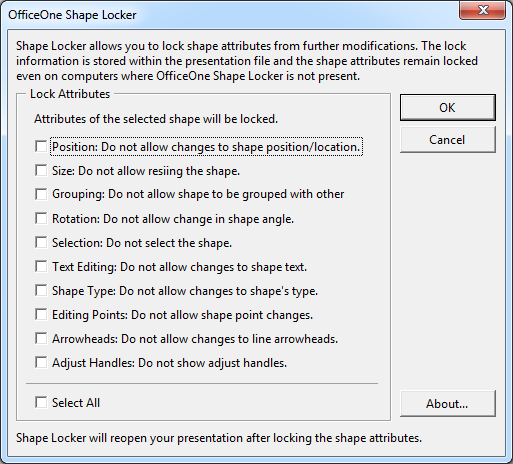
Shape locker provides the following various locking features –
- Lock Position – this is one of the best features. Enabling this will prevent the shape from being moved from its position.
- Lock Size – enabling this will prevent the resizing of a shape
- Grouping – this feature will disable the shapes from being grouped together
- Lock Rotation – this attribute prevents the shape from being rotated and locks the rotation of the shape
- Lock Selection – enabling this feature will prevent the user from even selecting the shape!
- Lock Text Editing – this features allows you to lock the text and prevent it from being edited further
- Lock Shape Type – this attribute prevents the user from changing a shape from one form to another (for eg. shape type won’t change from rectangle to trapezium)
- Lock Editing Points – this will prevent the points on the shape from being edited. Therefore, the structure of the shape can’t change.
- Arrowheads – prevent the users from changing the type of arrowhead used.
- Adjust Handles – enabling this won’t even show the adjust handles of a shape!
You can enable all of these features in one go by choosing “Select All” or you can choose one or more of these attributes individually!
Furthermore, once you have chosen the locking attributes, the shape will remain locked even when opened by another user who doesn’t have the application installed.
3. How to Lock an Image in PowerPoint?
To lock an image in PowerPoint, you can use the “Shape Locker” add-in.
Simply select the image you want to lock in the slide of your PowerPoint presentation and follow the steps described in the second method of the first section of this article.
After you have click on the “Select all” option and hit the “Ok” button, the image will be locked on that position in that slide and will not be editable.
4. How to Lock Editing in PowerPoint?
There are mainly four ways in which you can make sure that your PowerPoint presentation cannot be edited by other users.
You can either convert the presentation to a PowerPoint slide show, or save it as a PDF file, or save the presentation as an image or put a password on the presentation.
All of these methods are described in the following section.
4a. Convert the Presentation to PowerPoint Show
One way to prevent the presentation from editing is to convert it into a PowerPoint Show file (PPSX file format).
When you share this file with your users, this will open the presentation directly in the presentation mode and the user will not have access to the editing section of the slide by default!
I’ve written a complete article on how to use the PPSX file to open a PowerPoint directly in presentation mode! In the article, I have provided the detailed steps to convert your presentation into a PPSX file and prevent it from being edited!
4b. Save PowerPoint as a PDF
Another way to prevent your presentation from being edited is to save it as a PDF file! Saving a PowerPoint presentation as a PDF is quick and easy!
To save your PowerPoint presentation as a PDF file, you have to go to the “Export” option located in the “File” menu.
Again, I have a dedicated article on how to convert a PowerPoint presentation to a PDF where I share the detailed step-by-step process for the same! Make sure you check out that article for all the details.
4c. Save PowerPoint as an Image
Another method that you can use to prevent your presentation from being edited is to convert them into images before sharing the file with your colleagues or clients.
To save your PowerPoint presentation as a series of images, you have to use the “Export” option which is located in the “File” tab.
If you are unsure of how to do this, make sure you check out my other article where I go in-depth into how to save PowerPoint as an image.
4d. Password Protect Your Presentation
One of the best ways to lock your PowerPoint presentation and protect it from being edited is to protect is using a password.
This is more of a solution from other people stealing your content rather than preventing your colleagues or client from editing your presentation.
Follow the easy steps described below to password protect your PowerPoint presentation.
Step-1: Go to the “File” tab
The first step of the process is to select the “File” menu, which is the first option in the ribbon of your PowerPoint presentation.
Step-2: Go to the “Info” option
After you have selected the “File” tab, you will be taken to a different window. From that window, select the “Info” option which is the fourth option in the sidebar to the left of your screen.
Step-3: Select the “Encrypt with Password” option
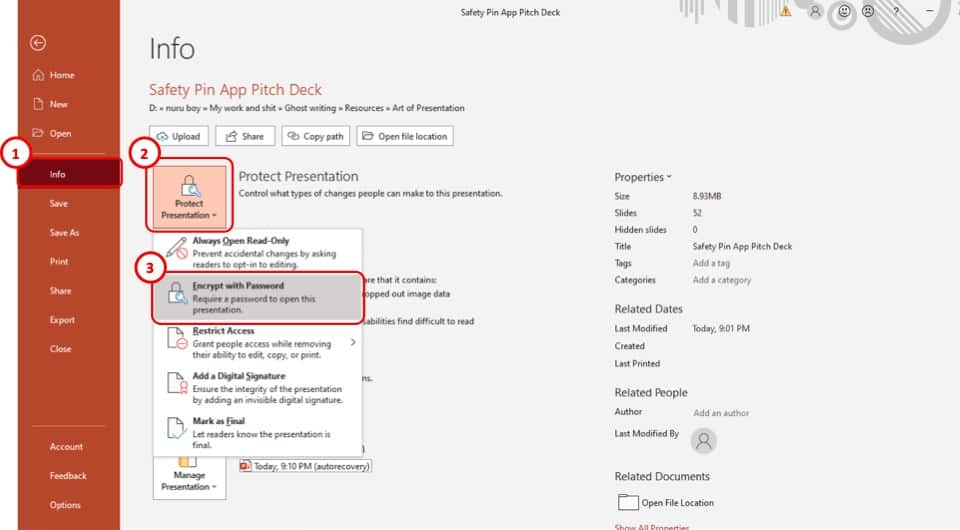
In the “Info” option, click on the “Protect presentation” option. This will open a drop-down menu. From the drop-down menu, select the “Encrypt with Password” option.
Step-4: Add the password to the presentation
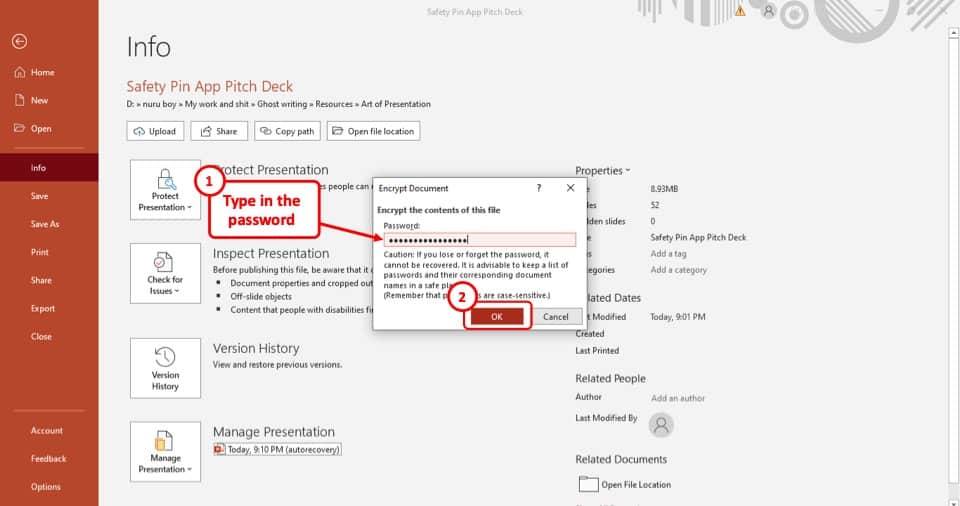
After you click on the “Encrypt with Password” option, a pop-up window will appear on your screen.
Simply type in the password that you want to set for this presentation and hit the red “Ok” button at the bottom right of the pop-up window and after that, users will have to use the password to access this presentation.
Make sure that you note down the password somewhere or remember it because if you forget your password, there is no way to recover it! In that scenario, you will have to recreate the complete presentation from scratch!
More Related Articles
- How to Format Shapes in PowerPoint? [A Complete Guide!]
- How to Crop a Picture in PowerPoint? [Here’s the Best Way!]
- Main Features of Microsoft PowerPoint? [You Need to Know This!]
- How to Create a Semi-circle in PowerPoint? [Step-by-Step Tutorial!]
- How to Use SmartArt in PowerPoint? [An EASY Guide!]
Credit to wayhomestudio (on Freepik) for the featured image of this article (further edited).