![Line Spacing in PowerPoint – Basics Explained [Finally!]](https://artofpresentations.com/wp-content/uploads/2022/03/Featured-Image-Line-Spacing-in-PowerPoint.webp)
Ever wonder why sometimes the text in your PowerPoint presentation is so far apart from each other from one line to another? This is due to the incorrect line spacing option that you may have chosen inadvertently on your slides!
Line spacing in PowerPoint allows you to adjust the space between two lines within a paragraph or the space between two paragraphs in a text box. By default, PowerPoint provides 5 line spacing options. However, you also get an option to add custom line spacing in PowerPoint.
When I edited text before I had the knowledge of line spacing in PowerPoint, it was really frustrating to not be able to adjust the spacing. Moreover, I found it really annoying when one text box looked different from the other in terms of the spacing between the lines!
Fortunately, I now have enough experience to avoid such issues in my presentations. In this article, I’ll share everything that you need to know along with the basics of line spacing in PowerPoint. Plus, I’ll also show you how you can customize the line spacing so you never really face any issue in the future with the spacing of text!
So, without further adieu, let’s get started!
1. What is Line Spacing in PowerPoint?
As I previously mentioned, the “Line Spacing” in Microsoft PowerPoint shows the space between each line or paragraph of text in the slides.
Adjusting the line spacing is crucial when you intend to format text in PowerPoint!
The line spacing is measured as the percentage of the text within a text box and thus it changes with the change in font size of the text. The line spacing options are available in the “Paragraph” group of the “Home” Tab in PowerPoint.
2. How to Access the Line Spacing Options in PowerPoint?
To access the line spacing options in PowerPoint, select the text box first. Then, click on the “Home” tab. From the “Paragraph” group, click on the “Line Spacing” button. From the dropdown, choose one of the default options (1.0, 1.5, 2.0, 2.5, 3.0) or “Line Spacing Options” for custom spacing.
Here’s a detailed step-by-step explanation of the above process –
Step-1: Click on the “Home” tab
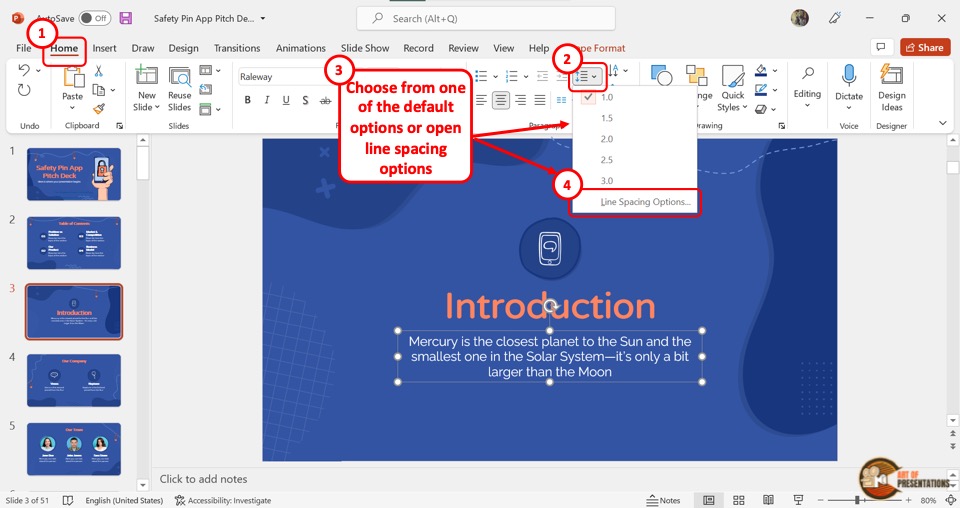
The first step is to click on the text inside a slide. Make sure that the text box is selected. Then, click on the “Home” tab which is the second tab in the menu ribbon located at the top of the screen.
Step-2: Click on the “Line Spacing” option
The next step is to click on the “Line Spacing” option in the “Paragraph” group of the “Home” menu as shown in the image in step 1. This will open a dropdown menu.
You can either click on one of the default options provided in the dropdown, or choose the “Line Spacing Options” button for customized line spacing options.
Step-3: Click on “Line Spacing Options”
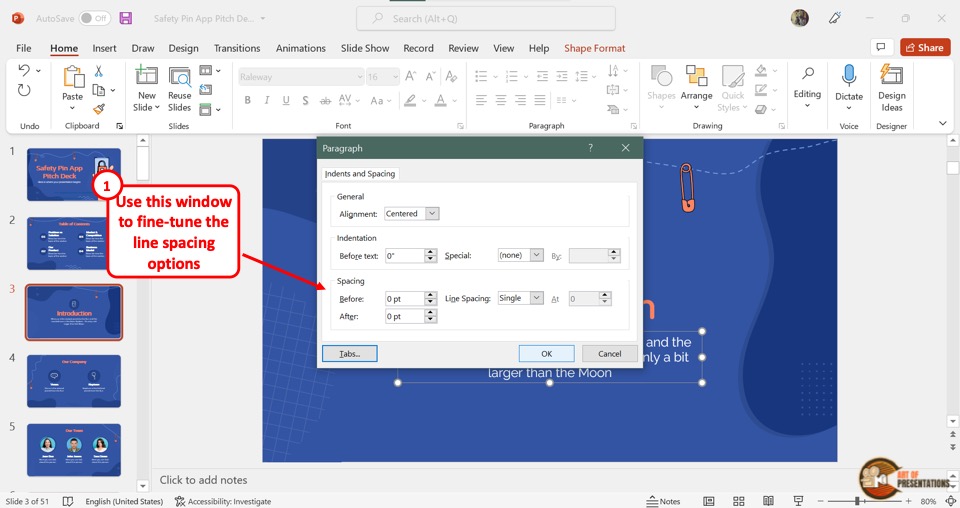
The final step is to click on “Line Spacing Options” in the dropdown menu to launch a dialog box. In the dialog box, you can now customize the line spacing option.
3. Line Spacing Options in PowerPoint
PowerPoint offers various preset line spacing options. You can also customize the line spacing using the “Paragraph” dialog box.
3.1 Standard Line Spacing Options
In the dropdown list under the “Line Spacing” icon in the “Home” menu, there are 5 premade standard line spacing options in PowerPoint.
The Default “1.0” Line Spacing Option

The lowest standard spacing option “1.0” creates the spacing by the amount that is half of the font size of the text in the text box. That is, for 12pt text, the spacing will be 6pt between each line. It is the default spacing option in PowerPoint.
The Default “1.5” Line Spacing Option
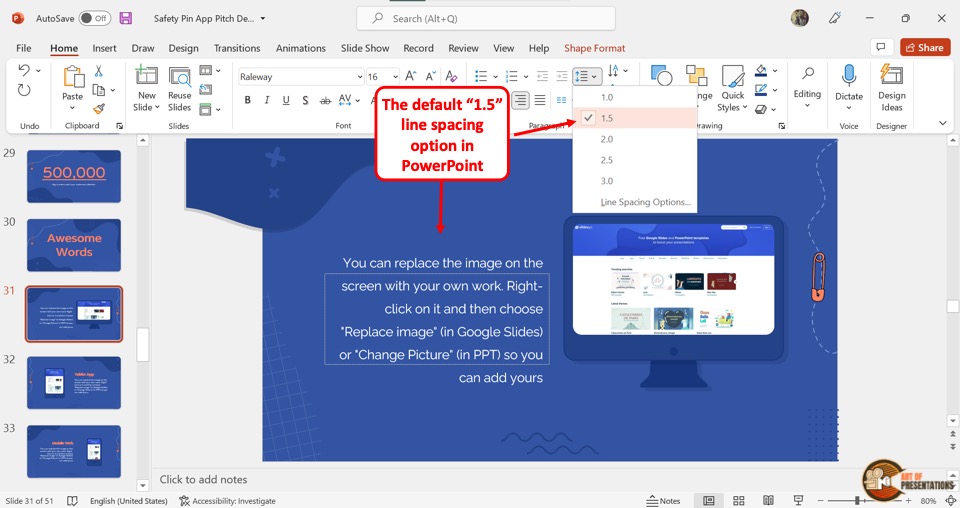
The second option, “1.5” creates a little more spacing between each line at 75% of the text. That is, if the font size of the selected text is 12pt, the spacing will be 9pt.
The Default “2.0” Line Spacing Option

The third option “2.0” is more visually pleasing as it creates 100% of text spacing between each line. That is, for text with 12pt font size, the spacing between each line will also be 12pt.
The Default “2.5” Line Spacing Option
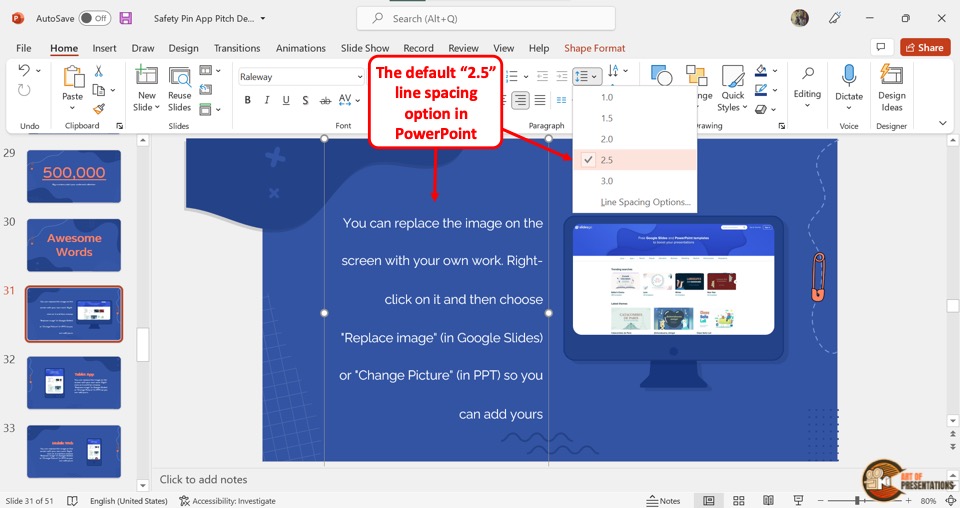
The fourth option is “2.5”. It will add space between each line of the selected text box by 125% of the text.
The Default “3.0” Line Spacing Option
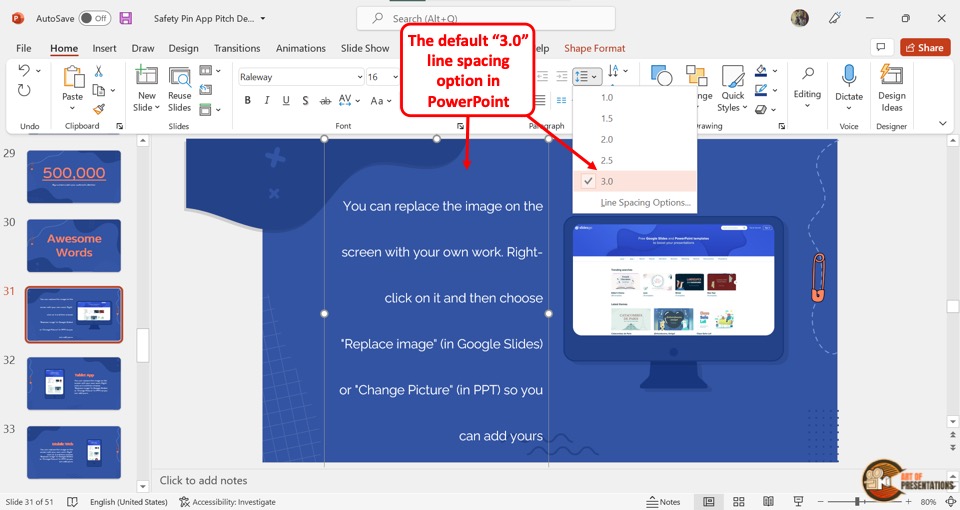
The last and fifth option “3.0” is the largest standard line spacing option. For more spacing, you have to add customized line spacing.
3.2 More Line Spacing Options
There are more line spacing options available in the “Line Spacing” dropdown list which is located in the “Spacing” section of the “Paragraph” dialog box.
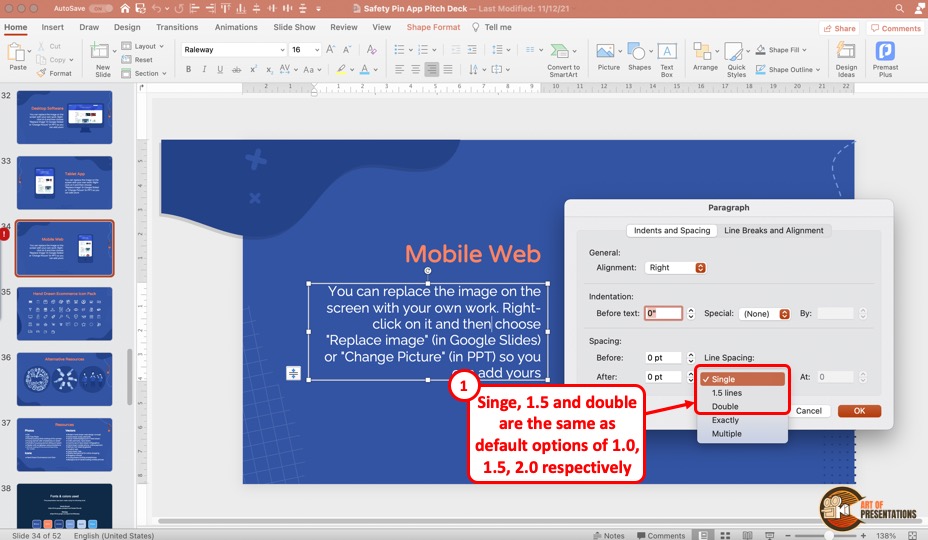
When you open the “Paragraph” dialog box, you will notice the following additional options provided in the line spacing section –
- Single
- 1.5 Lines
- Double
- Exactly
- Multiple
It is important to note that the first 3 options mentioned above i.e. “Single”, “1.5 Lines”, and “Double” function the same way as the default options of “1.0”, “1.5”, and “2.0” respectively!
Single, 1.5 Lines, and Double
The “Single” line spacing option, which is set in the PowerPoint text box by default, is the spacing between each line by half of the text size.
The “1.5 Line” option is the same as the “1.5” option in the standard line options. It adds line spacing of 75% of the size of the text between each line of the selected text box.
The “Double” spacing option is a widely accepted line spacing option. It is similar to the standard option “2.0” as it creates line spacing by the exact amount as the size of the text.
Exactly
Here’s where things start to get interesting!
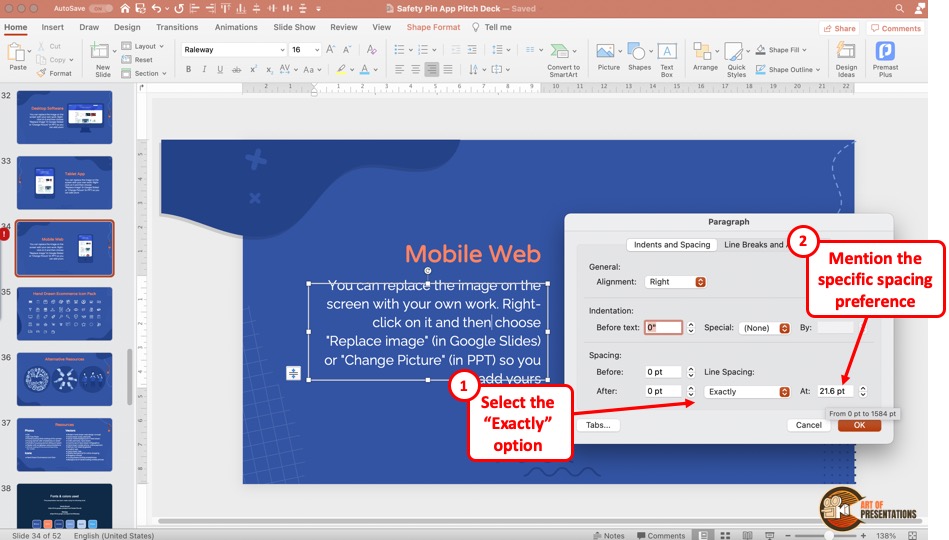
The “Exactly” spacing option allows you to control the exact spacing between the two lines. So, when you choose this option, make sure to change the value in the “At” field in order to control the exact spacing between the lines.
This option allows you to ensure consistency in the line spacing across your complete presentation. If you know the exact spacing of one text box, you can replicate the same value for all your text boxes in PowerPoint!
Multiple
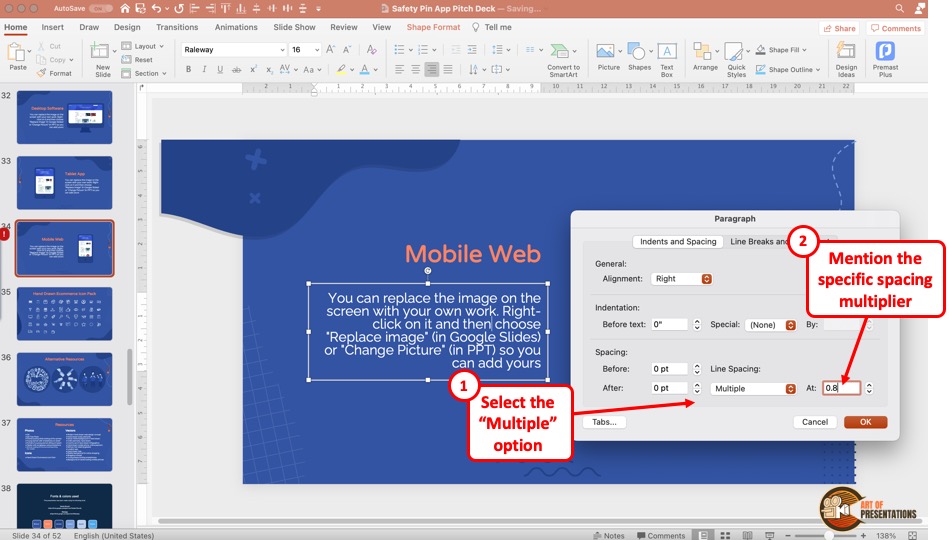
The “Multiple” option allows you to customize the line spacing option in the “At” box beside the “Line Spacing” box. The spacing amount in “Multiple” is measured like the standard spacing options as a percentage of the font size of the selected text.
You can also add a custom line spacing value just as you can when using the “Exactly” option. However, the key difference between “Exactly” and “Multiple” is that the latter increases the value of line spacing in multiples or percentages whereas using the “Exactly” option allows you to choose a specified spacing value!
That said, you can choose either of the two options to customize the line spacing beyond the default options. Just play around a bit with the values in the “At” field until you arrive at something that you like!
4. How to Change Line Spacing in PowerPoint?
To change the line spacing of text in PowerPoint, first, select the text. Then, click on the “Home” tab. Next, click on the “Line Spacing” button. Choose either the default options presented in the dropdown. Alternatively, click on “Line Spacing Options” to customize the line spacing of text.
The steps involved in changing the line spacing are similar to accessing the line spacing options. The process is described in detailed in the section 2 of this article.
That said, there are a few additional things that you may need to know when you wish to change the line spacing of text in PowerPoint. Let’s take a look at those –
4.1 How to Add Line Spacing Before a Paragraph?
To add line spacing before a paragraph, you have to first click anywhere in the paragraph. You can also select all the text inside a text box or placeholder to add line spacing before each paragraph.
Then follow the simple steps mentioned below –
Step-1: Click on the “Paragraph” dialog launcher
In the “Home” tab of the menu ribbon, click on the “Paragraph” dialog launcher. It is the square icon with an arrow inside and is located at the bottom right corner of the “Paragraph” group.
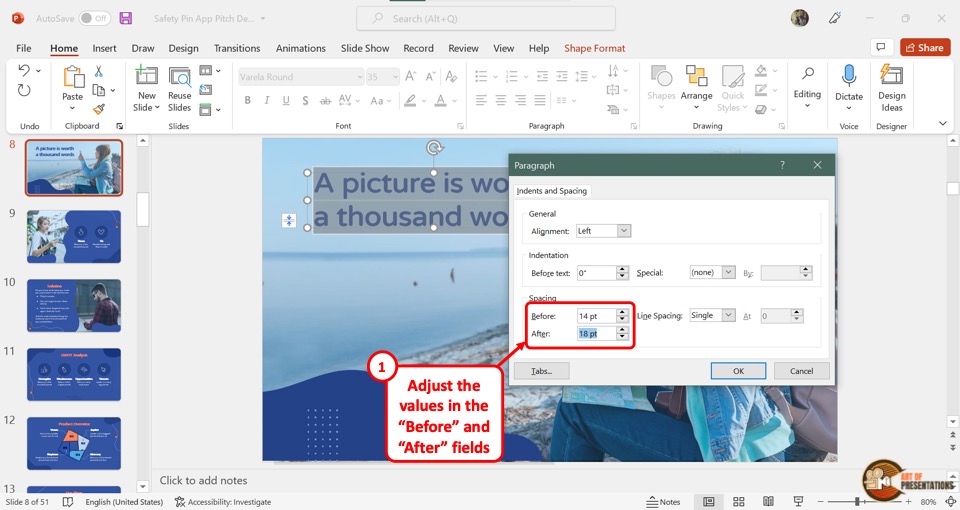
Step-2: Click on the “Before” box
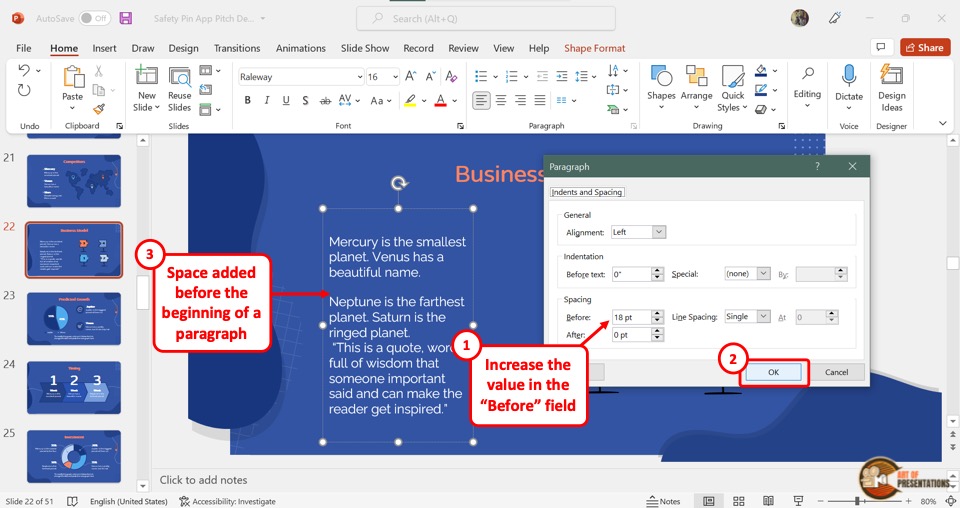
In the “Spacing” section of the “Paragraph” dialog box, click on the “Before” box. You can now type in your preferred spacing points. You can also click on the up or down arrow in the “Before” box to change the line spacing before the paragraph.
Now all you have to do is click on the “OK” button at the bottom of the dialog box.
4.2 How to Add Line Spacing After a Paragraph?
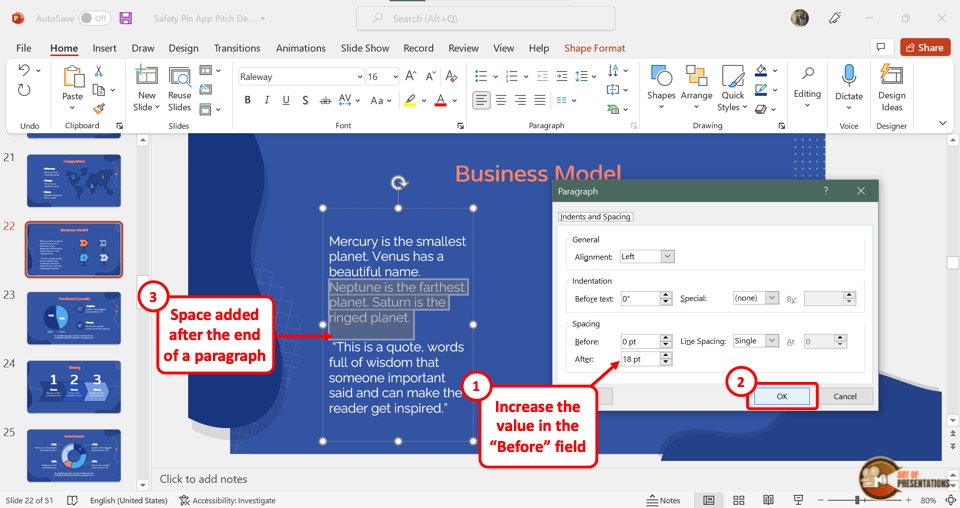
To add line spacing after a paragraph, you have to first select the paragraph in the slide. Then click on the “After” box in the “Spacing” section of the “Paragraph” dialog box.
Click on the upward arrow to add line spacing. You can also type in your preferred line spacing in the box. Finally, you have to click on the “OK” button at the bottom of the dialog box.
4.3 How to Change Line Spacing Between Bullets in PowerPoint?
Microsoft PowerPoint treats each bullet point as separate paragraphs.
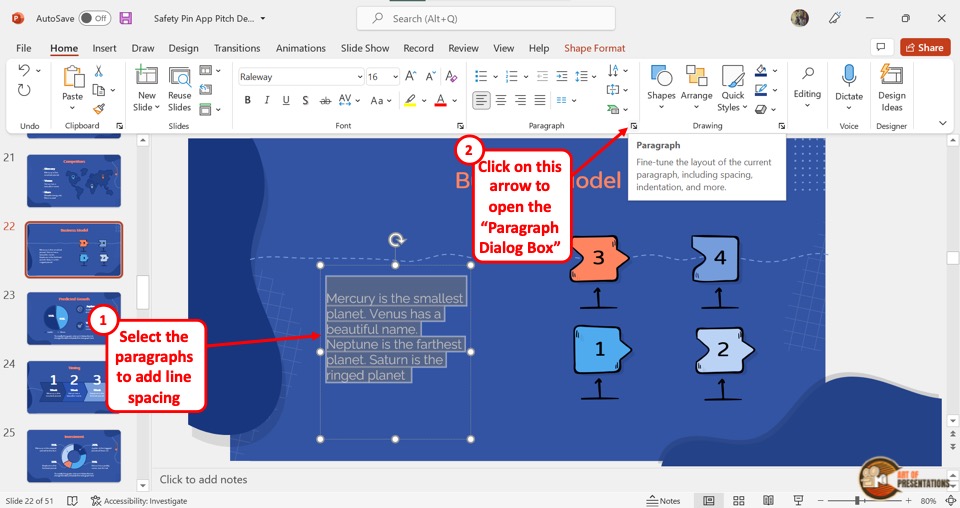
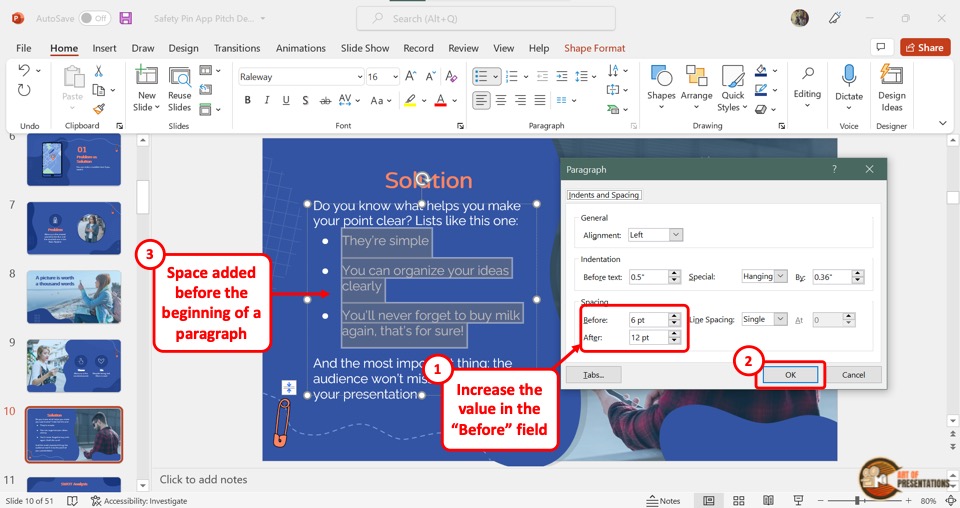
To change the line spacing between bullets in PowerPoint, first, select just the bullet points inside the text box. Click on the “Home” tab, “Lines Spacing Button”, and “Line Spacing Options” from the dropdown. Change the value in the “Before” and “After” fields in the “Paragraph Dialog Box” that opens up.
You can also open the “Paragraph Dialog Box” by clicking on the “Downward arrow” in the “Paragraph Group” on the home tab.
If you are unsure how to change the “Before” or “After” field value, refer to the image above or simply follow the steps mentioned in section 4.1 or section 4.2 of this article to change the line spacing of the bullets in PowerPoint.
4.4 How to Reduce Line Spacing Between Lines of Text in PowerPoint?
To reduce the spacing between lines of text in PowerPoint, you have to first open the “Paragraph” dialog launcher. Then follow the 3 easy steps.
Step-1: Click on “Exactly”
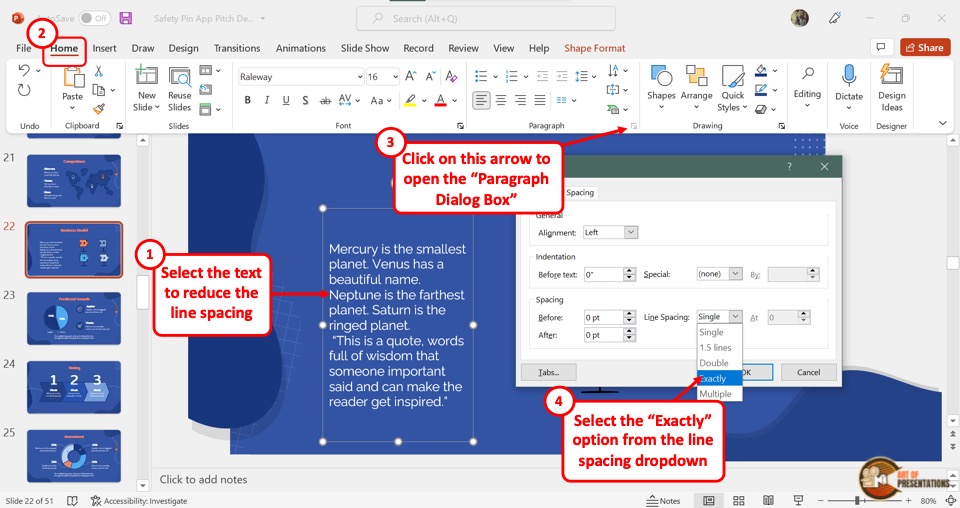
In the “Spacing” section of the “Paragraph” dialog box, click on the “Line Spacing” box. Then click on the “Exactly” option from the dropdown menu.
Step-2: Click on the “At” box
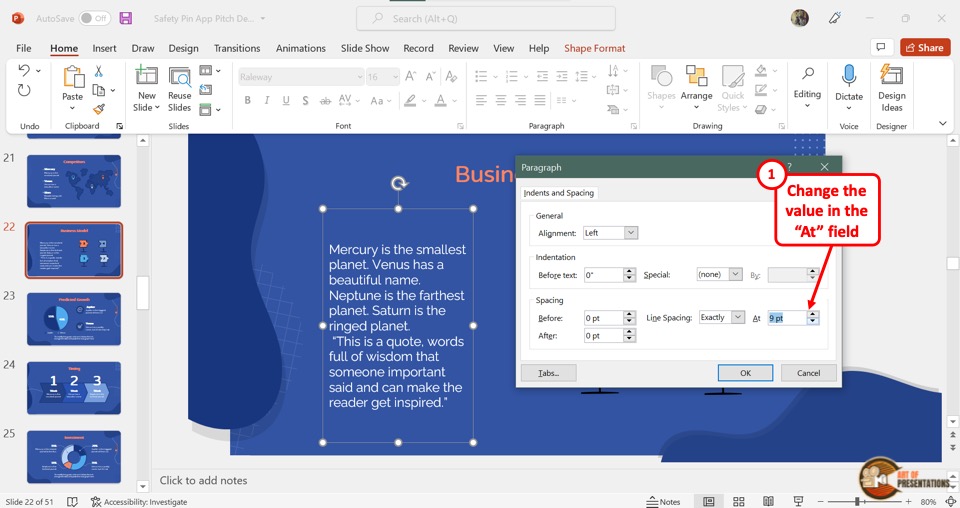
Beside the “Line Spacing” option, you have to now click on the “At” box. Then click on the downward arrow to reduce the line spacing between the lines.
Step-3: Click on “OK”
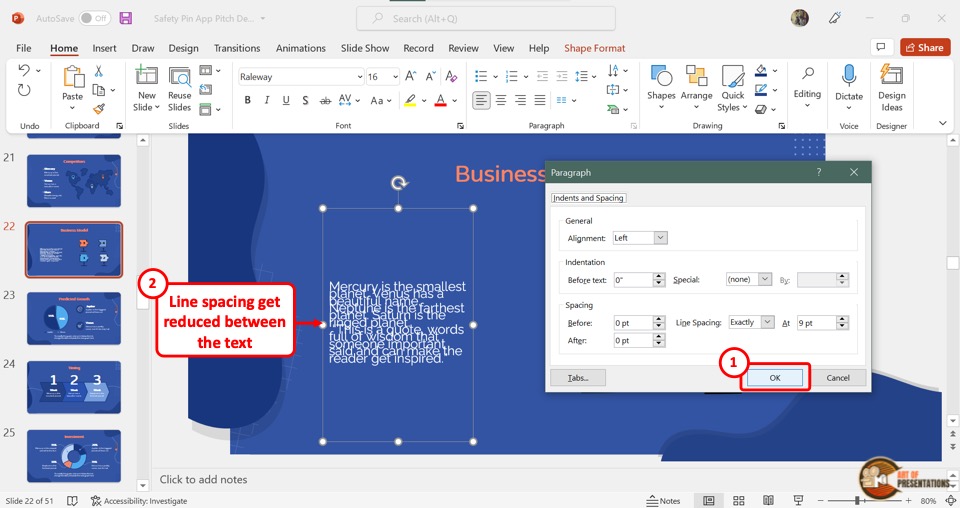
Now all you have to do is click on the “OK” button at the bottom of the “Paragraph” dialog box to save the customized line spacing.
4.5 How to Customize Line Spacing in PowerPoint?
In Microsoft PowerPoint, there are five standard line spacing options that you can choose from (as we have seen earlier in the article).
Besides these options, you can customize the line spacing options for lines and paragraphs in the slides.
To do so, follow the 4 simple steps.
Step-1: Open the “Paragraph Dialog Box”
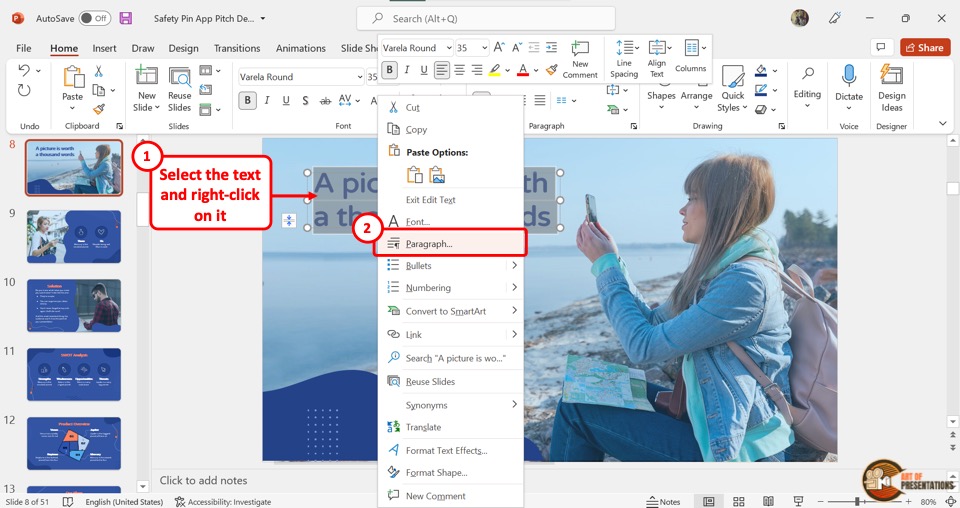
The first step is to access the “Paragraph” dialog box. To do so, you have to select the text and “Right Click” on it. Then click on the “Paragraph” option from the right-click menu to launch the dialog box.
Step-2: Adjust the “Before” or “After” value
In the “Spacing” section of the “Paragraph” dialogue box, click on the “Before” box and type in the spacing you want to add before a paragraph.
Similarly, you can click on the “After” box to customize the line spacing after each paragraph.
Step-3: Change the “Line Spacing”
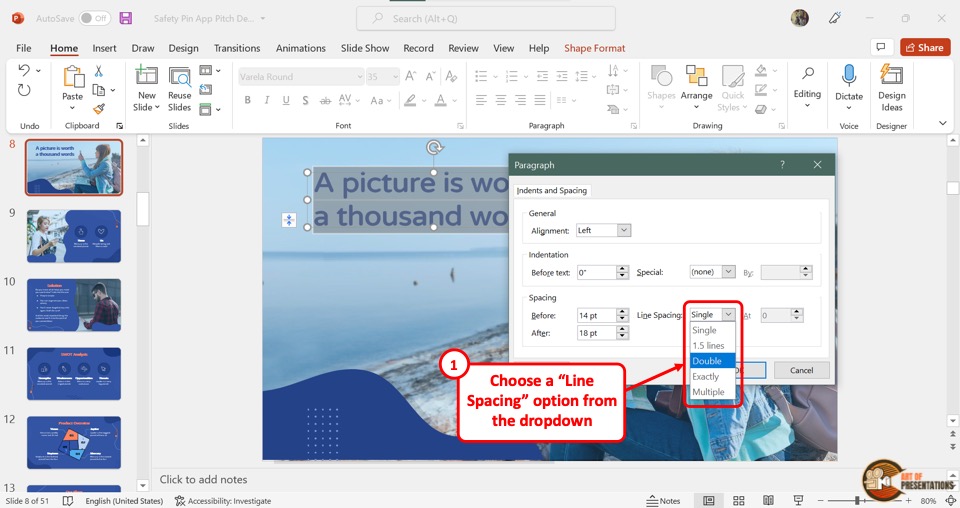
To customize the spacing between each line, click on the “Line Spacing” box under the “Spacing” section of the “Paragraph” dialog box. Then select your preferred line spacing option from the dropdown list.
Refer to section 3.2 to see what each of those options means.
Step-4: Click on the “OK” button
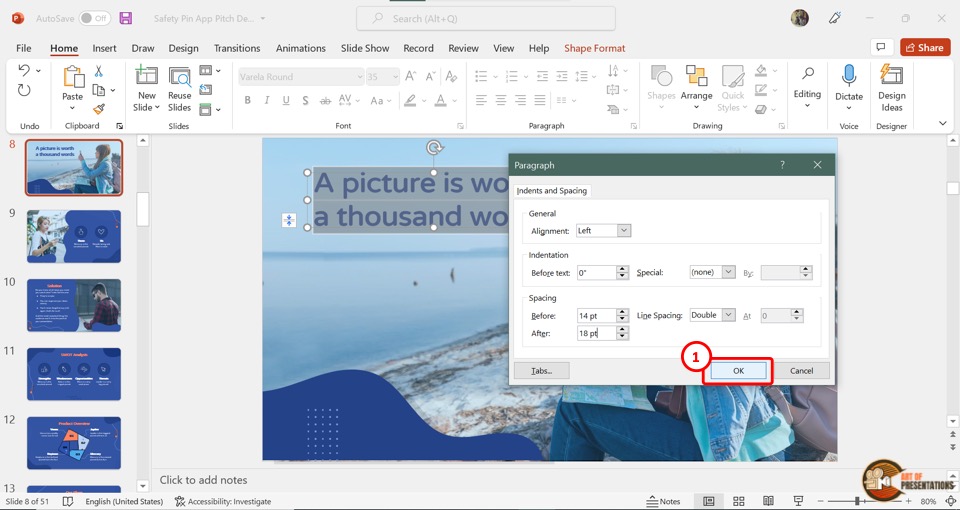
Now all you have to do is click on the “OK” button at the bottom of the “Paragraph” dialog box to save the customized line spacing options.
5. What is the Default Line Spacing Option in PowerPoint?
In Microsoft PowerPoint, the default line spacing option is 1 point. The text box, text placeholder, and the content placeholder available for adding text to slides in a PowerPoint presentation have the same default line spacing.
Credit to cookie_studio (on Freepik) for the featured image of this article (further edited).