![How to Insert a Table in PowerPoint Notes? [Full Guide!]](https://artofpresentations.com/wp-content/uploads/2022/06/Featured-Image-Insert-table-in-Powerpoint-Notes.webp)
Sometimes when presenting to a group, you don’t necessarily want to show long tables and complicated numbers. This would overwhelm the audience and, let’s face it, explaining it will take a lot more time. But you might still want to have it as a ready reference for yourself. That’s perhaps one reason why you would insert this table into PowerPoint Notes!
But, how do you insert a table in the notes section of PowerPoint?
To insert a table into PowerPoint Notes, first you will access the Notes page through the View tab. Then you can copy and paste the Table that you want into this page using the basic keyboard functions of Ctrl+C and Ctrl+V
For a more in-depth explanation of how this process can be done and how you can view, print, and insert other objects into Notes, read on.
1. Can You Insert a Table in PowerPoint Notes?
You can insert a table in PowerPoint notes. The “Notes View” in Microsoft PowerPoint allows you to add and read speaker notes. You can add tables and other graphic visuals in your speaker notes to aid your presentation.
2. How to Insert a Table in PowerPoint Notes?
There are actually a couple of different ways to insert a table in the Notes section in PowerPoint.
To insert a table in Microsoft PowerPoint, you have to first access the “Notes Page” screen. In the “Notes Page”, you can insert a new table, paste an existing table from another source, or edit and remove the tables.
This is the most common method. Nevertheless, let’s take a look at both the methods below –
2.1 Method 1 – Adding a Table in the Notes View
In the notes view, you can insert a new table using the “Insert” tab. All you have to do is follow the 5 simple steps.
Step-1: Click on the “Notes Page” option
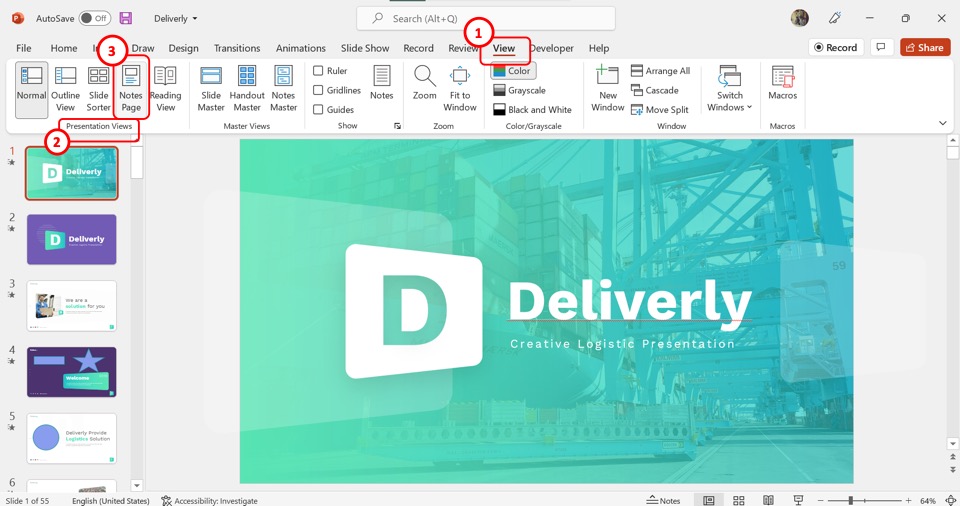
To access the notes screen, you have to first open the “View” menu. To do so, click on the “View” tab in the menu ribbon located at the top of the screen. In the “View” menu, click on the “Notes Page” option from the “Presentation Views” group.
Step-2: Click on the “Insert” tab
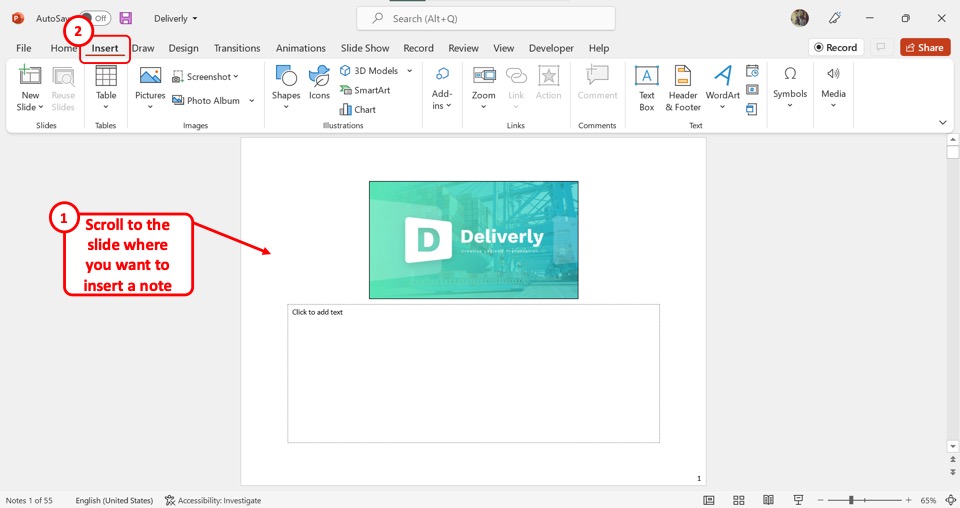
In the “Notes Page”, the next step is to scroll down to find the slide where you want to add the note. Then click on the “Insert” tab in the menu ribbon to open the “Insert” menu.
Step-3: Click on the “Insert Table” option
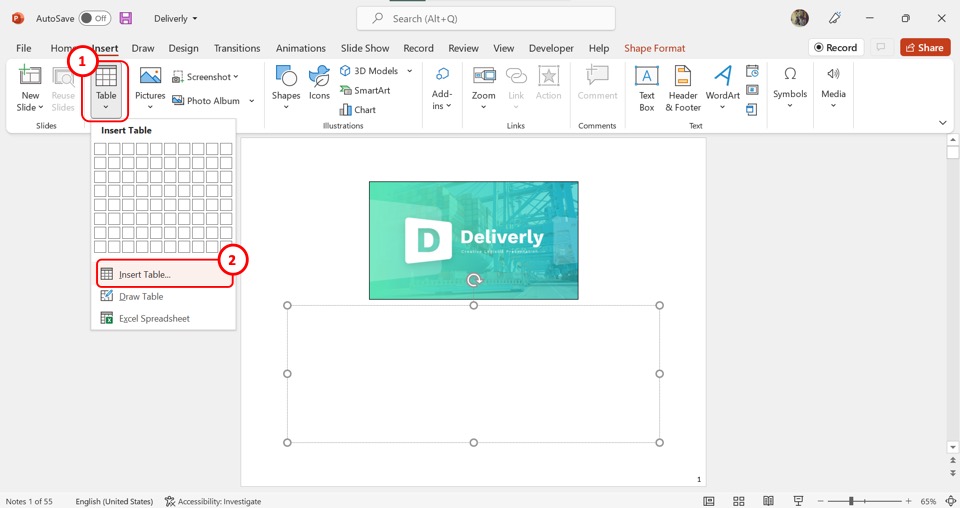
Now you can insert the table in the slides notes. All you have to do is click on the “Table” option in the “Insert” menu. In the dropdown menu under the “Table” option, click on the “Insert Table” option to launch a dialog.
Step-4: Select the number of columns and rows
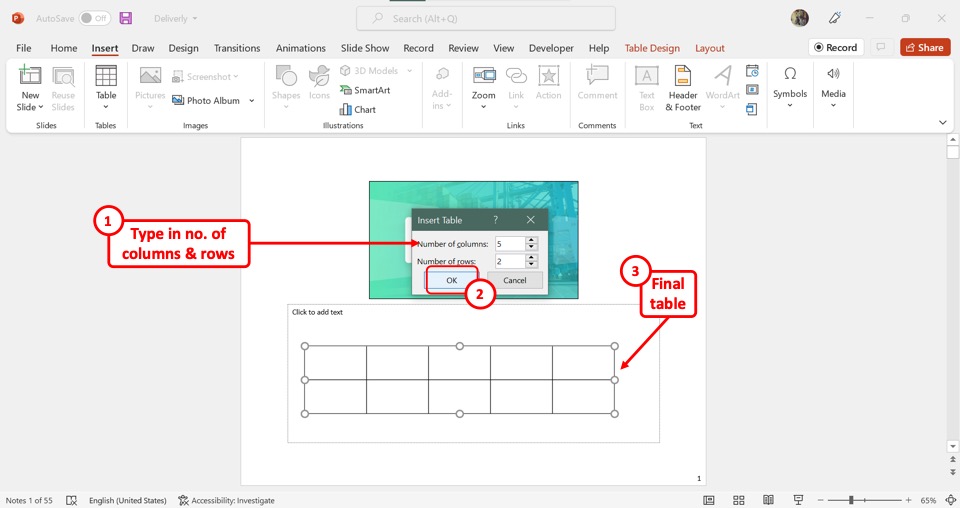
In the “Insert Table” dialog box, you have to first click on the “Number of columns” box and type in how many columns you want in the table. Similarly, you have to click on the “Number of rows” box to type in your preferred number of rows for the table.
Step-5: Click on the “OK” button
Finally, all you have to do is click on the “OK” button at the bottom of the “Insert Table” dialog box to insert the table in the slide notes (as shown above).
2.2 Method 2 – Pasting an Existing Table as an Image
In the PowerPoint notes, you can also paste a table from another source. For instance, you can insert a table from excel into your PowerPoint. You will need to use the paste special options such as “Use Destination Theme”, “Keep Source Formatting”, and “Picture”.
To paste an existing table as an image, follow the 4 quick steps.
Step-1: Click on the “View” tab
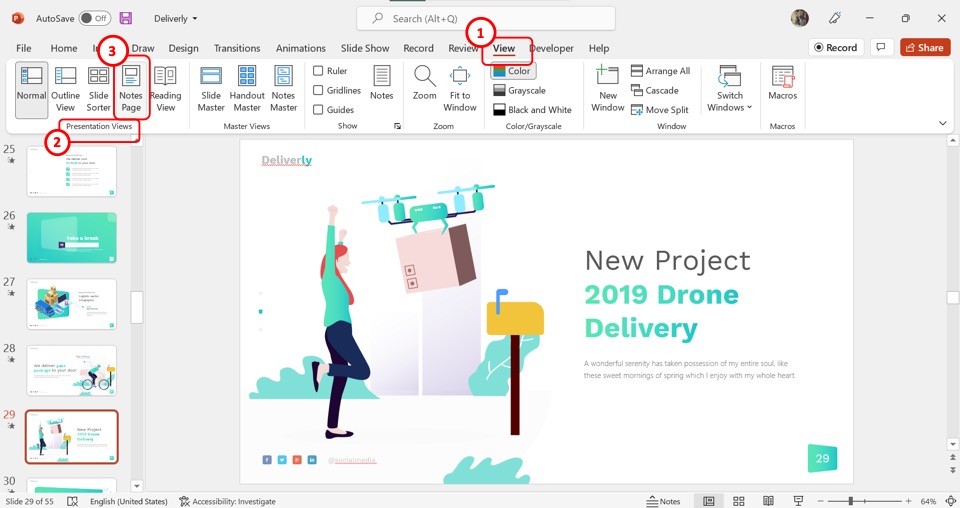
In the menu ribbon located at the top of the screen, click on the “View” tab. In the “View” menu, click on the “Notes Page” option in the “Presentation Views” group.
Step-2: Click on the “Picture” option under “Paste Options”
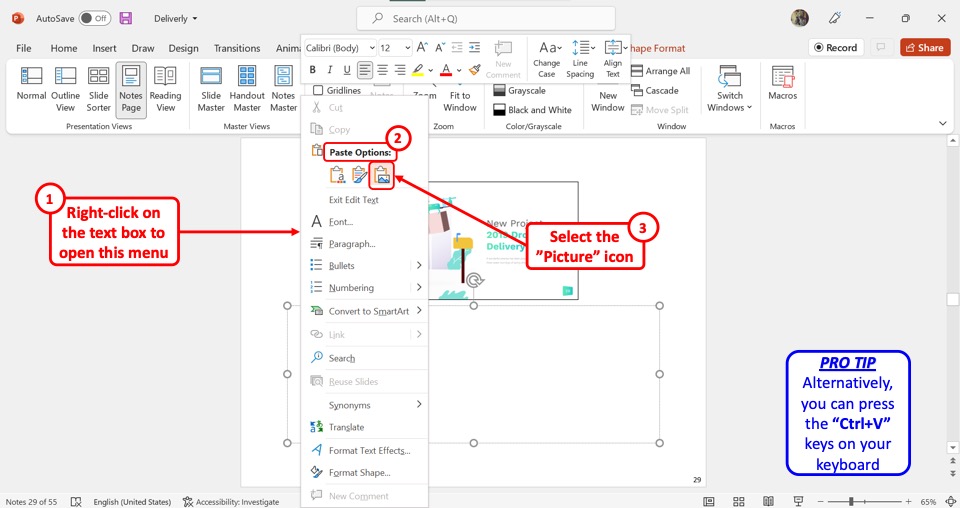
In the notes view, you have to first “Right Click” in the text box for notes. Then click on the “Picture” icon under “Paste Options” in the right-click menu. Alternatively, you can press the “Ctrl+V” keys on your keyboard.
Step-3: Reposition the table
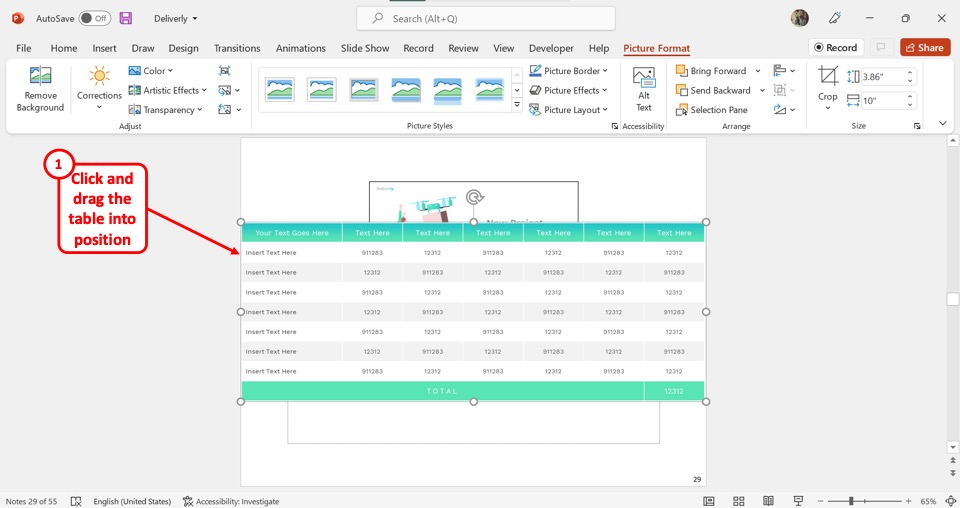
The copied table from another source will be pasted outside of the notes text box. Now all you have to do is click on the table and drag it to reposition it on the notes text box.
Step-4: Click on the “Normal” option

The final step is to return to the normal view. To do so, click on the “Normal” option in the “Presentation Views” group of the “View” tab. You can now return to editing the presentation slides.
3. How to View the Table in PowerPoint Notes?
In Microsoft PowerPoint, you can view the notes using the “Notes Page” view. You can also print PDF notes to view them in a PDF file. The notes will include all objects like text, tables, graphs, images, etc.
3.1 Method 1 – Using the Notes View
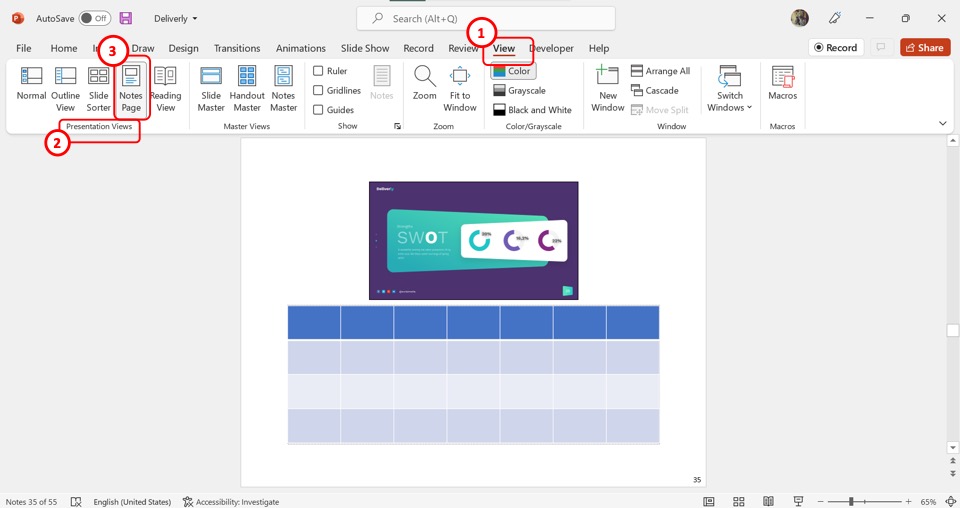
The quickest way to view the presentation notes in PowerPoint is to use the “Notes Page” screen. All you have to do is click on the “View” tab in the menu ribbon.
Then click on the “Notes Page” button in the “Presentation Views” group of the “View” tab. In the “Notes Page”, each page shows a slide and the speaker notes for it. You can scroll through the pages to view the tables inserted in the notes.
3.2 Method 2 – Print PowerPoint With Notes
Using the “Print” feature in PowerPoint, you can create a PDF file containing all the speaker notes of a specific presentation. You can also create handouts for your PowerPoint presentation and view the tables in the notes section that way!
You can use this method to view the tables that are inserted in the notes. All you have to do is follow the 6 easy steps.
Step-1: Click on the “File” tab
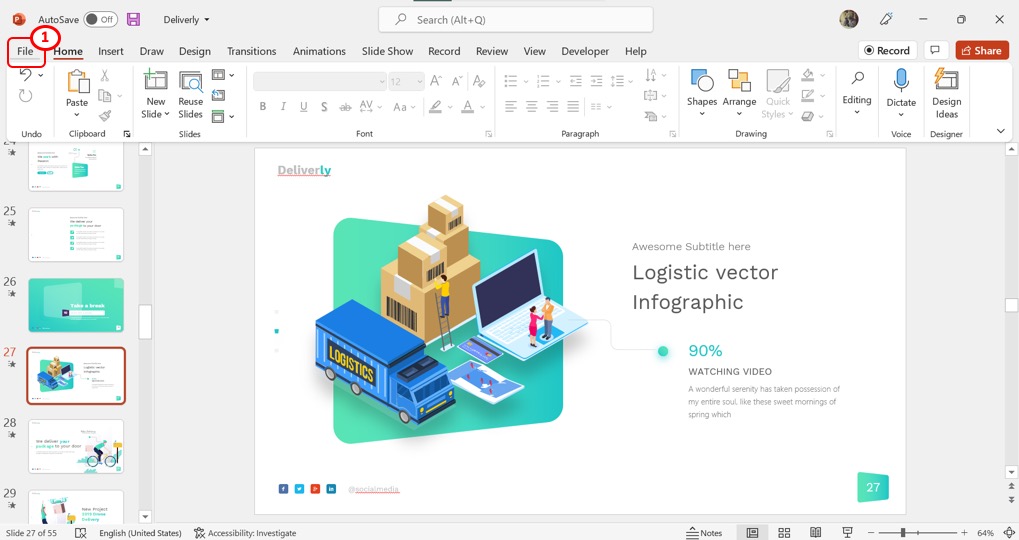
The first step is to open the “File” screen. To do so, click on the “File” tab which is the first tab in the menu ribbon located at the top of the screen.
Step-2: Click on the “Print” option
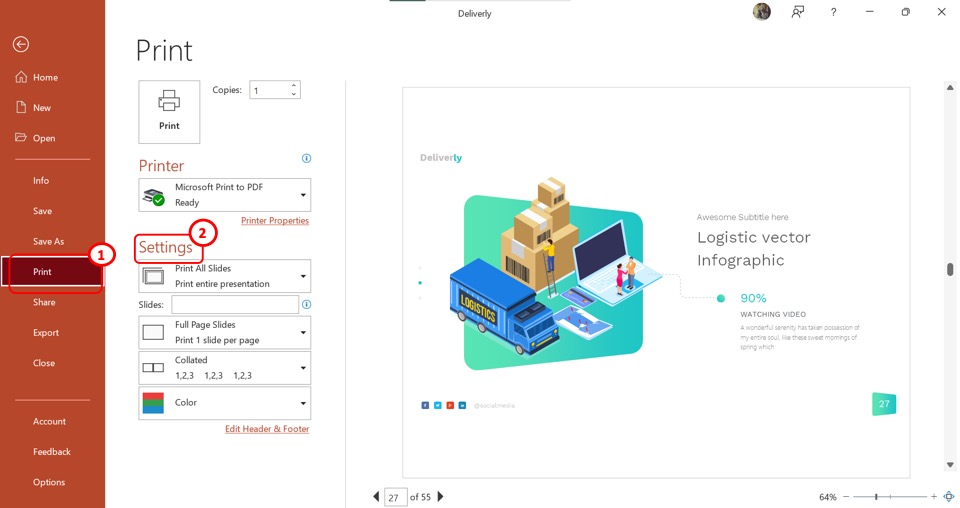
The next step is to open the “Print” screen. In the sidebar on the left side of the “File” menu, click on the “Print” option.
Step-3: Click on the “Notes Pages” option
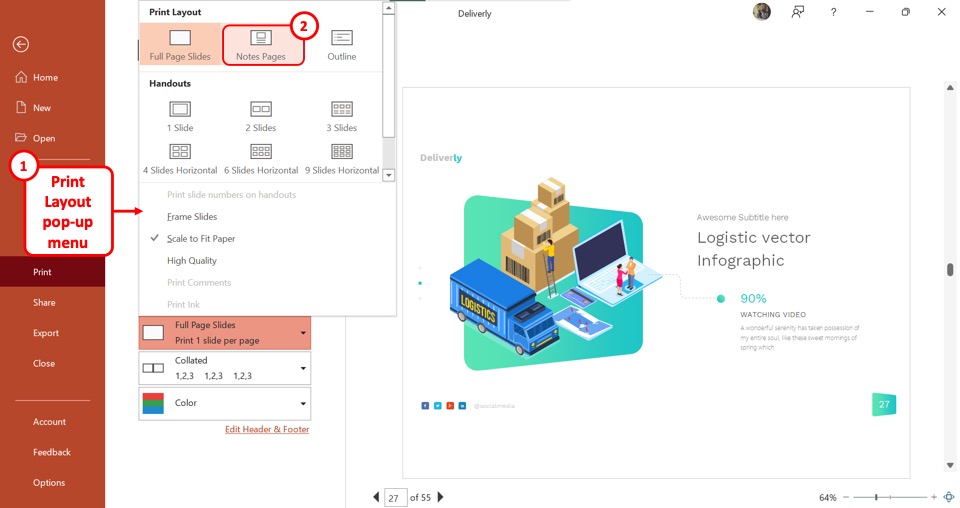
In the left column of the “Print” screen, click on the “Print Layout” option under the “Settings” section (shown before).
The “Print Layout” option in the box shows “Full Page Slides” by default. In the “Print Layout” pop-up menu, click on the “Notes Pages” option. The preview screen in the right column will switch from the slides to the notes.
Step-4: Click on the “Microsoft Print to PDF” option
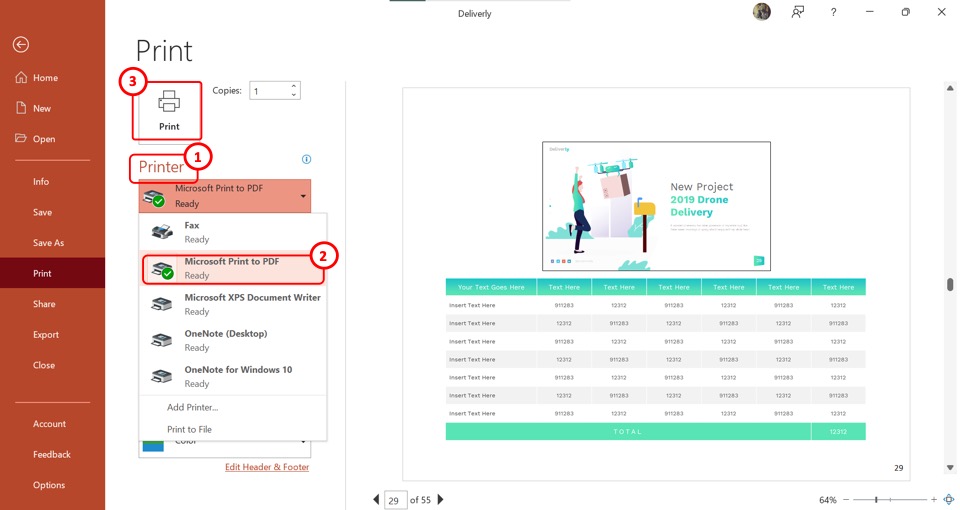
The next step is to click on the “Printer” option in the left column of the “Print” screen. Then click on the “Microsoft Print to PDF” option from the dropdown menu under the “Printer” option.
Step-5: Click on the “Print” button
Now all you have to do is click on the “Print” button (as shown in the previous image) located at the top of the “Print” screen. This will prompt the “Save Print Output As” dialog box.
Step-6: Click on the “Save” button
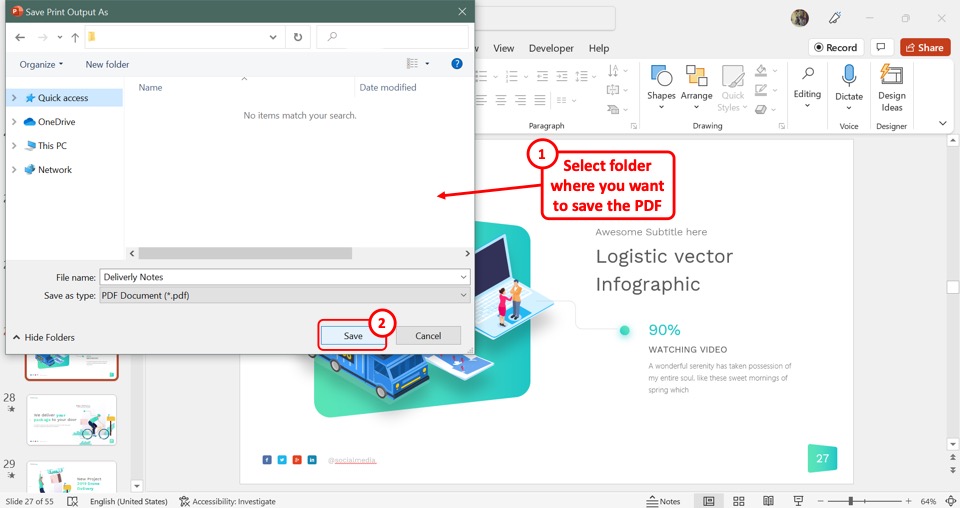
In the “Save Print Output As” dialog box, select the folder in your computer where you want to save the PDF file containing the presentation notes. Then all you have to do is click on the “Save” button at the bottom of the dialog box. You can now view the tables in the presentation notes by opening the PDF file.
More Related Articles
- How to Add Tables in PowerPoint? [Complete Guide!]
- How to Move or Resize a Table in PowerPoint? [An EASY Way!]
- How to Transpose a Table in PowerPoint? [A Simple Solution!]
- Pivot Table in PowerPoint? Here’s How to do It! [With Slicers!]
- How to Format a Table in PowerPoint? [The ULTIMATE Guide!]
Credit to benzoix (on Freepik) for the featured image of this article (further edited).