![How To Insert Picture In PowerPoint [A Comprehensive Guide]](https://artofpresentations.com/wp-content/uploads/2022/11/Featured-Image-How-to-Insert-Picture-in-Powerpoint.webp)
When I am in a conference hall, and the speaker is presenting a PowerPoint to the audience, the first thing that catches my eye is the pictures in the presentation. Pictures are a wonderful way of representing information in an engaging and creative manner. They bring life to an otherwise dull text-heavy presentation.
But, how do you insert pictures in PowerPoint?
To insert a picture into a presentation, first go to the slide where the picture will be added. Then select the “Insert tab”, click on “Pictures”, and “Source of the picture”. Choose the picture you want, either from the Internet, Stock images, or from the computer. Finally, click Open (or OK), and the picture will be inserted.
There are many other ways to add in a picture into your presentation. In this article, we shall cover all the different ways to insert a picture in PowerPoint. Plus, I’ll also share a few pro-tips to help you add text with the picture to your slide.
So, let’s get started!
1. How to Add Pictures in PowerPoint?
In Microsoft PowerPoint, you can add pictures and any other object using the “Insert” tab. The “Insert” tab includes features that allow you to insert a picture from different sources like your device, a camera, a cloud drive, the internet, etc.
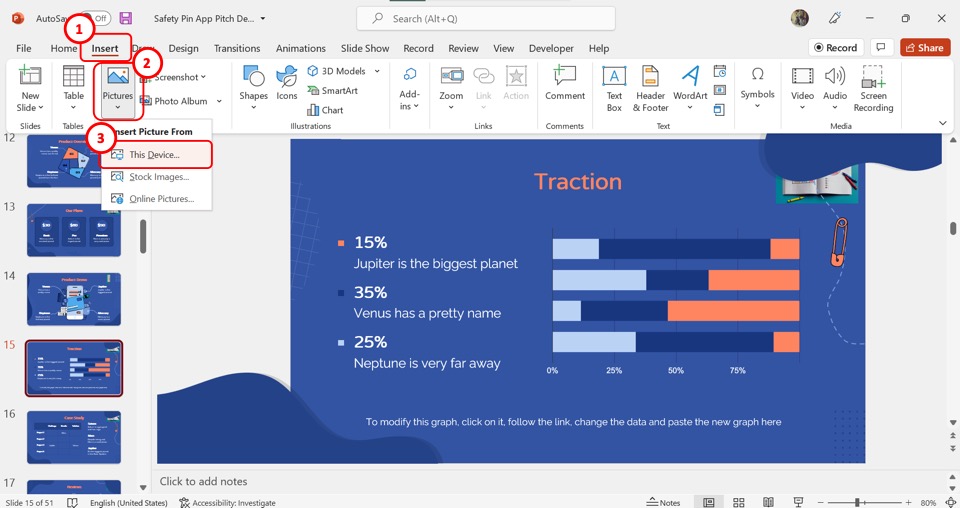
1.1 How to Insert Picture from Computer in PowerPoint?
To insert a picture into a PowerPoint slide, you have to use the “This Device” option in the “Insert Picture From” list. You can also use the keyboard shortcuts to quickly add a picture to a PowerPoint presentation.
1.1a Method 1 – Using the Insert Tab
The “Insert” tab is the third tab in the menu ribbon in Microsoft PowerPoint. To add a picture to a slide using the “Insert” tab, follow the 3 simple steps.
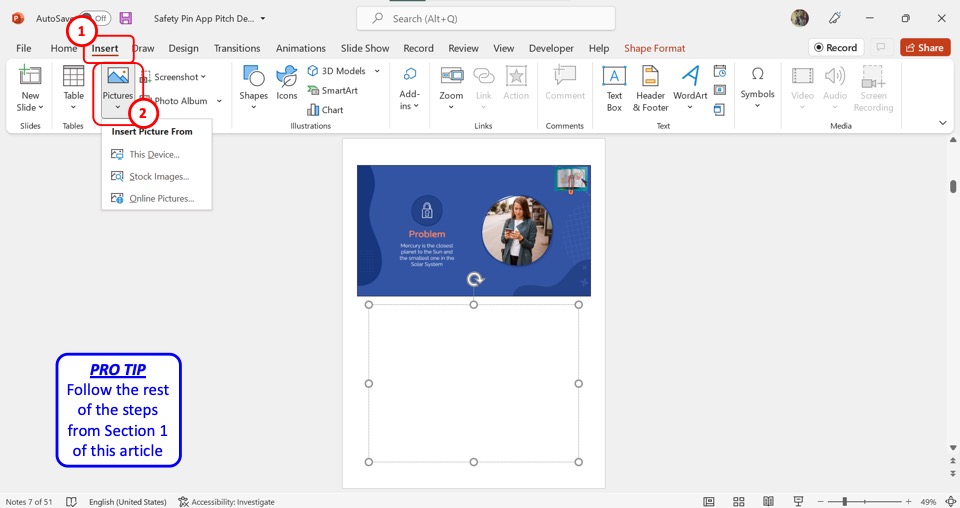
Step-1: Click on the “Insert” tab
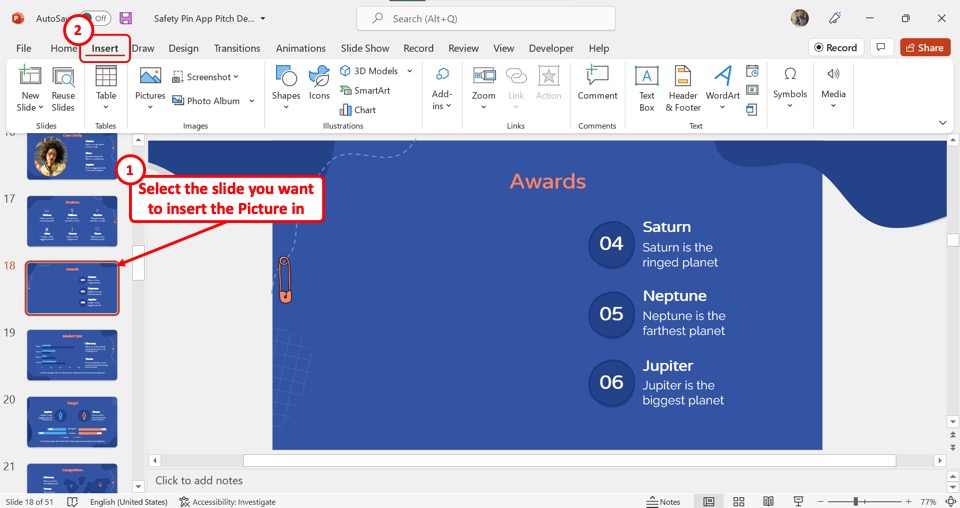
The first step is to open the slide where you want to add the picture. Then click on the “Insert” tab in the menu ribbon located at the top of the screen.
Step-2: Click on the “Pictures” option
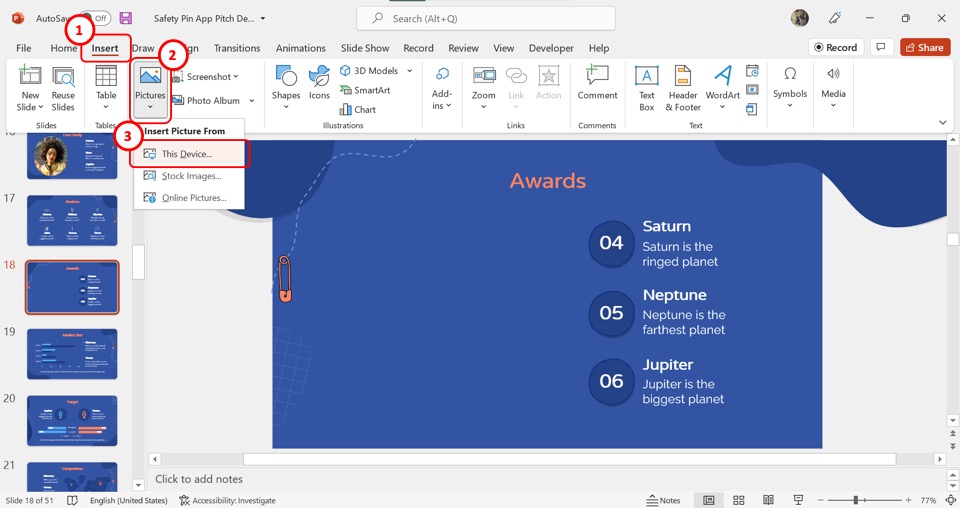
The next step is to click on the “Pictures” option in the “Images” group of the “Insert” menu. Then click on the “This Device” option from the dropdown menu under the “Pictures” option.
Step-3: Click on the “Open” button
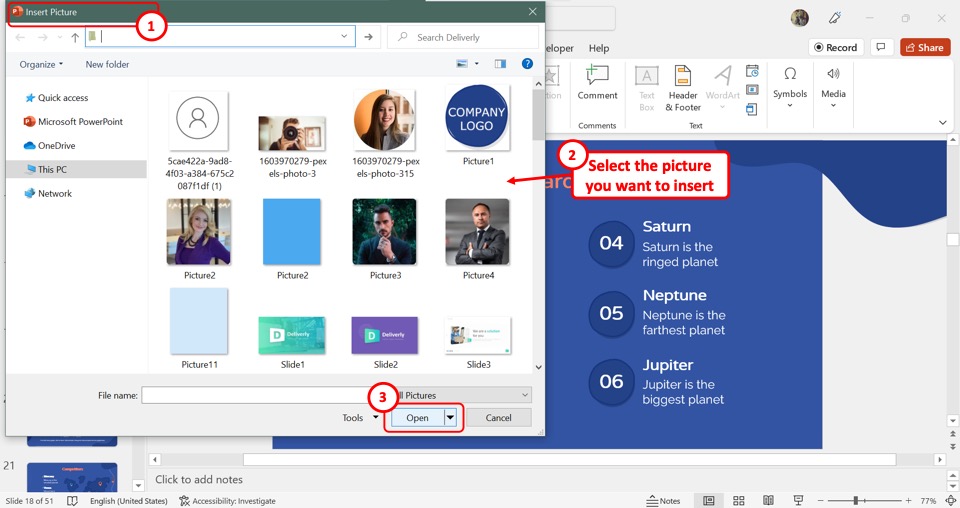
In the “Insert Picture” dialog, browse for the picture on your computer. Then select the picture and click on the “Open”button at the bottom of the dialog box to insert the picture into the open slide.
1.1b Method 2 – Using Drag and Drop
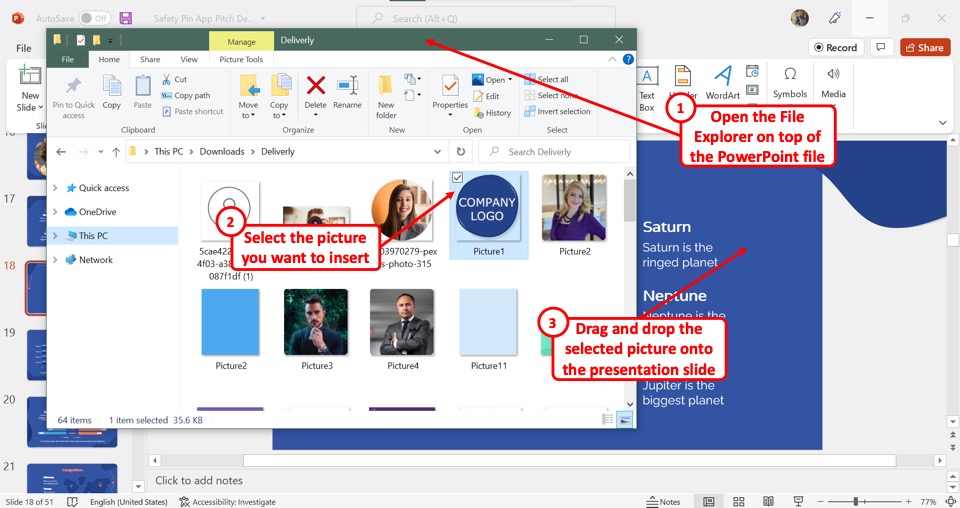
To use the “Drag and Drop” method, you have to open the “File Explorer” window over the PowerPoint file. In the window, look for the picture that you want to insert into the presentation slide. Then all you have to do is click on the picture in the “File Explorer” window and drag it to the presentation slide and drop it there.
1.2 Shortcut to Insert Picture in PowerPoint?
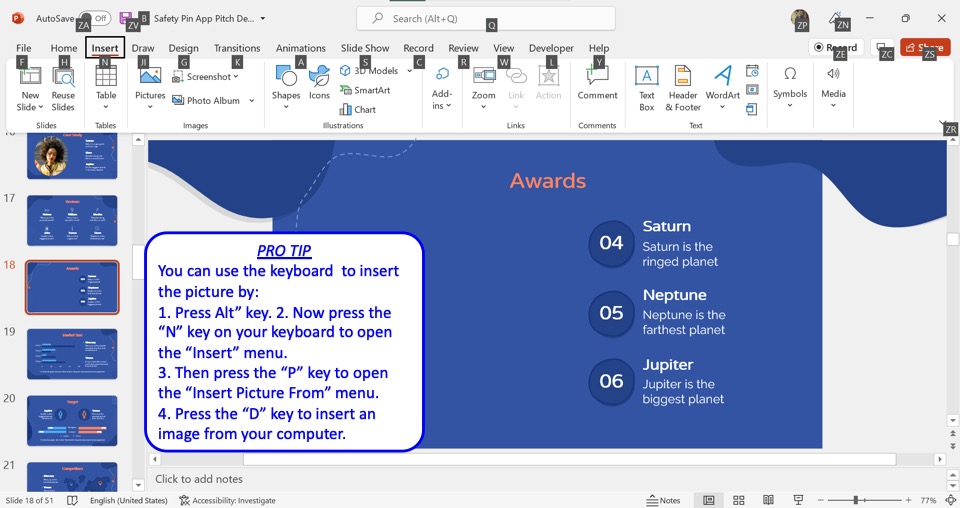
Microsoft PowerPoint allows you to insert a picture into your slide using only the keyboard. To use the keyboard shortcuts, you have to first press the “Alt” key.
The keyboard shortcut for each option in the menu ribbon will now be visible on the screen. Now press the “N” key on your keyboard to open the “Insert” menu. In the “Insert” menu, press the “P” key to open the “Insert Picture From” dropdown menu.
Press the “D” key to insert an image from your computer. You can also press the “S” key for stock images and the “O” key for online pictures.
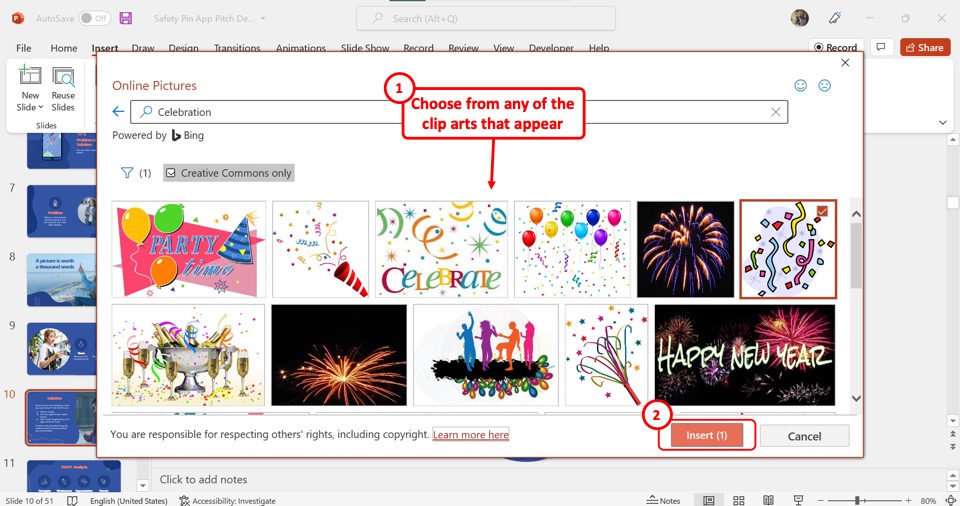
1.3 How to Insert Online Pictures in PowerPoint?
The “Online Pictures” option in PowerPoint allows you to insert a picture from the internet into your slide using the Bing search engine. To add a picture from the web to PowerPoint, follow the 5 easy steps.
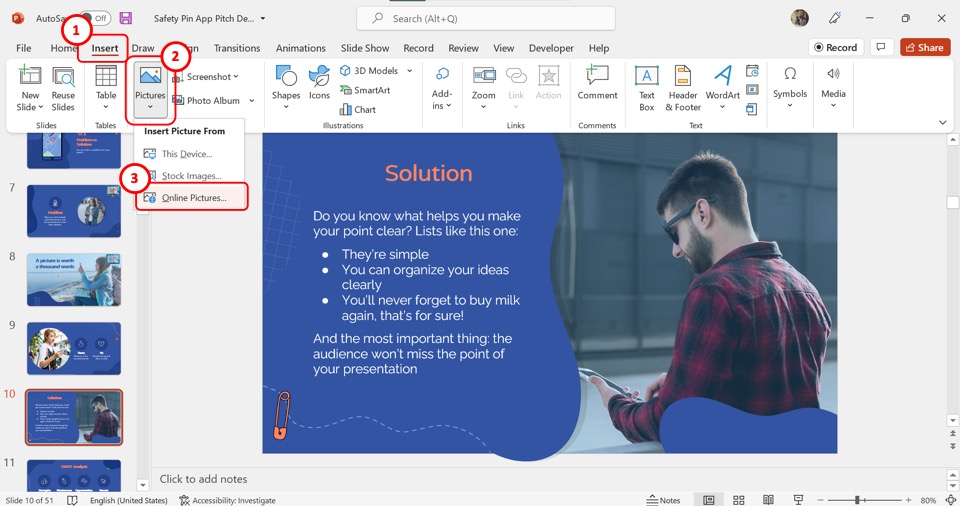
Step-1: Click on the “Insert” tab
You have to first open the “Insert” menu. To do so, click on the “Insert” tab in the menu ribbon located at the top of the screen.
Step-2: Click on the “Online Pictures” option
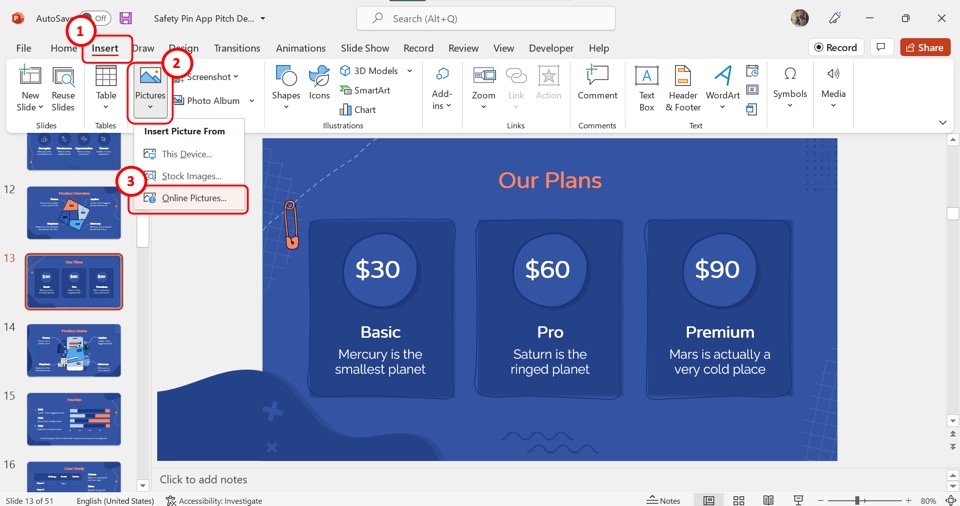
In the “Images” group of the “Insert” menu, click on the “Pictures” button. Then click on the “Online Pictures” option from the dropdown menu under the “Pictures” option.
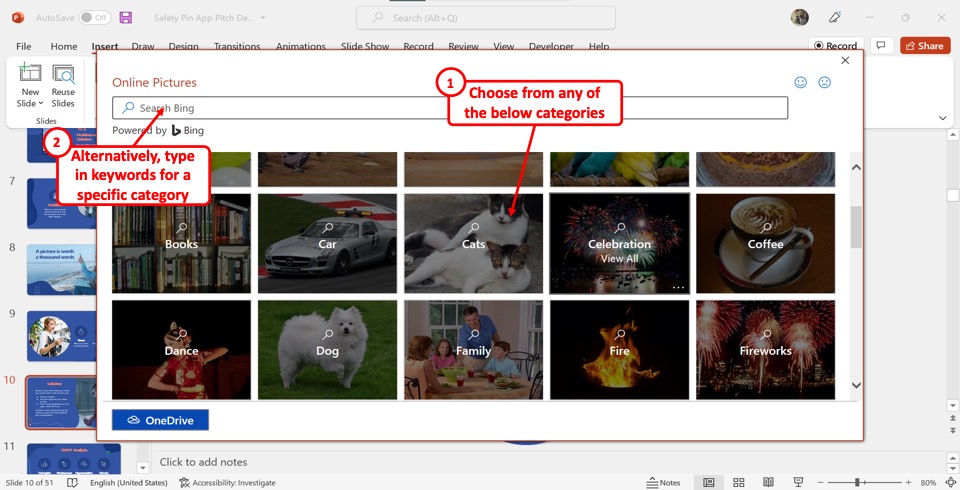
Step-3: Click on the search bar

Now you have to click on the search bar at the top of the “Online Pictures” dialog box and type in what you are looking for. You can also select a preferred category from the dialog box.
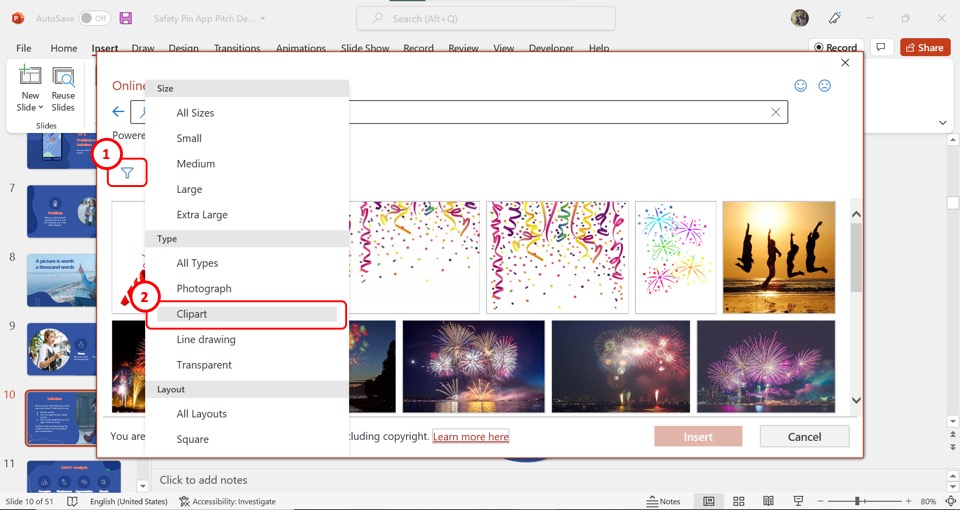
Step-4: Click on the “Filter” option
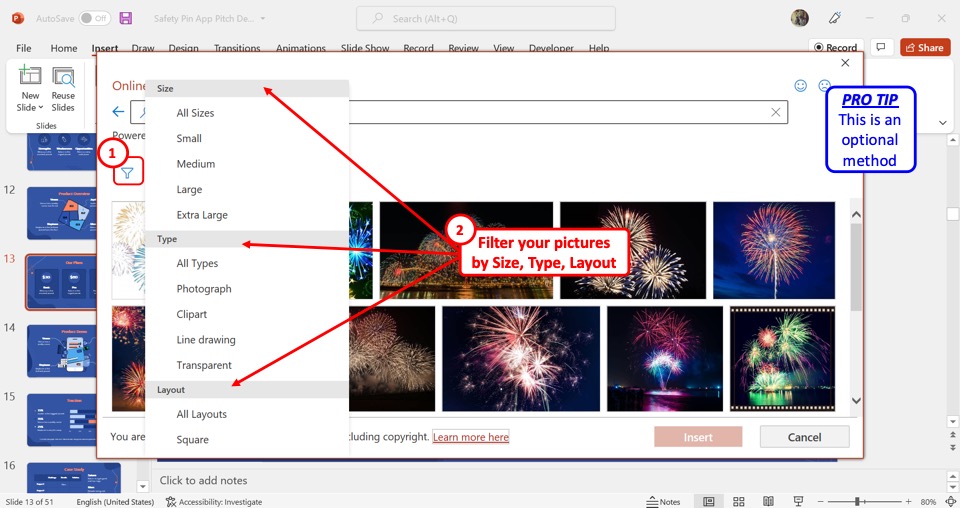
The next step is optional. You can click on the “Filter” icon which looks like a funnel under the search bar. In the “Filter” dropdown menu, you can select the size, type, and layout of the online picture.
Step-5: Click on the “Insert” button
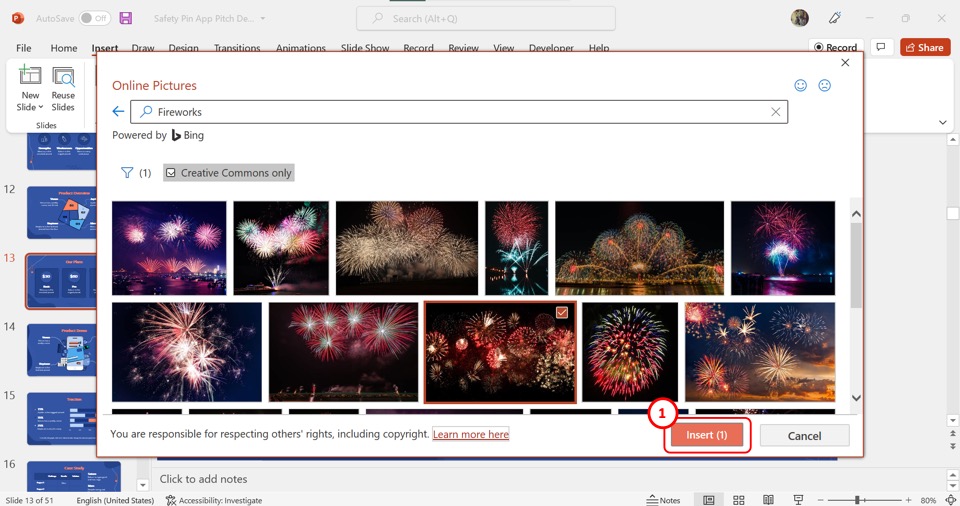
Finally, you have to click on one or more pictures that you want to add to the slide. Then click on the “Insert” button at the bottom of the dialog box.
1.4 How to Insert Image Using Photo Browser in PowerPoint?
The “Photo Browser” option in Office helps you browse through the photos on your Mac device. This option is only available in Microsoft PowerPoint for Mac. To insert an image from iPhoto or Photo Booth using the “Photo Browser”, follow the 2 quick steps.
Step-1: Click on the “Photo Browser” option
The first step is to open the slide where you want to add the picture. Then click on the “Picture” option in the “Insert”menu and select the “Photo Browser” option under the “Picture” option.
Step-2: Select your preferred image
In the dialog box, you have to now browse to the picture that you want to add to the PowerPoint slide. Then all you have to do is drag the picture onto the slide.
1.5 How to Add Image From Your Phone to Your PowerPoint Presentation?
When you take a photo on your iPhone, you can add it to your PowerPoint presentation using the PowerPoint for Mac. You have to first save the picture to iCloud Drive. Then follow the 2 simple steps.
Step-1: Click on the “Picture From File” option
The first step is to open the slide where you want to insert the image. In the “Insert” menu, hover your pointer over the “Picture” option. Then click on “Picture From File”.
Step-2: Click on the “Insert” button
In the dialog box, look for the picture in your iCloud that you want to insert and click on it. Then all you have to do is click on the “Insert” button to add it to the open PowerPoint slide.
1.6 How to Add Stock Images in PowerPoint?
Stock images are a gallery of free images available in PowerPoint. To insert a stock image into a PowerPoint slide, follow the 5 quick steps.
Step-1: Click on the “Insert” tab
In the PowerPoint presentation, open the slide where you want to add the stock image. Then click on the “Insert” tab which is the third tab in the menu ribbon.
Step-2: Click on the “Stock Images” option
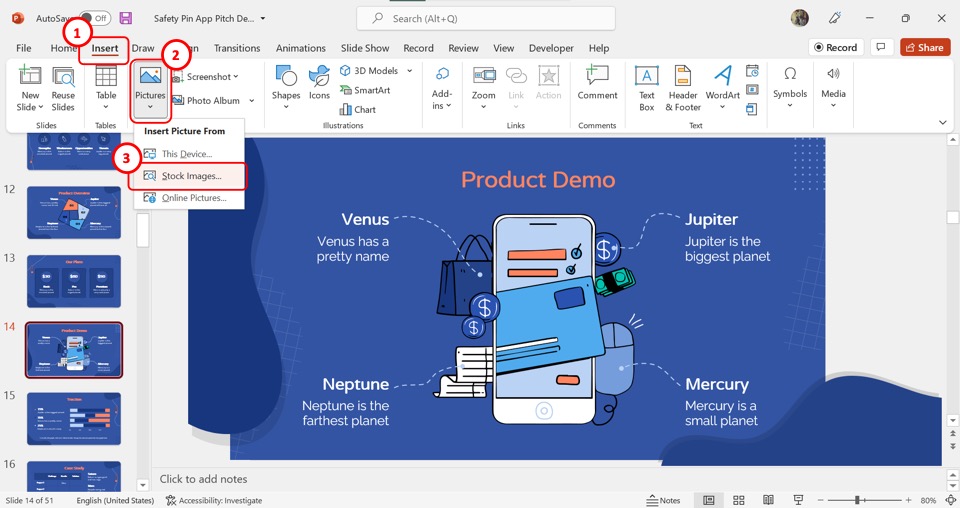
Now you have to click on the “Pictures” option in the “Images” group of the “Insert” menu. Then click on the “Stock Images” option from the dropdown menu. This will prompt a dialog box.
Step-3: Select your preferred category
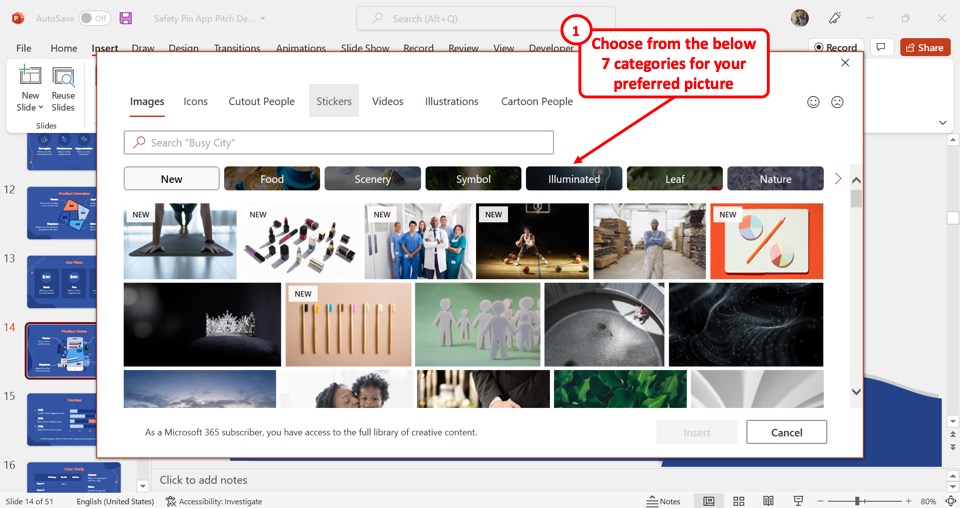
At the top of the dialog box, click on one of the seven categories of stock images available in PowerPoint.
Step-4: Click on the search bar
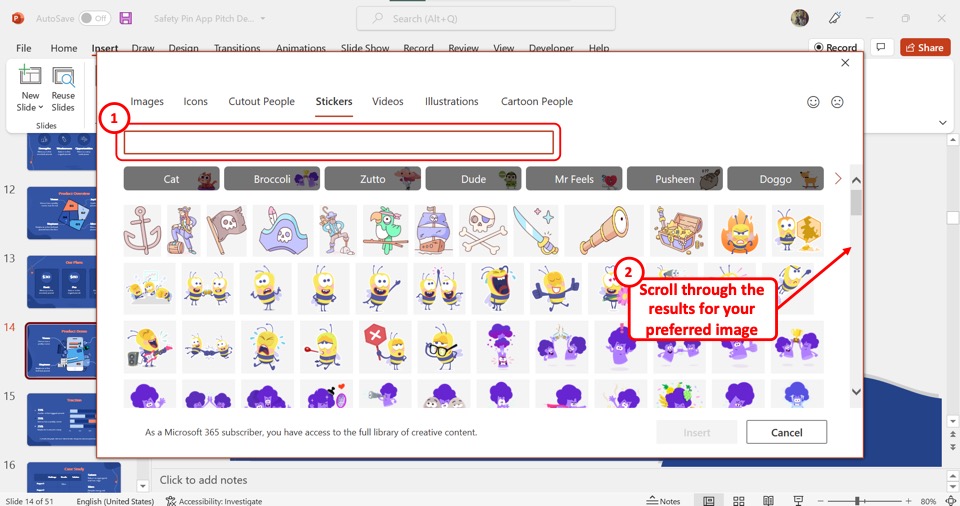
The next step is to click on the search bar and type in the keywords to search for a stock image. Then scroll through the images to select your preferred image.
Step-5: Click on the “Insert” button
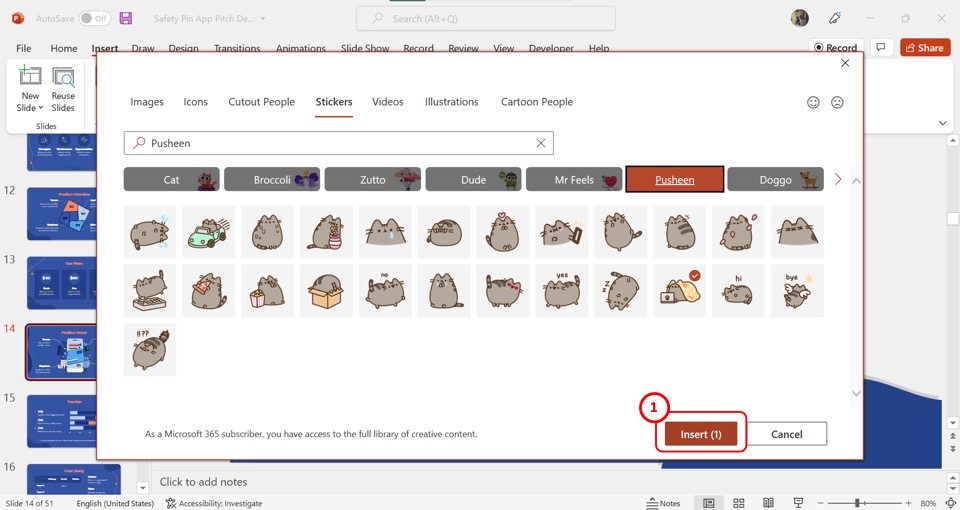
Now all you have to do is click on the “Insert” button at the bottom of the dialog box to add the selected stock image to the open slide.
1.7 How to Insert Picture in PowerPoint on Mobile?
In the PowerPoint app for Android devices, you can insert a picture directly from the camera on your mobile phone. All you have to do is follow the 3 easy steps.
Step-1: Tap on the “Insert” tab
You have to first open the slide where you want to add the picture. Then tap on the “Insert” tab in the floating ribbon on the bottom of the screen.
Step-2: Tap on the “Camera” option
In the “Insert” menu, tap on the “Pictures” option. Then tap on the “Camera” option under the “Pictures” option. This will open the camera app on your phone.
Step-3: Tap on the “Done” button
Now all you have to do is take a picture. If you are satisfied, tap the “Done” button at the bottom of the screen to insert the picture into the PowerPoint slide.
2. How to Insert Pictures On All Slides in PowerPoint?
Using the “Slide Master” feature in PowerPoint, you can insert a picture into all the slides of the presentation at once. To do so, follow the 5 simple steps.
Step-1: Click on the “Slide Master” option
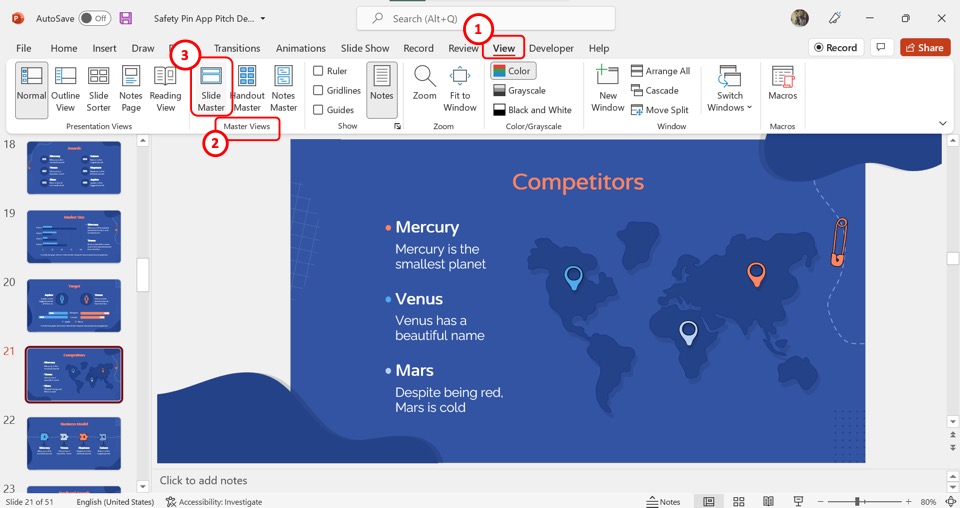
In the menu ribbon located at the top of the screen, click on the “View” tab. Then click on the “Slide Master” option in the “Master Views” group of the “View” menu.
Step-2: Click on the master slide
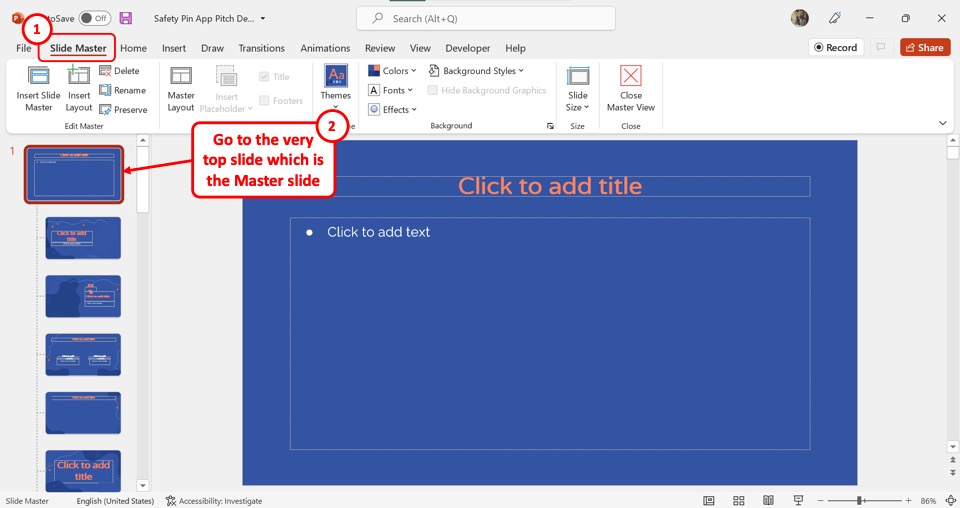
In the “Slide Master” view, you have to open the master slide. Scroll up in the slide layout pane on the left side of the screen and click on the slide at the very top. This is the master slide.
Step-3: Click on the “Pictures” option
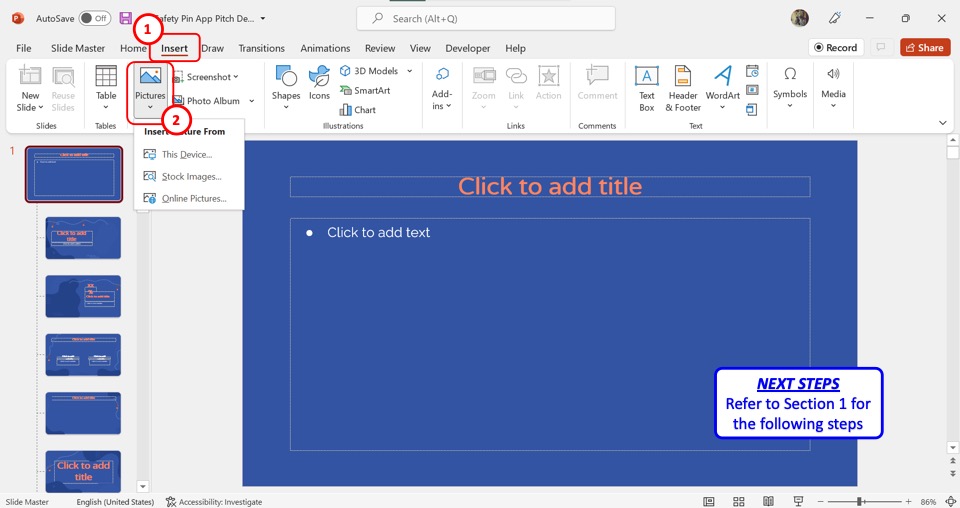
The next step is to insert the picture. Click on the “Insert” tab in the menu ribbon, and then click on the “Pictures”option in the “Insert” menu. Refer to section 1 for detailed steps on inserting images from different sources.
Step-4: Click on the “Picture Format” tab
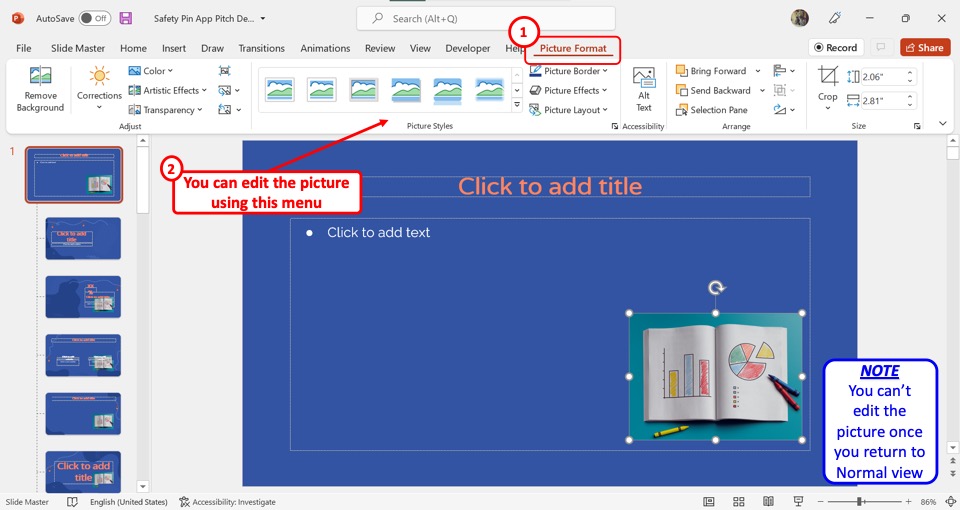
In the menu ribbon, you have to now click on the “Picture Format” tab. In the “Picture Format” menu, you can now edit, adjust, resize, and reposition the inserted picture. You cannot edit the picture in the master slide once you return to the “Normal” view.
Step-5: Click on the “Close Master View” button
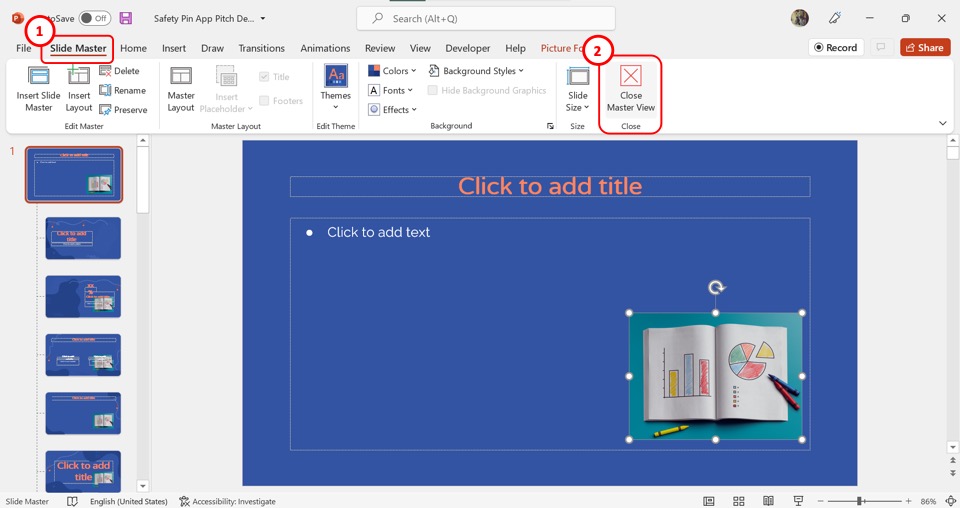
Once you have inserted and edited the picture, you can now return to the “Normal” view. All you have to do is click on the “Slide Master” tab. Then click on “Close Master View” in the “Slide Master” tab.
3. How to Insert Picture as Slide Background in PowerPoint?
In Microsoft PowerPoint, you can insert a picture into a slide as a background. All you have to do is follow the 4 easy steps.
Step-1: Click on the “Format Background” option

“Right Click” anywhere on the open slide. Then click on the “Format Background” option from the right-click menu.
Step-2: Click on the “Picture or texture fill” option

In the “Format Background” sidebar, click on the “Fill” option. Then click on the “Picture or texture fill” option under the “Fill” section.
Step-3: Click on the “Insert” button
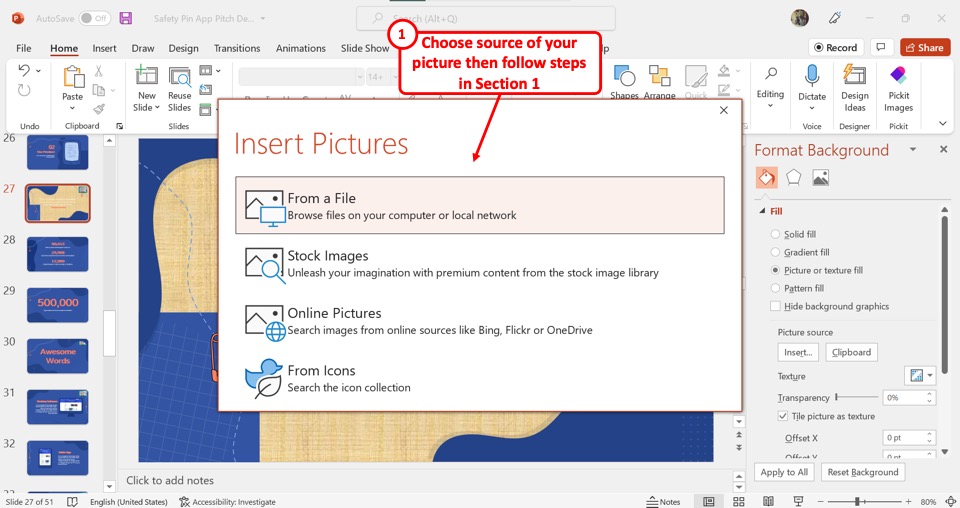
The next step is to click on the “Insert” button under the “Picture Source” option in the “Format Background” sidebar as shown in the previous picture. This will open the “Insert Pictures” dialog box.
Step-4: Insert a picture
In the “Insert Pictures” dialog box, click on the source of the background picture. You can see the detailed steps for adding pictures from each source in section 1.
4. How to Insert Image Placeholder in PowerPoint?
A picture placeholder in PowerPoint is a predesigned spot in a slide layout where you can add a picture. Check out my other article to learn more about placeholders in PowerPoint.
To insert an image placeholder, follow the 4 quick steps.
Step-1: Click on the “Slide Master” option

The first step is to click on the “View” tab in the menu ribbon. In the “View” menu, click on the “Slide Master” option.
Step-2: Click on the “Insert Placeholder” button
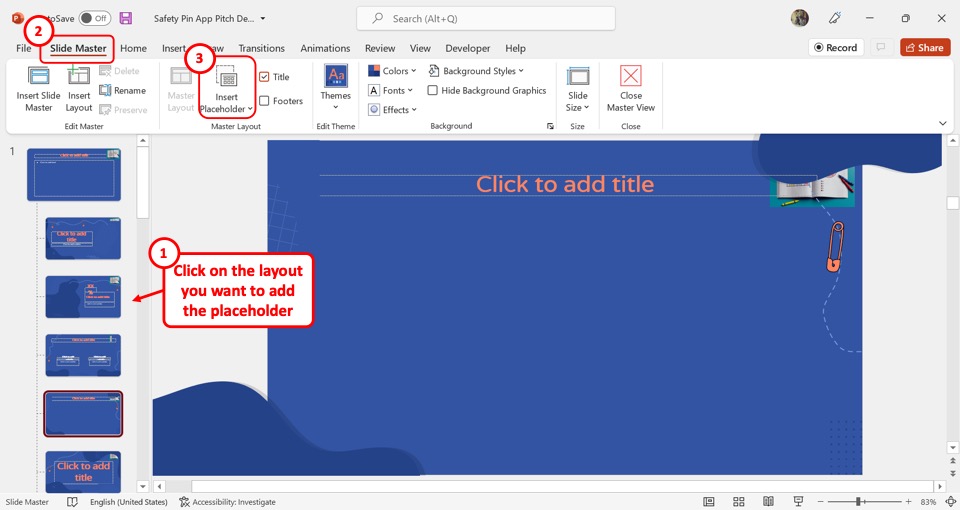
In the slide layout pane on the left side of the “Slide Master” screen, click on the layout where you want to add the placeholder. Then click on the “Insert Placeholder” option under the “Slide Master” tab.
Step-3: Click on the “Picture” option
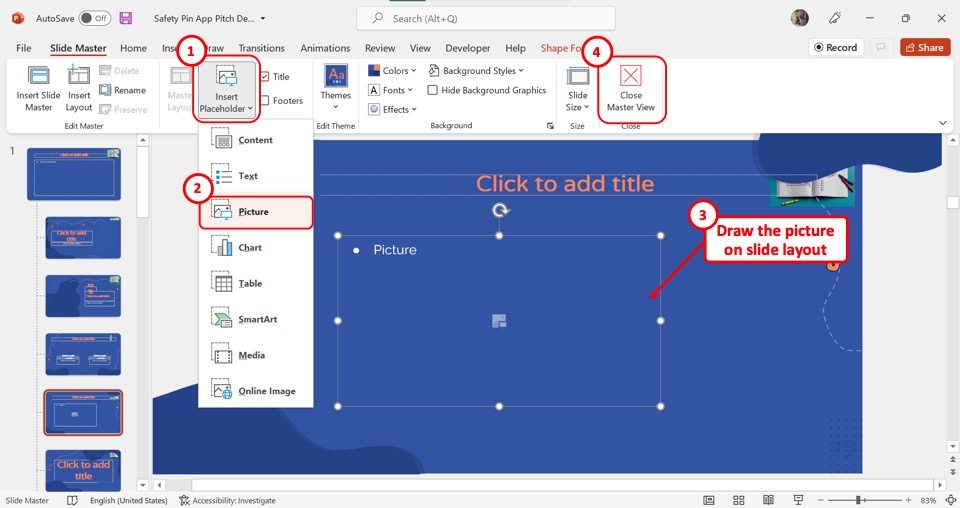
In the dropdown menu under the “Insert Placeholder” option, click on the “Picture” option. Then draw the picture placeholder on the slide layout
Step-4: Click on “Close Master View”
Finally, all you have to do is click on the “Close Master View” option to save the picture placeholder in the slide layout (as shown above).
5. How to Insert Picture in PowerPoint Without White Background?
When inserting a picture into a PowerPoint slide, you may want to remove the unnecessary white background in your picture. To learn about all the tools you can use to remove the background, you can read my article here. To remove the white background using the “Set Transparent Color” feature, follow the 4 simple steps.
Step-1: Insert a picture
The first step is to insert the picture with white background into the PowerPoint slide. Refer to section 1 for the detailed steps on inserting images from all sources.
Step-2: Click on the “Picture Format” tab
The next step is to click on the “Picture Format” tab in the menu ribbon located at the top of the screen.
Step-3: Click on the “Set Transparent Color” option
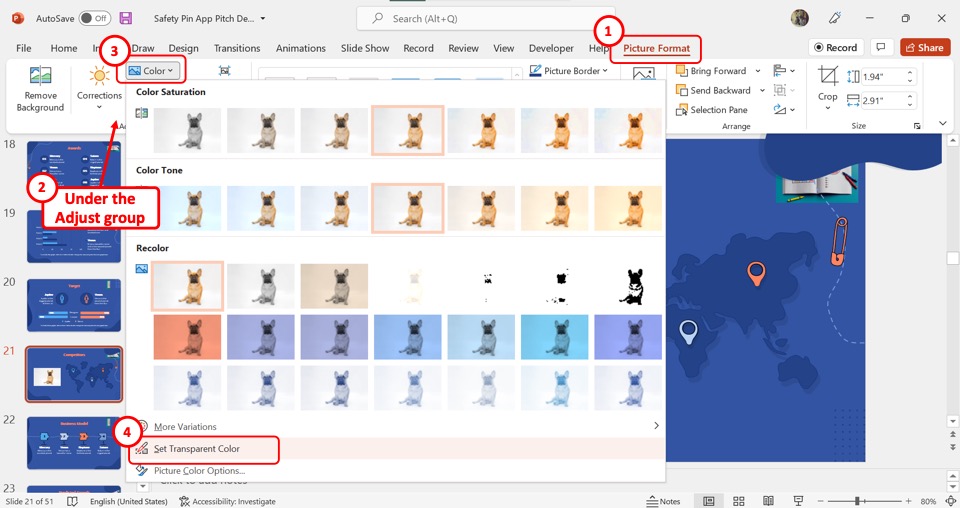
In the “Adjust” group of the “Picture Format” tab, click on the “Color” option. Then click on the “Set Transparent Color” option at the bottom of the dialog box under the “Color” option.
Step-4: Click on the white background
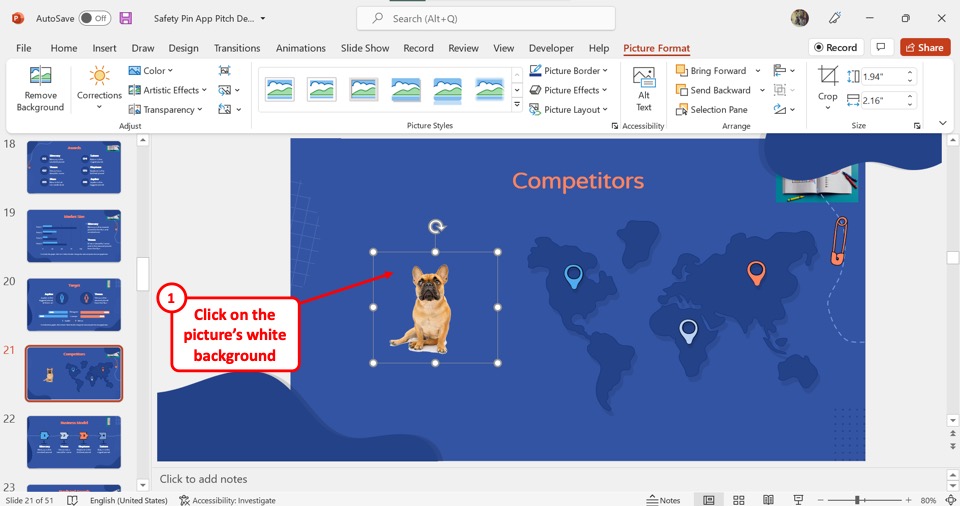
Now all you have to do is click on the white part of the selected image on the slide to remove the white background.
6. How to Insert Picture With Text in PowerPoint?
Once you have inserted a picture in PowerPoint, you can add text on top of it. To add text to an inserted picture, follow the 4 simple steps.
Step-1: Click on the “Text Box” option
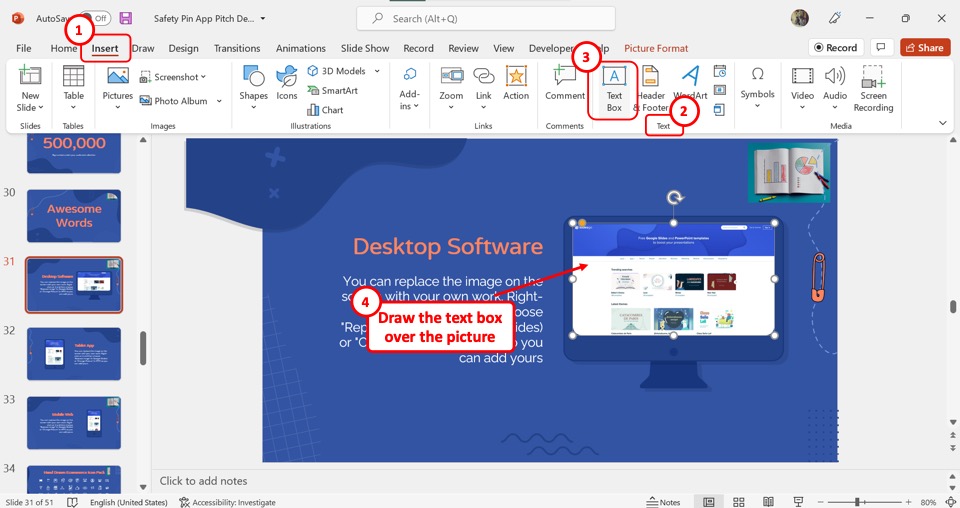
In the menu ribbon, click on the “Insert” tab. Then click on the “Text Box” option in the “Text” group of the “Insert”menu. Now you have to draw the text box over the inserted picture in the slide.
Step-2: Type in the text box
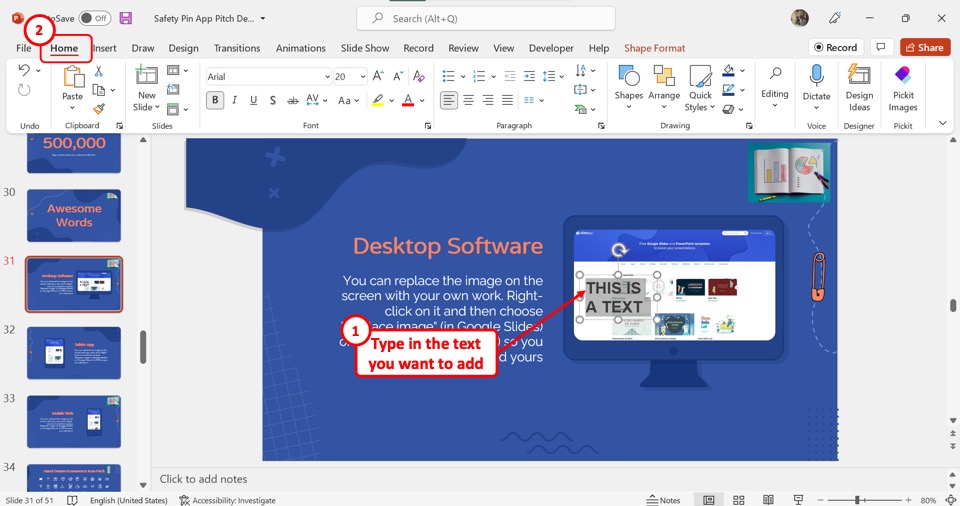
In the text box, you can now type in the text that you want to add to the picture. You can also edit the appearance of the text using the features available in the “Home” menu.
Step-3: Select the text box and the picture together
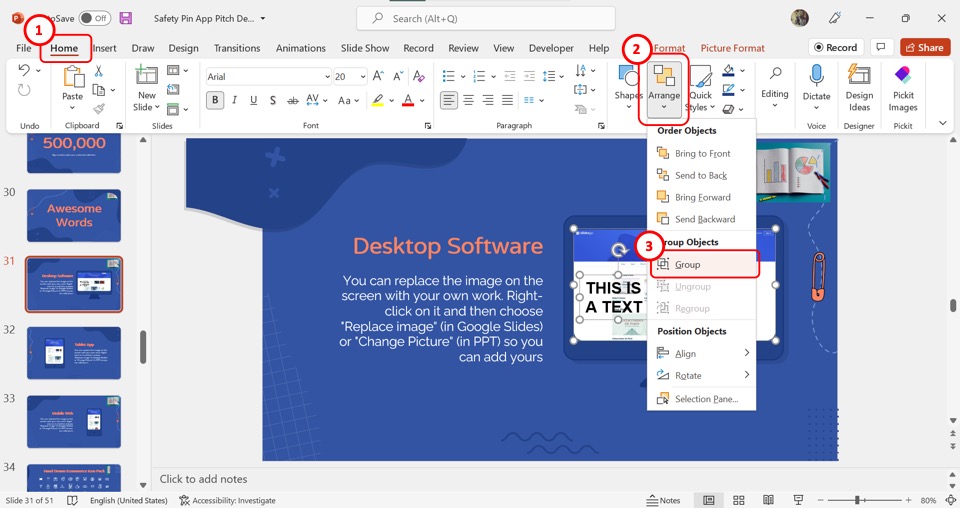
Now you have to select the text box and the picture together to group them. Press and hold the “Ctrl” key on your keyboard and click on the text box and then the picture to select them both.
Step-4: Click on the “Group” option
In the “Drawing” section of the “Home” tab, click on the “Arrange” button. Then click on the “Group” option in the dropdown menu to group the text with the inserted picture on the slide (as shown above).
7. How to Insert Picture in PowerPoint Notes?
In PowerPoint, you can add a picture to your speaker notes. All you have to do is follow the 3 quick steps.
Step-1: Click on the “Notes Page” option
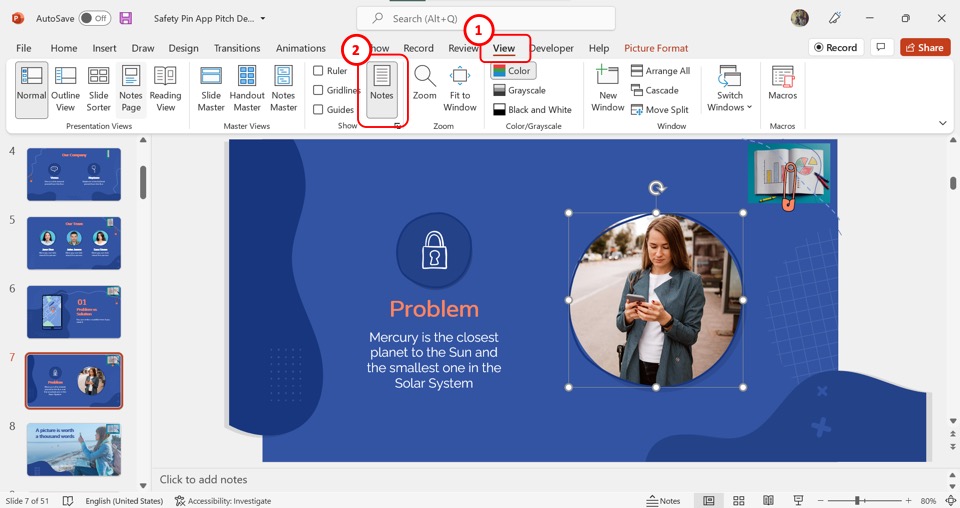
The first step is to click on the “View” tab in the menu ribbon. In the “View” menu, click on the “Notes Pages” option.
Step-2: Click on the “Insert” tab
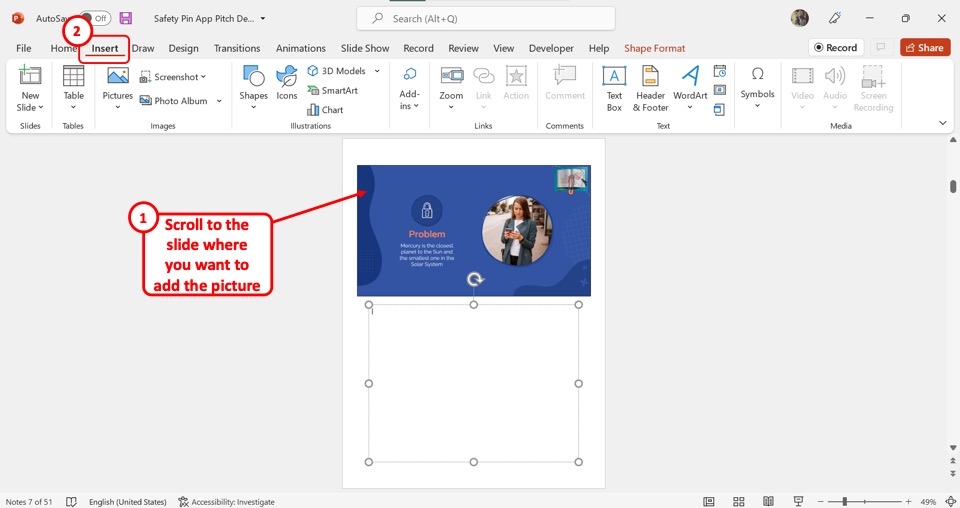
In the “Notes Page” view, scroll through to open the slide note where you want to insert a picture. Then click on the “Insert” tab in the menu ribbon.
Step-3: Click on the “Pictures” option
In the “Images” section of the “Insert” tab, click on the “Pictures” option. Then select the picture source from the dropdown menu. You can find the detailed steps for inserting an image in section 1.
8. How to Insert Clip Art in PowerPoint? [Link to Existing Article]
The clipart in PowerPoint is a collection of free images that you can use in your presentation slides. You can read about the detailed steps on inserting clipart in any version of PowerPoint in my article here.
To insert a clipart in PowerPoint using the “Online Pictures” option, follow the 5 simple steps.
Step-1: Click on the “Insert” tab

The first step is to open the slide where you want to insert the clipart. Then click on the “Insert” tab in the menu ribbon located at the top of the screen.
Step-2: Click on the “Online Pictures” option
In the “Images” group of the “Insert” tab, click on the “Pictures” option. In the dropdown menu under the “Pictures”option, click on the “Online Pictures” option.
Step-3: Select your preferred category
In the “Online Pictures” dialog box, you can now click on any of the available categories of the pictures. You can also click on the search bar at the top of the dialog box to search for a specific category.
Step-4: Click on the “Clipart” option
Now you have to click on the “Filter” option, which is the funnel icon under the search bar. In the “Filter” pop-up menu, click on the “Clipart” option under the “Types” section.
Step-5: Click on the “Insert” button
The final step is to select one or more cliparts from the “Online Pictures” dialog box to insert into the slide. Then all you have to do is click on the “Insert” button at the bottom of the dialog box.
9. How to Add Picture to a Shape in PowerPoint? [Link to Existing Article]
Microsoft PowerPoint allows you to add a picture to an existing shape inside a slide. You can read about the different methods for adding pictures to a shape in my other article. To insert a picture into a shape using the “Shape Fill” feature, follow the 3 easy steps.
Step-1: Click on the “Fill” option
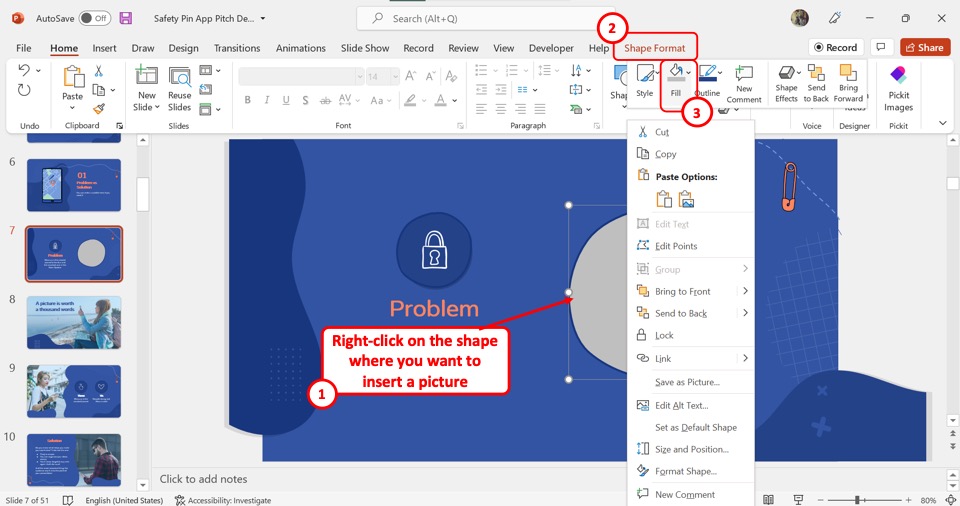
The first step is to “Right Click” on the shape where you want to insert the picture. From the Shape Format tab, in the pop-up menu, click on the “Fill” option.
Step-2: Click on the “Picture” option
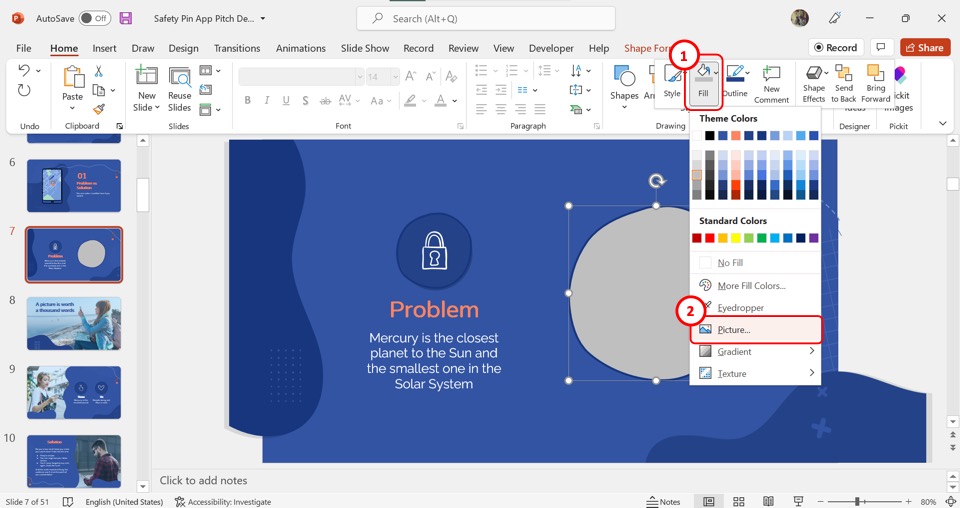
In the dropdown menu under the “Fill” option, click on the “Pictures” option. This will open the “Insert Pictures”dialog box.
Step-3: Insert a picture
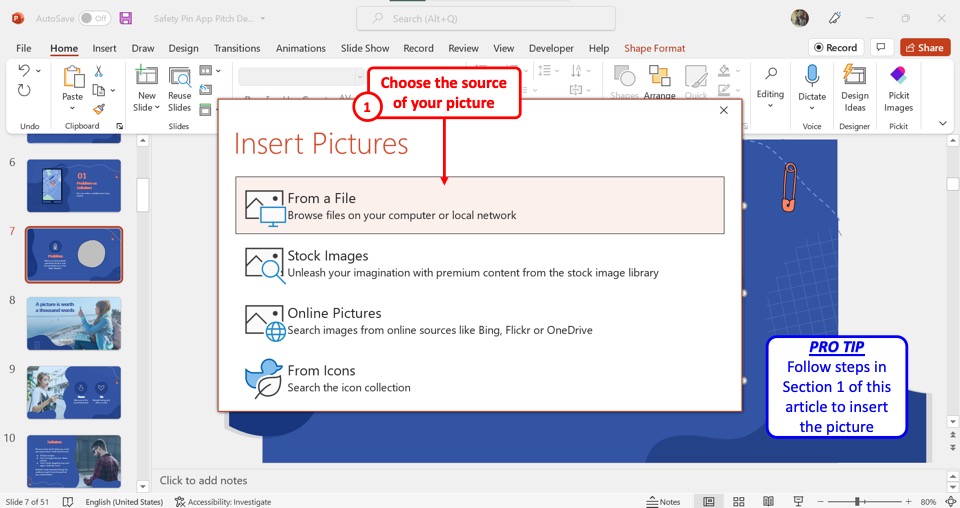
Now all you have to do is insert the picture into the selected shape. In the “Insert Pictures” dialog box, choose where you want to add the picture from. For the detailed steps for inserting pictures from any source, refer to section 1.
10. How to Insert Round Picture in PowerPoint?
In Microsoft PowerPoint, you can add any shape to a picture. To insert a round picture, you have to first insert a picture following the steps detailed in section 1. Then follow the 3 simple steps.
Step-1: Click on the “Picture Format” tab

Click on the picture that you want to add a round shape to. Then click on the “Picture Format” tab from the menu ribbon located at the top of the screen.
Step-2: Click on the “Crop to Shape” option
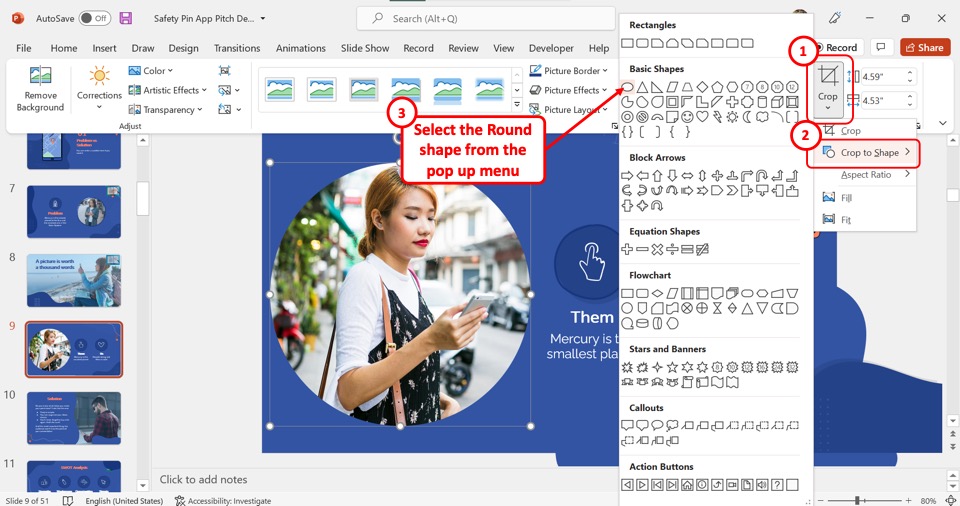
In the “Size” group of the “Picture Format” tab, click on the “Crop” option. In the dropdown menu under the “Crop”option, click on “Crop to Shape”. This will open a secondary menu containing a list of all the available shapes.
Step-3: Select the round shape
Finally, all you have to do is click on the round shape from the dropdown list to insert the picture into the round shape as shown in the image above.
11. How to Insert a Linked Picture in PowerPoint?
Microsoft PowerPoint offers the feature to insert a linked picture so that the inserted picture in the presentation can update automatically when it is edited outside the PowerPoint file. To insert a linked picture, follow the 3 easy steps.
Step-1: Click on the “Insert” tab
In the menu ribbon located at the top of the screen, click on the “Insert” tab.
Step-2: Click on the “This Device” option
In the “Insert” menu, click on the “Pictures” option. Then click on the “This Device” option from the dropdown menu. You can insert a linked picture only from this option. (shown in the image above)
Step-3: Click on the “Insert and Link” option
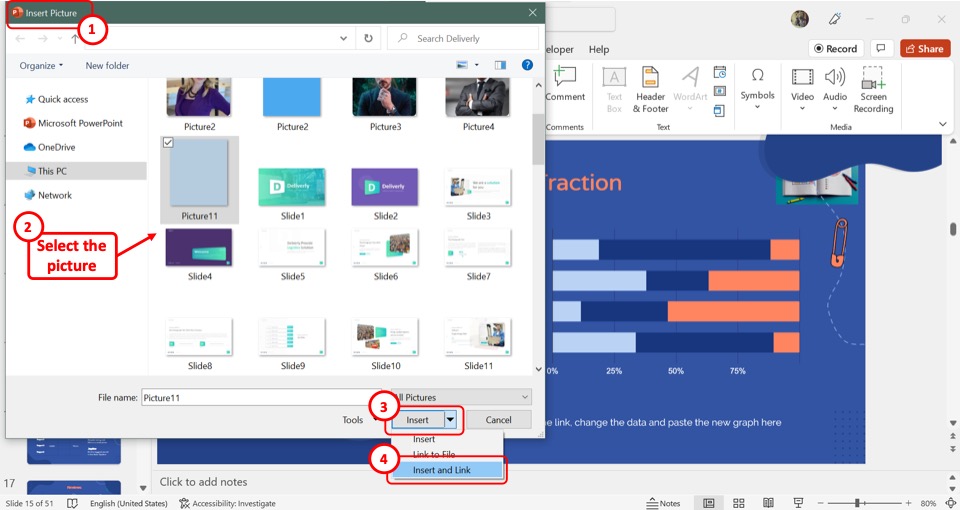
In the “Insert Picture” dialog, click on the picture that you want to add. Then click on the down arrow by the “Insert”button at the bottom of the dialog box. Click on the “Insert and Link” option from the dropdown list to insert the linked picture.
12. How to Insert a Screenshot in PowerPoint? [Link to Existing Article]

In PowerPoint, you can directly take and add a screenshot to a slide. To do so, you have to first click on the “Insert” tab in the menu ribbon. In the “Images” group of the “Insert” tab, click on the “Screenshot” option.
The “Available Windows” option allows you to take a screenshot of any of the open windows. You can use the “Screen Clipping”option to take a screenshot of the current screen. Read my article here to learn more about the “Screenshot” feature in PowerPoint.
13. Insert Image in a Table in PowerPoint
In Microsoft PowerPoint, you can insert an image inside a table. All you have to do is follow the 2 quick steps.
Step-1: Click inside a cell
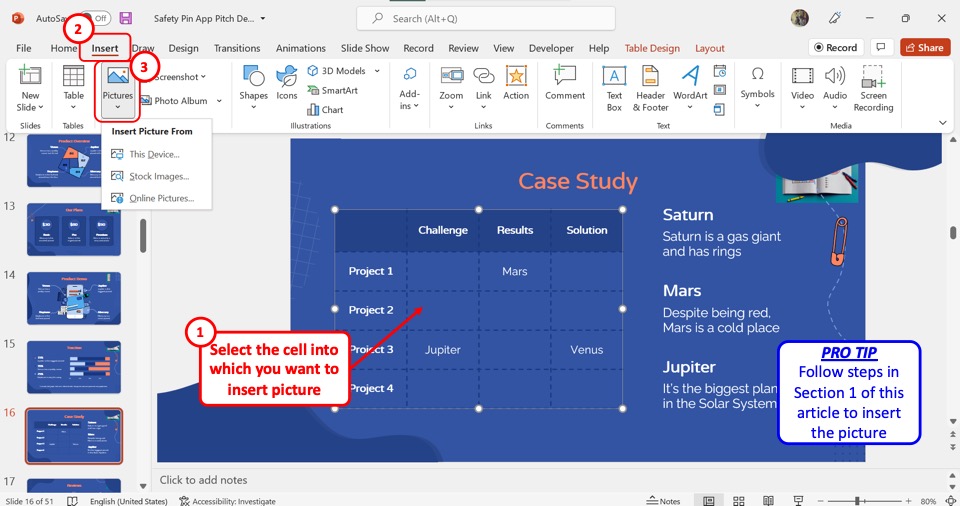
You have to insert the picture inside a single cell in a table. So the first step is to click on the cell where you want to insert the picture. Then click on the “Insert” tab in the menu ribbon.
Step-2: Click on the “Pictures” option
In the “Insert” menu, click on the “Pictures” option. Refer to section 1 for the detailed steps on inserting images from different sources into PowerPoint. (shown in the image above)
14. Unable to Insert Image in PowerPoint Error
If PowerPoint shows an error message when inserting an image into a slide, you can embed the picture into the slide instead. To do so, follow the 4 simple steps.
Step-1: Click on the “Object” option
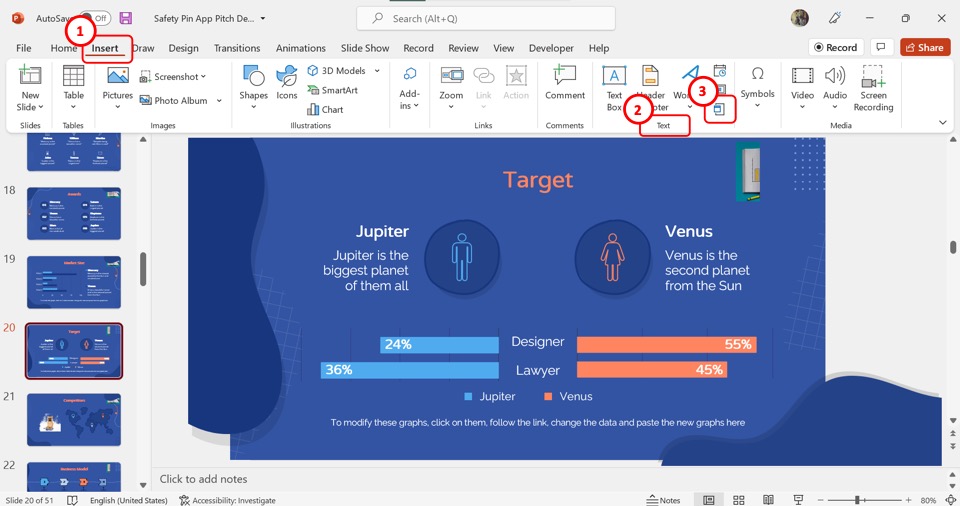
In the menu ribbon located at the top of the screen, click on the “Insert” tab. Then click on the “Object” option which is the last icon in the “Text” group of the “Insert” tab.
Step-2: Click on the “Browse” option
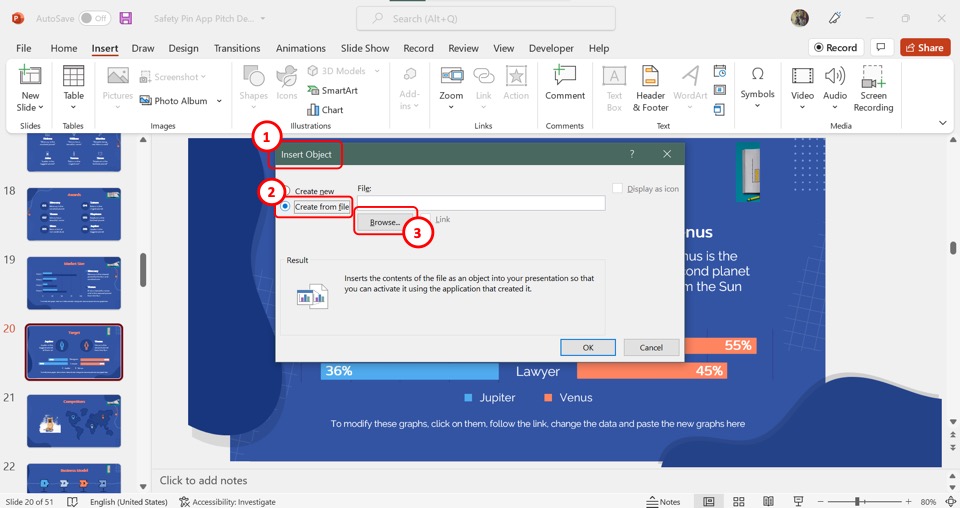
In the left column of the “Insert Object” dialog box, click on the “Create from file” option. Then click on the“Browse” button at the center of the dialog box.
Step-3: Click on the “OK” button
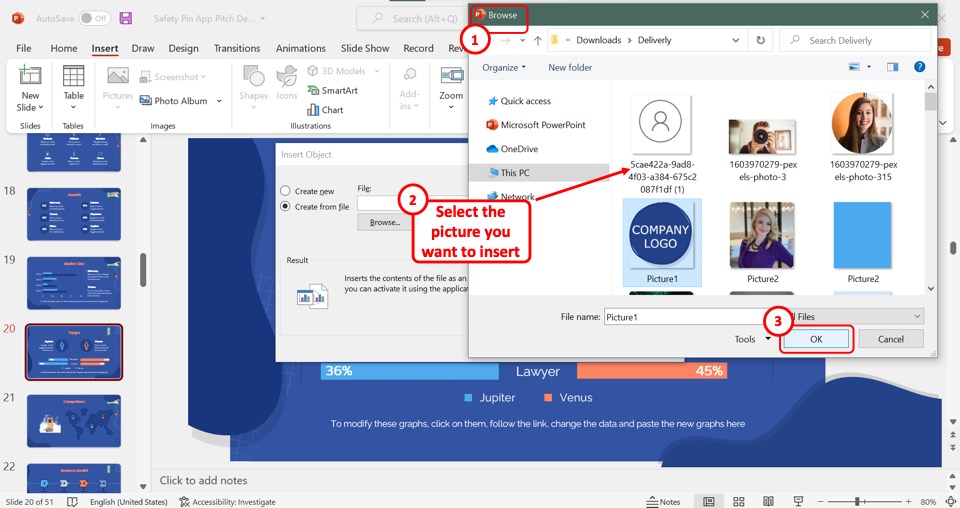
In the “Browse” window, select the picture that you want to insert into the slide. Then click on the “OK” button at the bottom.
Step-4: Click on the “OK” option
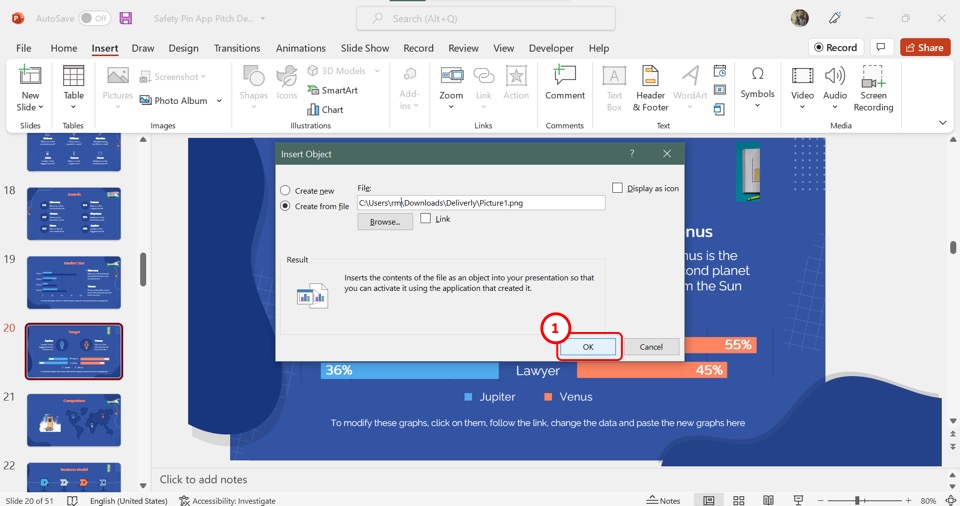
Finally, all you have to do is click on the “OK” button at the bottom of the “Insert Object” dialog box to embed the selected picture into the PowerPoint slide.
Credit to wayhomestudio (on Freepik) for the featured image of this article (further edited).