![Insert a Table in PowerPoint from Excel? [Step-by-Step!]](https://artofpresentations.com/wp-content/uploads/2022/05/Featured-Image-Insert-table-from-Excel-to-Powerpoint.jpg)
One of the conveniences that PowerPoint presentations provide is the ability to insert tables and make them dynamic in nature from any source, particularly Excel. This allows presenters to continue in the flow of their presentations without having to shuffle through multiple open windows.
To insert a table in PowerPoint from Excel, first, select and copy the table in Excel using the “Ctrl+C” shortcut. Then, open the specific slide in your presentation to paste the table. Use the shortcut “Ctrl+V” to paste the table in PowerPoint.
Does this seem too simple to imagine, doesn’t it? And, it is quite simple! However, to give you a few more options for inserting tables from Excel to PowerPoint, I have listed some methods below. Let’s get started.
1. Adding a Table from Excel to PowerPoint
The “Insert Table” feature in Microsoft PowerPoint allows you to only add new tables to your slide. However, you can add an existing table from a different source like Microsoft Excel also using the methods mentioned below.
To add a table from Excel to PowerPoint, you need to use the “Copy” and “Paste” features.
1.1 Method 1 – Using Copy and Paste (Unlinked)
Using the simple “Paste” feature in Microsoft PowerPoint, you can quickly add an Excel table to your slide without any hyperlinks. To do so, follow these steps.
Step-1: Click on the “Copy” option
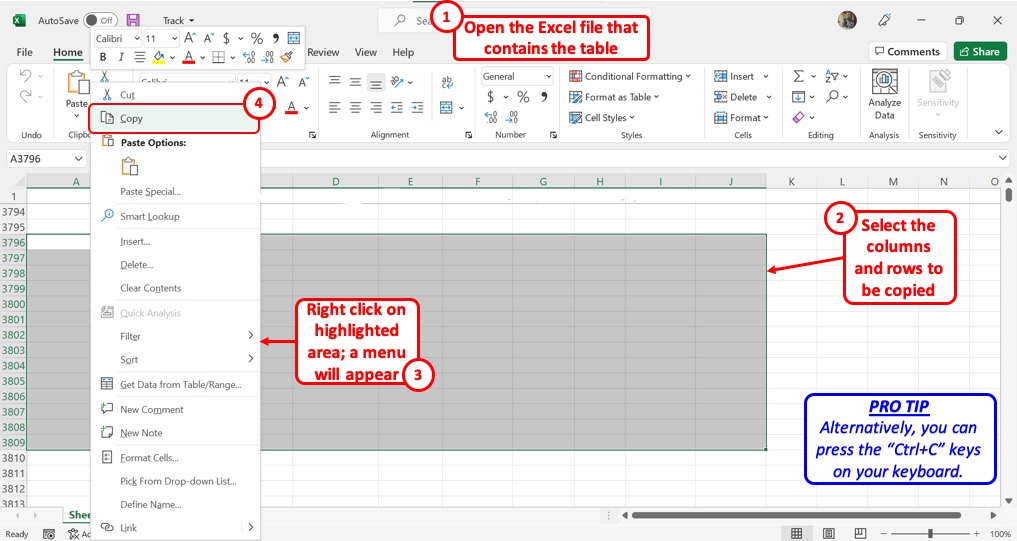
The first step is to open the Microsoft Excel worksheet from where you want to copy the table. Then select the preferred columns and rows to highlight them. “Right Click” on it and click on the “Copy” option. Alternatively, you can press the “Ctrl+C” keys on your keyboard.
Step-2: Click on the “Paste” option
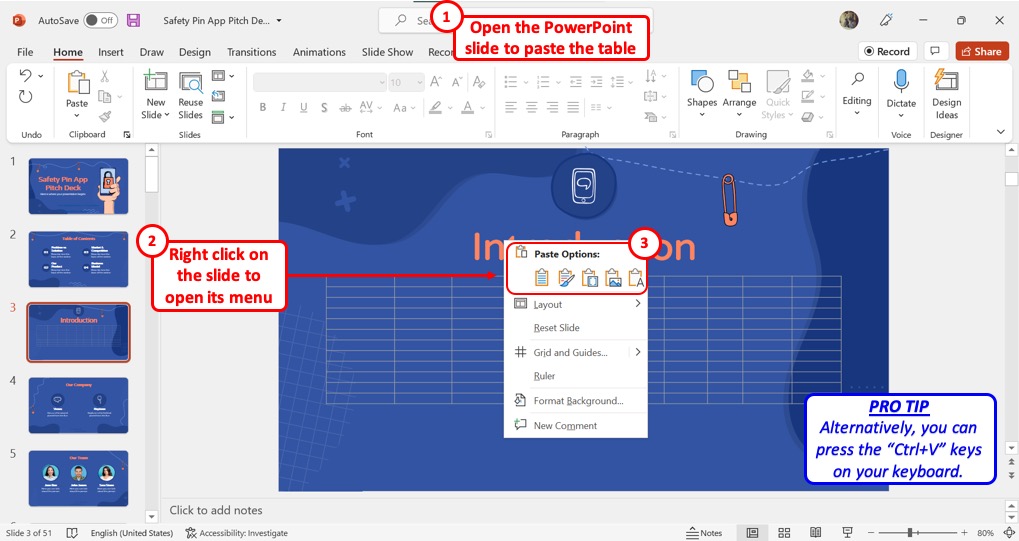
The next step is to “Right Click” on the PowerPoint slide where you want to add the table. In the right-click menu, click on your preferred option under “Paste Options”. You can alternatively press the “Ctrl+V” keys on your keyboard to paste the Excel table to your slide.
1.2 Method 2 – Using Paste Special
In Microsoft PowerPoint, the “Paste Special” dialog box offers options to paste the copied table in different special formats. To paste the Excel table with a hyperlink, follow these steps.
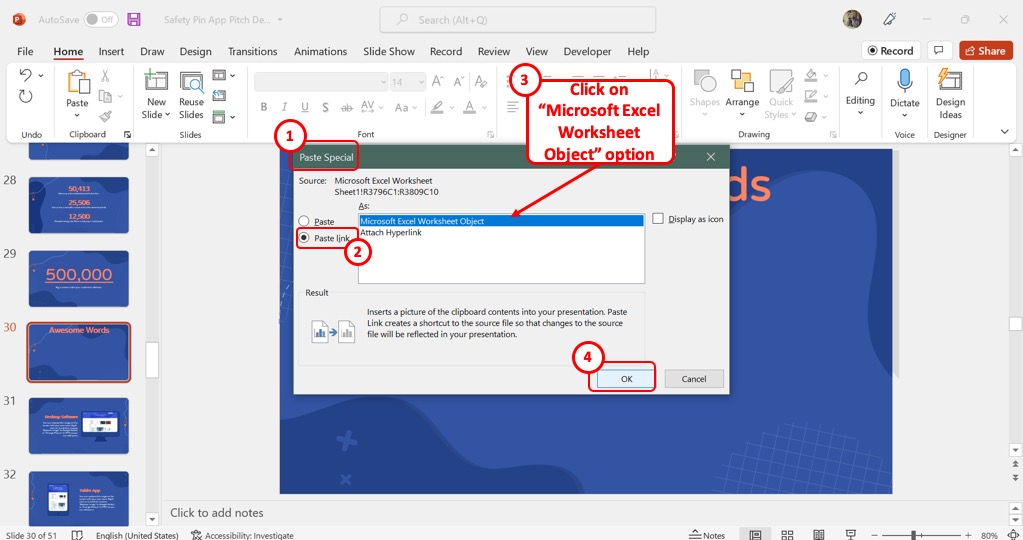
Step-1: Click on the “Paste Special” option

In the “Paste” group of the “Home” tab, click on the down arrow under the “Paste” icon that looks like a clipboard. Then click on the “Paste Special” option from the dropdown menu to launch a dialog.
Step-2: Click on the “Microsoft Excel Worksheet Object” option
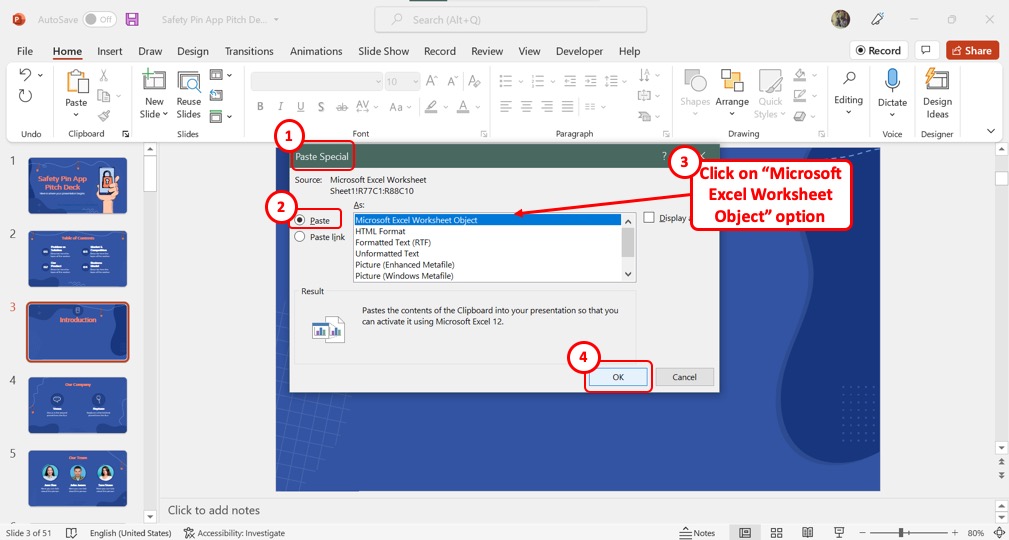
In the “Paste Special” dialog box, click on the “Paste” option from the left column. Then in the box in the middle of the dialog box, click on the “Microsoft Excel Worksheet Object” option.
Step-3: Click on the “OK” button
Now all you have to do is click on the “OK” button at the bottom of the “Paste Special” dialog box to paste the Excel table in your PowerPoint slide (shown above).
1.3 Method 3 – Using the Insert Object Option (Entire Excel Sheet)
Microsoft PowerPoint also allows you to paste the entire Excel sheet into your presentation slide. For this, you have to use the “Insert” tab. Follow the 4 steps below:
Step-1: Click on the “Insert” tab
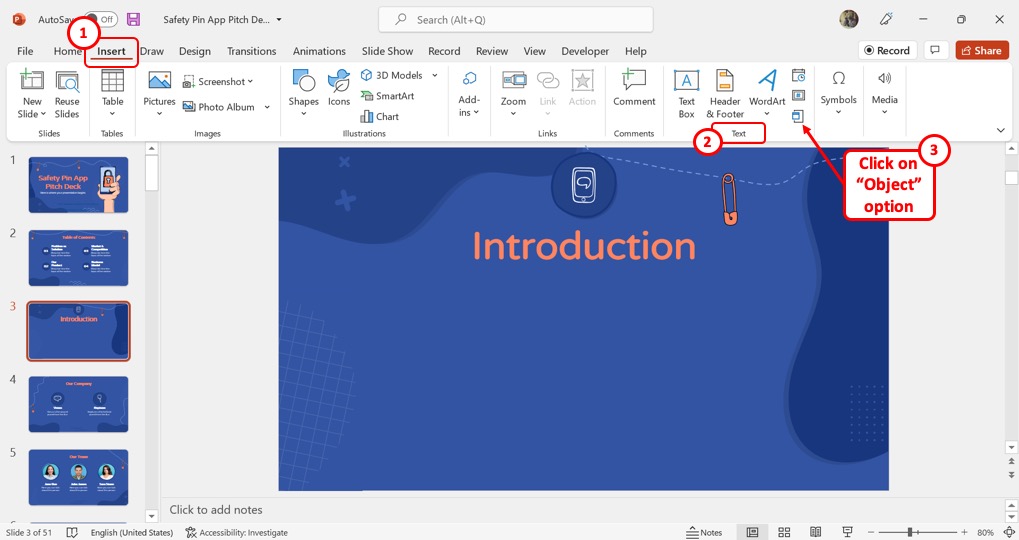
In the menu ribbon located at the top of the screen, click on the “Insert” tab. Under the “Insert” tab, click on the “Object” option which is the last icon in the “Text” group.
Step-2: Click on the “Create File” option
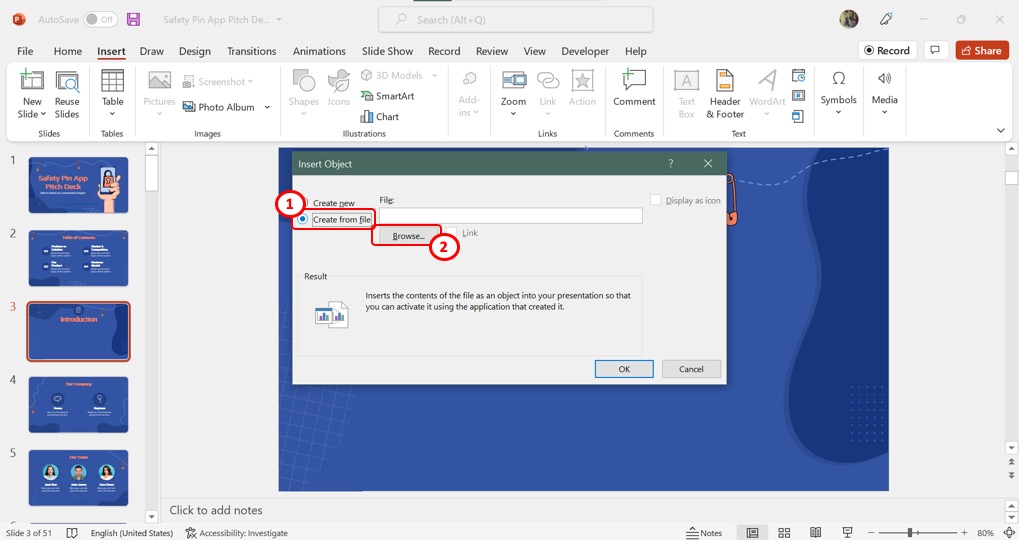
In the left column of the “Insert Object” dialog box, click on the “Create from file” option. Now you can select an Excel sheet to add to the slide.
Step-3: Click on the “Browse” button
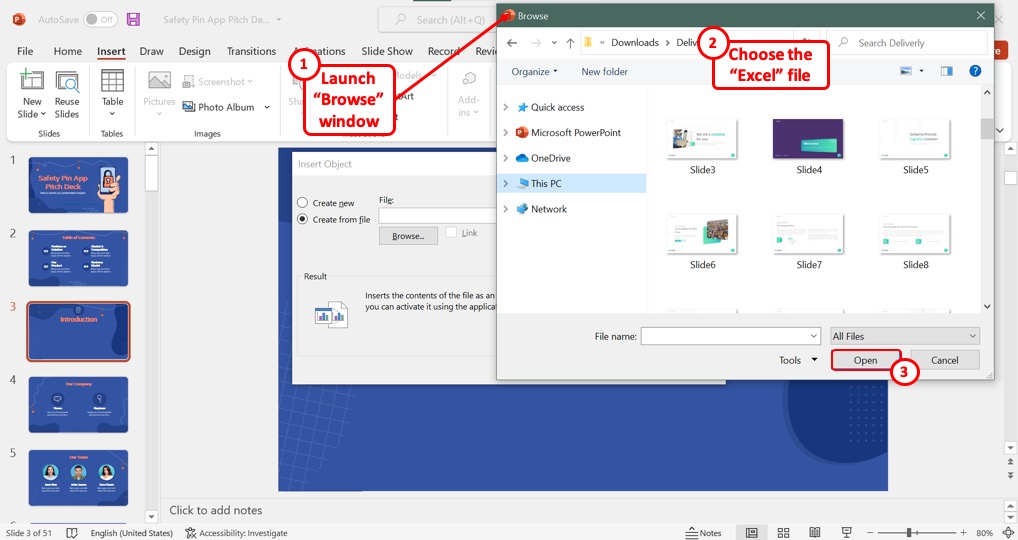
Click on the “Browse” button in the “Insert Object” dialog box to launch the “Browse” window. Select the Excel file and click on the “Open” button at the bottom of the “Browse” window (shown above).
Step-4: Click on the “Link” option
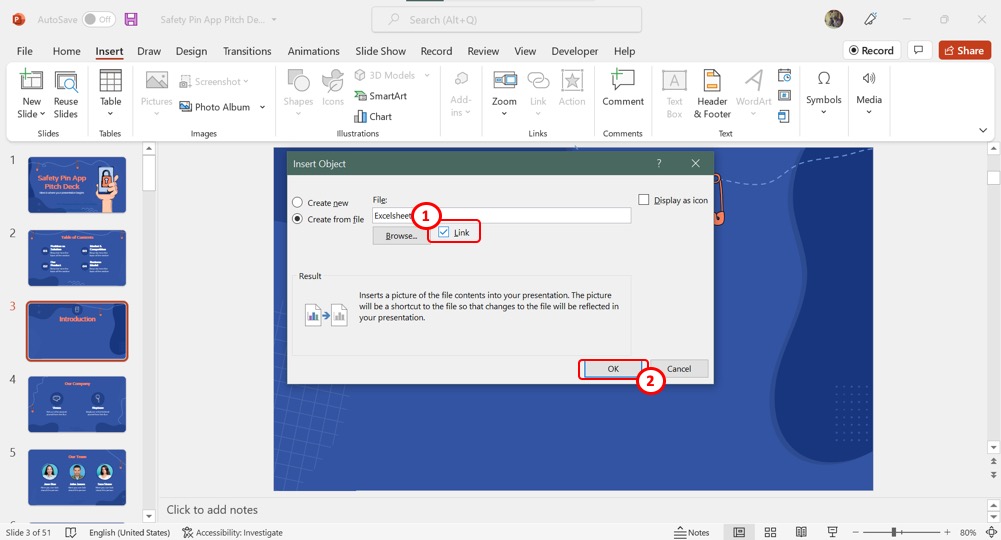
In the “Insert Object” dialog box, click on the “Link” option to hyperlink the Excel table. Click on the “OK” button at the bottom of the dialog box to finish the process.
2. How to Copy Tables from Excel to PowerPoint with Formatting?
When you copy a table from Excel, you can paste it into Microsoft PowerPoint in multiple different formats. For easy editing access, you can use the “Keep Source Formatting” feature.
You can also paste the table as a picture to avoid any accidental edits to the table.
2.1 Method 1 – Using Keep Source Formatting Option

To paste the Excel table as an editable object, you can use the “Keep Source Formatting” option. All you have to do is “Right Click” on the slide and select the “Keep Source Formatting” option under “Paste Options” in the right-click menu. The table in PowerPoint will retain the formatting from Excel.
2.2 Method 2 – Paste as an Image
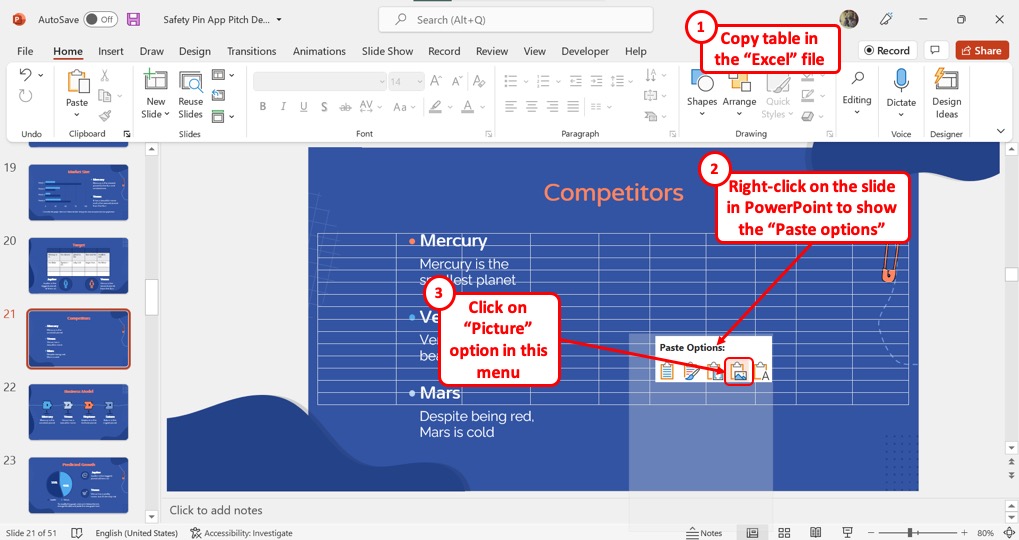
You can paste the Excel table as an image if you do not want any edits to the table. To paste as an image, “Right Click” on the slide and click on the “Picture” option under “Paste Options” in the right-click menu.
3. How to Insert an Excel File into PowerPoint as an Icon?
Instead of pasting a table, you can add an Excel icon in Microsoft PowerPoint. Clicking on the icon during the presentation will lead you to the Excel worksheet. To insert an Excel file as an icon, follow these steps.
Step-1: Copy Table from Excel
The first step is to open the Microsoft Excel worksheet from where you want to copy the table. Then select the preferred columns and rows to highlight them. “Right Click” on it and click on the “Copy” option. Alternatively, you can press the “Ctrl+C” keys on your keyboard.
Step-2: Click on the “Paste Special” option
In the “Clipboard” group of the “Home” tab, click on the down arrow under the “Paste” icon. Then click on the “Paste Special” option from the dropdown menu to launch a dialog.
Step-3: Click on the “Microsoft Excel Worksheet Object” option
Now just click on the “Microsoft Excel Worksheet Object” option in the “Paste Special” dialog box,
Step-4: Click on “Display as icon”
The next step is to click on the “Display as icon” option in the right column of the “Paste Special” dialog box. A checkmark will appear beside the option. Now click on the “OK” button at the bottom to insert the Excel file as an icon (shown above).
4. How to Link Existing PowerPoint Table to Excel for Dynamic Data Updates?
In Microsoft PowerPoint 2019 and later versions, you cannot link an Excel worksheet to an existing PowerPoint table. However, any hyperlinked table from Excel in PowerPoint is automatically set for dynamic data updates.
To enable this feature, follow these steps.
Step-1: Copy Table from Excel
The first step is to open the Microsoft Excel worksheet from where you want to copy the table. Then select the preferred columns and rows to highlight them. “Right Click” on it and click on the “Copy” option. Alternatively, you can press the “Ctrl+C” keys on your keyboard.
Step-2: Click on the “Paste Special” option

In the “Home” menu, click on the down arrow under the “Paste” icon. Then select the “Paste Special” option from the dropdown menu.
Step-3: Click on “Paste Link”
In the left column of the dialog box, click on the “Paste link” option. This will link the table to its Excel source. You can edit the table in either PowerPoint or Excel and find the changes in both files.
Step-3: Click on the “Microsoft Excel Worksheet Object” option
Now click on the “Microsoft Excel Worksheet Object” option from the box in the middle of the “Paste Special” dialog box. Then click on the “OK” button to insert the table (as shown above).
5. How to Unlink Table in PowerPoint from Excel?
In PowerPoint, you can remove the hyperlink added to an Excel table. However, you must remove hyperlinks from all objects in the presentation at once. Follow the 2 quick steps.
Step-1: Click on the “File” tab
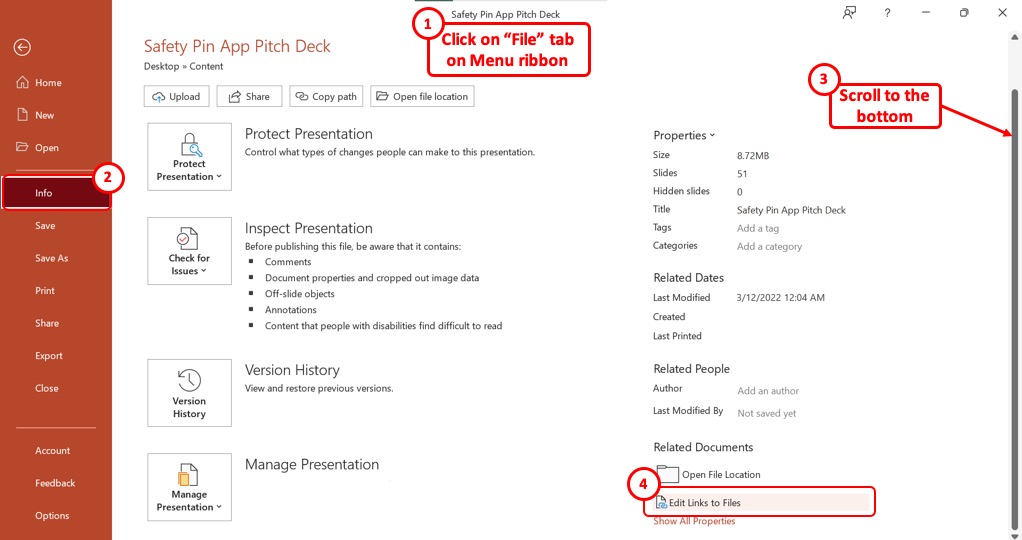
Click on the “File” tab in the menu ribbon located at the top of the screen. In the left sidebar of the “File” menu, click on the “Info” option.
Step-2: Click on “Edit Links to Files”
Now scroll all the way down to the bottom of the “Info” screen. At the right column, click on the “Edit Links to Files” option to remove all the hyperlinks.
6. How to Embed Excel in PowerPoint?
To embed an Excel sheet into a PowerPoint slide, follow these steps.
Step-1: Click on the “Object” option

In the menu ribbon located at the top of the screen, click on the “Insert” tab. Then click on the “Object” icon from the “Text” group.
Step-2: Click on “Microsoft Excel Worksheet”
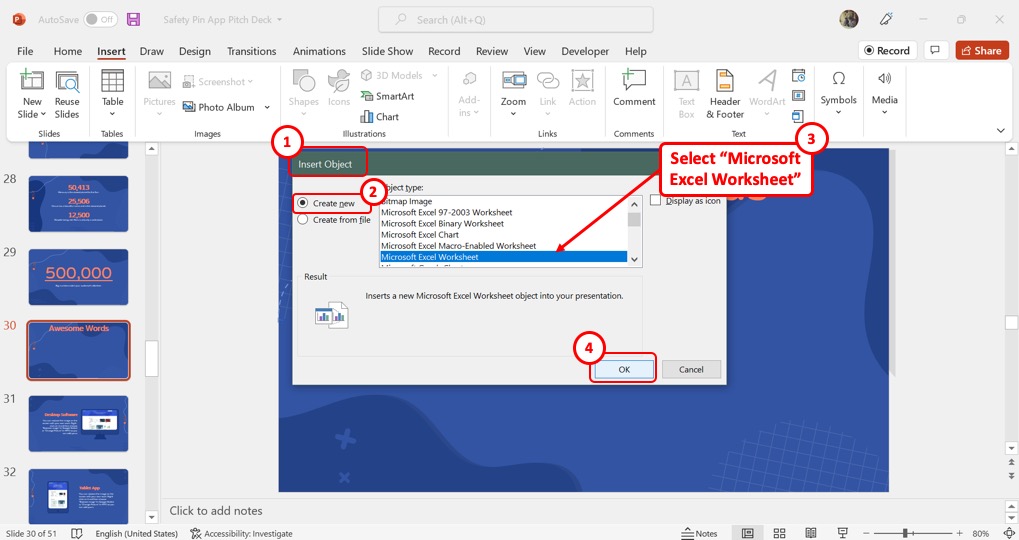
In the “Insert Object” dialog, click on the “Create New” option from the left column. Then select the “Microsoft Excel Worksheet” option from the “Object Type” list. Finally, click on the “OK” button to embed the Excel sheet.
7. How to Insert a Scrollable Table from Excel in PowerPoint?

In Microsoft PowerPoint, all the embedded Excel tables are scrollable. To insert a scrollable table from Excel into your PowerPoint presentation, follow the steps discussed in Section 6. However, to make the table scrollable for your viewers, you will need to access the “Developer” tool.
Here’s a link to a Microsoft Support group addressing what you need to do in order to make your table scrollable. Make sure you check that out.