![[SOLVED!!] Remove All Notes from PowerPoint! (Even on Mac!)](https://artofpresentations.com/wp-content/uploads/2020/09/Featured-Image-How-to-Remove-Notes-in-PowerPoint.jpg)
PowerPoint Notes is a powerful tool that can ensure perfect communication throughout a team. With Notes, you can efficiently convey your messages, concerns, suggestions, and/or creative ideas with your colleagues and boss. There will come times when you need to remove those Notes. But, how exactly do you remove notes from PowerPoint?
To remove Notes from PowerPoint, click on “File” and then “Info”. Next, click on “Check for Issues” and then “Inspect Document”. Finally, select “Annotations”, “Comments” and “Notes” and then click “Remove all” to remove all comments from your PowerPoint presentation.
There is more than one way to remove Notes from PowerPoint, in this article we will take a run-through of all the different methods. I will also be highlighting some important things that you should remember. PowerPoint presentations can take long to produce so the more you know, the more time you can save.
For everything that you need to know, keep reading!
A Quick Note Before We Begin – if you want to make jaw-dropping presentations, I would recommend using one of these Presentation Designs. The best part is – it is only $16.5 a month, but you get to download and use as many presentation designs as you like! I personally use it from time-to-time, and it makes my task of making beautiful presentations really quick and easy!
Removing All Notes from PowerPoint on Windows
I can think of a multitude of reasons as to why you would use Notes, and likewise, why you would want to remove them. You will be using the document inspector to do this so once you have gone through the step by step, be sure to check out some important things you need to know about the inspector.
The process for removing notes from PowerPoint is different for Windows and Mac. This is how you remove your Notes from PowerPoint on Windows. Remember to follow each step correctly.
Step 1 – Open the Info option on the File Tab
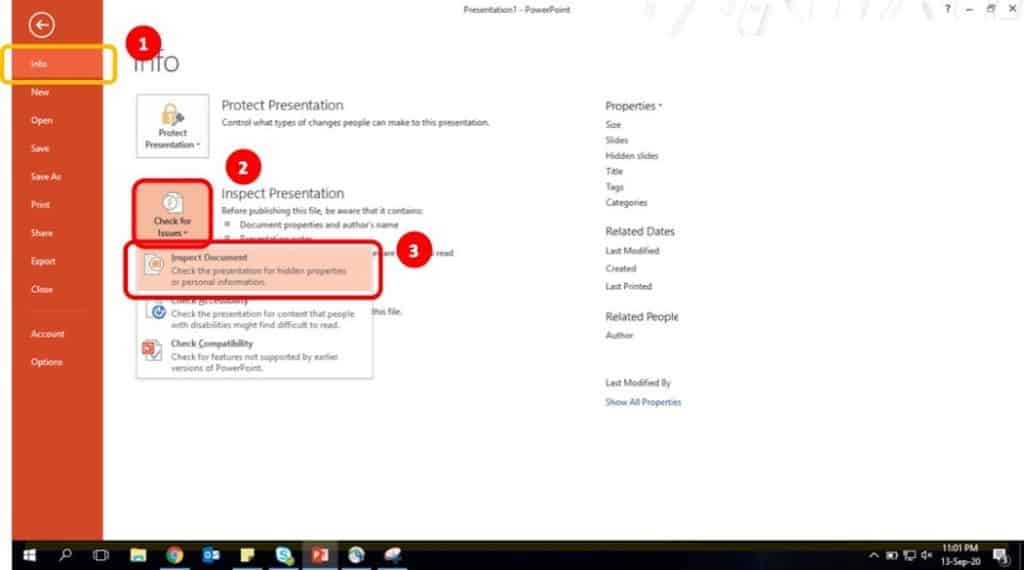
In the first step, click on the “File” tab on the top left corner of your screen.
You will see a screen like the one showcased in the above image. Make sure you are on the “Info” option. Under the Info option, click on “Check for Issues“. When you click on this button, you will be prompted with a few options in a dropdown. Click on “Inspect Document“
Step 2 – Inspect Document for Notes
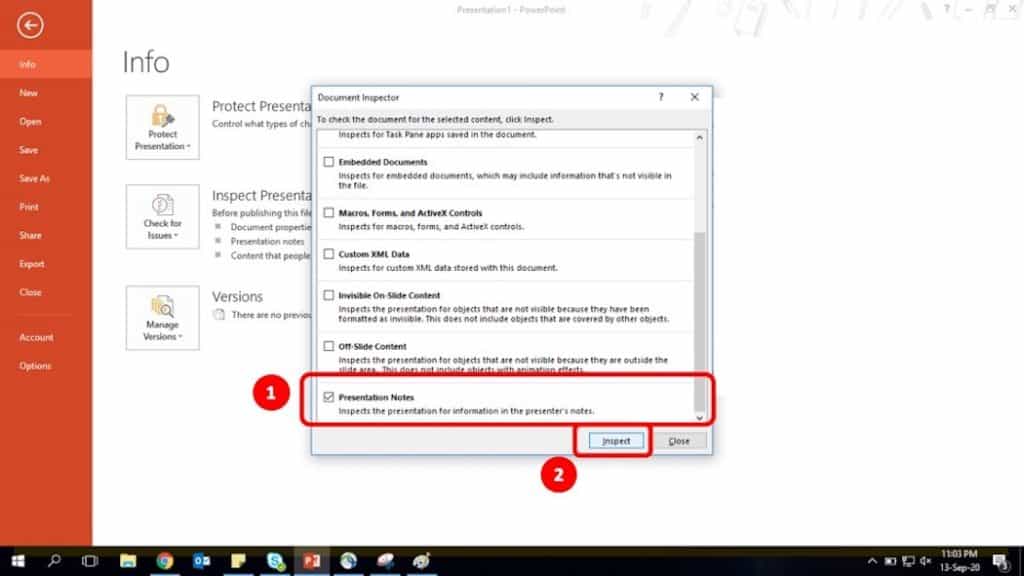
In order to inspect the presentation, you will be first prompted with a pop-up window with several different options.
Make sure you uncheck everything, and scroll down to the bottom of the window and check only “Presentation Notes“.
Then, click “Inspect“.
Step 3 – Remove all Notes from PowerPoint
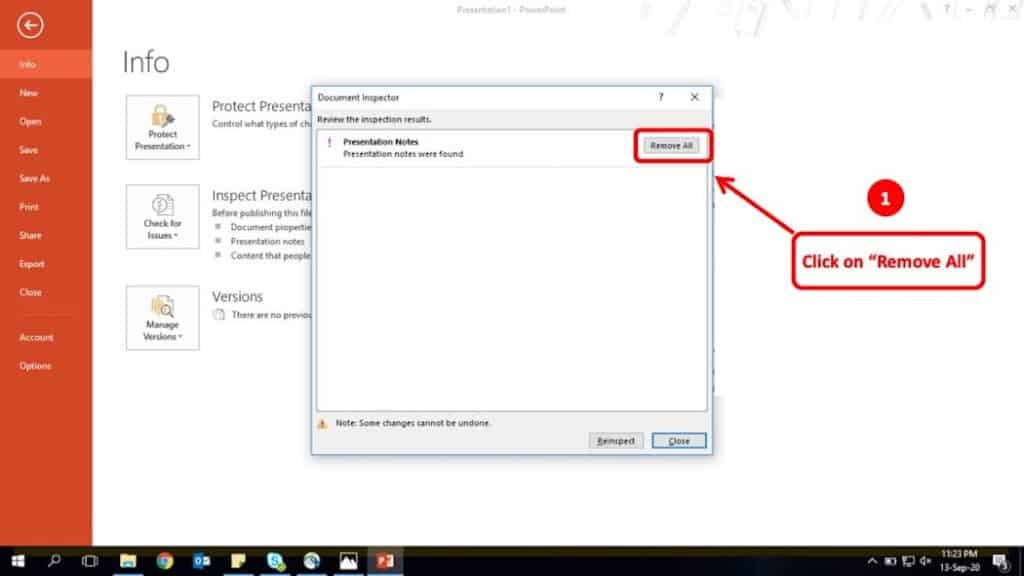
Upon clicking inspect, PowerPoint will basically search for all notes on your presentation file and then prompt you with another pop-up window.
The last step is to click “Remove All” to delete all the notes from your presentation.
It is as easy as that!
Follow the above step by step guide and you should be good to go. Remember, this removes all your Notes.
If you want to remove only certain Notes, you will have to do it individually via your slides. That might take some time but it is unlikely that you would only need to remove “some” notes.
Remove All Notes from PowerPoint on Mac
Sadly, Microsoft PowerPoint doesn’t have a direct option to remove notes from all slides on Mac as the “Inspect Document” option is not provided.
Fortunately, there are ways to work-around this problem!
Firstly, If you do not have too many slides (more than 10-15 slides), I’d just advise you to delete the notes manually by going to each slide one by one and deleting the notes as that would be the fastest. However, if you are stuck with a presentation that has several slides, you can follow one of the following three methods –
Method 1 – Save your Presentation as a PDF
If you want to just get rid of the notes perhaps before you share it with you manager, this method can work great.
The only drawback of this method is that if your presentation has any animations, transitions, or audiovisuals, these won’t work when your PowerPoint presentation is saved as a PDF file.
Nevertheless, let’s look at how you could save your presentation as a PDF –
Step 1 – Click the File option
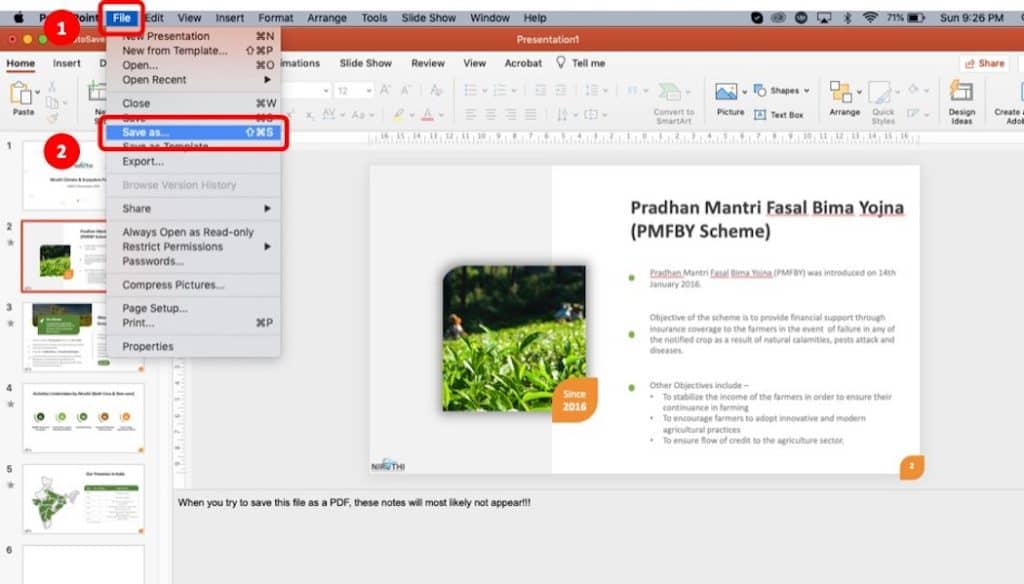
The first step is to click on “File“. You’ll see a dropdown menu with several options.
Click on “Save As“
Step 2 – Change File Format to PDF
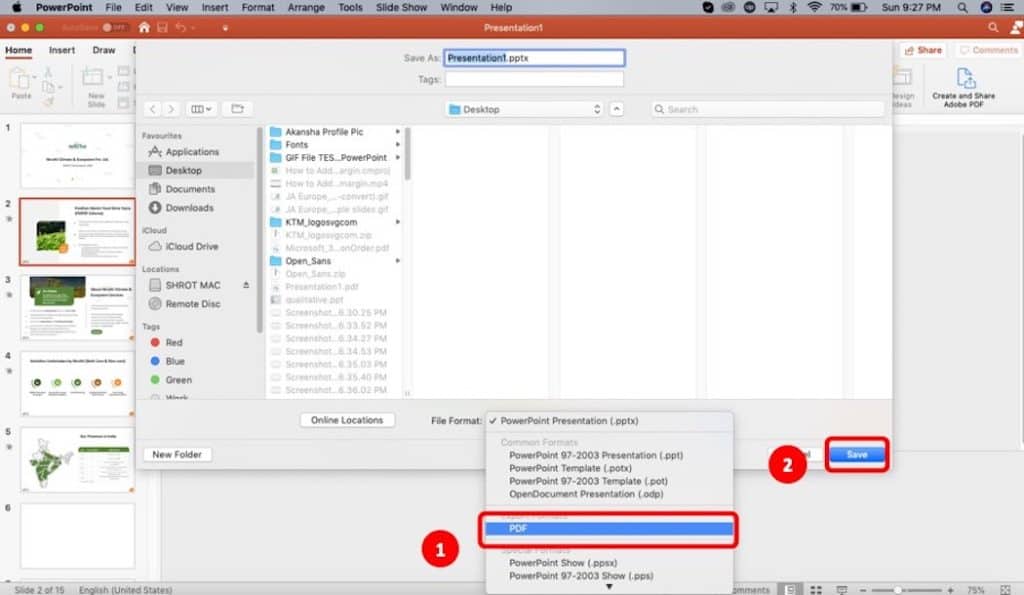
When you choose the “Save As” option, a window will pop-up asking you to choose the location.
Make sure you choose the correct location, and name the file appropriately.
Then, on the “File Format“, click on the dropdown (which will show PowerPoint by default), and select “PDF“
Lastly, click “Save“.
You’ll now have a PDF will that will show just the slides without the notes.
Method 2 – Use a Friend’s Windows PC
Well, if you really want to retain the flexibility to edit the file and retain the animations and transitions, then perhaps a good way to solve this problem would be to take some help from your friend or colleague.
If someone around the office has a Windows PC with a Microsoft Office installed on it, you could just ask them to remove all the notes using the process described above within minutes.
This is perhaps one of the easiest of the three methods.
However, if you don’t have access to a Windows PC and you definitely want to delete notes from PowerPoint, then perhaps method 3 well definitely be the most helpful.
Method 3 – Remove All Notes from Mac by Running a Macro (Advanced)
The only sure-shot way of removing all the notes in one go is by running a macro in PowerPoint.
Although this method is an advanced technique, however, if you follow the below steps, it will be a breeze. Thus, I will make sure to explain the steps in great detail so that you can easily follow along.
So, before we go into the process, I just want to highlight what all we shall be doing in order to solve this issue.
First, we shall be inserting a code (which I shall provide to you) in PowerPoint using the Visual Basic Editor. Then, we shall run the Macro. That’s it! Trust me, it is that simple!
So, let’s look at the detailed steps involved in deleting all notes from PowerPoint on Mac using Macro
Step 1 – Open Visual Basic Editor
The first step is to open the visual basic editor on PowerPoint as we shall be adding a few lines of codes to run a macro on PowerPoint.
An important thing to note here – if you are using PowerPoint 2013 or older software versions on Mac, then the visual basic editor will be under the “Developer” tab which would be just like any other tab such as Home tab, Insert tab, Design tab etc.
If you are unable to locate the “Developer” tab, then perhaps you will have to enable to make it visible. To do so, simply click on “PowerPoint” next to the apple icon in the top left corner of your screen, then click “Preferences”.
Next, choose “Ribbons & Toolbar”, scroll down on the left part of the window that pops-up, locate and click on “Developer”, and move it under “Customise the Ribbon” section of the window.
If you are using Office 365 or PowerPoint 2016 and above, the Developer ribbon is not available but all the options of this tab are available by default including the visual basic editor for PowerPoint.
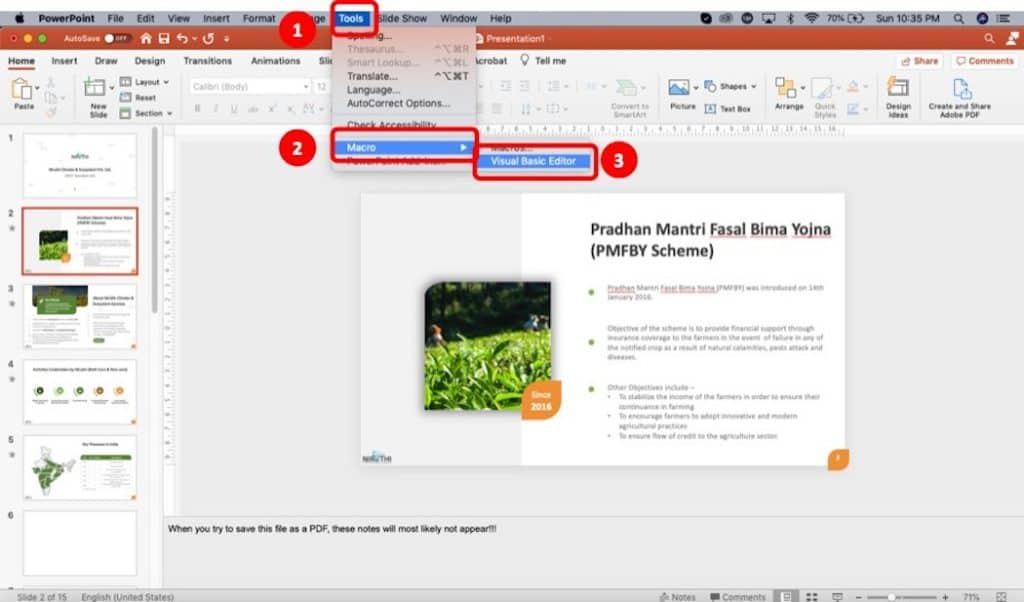
To open the visual basic editor, click on “Tools“. A dropdown menu will open up, click on “Macro“, and then on “Visual Basic Editor“.
Step 2 – Add the Code

A new window will pop-up. Don’t be intimidated with this window! There are a few basic and simple steps that we need to follow.
First, add a new “Module” by clicking on the button for adding a new module (as indicated in the image above). Then, a new blank window with white screen will pop open on the right.
Copy and paste the following code in this window –
Sub Zap()
Dim osld As Slide
For Each osld In ActivePresentation.Slides
With osld.NotesPage.Shapes(2)
If .HasTextFrame Then
.TextFrame.DeleteText
End If
End With
Next osld
End Sub
Once you’re done pasting the code, close the module window by clicking on the red dot on the top left corner of your screen.
Finally, close the visual basic editor window as well.
This was the hard part, and if you have managed to follow along so far, then the rest is going to be a cakewalk!
Step 3 – Run the Macro
The last step is to run the Macro that we have newly created.
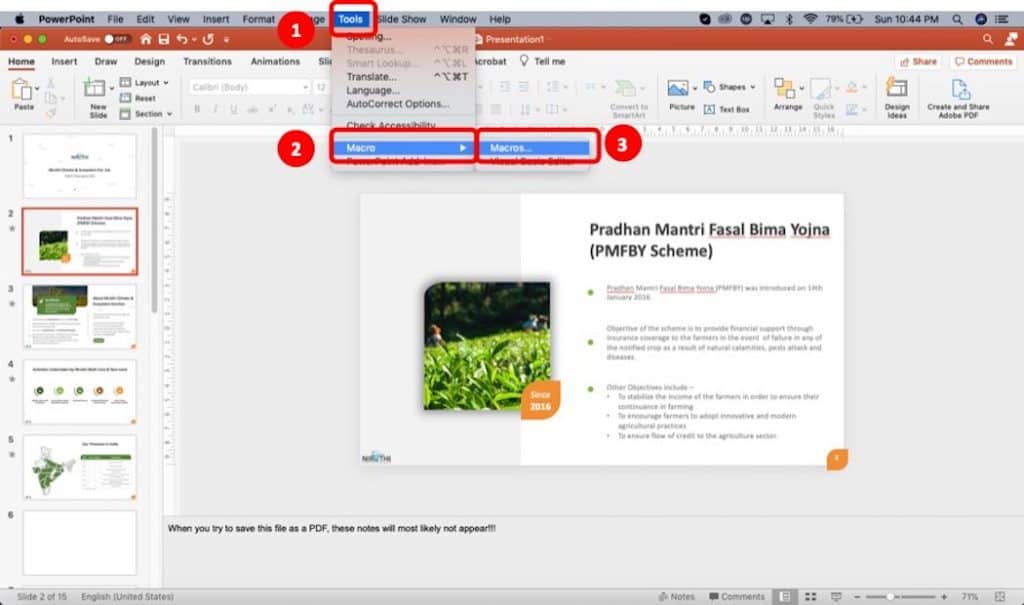
To run the macro, simply click on “Tools“. Then, click on “Macro“, and in the next menu, choose “Macros“.
For PowerPoint 2013 or older on Mac, you will find the option to run the Macro under the developer tab.
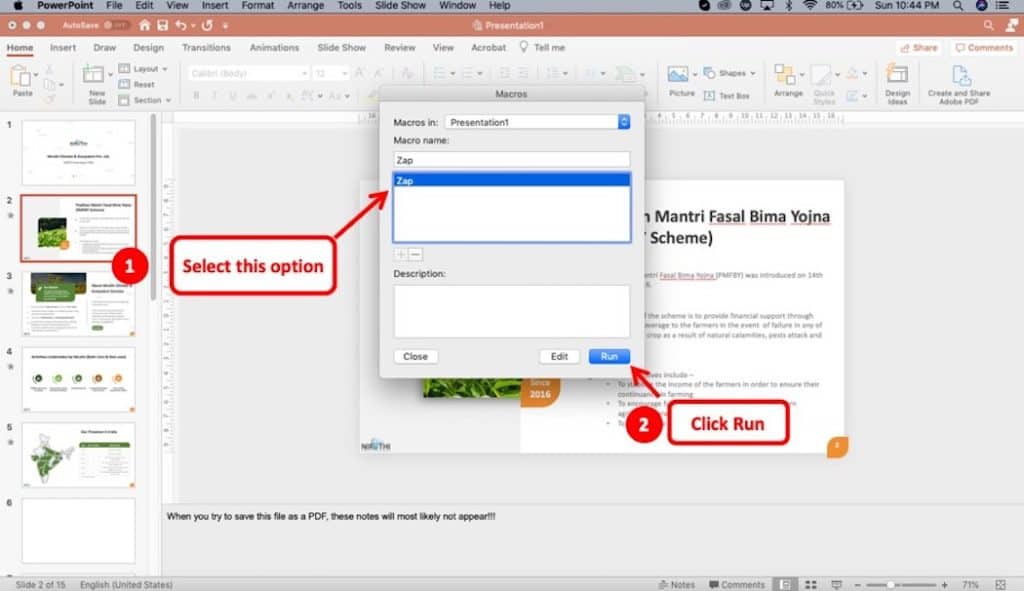
A new window will pop-up. Choose “Zap“, and lastly click “Run“.
Voila! You will notice that all the notes have been deleted from your PowerPoint File on Mac!
How to Hide Notes in PowerPoint?
Hiding your PowerPoint notes can be handy if you want to keep the notes in your presentation file, but just don’t want to show it to other colleagues during a meeting.
You might also want to hide notes to prevent people from seeing how and why you did certain things in your presentation.

Hiding notes is pretty simple. All you need to do is just click on “Notes” at the bottom of your PowerPoint Window (as indicated in the image above) and you will be able to toggle between enabling and disabling the notes section.
How to Recover Deleted Notes in PowerPoint?
Ok, so you or one of your colleagues have made a mistake and have done something that they shouldn’t have while using the inspector. Don’t worry, we have a little trick up our sleeves. First, we need to know where AutoSave files go.
Where are the AutoSave files saved?
Microsoft has implemented a recovery system that allows you to go back and look for previous versions of your work. These are autosaved files. Not many people know about this or how to use it.
To recover Notes, the best way is to recover previous versions of your presentation by accessing the AutoSave files. These files are usually saved in this location: C:\Users\<username>\AppData\Local\Microsoft\Office\UnsavedFiles
Method 1 -By using AutoRecovery
This method is the easiest and can be done from within the PowerPoint software itself. It is mainly used if you forget to save your presentation. You must be using PowerPoint 2010 or above in order to use this feature.
Whenever you start a new presentation you should always set AutoRecovery to on and have it save at least every 5 minutes.
- Go to the “File” tab which can be found on the top left. A Drop-down menu will appear.
- Go to a tab called “Recent”. This will present another menu.
- Look for an option called “Recover unsaved presentations”.
- Find the version of your project that you wish to recover, select it.
- Open the file.
- Save the presentation in order to make it the default version of your presentation.
Method 2 – Recover your PowerPoint Presentation Manually
If your version of Office does not have the recovery option, You will need to look for the files manually.
- Go to “File Explorer” through windows explorer.
- Go to this location C:\Users\<username>\AppData\Local\Microsoft\Office\UnsavedFiles
- Find the version you are looking for. PowerPoint Temp files are named as such “pptxxx.tmp” the xxx is the number of the save.
- Open the file and save the presentation.
Using the Inspector Tool in PowerPoint
The inspector is a powerful PowerPoint document management tool. Some presentations are just a few short slides while others can be hundreds of slides. When our presentation gets too big, managing it can become a little bit daunting and time consuming. This is how you use the PowerPoint Document Inspector:
“File” >> “Info” >> “Check for issues” >> “Inspect Document”.
You will now have a small pop-up window where you can easily manage your presentation without having to individually comb through each slide in your presentation. The inspector makes PowerPoint just that little bit more powerful and easy to use.
The thing with using the inspector is you need to make sure that you do not make mistakes because most things done using the inspector can not be undone.
Thus, it is recommended that you save a copy of your presentation every time you are about to open the inspector. This will eliminate a lot of stress.
If you do, however, end up making a mistake with the inspector tool, you can recover your lost data using the AutoRecovery method described above. That said, I wouldn’t want to rely completely on AutoRecovery as I don’t have complete control on what all has been saved and what information does PowerPoint recover.
What all can you do with the Document Inspector Tool?
In the PowerPoint inspector, you can search your presentation for a certain type of content and it will find all of those. You can then remove that content from your presentation. The type of content that can be found is as follows.
- Personal information such as author name and details.
- Embedded Documents
- Content add-ins
- Comments, Notes, and annotations.
- Macros, Forms, and ActiveX Controls.
Final Thoughts
I feel like there needs to be easier ways of recovering lost or deleted files. As Microsoft keeps updating its Office products, I am sure that over time they will make it easier. They are constantly working on making their products more efficient and more accessible.
Until then, we need to use the methods mentioned above in this article. They shouldn’t be difficult especially if you follow the steps correctly. The goal of this article was to make your life easier and hopefully, we did.