2020 has been a year that has changed the way we conduct business. More and more people are working remotely and we are relying more on presentations to convey information to our colleagues. This is where Google’s own Office suite software comes in handy. In this article, we will help you to learn how to Embed pretty much anything in Google slides!
To embed something in Google Slide, go to the “Insert” tab, and select the type of file or object that you want to embed. Google Slides allows you to embed images, video, audio, charts, and other objects such as shapes.
A lot of people are moving over to Google’s office suite mainly because it is free and easy to use. That being said, not everybody has the time to go through everything there is to know about Slides. After all, most of us have jobs and we are trying to meet deadlines.
That’s why you have us! If you are looking for the only resource you need to become an expert in embedding whatever it is that you need to embed in Google slides, then you have come to the right place!
So, let’s get started.
A Quick Note Before We Begin – if you want to make jaw-dropping presentations, I would recommend using one of these Presentation Designs. The best part is – it is only $16.5 a month, but you get to download and use as many presentation designs as you like! I personally use it from time-to-time, and it makes my task of making beautiful presentations really quick and easy!
What all can You Embed in Google Slides?
Google Slides allows you to Embed pretty much anything that you would need to Embed in order to create a great presentation.
It also offers a variety of ways to embed files as you can often choose to embed things from websites such as videos from YouTube and/or videos from Google Drive. The same can be done with almost any type of embed that you want to do.
Let’s take a quick look at everything that can that you can embed in Google slides.
- Images: You can embed images from the Google image search, your google drive, your local computer, google photos, or using a URL. (I have a little trick up my sleeve to make your presentation images look incredible.)
- Videos: Videos can be embedded using a URL, from Youtube, or from your Google Drive.
- Audio: You can Embed Audio from your Google Drive or from Google Drives that you have access to. Embedding audio and video has a little snag to it, so I recommend that you keep reading.
- Charts: Google recently added a feature that allows you to update charts by updating the source data in Sheets and/or Excel.
Let’s take a detailed look at them one by one.
How to Embed a Video in Google Slides?
Adding videos to a presentation can make it look and feel very professional. If you aren’t the one making the videos, it may make it seem like you put more effort into the presentation than what you did. I suppose it is always good to work hard when you have to and work smart when you can.
By far one of the best features in Google slides is the ability too easily and efficiently embed videos into your presentation. There are a few ways in which you can embed videos.
Let’s take a quick look at how to embed Youtube videos into your Google Slides presentation.
How to Embed YouTube Videos in Google Slides?
Embedding YouTube Videos in Google Slides is pretty easy. I’m going to be sharing with you two methods in which you can do this.
Method 1 – Using the Search Function
The first method of embedding a video in Google Slides is using the search function within Google Slides. This allows you to search for a video on the internet and directly insert it in your Google Slides presentation. Let’s go through the steps –
Step 1 – Identify the Video
Make sure you know which video you want as the search function does not seem to respond well to broad terms.
Step 2 – Proceed to Insert Video
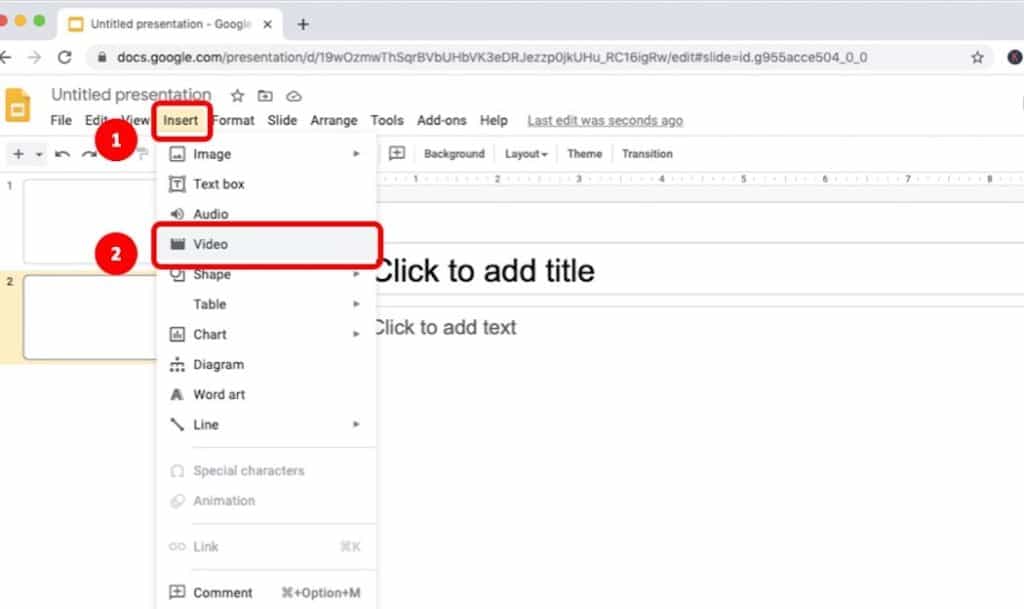
To begin the process of inserting a video in Google Slides, click on the “Insert” tab.
You’ll notice that a dropdown menu appears. Scroll down and select “Video” from the dropdown menu.
Step 3 – Search for the specific Video
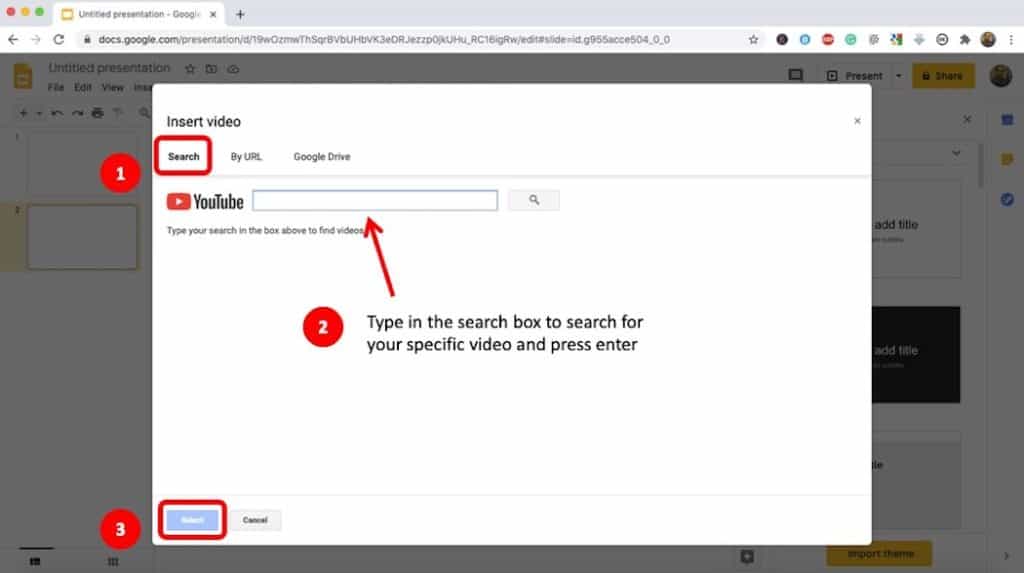
You’ll now see that a little pop-up box will appear on your screen. Make sure you are looking for the video under the “Search” option.
Then, type in the video in the search box that you want to embed. Try to be as specific as possible with your search term.
Step 4 – Locate and Embed the Video in Google Slides
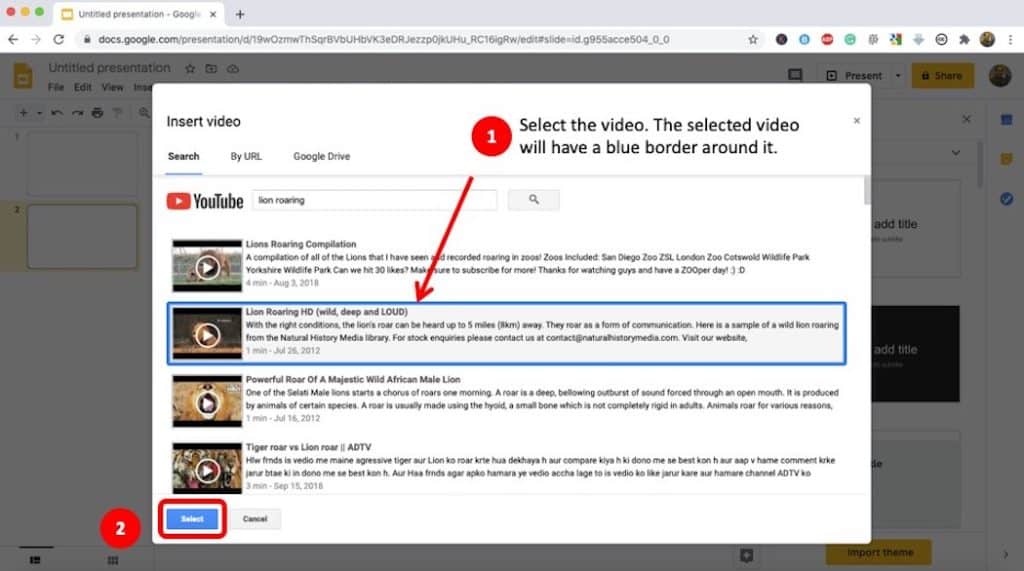
Once you found the video, select it. The video will have a blue border if it is selected.
Then, click “Select” in the bottom left of the pop-up window and you are done with that part.
The video will be embedded in Google Slides. You may want to resize the video as per your requirement.
Do remember that you will only be able to play the video when you put the presentation in the “Present” mode.
This can be done either by pressing Ctrl+Enter (or Cmd+Enter on Mac) or clicking on the “View” tab and then selecting “Present”.
Method 2 – Using a URL of the Video
There is another way to embed Youtube videos into your presentation and some people actually say it is easier. Some of the initial steps are exactly the same so we will skip that for now.
Step 1 – Identify a Video
As we did in the first method, we will need to try and think of what type of video that we need to embed in Google Slides. The difference here is you can actually look for that video first on YouTube.
Go to Youtube and find the video that you want to embed and copy the URL from the browser address bar.
Step 2 – Proceed to Insert the Video
This step is similar to step 2 that we did in the previous method.
In google slides, go to the “Insert” tab and select it. Then, from the dropdown, select “Video” and you will get a little popup box.
Step 3 – Paste the URL of the desired Video
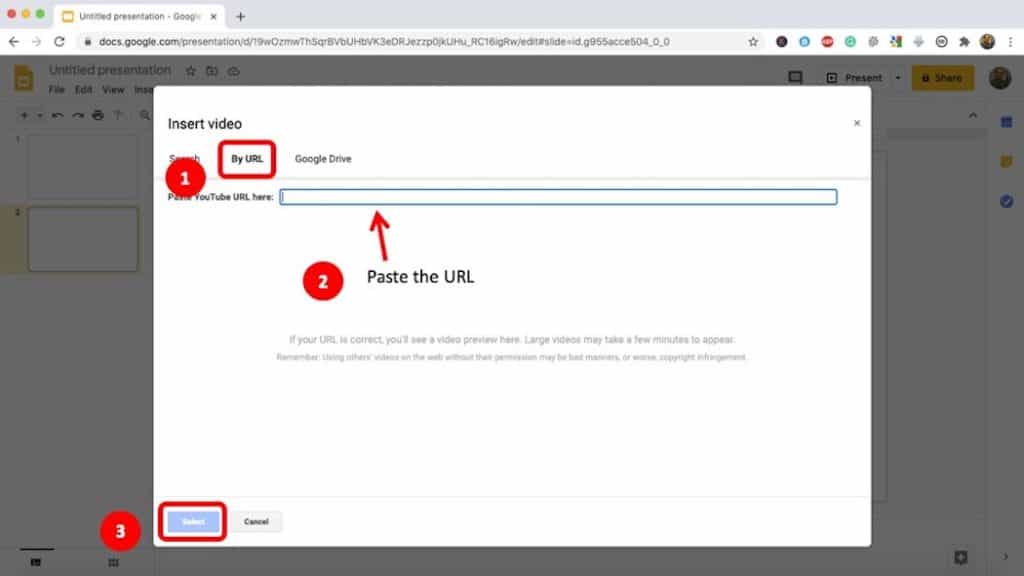
In the pop-up window that comes up, you will see an option to insert the video by “URL”. Make sure that you select it.
You will then be presented with a space to paste the URL. Paste the copied URL into the empty field. The video will now be displayed and you can preview it.
Once you’ve confirmed that the correct video is displayed, click “Select” in the bottom left of the popup window and you are done with that part.
Lastly, resize the video. Line it up with your other elements on the slide and you are done!
How to Embed a Non-YouTube Video in Google Slides
If you have your own video that is currently hosted on any other platform like YouTube and you want to you use it in your Google Slides presentation, you can definitely do that as well.
To embed a non-YouTube video in Google Slides, you will need to have the video saved in your Google Drive. Then, from the Insert Menu, select Video. Choose the Google Drive option, and search for the video from your Google Drive. Locate the video, and click Select.
This process is very similar to adding a youtube video. However, there is one very important thing to remember, anybody who views the presentation will need access to that file. So, you will need to share the folder-link with anyone who you want to view the video.
You can also use videos that have been shared with you on other people’s Drive. For now, let’s go through a quick step by step on how to embed non-youtube videos.
Step 1 – Identify and Locate the Video
Before you begin the process of inserting the video from Google Drive, make sure you know exactly which folder is it stored on your Google Drive.
Step 2 – Proceed to Insert the Video
The step is the same as what we covered in the previous methods. Simply go to Insert, and choose “Video” from the dropdown menu.
Step 3 – Choose Google Drive
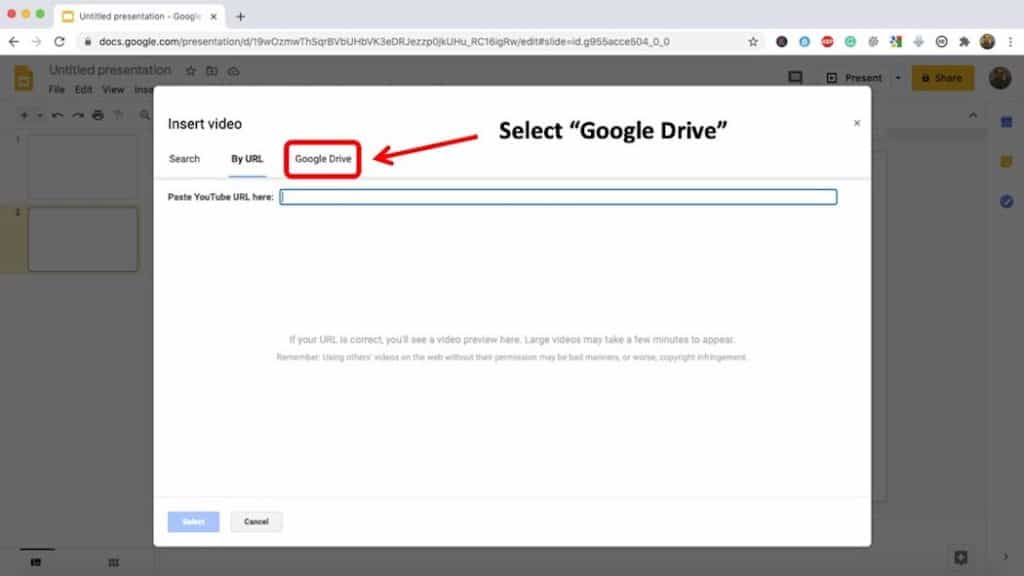
When you choose “Video” from the dropdown menu, you will get a pop-up window which has multiple options on the top. By default, “Search” option will be selected.
Make sure you select the “Google Drive” option.
Step 4 – Locate and Embed the Video
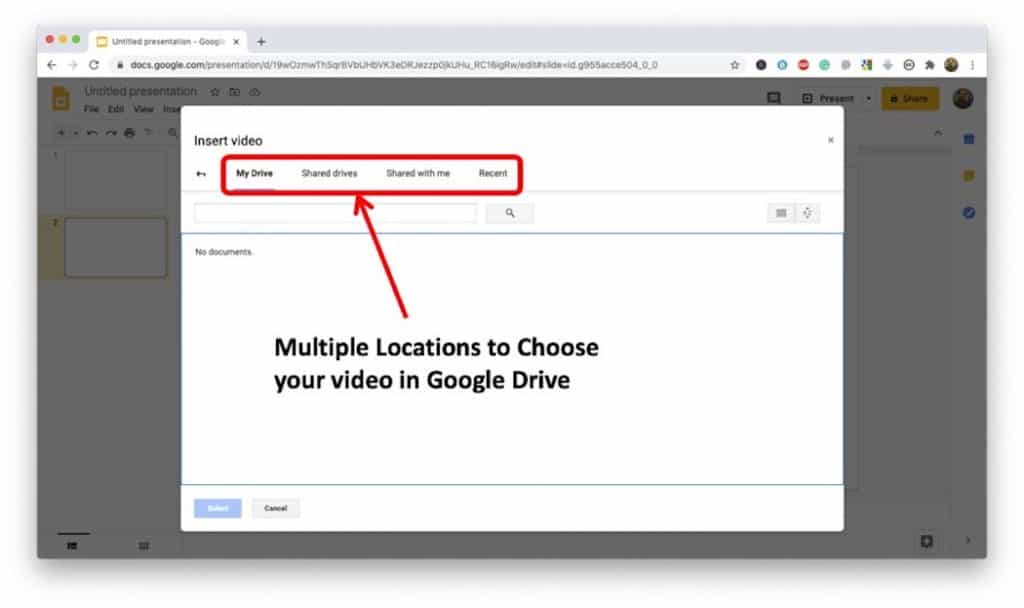
When you click on “Google Drive”, you will see four new options, My Drive, Shared Drives, Shared With Me, and finally, Recent. Select whichever one of those options.
Choose your desired video. Make sure it is selected.
Click “Select” at the bottom left of the window. Your video will be embedded in your presentation.
How to Embed Audio in Google Slides
Adding audio to your presentation gives it a touch of class that isn’t often seen very much. If you are trying to impress somebody, this is the way to do it.
To embed an audio file in Google Slides, you will need to have the audio file saved in your Google Drive. Then, from the Insert Menu, select Audio. Finally, search and locate the audio file in your Google Drive, and click Select.
There is only one option for this, you need to have the audio in Google drive. That means that the same rules apply as that of embedding a video.
Once the audio file has been embedded, there are lots of options that you can play around with. These options allow you to have a bit of extra control. These options are:
- Start playing: This can happen on click or automatically.
- Volume adjuster
- Loop audio
- Stop when a slide changes: This means you can have the music play during one slide only or through the entire presentation.
The rest of the options just have to do with the audio icon and its placement.
Now, let’s get into the step by step process of embedding an audio file into your presentation.
Step 1 – Proceed to Insert the Audio File
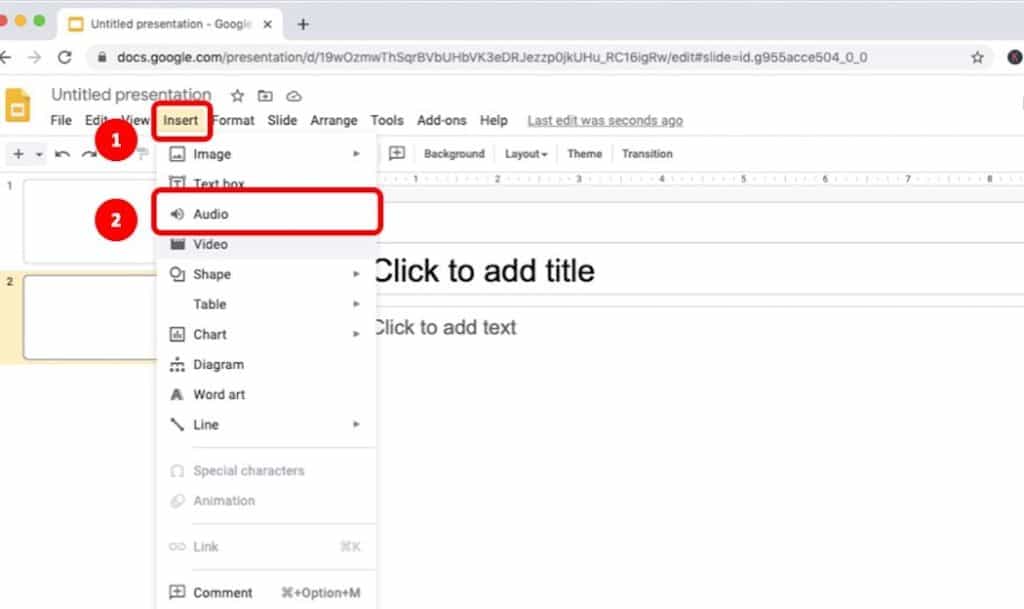
As I mentioned earlier, the process for embedding an audio file is similar to that of a video file. Thus, just as we did in while embedding a video file, click on “Insert” tab, and from the dropdown, select “Audio“
Do note that there is no preview mode when selecting audio files, so, be sure to know the file name of the song you want to add.
Step 2 – Locate and Embed the Audio
Upon selecting the “Audio” option, a pop-up window will appear with three options, My Drive, Shared With Me, and Recent.
This pop-up menu is similar to that we saw while embedding the video in the earlier methods.
Select the right option to locate the audio file. Then, click on the audio file that you want to embed.
Lastly, click on the “Select” button in the bottom left corner of the pop-up window and your song will be embedded.
How to Embed Charts into Google Slides?
One of the main reasons why we make presentations is to present data. It used to be that slides did not have a function to properly link charts with their data source. That has changed and we are going to take a quick look at how to embed and then link charts in google slides.
I’m going to be sharing with you two methods on how we can insert the charts. Let’s look at the first method.
Method 1 – Embed an Existing Chart
In this method, we will be using a chart that is already existing on another Google Sheet. When you add it like this, the chart is automatically linked to its data source.
Furthermore, if you have data in an excel sheet. Simply upload it to your Google Drive before beginning this process.
Step 1 – Proceed to Insert an Existing Chart
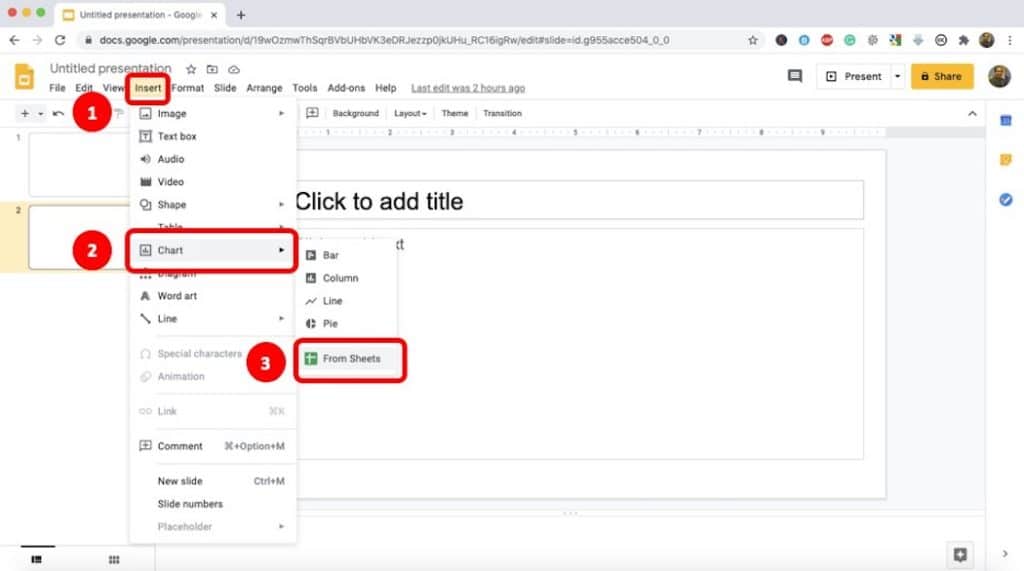
To embed a chart from an existing sheets file, simply click on “Insert“. You’ll see a dropdown menu appear. Choose “Charts” from the dropdown menu.
You’ll see another dropdown menu that appears on the side. Choose “From Sheets” from this menu.
This will pop-up a window which will allow you to choose the sheets from which you want to insert a chart.
Step 2 – Locate and Embed the Chart
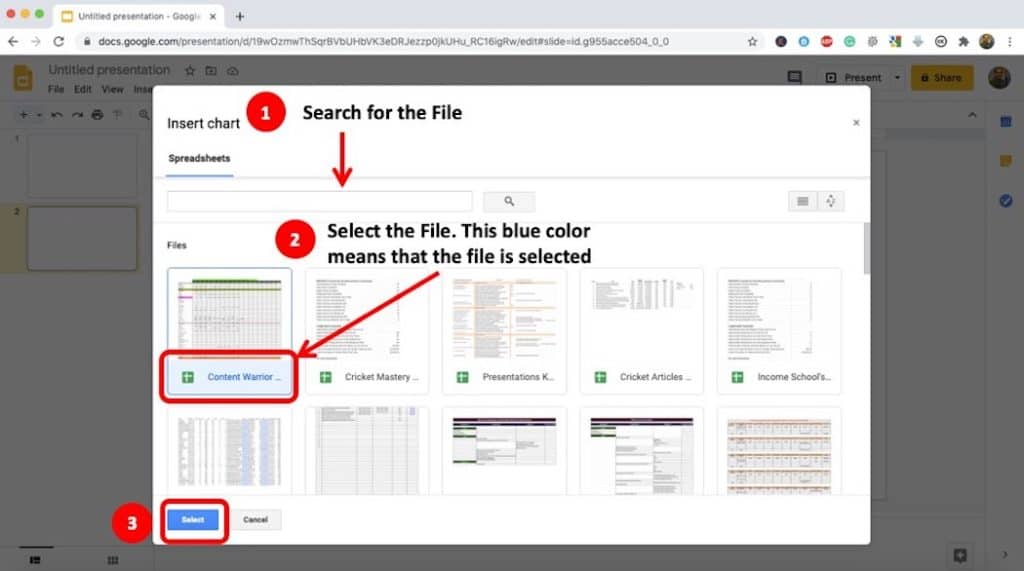
In the pop-up window (as indicated in the image above), search for the file by its name if you are unable to locate it directly. Then, select the file.
When you have selected the file, you will notice that the background under its name becomes blue in color. Once the file is selected, click “Select“
That’s it! You’re done!
It is important to note that if you don’t have a chart in the file that you have selected, Google Slides will show an error and ask you to choose the correct file. Simply double-check if you have selected the correct file and repeat the process.
Method 2 – Embed a New Chart with its Own Data Source
For this method, you do not create a chart on google sheets. This method creates a data source automatically. You can then create or input the data into that sheet.
Since the process is quite similar to the one described in Method 1, I will not go into the detailed step by step explanation.
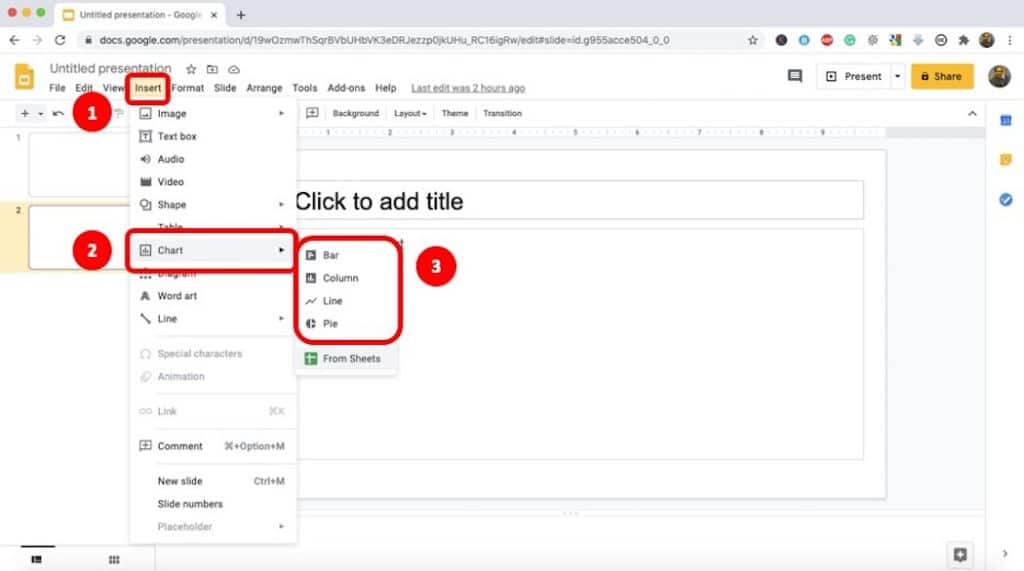
Just remember that once you’ve clicked on “Insert“, and then “Charts“, in the next step instead of selecting “From Sheets”, you need to select one of four options, Bar, Column, Line, or Pie.
That’s it, you are done. You can now edit the chart directly.
How to Embed Images in Google Slides?
Before we get started on this section, I did say that I was going to give you a little trick to make your presentations stand out with the images you decide to use.
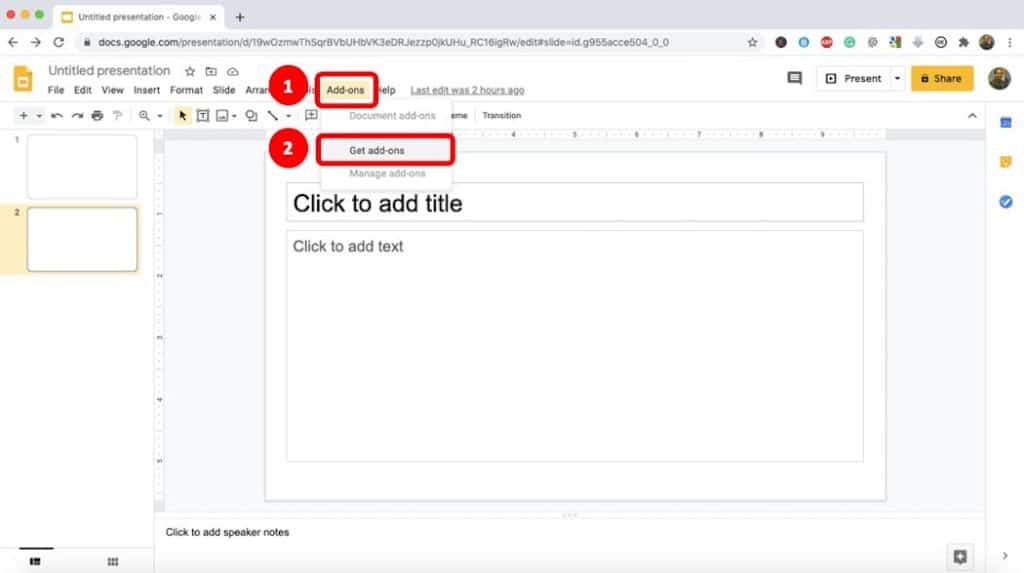
In Google slides, you want to go to the add-ons menu, click on “get add-ons”, and look for an add-on called Unsplash images.
The images on this website are completely free, there is no catch and there’s no copyright. The images are of high quality. Giving credit to the person who took the image is always recommended but that will be difficult in Slides so don’t worry about it.
Now, let’s get back to the tutorial.
I’ll be sharing three methods to embed images in Google Slides. Let’s start with the first method.
Method 1 – Embed Images from the Web into Google Slides
The first method is by embedding images directly from the web.
Step 1 – Proceed to Insert Image from the Web
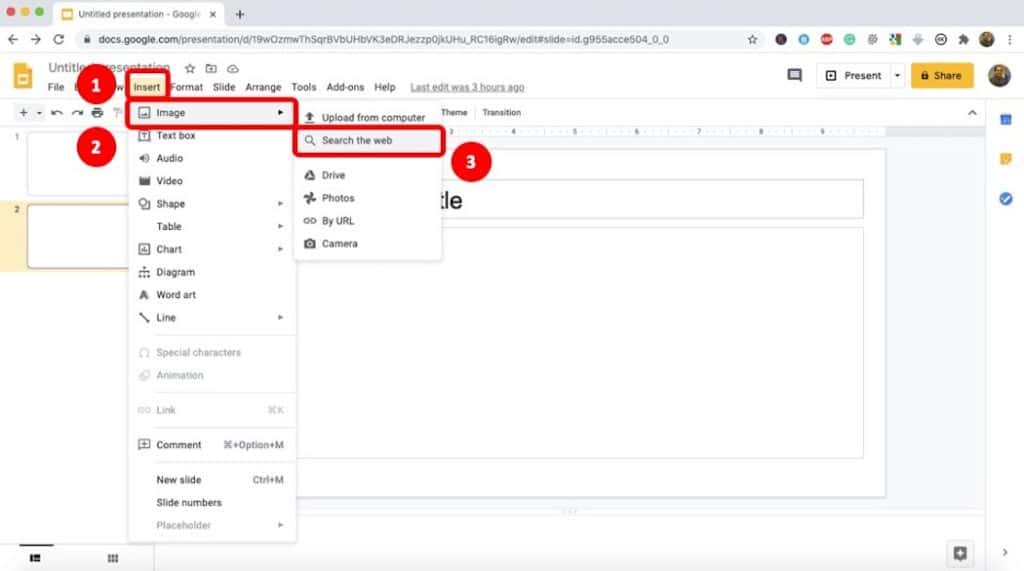
Go to the “Insert” tab. Select “Image”. A pop-up window will appear that says “Search Images”. On the mac, you will be shown the option directly in the dropdown menu that opens up upon clicking Images. Then, select “Search the Web“
Step 2 – Search and Embed the Image
When you click on search the web, Google Slides will open up a sidebar that allows you to search Google Images.
Search for the image you want. When you have found the image, simply drag and drop it into your slide. Resize and align your image and you are done.
Method 2 – Embedding Images from into Google Slides
Unsplash is a great alternative to some of the paid-for stock photo websites. In my experience, using these images would definitely elevate your presentation to a higher level, that is of course if you are using images in your presentations.
As mentioned earlier, you will first need to install the Unsplash add-on.
Step 1 – Install the Unsplash Add-on
First, you will need to install the Unsplash Images Add-on.
To do that, click on “Add-ons“. In the dropdown, select “Get add ons“. A new window will pop-up.
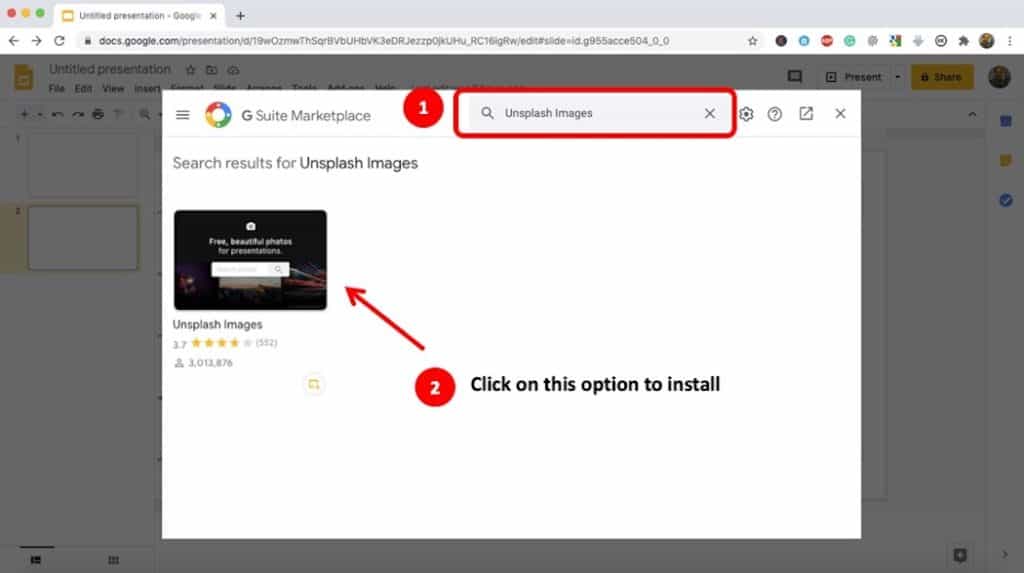
Search for “Unsplash Images“, and when the search result appears, select the Unsplash Images. The window will then prompt you to install it. Go ahead and click install.
You will now have successfully installed Unsplash Images Add-on for your Google Slides.
Step 2 – Insert an Image using Unsplash Add-on
Once you’ve installed the add-on, you will now be able to access it under the “Add-ons” menu in Google Slides.
Simply go to the “Add ons” tab once again. You should see an option called “Unsplash”. Hover your mouse over it. A dropdown will appear. Select the “Insert an Unsplash image” option. Search for an image.
Again, just drag and drop the image of your choice.
That’s it! It’s that simple.
Method 3 – Embed Google Drive Images into Google Slides
The third method is using the images that are saved in your Google Drive. It is quite similar to the process that I described in the embedding an audio file from Google Drive. So, I won’t be sharing any screen-grabs.
I’m hopeful that you will be able to follow along using the below steps –
- Make sure you know where the image is stored.
- In slides, go to the “insert” tab.
- Select “Image”. A pop-up window will appear.
- Select the “Google Drive” option.
- Select “My Drive” or “Shared Drive”.
- Choose your desired image.
- Drag and drop.
Few Things that you CANNOT Embed in Google Slides
Google is constantly working to improve their google suite offerings. So, all the features that aren’t there right now, will most likely make their way to Slides eventually. For now, it has enough features for most people to make great presentations already.
Embedding Google Data Studio Charts into Google Slides
Unfortunately, there is currently no way to Embed your Data Studio content into slides. You cannot even copy and paste it as an image. I am sure that Google will address this but for now, it cannot be done.
Some other things that cannot be Embedded in Slides, these are the most important ones in my opinion.
- Cannot Embed Google Forms.
- Cannot Embed HTML or HTML boxes.
- Cannot Embed Iframe but you can do it the other way around. Ie, you can embed your Google Slide into iframe.
More About Google Slides
Here’s some more information about Google Slides that you need to be aware of –
What is Google Slides?
Google Slides is Google’s answer to programs like PowerPoint. It allows you to create and share presentations. These presentations could be for work, school, or just about anything. It is part of Google’s ever-growing office Suite package. The programs that are included in Google Suite are all mostly free to use.
How can you Use Google Slides
First, you need to have a Google account and be signed in. When you’re logged into Google you will see a small little square box made up of 9 little dots on the top right-hand of your screen. Click that box and it will display all the packages that Google Suite has to offer. Scroll through the items until you find “Slides”.
When you first try to use any of these programs including slides, you might have to Grant Google permissions and agree to terms and conditions, but after that, there isn’t much to do. You just use the software when you want to use it.
Is Google Slides FREE?
Yes, Google slides is free to use and so is just about every piece of software in the Google Suite lineup. This includes Sheets, Docs, Slides, Forms, and most recently Google Data Studio.
Is Google Slides worth it?
Google Slides allows you to easily create presentations for free. There is no installation of software, it just simply works. In my experience, Google Slides is a great alternative to other presentation software.
Final Thoughts
Life can get very busy with work, family, and other commitments and we often don’t have the time to learn new things through trial and error. That is why my goal in this article was to deliver all the information needed to make your life easier.
Many people are switching over to Google Slides as it offers a certain level of convenience. Seeing as the software is free and easy to use, I can understand why people are making the switch.
If you enjoyed this article, be sure to bookmark the page as a reference. We upload new content often, so, be sure to check in every now and then for more.