![How to Align in PowerPoint? [A Comprehensive Guide!]](https://artofpresentations.com/wp-content/uploads/2021/07/Featured-Image-How-to-Align-in-PowerPoint.jpg)
Knowing how to align text or objects in PowerPoint with respect to each other can save you a ton of time! PowerPoint actually provides the tools so that you can align elements as per your desire directly instead of using a mouse! So, you may be wondering, how exactly do you align in PowerPoint?
To align text in PowerPoint, select it first. Then, from the “Home” tab, choose the preferred horizontal (left, right, center, justified) and vertical (top, middle, bottom) alignment. To align shapes, select them first. Click on the “Shape Format” tab, “Align”, and choose the preferred setting.
I understand that the short answer above may leave you with a few questions! So, in this article, I will do a deep-dive of how exactly should you use the align tool in PowerPoint with tips that will help you save some time and frustration!
So, let’s get started!
1. How to Align Text in PowerPoint?
When it comes to aligning text in PowerPoint, there are really two options that are available – horizontal alignment, and vertical alignment.
To align text in PowerPoint, simply select the text inside the shape or text box. Then, click on the “Home” tab, and choose from the left, center, right, and justified alignment. You can also set the vertical alignment to the top, middle, and bottom align settings within an object.
The “Alignment” buttons can be found under the “Paragraph” section of the “Home” tab (if you are using PowerPoint on Windows). You can also open the “Paragraph Dialog Box” and adjust the settings accordingly.
In the subsection below, I will be describing how to left align, right align, justified align, and center align text and also how to use the vertical alignment keys in PowerPoint.
1a. Left Align
To align text to the left in PowerPoint, select the text that you are going to realign. Then, click on the left-most alignment key called the “Align Left” option in the “Paragraph” section of the “Home” tab. The icon looks like four horizontal lines aligned to the left.
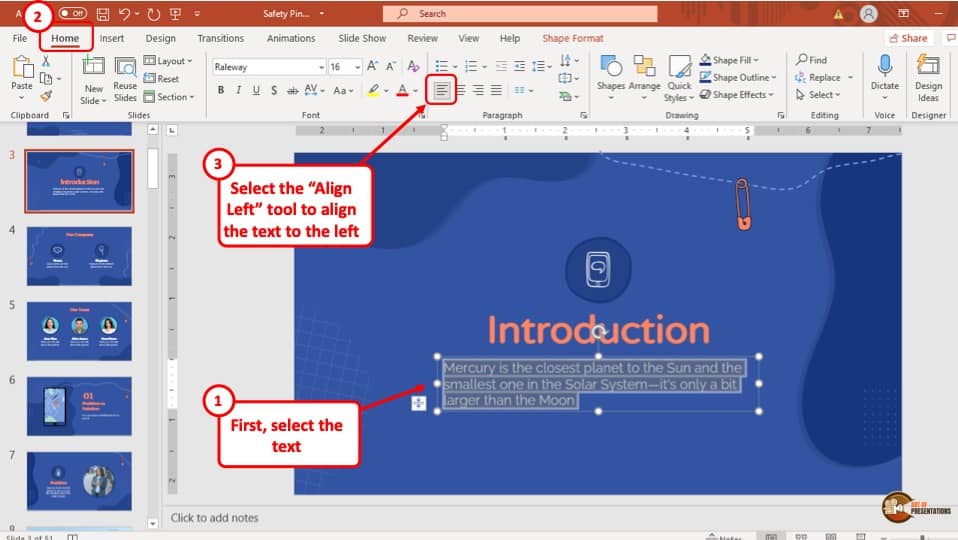
Alternatively, you can press the “CTRL + L” keys simultaneously on the keyboard of your computer and the text will align to the left automatically.
1b. Right Align Text
To align your text to the right, simply select the text that you want to realign and then select the “Align Right” option in the “Paragraph” section of the “Home” tab. The icon looks like horizontal lines aligned to the right. It is the third icon of the “Alignment” keys.
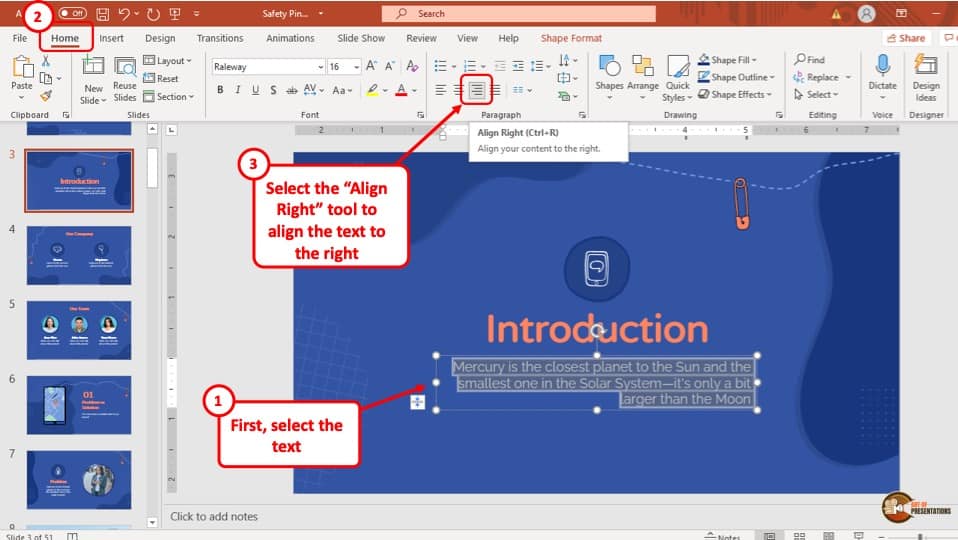
Alternatively, you can press the “CTRL + R” keys simultaneously on the keyboard of your computer and the text will align to the right automatically.
1c. Centre Align Text
To align text along the center of your PowerPoint Presentation, select your preferred text and hit the “Align Centre” option from the “Paragraph” section of the “Home” tab. It is the second icon of the “Alignment” keys, and it looks like four horizontal lines aligned in the middle.
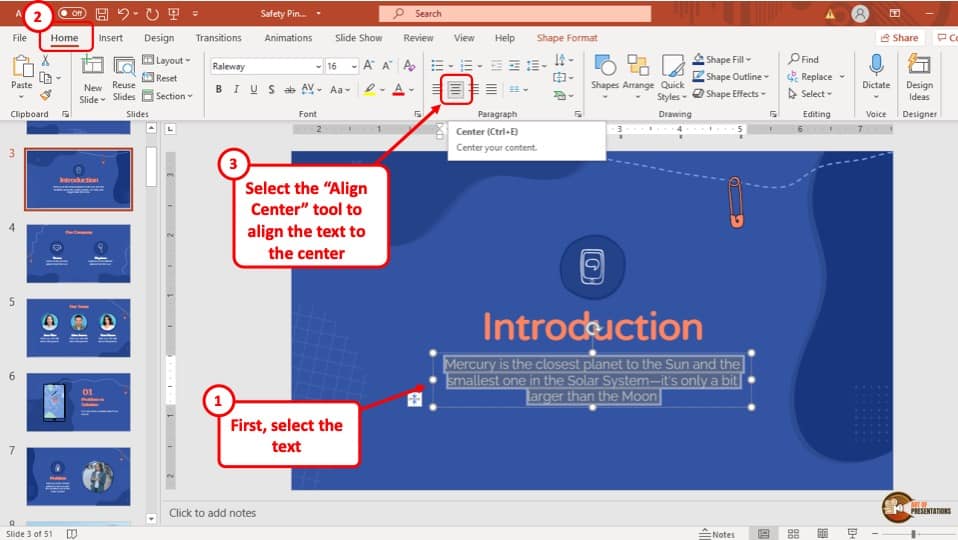
Alternatively, you can press the “CTRL + E” keys simultaneously on the keyboard of your computer and the text will align to the center automatically.
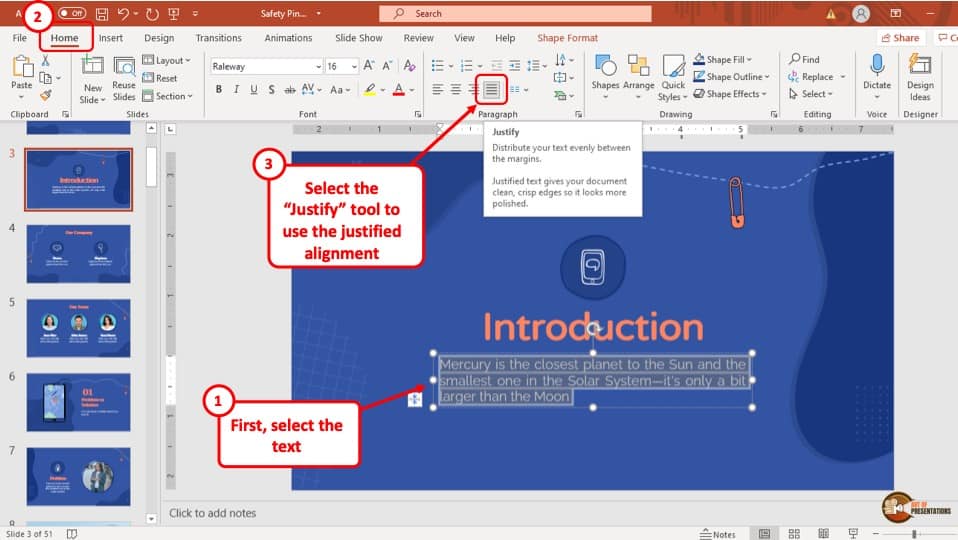
1d. Justify Text
Using the justified alignment allows you to fit the text evenly inside a shape or a text box from left to right. So, the text basically takes up all the space that is available inside the element.
To justify text in PowerPoint, select your desired text and then click on the “Justify” button. The icon looks like four uniform horizontal lines stacked on top of each other and it is the right-most icon of the “Alignment” keys.
1e. Vertical Alignment of Text within Text Box (Top, Middle, Bottom)
You can also adjust the vertical alignment of text within a text box or a shape. Here’s how to do that –
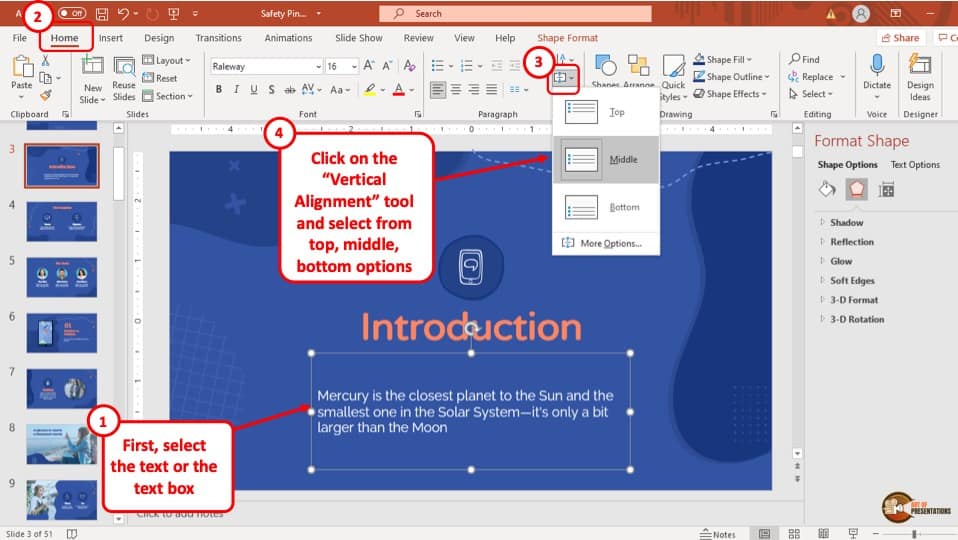
To change the vertical alignment of texts within a text box, you have to click on the “Align Text” button in the “Paragraph” section of the “Home” tab. After selecting your preferred text, simply click on the “Align Text” button and select the vertical alignment that you wish want from the drop-down menu.
Related Article – How to Format Text Text in PowerPoint? [A Comprehensive Guide!]
2. How to Align Text Box in PowerPoint?
To align a text box in your PowerPoint presentation, you have to use the “Align” option from the “Arrange” section of the “Shape Format” tab. The whole process is described in 3 easy steps given below.
Step-1: Select the text box
The first step is to select the text box that you want to change the alignment of. Simply click on the border of the text box to select it.
Once selected, the border of the text box will be visible on your screen.
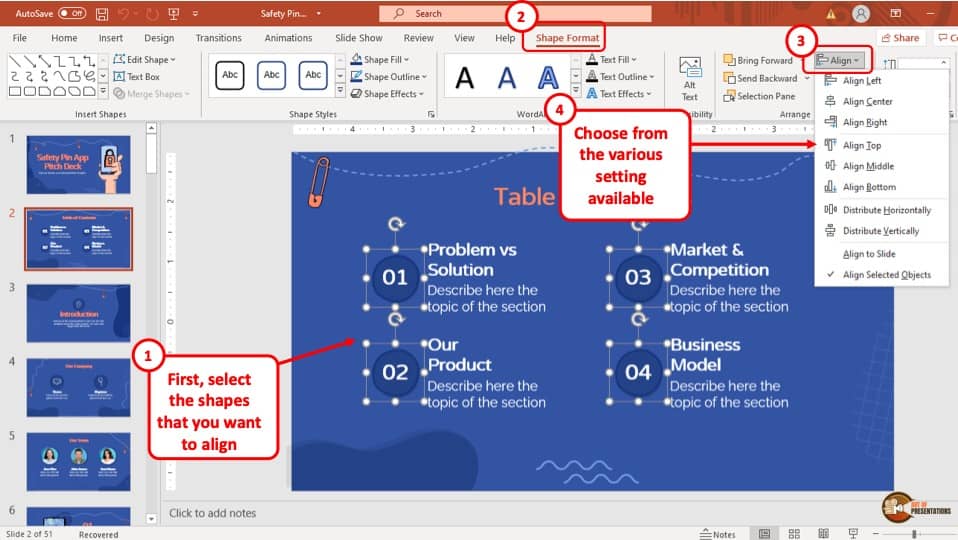
Step-2: Click on the “Align” button
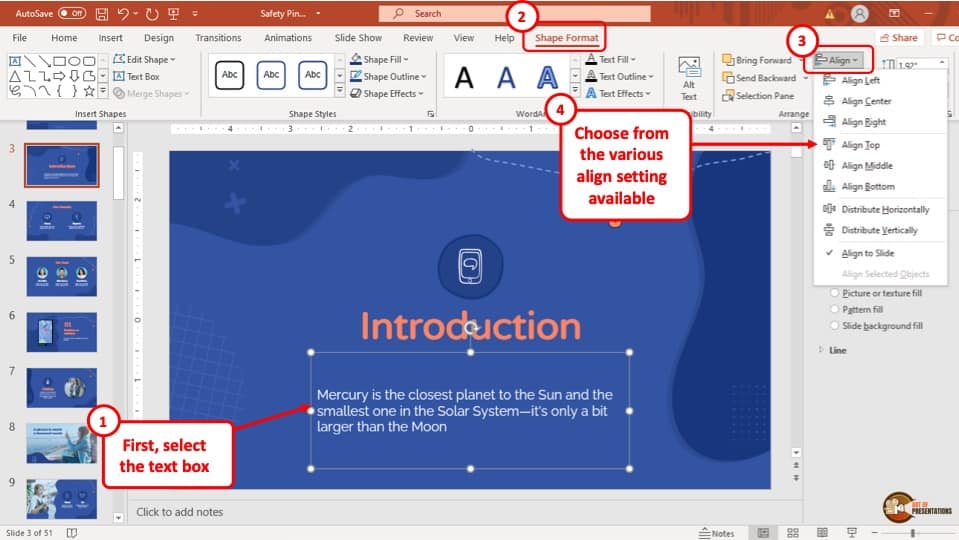
Once the text box has been selected, head on to the “Shape Format” tab and click on the “Align” button which is located in the “Arrange” section of the tab. A drop-down menu will appear on your screen.
Step-3: Select your preferred alignment
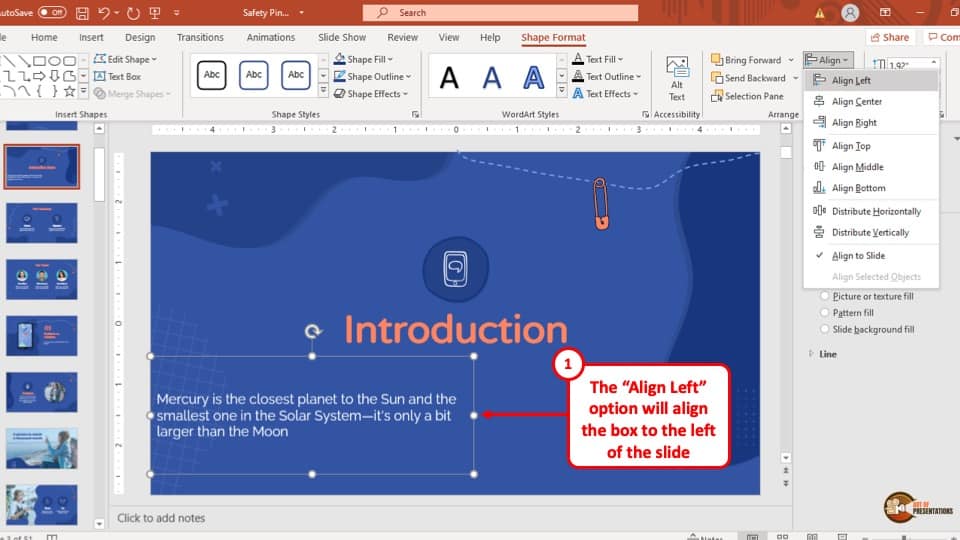
The drop-down menu offers a range of horizontal and vertical alignment options. From the “Align” drop-down menu, select your preferred alignment for the text box and the alignment of the text box will change accordingly.
3. How to Align an Object to the Slide?
To align an object in your PowerPoint presentation, follow the steps given below.
Step-1: Select the object
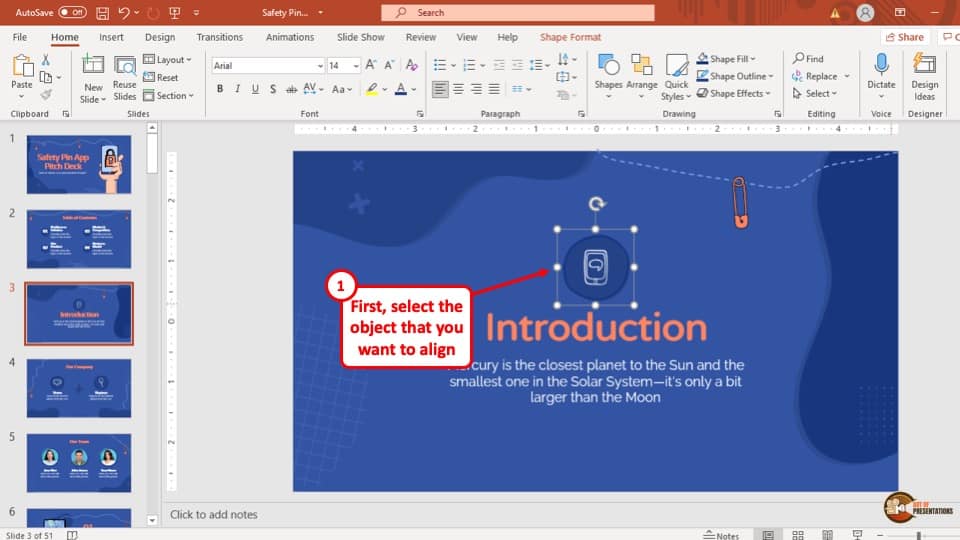
To begin, go to the slide which has the object that you want to align. After that, click on the object to select it. Once the object is selected, it will have a white outline with points on it.
Step-2: Select your preferred alignment
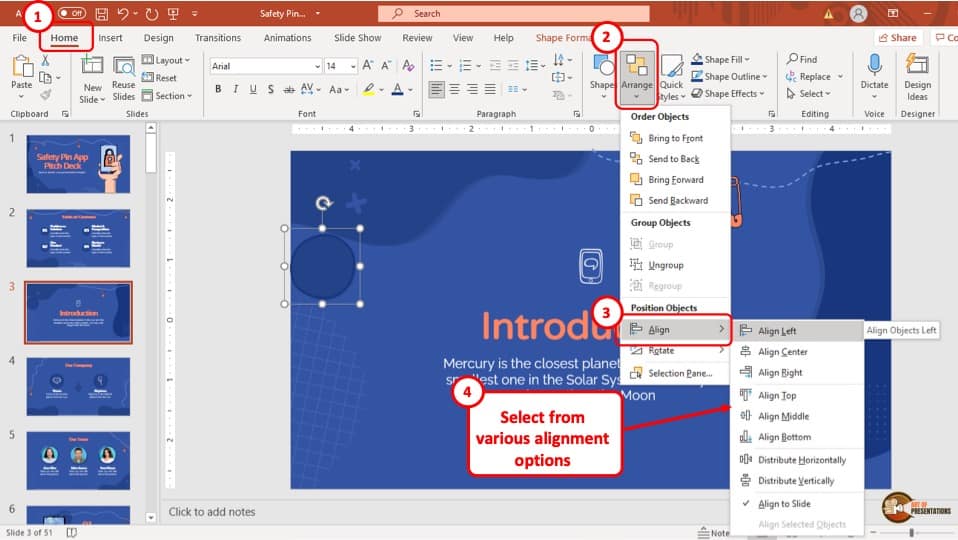
While keeping the object in your PowerPoint selected, click on the “Arrange” option from the “Drawing” section of the “Home” tab.
From the drop-down menu, go to “Align”, which will open another drop-down menu to show you all the alignment options available for the object. Simply choose your desired alignment option to finish off.
4. How to Align Two or More Objects?
To align two or more objects in the slide of your PowerPoint presentation, you have to select all the objects simultaneously and then change their alignment. The whole process is described step-by-step below.
Step-1: Select the multiple objects
To select multiple objects from your PowerPoint presentation, you have to use the “Shift” key on the keyboard of your computer. Simply click on the objects that you want to change the alignment of while also holding the “Shift” key on the keyboard of your computer simultaneously.
This way multiple objects will be selected together.
Step-2: Click on the “Align” option
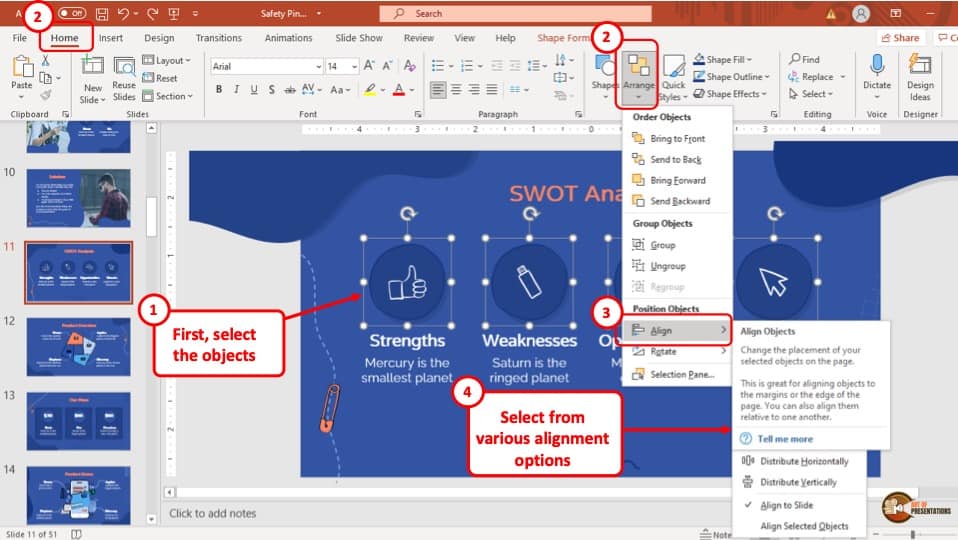
Once you have selected your preferred objects, click on the “Align” option from the “Arrange” drop-down menu which is located in the “Drawing” section of the “Home” tab in the ribbon of your PowerPoint presentation.
Step-3: Select your preferred alignment.
Once you go to the “Align” option from the “Arrange” drop-down menu, yet another drop-down menu will appear on your screen.
From this drop-down menu, to arrange the object on top select the “Align Top” option. To arrange them at the bottom, select the “Align Bottom” option. To align them to the left, select the “Align left” option. To align the objects to the right select the “Align right” option.
Likewise, to align the objects in the middle select the “Align middle” option and finally to align them to the center, select the “Align center” option.
I’ve actually written a detailed article on how to format shapes in PowerPoint. Make sure you check out that article to learn more about it!
5. Shortcut to Align in PowerPoint?
You can use specific keyboard shortcuts to align texts, objects, pictures, or anything you want in Microsoft PowerPoint. Just follow the shortcuts given below:
- To Align on the top of the page simultaneously press, “CTRL + ALT + SHIFT + T”
- To Align on the bottom of the page simultaneously press, “CTRL + ALT + SHIFT + B”
- To Align to the left of the margin simultaneously press, “CTRL + ALT + SHIFT + L”
- To Align to the right of the margin simultaneously press, “CTRL + ALT + SHIFT + R”
- To Align in the middle of the page simultaneously press, “CTRL + ALT + SHIFT + M”
6. How to Arrange and Distribute Objects in PowerPoint?
This might sound a little tricky, but simply follow the steps below to arrange and distribute objects in Microsoft PowerPoint:
Step-1: Select the objects
The first step of the process is to select all the objects that you want to arrange and distribute in the slide of your PowerPoint presentation.
Simply select all the objects while simultaneously holding the “Shift” key on the keyboard of your computer.
Step-2: Go to the “Align” option
After selecting the objects go to the “Shape format” tab in the ribbon. In this tab, click on the “Align” option which is located in the “Arrange” section. A drop-down menu will appear on your screen.
Step-3: Select your preferred distribution
In the drop-down menu, there are two options called “Distribute Horizontally” and “Distribute Vertically.”
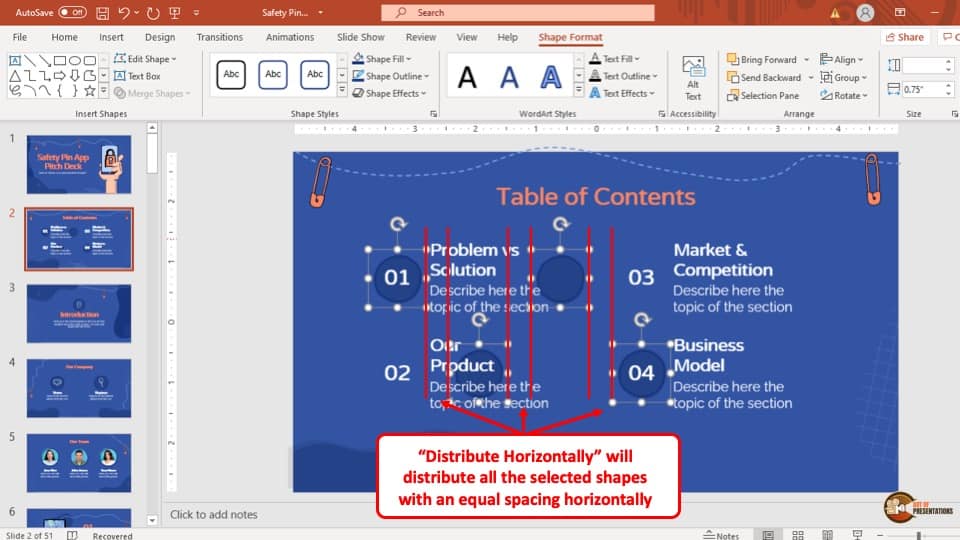
To distribute the objects horizontally, click on the “Distribute Horizontally” option. This will make the objects align horizontally relative to their current position and the position of the other objects.
To distribute the objects vertically, click on the “Distribute Vertically” option.
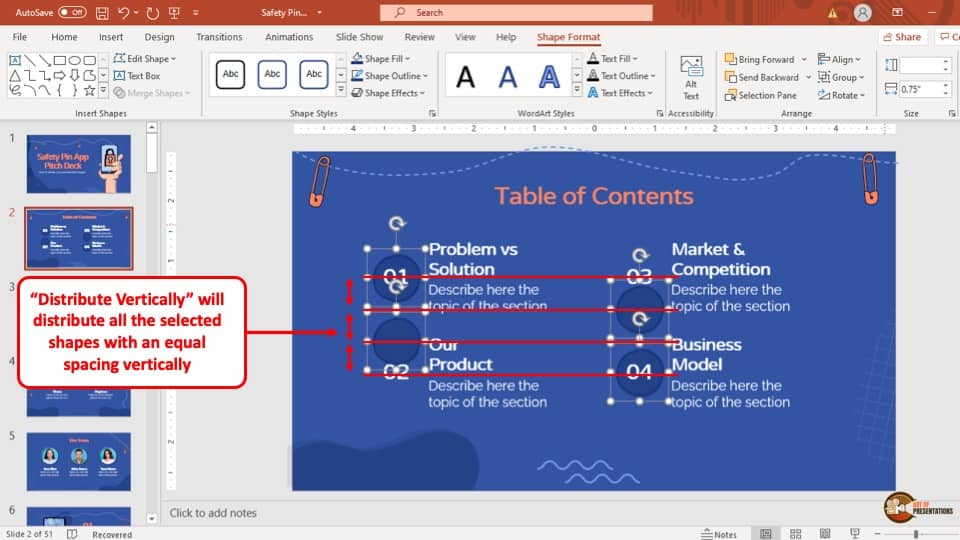
This will change the arrangement of the object to vertically align relative to its current position and the position of the other objects.
As you will notice, simply clicking on the options does not uniformly distribute the objects in the slide of your PowerPoint presentation.

To make sure that the objects are uniformly distributed, select the “Align Top” or “Align Bottom” option after selecting the vertical or horizontal distribution, according to your preference, to uniformly distribute the objects across the slide.
7. How to Use Smart Guides to Align in PowerPoint?
Smart guides help to accurately place objects and precisely position them. Furthermore, PowerPoint also allows you to snap objects automatically to the smart guides.
If you want to use smart guides in Microsoft PowerPoint, you have to turn it on in the “View” tab of the PowerPoint presentation.
The whole process of using Smart Guides is described step-by-step below –
Step-1: Select the “Guides” check box
The first step of the process is to turn on the “Guides” to use them. Simply go to the “View” tab and click on the checkbox beside “Guides” which is located in the “Show” section of the same tab.
A vertical dotted line and a horizontal dotted line intersecting each other will appear on the slide of the PowerPoint presentation.
Step-2: Duplicate the guidelines
You can move the dotted lines and position them anywhere on the slide. Simply place them on one of the objects or a position where you want to accurately place objects.
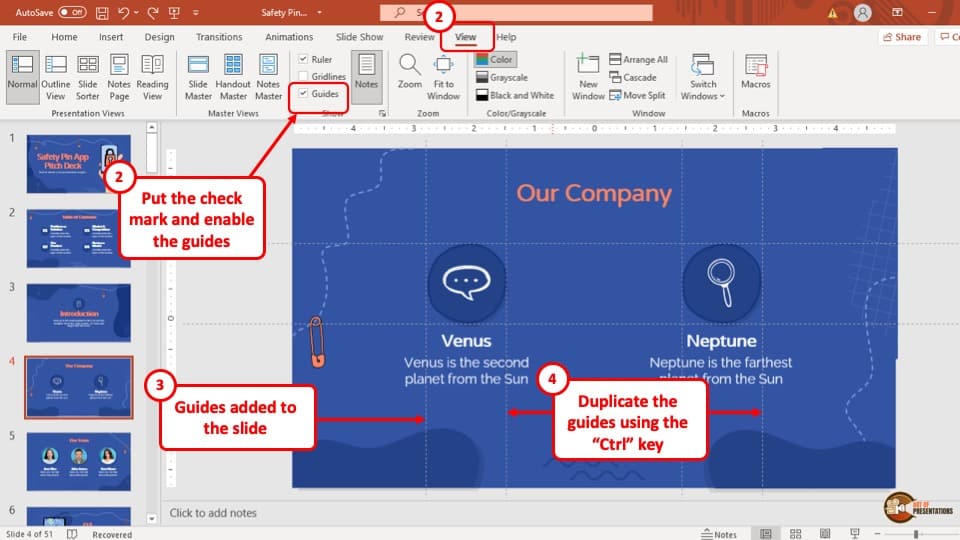
Moving the horizontal or vertical dotted line while simultaneously holding the “Ctrl” key on the keyboard of your computer will make a copy of the dotted line and you can place the copied line in the preferred position.
In this way, you can use the smart guides to accurately arrange the objects in your PowerPoint presentation manually.
8. How to Turn Off Auto Align in PowerPoint?
To turn off auto-align in PowerPoint you have to go to the “Grid Settings” of the PowerPoint presentation you are working on. Follow the simple steps explained below to turn off the auto-align option.
Step-1: Go to the “Grid Settings” pop up window

At first, you have to go to the “View” tab where you will find the “Show” section. At the bottom right corner of the “Show” section there is a tiny arrow pointing towards the bottom right corner (as shown in the image above).
Click on the tiny arrow and a pop-up window will appear.
Step-2: Untick the “Snap objects to Grid” box
After clicking on the arrow, a new pop-up window called “Grid and Guides” will appear on your screen. Simply untick the box right beside “Snap Objects to Grid”.
Then, hit the “Ok” button at the bottom right corner of the pop-up window to turn off auto-align in your PowerPoint presentation.
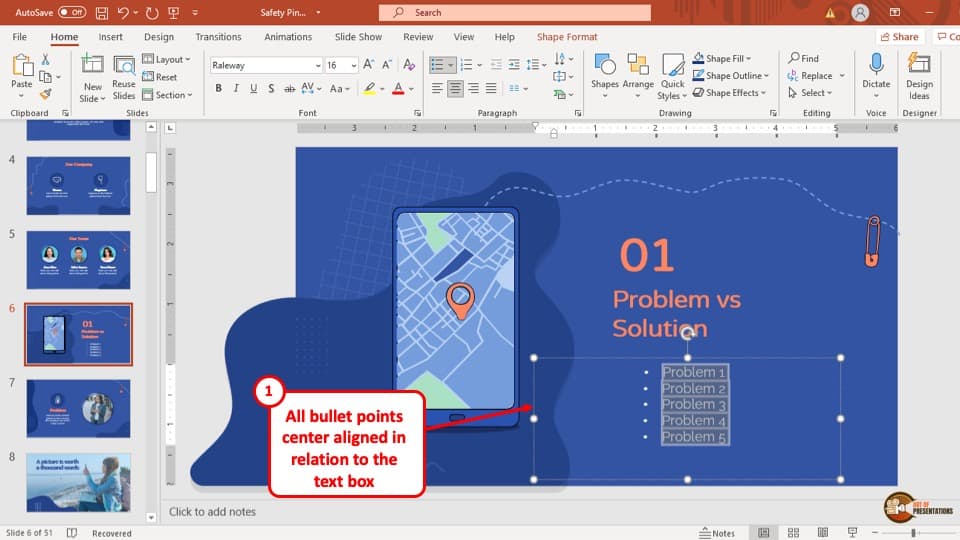
9. How to Align Bullets in PowerPoint?
To align bullet points in your PowerPoint presentation, follow the easy 3 step process described below.
Step-1: Select the bulleted texts
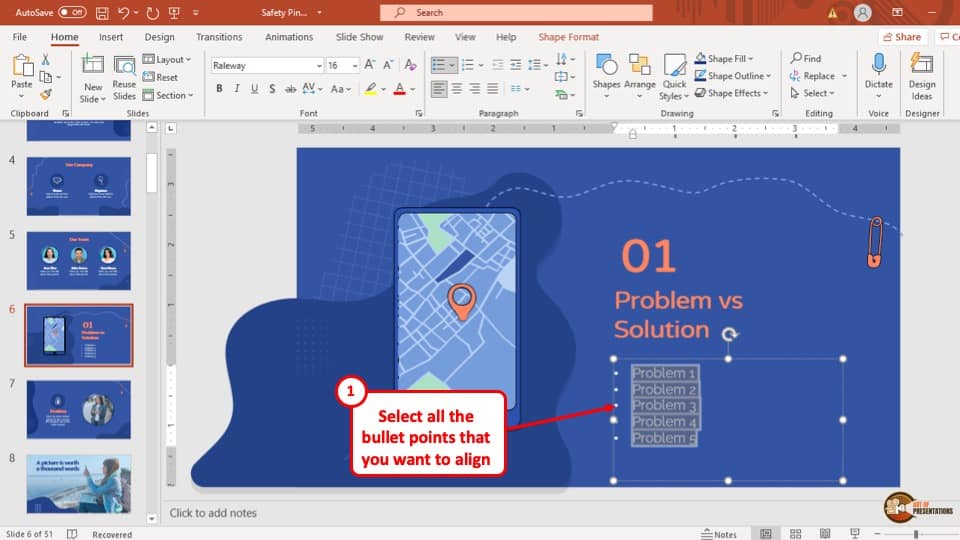
The first step of the process is to select the bullet points you want to align or change the alignment of.
Step-2: Click on the “Align” option
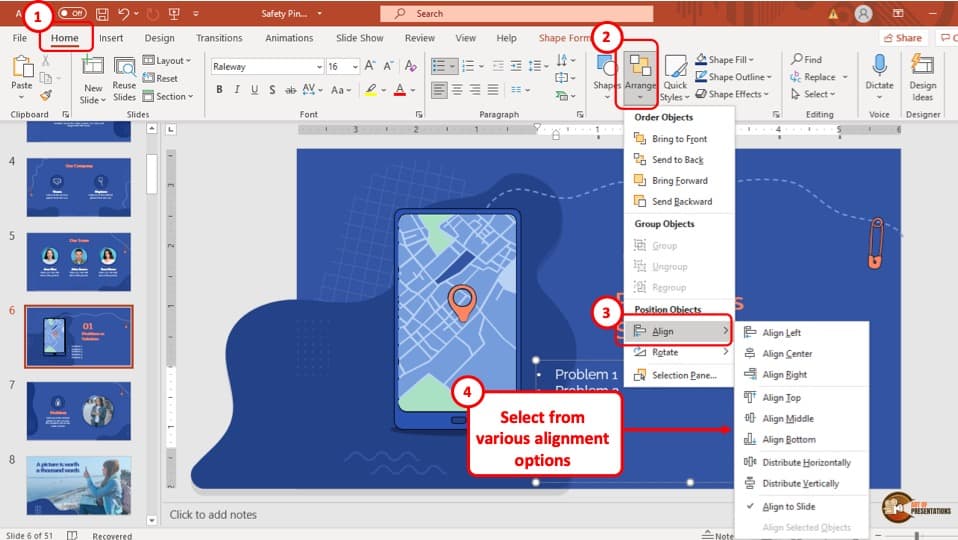
After selecting the bullet points, click on the “Align” option from the “Arrange” drop-down menu which is located in the “Drawing” section of the “Home” tab of your PowerPoint presentation.
Step-3: Select your preferred alignment
In the drop-down menu of the “Align” option, there are several alignment options to choose from. Simply click on your preferred alignment and all the selected bulleted text will change its alignment accordingly.
10. How to Align Titles on All Slides in PowerPoint?
To align titles on all Slides in your PowerPoint presentation, you have to use the “Slide Master” view and edit the title in the “Master Slide.” The whole process is described in easy steps below.
Step-1: Go to the “Slide Master” view
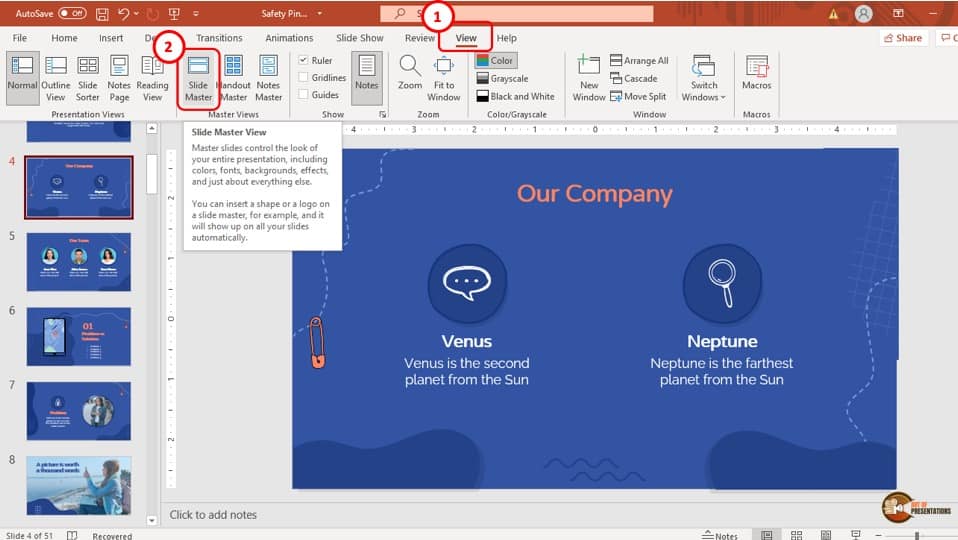
The first step of the process is to go to the “Slide Master” viewing option. To do that, simply click on the “Slide Master” button from the “Master Views” section located in the “View” tab of your ribbon.
Step-2: Change the title of the “Master Slide”
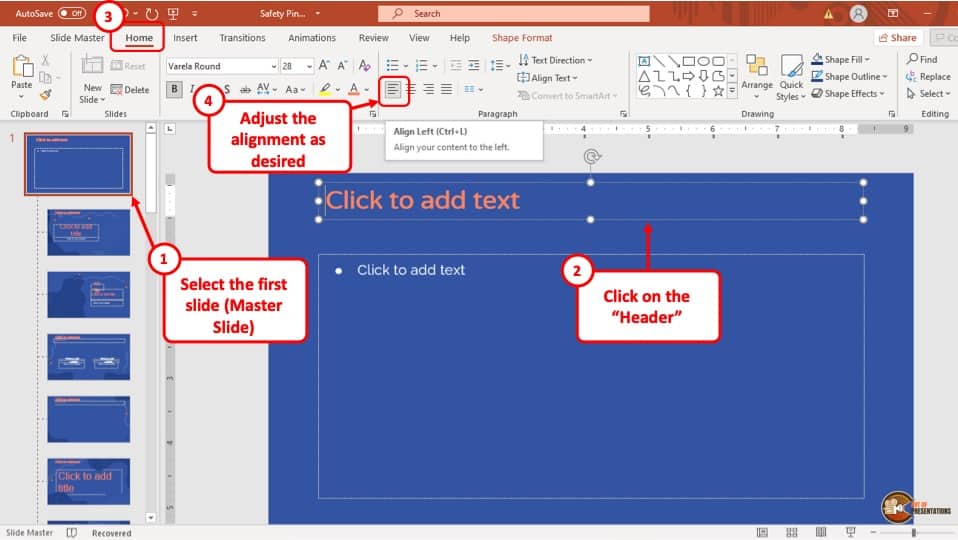
After opening the “Slide Master” viewing option, you will be able to edit the layouts of the slides in your PowerPoint presentation. The first slide in the “Slide Master” view is the “Master Slide.”
Any edit in this slide will result in the change to be applied in all the slides of your PowerPoint presentation. So, in this step, simply change the alignment of the title of the “Master Slide” and all the titles of the slides in the PowerPoint presentation will change accordingly.
Credit to wayhomestudio (on Freepik) for the featured image of this article (further edited).