
Videos are one of the key elements that can make a presentation very informative and also hold the attention of the audience. Adding a short and relevant clip to your presentation slide can help a lot to deliver your message clearly to the audience. Adding videos in Google Slides presentation is quite easy. Let’s understand how to do that!
To add a video on Google Slides, click on the “Insert” menu. Then, from the dropdown, click “Video”. You can then choose the source of your video file. You can add a video from YouTube, a web link, or from a local computer by adding the video to your own Google Drive account!
There are multiple other ways you can add a video to your Google Slides presentation. In this article, I am going to explain how to add a video on Google slides whether it is from your computer or smartphone, from YouTube, or from some other platform. So, let’s get started!
How to Add a Video in Google Slides?
As you may by now be aware, there are several ways to add videos in Google Slides. You can add videos from YouTube or add a non-YouTube video in your presentation slide.
I am going to walk you through these methods step-by-step so that you can easily understand how you can put a video in your Google Slides presentation.
How to Put a Video on Google Slides from YouTube?
YouTube has been owned by Google since 2006. As a result, it is very easy to integrate YouTube videos in many Google products such as Google Slides. It is the fastest way to put a video in your presentation slides. You can add YouTube videos on Google Slides in two ways.
Method 1 – Searching for YouTube Video through Google Slides
The first method is by searching for the desired YouTube video and adding it to Google Slides directly through the insert function. To do that-
1. First, open the presentation slide you want to put a video on
2. Now, choose the “Insert” option from the menu bar on the top.
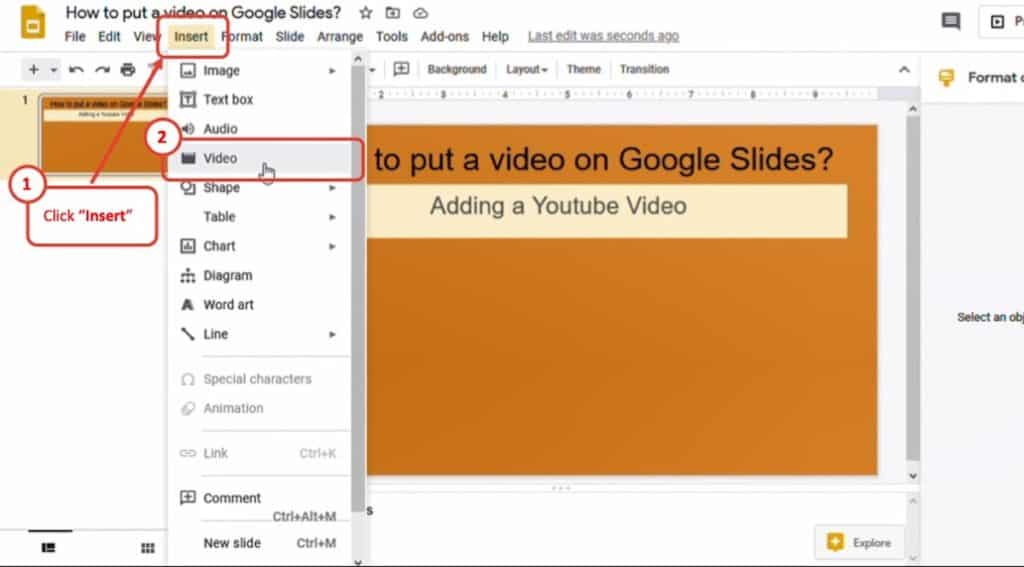
3. From the dropdown menu, select” Video”(as indicated in the image above)
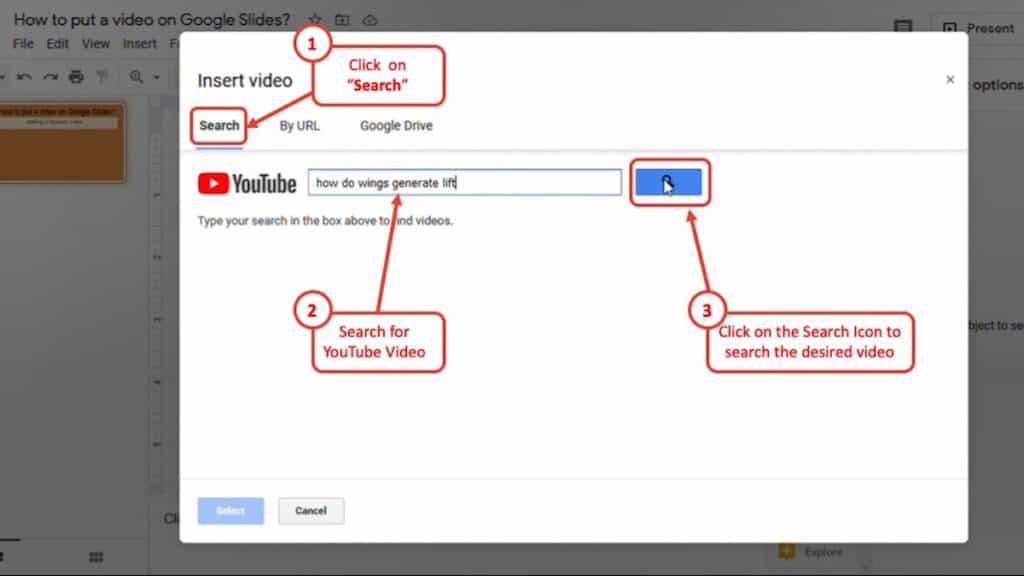
4. From there, a YouTube search bar will open. To find the video that you are looking for, type the keywords for that video in the search bar. After typing the keywords in the search bar and clicking on the search icon, you will see instant search results.
5. Now find your desired video from the search results and click on “Select”. The video will appear on your presentation slide.
Method 2 – Using YouTube Video URL
The second method using a YouTube video URL. This method is useful when you have the URL of the YouTube video that you want to put in your presentation slide.
Furthermore, inserting YouTube videos using a URL is the most convenient way to adding a YouTube video to your Google Slides presentation as sometimes, directly searching for the video using method 1 mentioned above doesn’t yield relevant results.
To follow the steps for this method, make sure you open the desired YouTube video in another tab or browser window. Search and open the video in that tab first. Then, copy the link from the address bar of your browser. The link should look something like – “youtube.com/watch?v=…..”
Once you have located the link, copy the link of the YouTube video and then proceed with the following steps –
1. Open the presentation slide to put the video on.
2. Choose “Insert” from the top menu bar.
3. From the dropdown menu that appears, click on “Video“.
4. A new window will open. Choose the “By URL” tab.
5. Now paste your desired YouTube video URL in the “Paste YouTube URL Here” bar. It will take some time to load the video depending on the video file size.
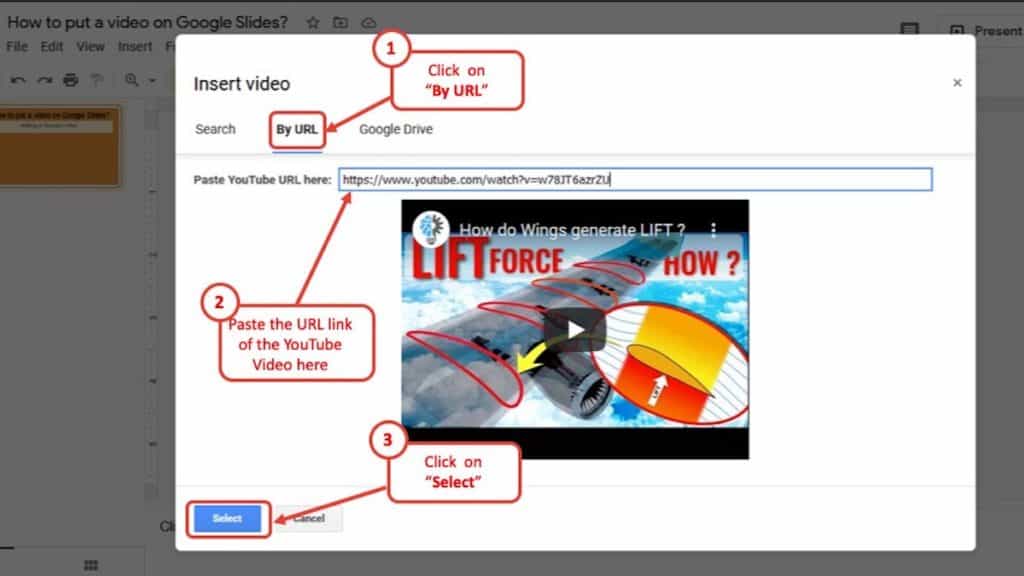
6. When the video file loads, press “Select“. The video file will appear in your presentation slide.
You can drag and drop the video files in your desired position to give the slide a polished look. Google slide also allows some video editing tools inside the application.
You can set the timer from when the video will start or when the video will stop, the size and position of the video player, and some minor customization to the video like transparency, blur radius, etc.
However, you cannot crop the video, but you can drag-drop and adjust the video player size to give your presentation a much cleaner look.
How to Insert a non-YouTube Video in Google Slides?
Other than putting the YouTube videos, one can also add non-YouTube Videos in Google Slides. You can either upload the video in Google Drive or then use the video in your presentation or you can add an outside video source with some extra work.
To insert a non-YouTube video that is stored in a computer, follow these steps –
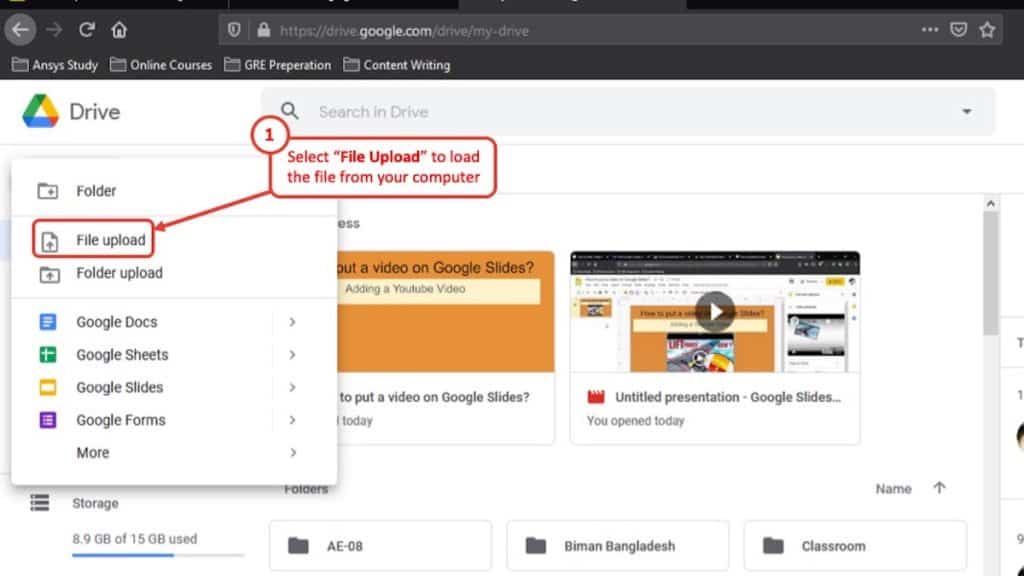
1. First, upload the video file into Google Drive. To upload the file, go to Google Drive, select “New> File upload“. Now find the desired video file on your computer and press “Open“. Wait for a few minutes to upload the video file into Google Drive.
2. Once the file is uploaded, open the presentation slide where you want to put the video on.
3. Click on “Insert” from the top menu bar in Google Slides and from the dropdown menu choose “Video”.
4. A new window will open. From the new window, select the Google Drive Tab.
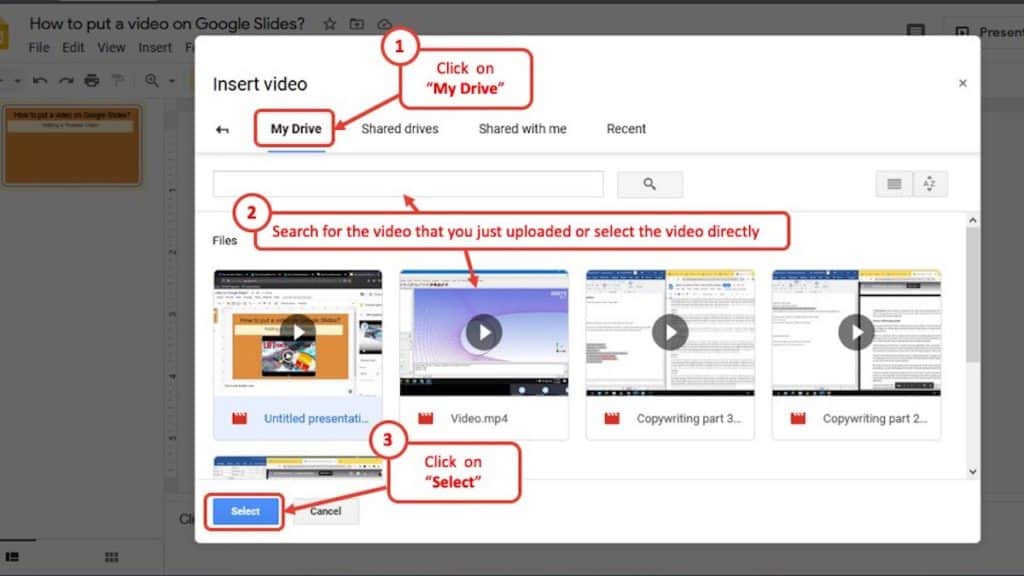
5. Now search for the desired video that you uploaded in Google Drive. Find the video and click on “Select”.
6. The video will appear on the presentation slide.
As mentioned before, you can use the video editing tools in Google Slides to adjust the positioning of the video player and the timing of the video. You can also select whether the video will play automatically or manually.
How to add a Video from your Phone to Google Slides?
Google Slides are also available on Android and iOS. You can download the Google Slides app from app stores (Play store for Android and Apple App Store for iOS) or use web browsers to use the Google Slides application.
1. From Android Smartphone
There is no direct way to put videos on the Google Slides Android app. But that will not stop you to add a video to your presentation. To put videos on Google Slides using Android Smartphone, follow these steps: –
- First, upload the video into Google Drive if the video is on your smartphone.
- Then copy the Google Drive link of the video. If the video is from YouTube, copy the YouTube URL of that video.
- Find an engaging moment in the video and take a screenshot of it and crop the screenshot image to the appropriate size. This screenshot will act as the thumbnail of your video.
- Open the Google Slides app on your android smartphone.
- Now open the presentation slide that you want to put a video on.
- Press the “+” icon on the top right corner of the screen. From there, select “Image > From photos”.
- Now, find the screenshot that was taken before and select it. The screenshot will appear in the presentation slide. Drag and drop the screenshot into a suitable position in the slide.
- When you are done with positioning the screenshot, again press “+” on the top right corner of the screen and select “Link”.
- Paste the link that was previously copied in the URL bar and press “✓”.
Now whenever you press the screenshot image, you will be directed to the video link.
2. From iPhone
Similar to Android smartphones, there is also no direct way to put videos on Google Slides on iPhone. To put videos on Google Slides using iPhone, follow these steps: –
- First, upload the video into Google Drive if the video is on your iPhone.
- Then copy the Google Drive link of the video. If the video is from YouTube, copy the YouTube URL of that video.
- Find an engaging moment in the video and take a screenshot of it and crop the screenshot image to the appropriate size. This screenshot will act as the thumbnail of your video.
- Open the Google Slides app on your iPhone.
- Now open the presentation slide that you want to put a video on.
- Press the “ + ” icon on the top right corner of the screen. From there, select “Image > from photos”.
- Now, find the screenshot that was taken before and select it. The screenshot will appear in the presentation slide. Drag and drop the screenshot into a suitable position in the slide.
- When you are done with positioning the screenshot, again press “ + ” on the top right corner of the screen and select “Link”.
- Paste the link that was previously copied in the URL bar and press “ ✓ ”.
Now whenever you click on the screenshot image in the presentation slide, you will be directed to the video link.
How to Embed a YouTube Video at a certain time in Google Slides?
When a YouTube video or a video from Google Drive is added to the slide, the entire video will be embedded by default. Now when you are presenting your slide, many among the audience will not have the patience to sit through the entire video in your presentation.
Keeping that in mind, you might want to include only a select part of the video that is brief, relevant to your presentation. You can do that in Google Slides. Once you embed a YouTube video or a video from your Google Drive account, you can pick the time from which the video will start and end.
To start or end a YouTube video at a certain time interval, you should –
- First, add a YouTube video or a video from Google Drive in your presentation slide.
- Once the video is embedded on your slide, select the video just by clicking on it.
- A “Format options” tab will open on the right corner of the screen.
- There you can select the time from when the video will start at and when the video will end.
- Just put on your desired time on the “Start at” and “End at” timer boxes on the “Format options” tab.
How to Fix the “Google Slides Video Request Access” Error?
Now, when you are adding a video to your Google Slides presentation, sometimes you may come across a “Request Access” error that either prevents you from adding a video to your presentation or prevents you from playing the video embedded in your presentation.
“Google Slide Video Request Access” error occurs when a user has two different Google Accounts and the video embedded is from one account while the Google Slides presentation has been created using a different account. The error can also occur if you do not have access/permissions to use the embedded video link.
This is a common problem and the solution is also simple. All you have to do is ensure that your to permit the other accounts to access the video that has been embedded.
In order to fix the “Google Slides Video Request” error, follow the below mentioned steps –
- Log in to the account that was used to create the Google Drive video link.
- Open Google Drive and locate the video.
- Right-click on the video and choose “Share”.
- You can fix the “Google Slides Video Request Access” error by adding the account that you are using to access the presentation slide in the search bar. By doing so you are permitting them to access the file. You can also select specific permission whether they can modify the file or just view the file here.
After doing so, you should be able to view the video file without any error. If you access the slide from another account, just make sure that the account has permission to view the video file.
How to Embed a Video in Google Slides with embed code?
Right now, it is not possible to embed a video in Google Slides with embed codes like you can do in the Microsoft PowerPoint application. But Google is continuously improving its Google Slides application. Hopefully, they will add this feature in near future.
How to link a Video to a Picture in Google Slides?
There is no direct way to add a video that is not from YouTube. Linking a video to a picture is a way to add non-YouTube videos on Google Slides. To do that, you need to take some extra steps to incorporate the video on the slide. These steps are-
- First, find an engaging moment in the video and take a screenshot of it. Crop the screenshot image so that it looks like a thumbnail of the video.
- Now, open the presentation slide file in Google Slides.
- Click on the “Insert” option from the top menu bar of Google Slides.
- Now select “Image” from the dropdown menu.
- Find the screenshot that you captured earlier from the video. Add this screenshot to your presentation slide and adjust the position of the screenshot as you see fit.
- Once you are done with the positioning of the screenshot, select the screenshot on the slide and click on “Insert”.
- From the dropdown menu, select “Link” and paste the URL of the video, and press “Apply”.
Once all these steps are completed, clicking on the screenshot image in the presentation slide should open the direct link to the video. You cannot use the video editing tools in Google Slides for videos that are linked to a picture.
You can adjust the picture position but you can’t adjust the time of the video file which is possible for embedded YouTube videos or videos from Google Drive.
Compressing Videos before Adding to Google Slides?
Video compression is done to shrink the size of the video file without harming the video quality significantly. This is a useful method to save some storage space. When you are using a non-YouTube video file in your presentation slide, you have to upload the file into your Google Drive and then embed it to your presentation.
But Google Drive has very limited storage space especially in a free Google Drive account where you have only 15 GB cloud storage space. This is where video compression is very useful. It doesn’t hurt the video quality and at the same time, you can store more videos.
How to Compress Videos?
There are many online and offline video compression software available for desktop, Android, and iOS. Some of the best video compression apps and websites are given below-
1. VideoProc
This is one of the best video compression software for windows and Mac. This is not just a simple video compression software, you can cut, copy, and edit your video in this software also. VideoProc can compress up to 8K resolution video files and up to 90% of the original video size without any significant change in video quality.
VideoProc also offers lots of video and audio encoder formats that are not available in the many popular video compression software.
2. Video Compress (Android)
This is a video compression application for Android smartphones. The main feature of this application is, it is very easy to use. The simplistic user interface allows anyone to compress their video file without any prior knowledge or experience.
Just select the video file that you want to compress, select the desired resolution, desired file size, and file format. This application offers multiple video compression modes and supports almost all video file formats.
3. Media.io Online Uniconverter
This is one of the best online video compressors and it is free. This online video compressor application allows you to compress your video file, shrink the file size, reduce the resolution, and select the desired video file format. All the popular video formats are available here.
You can upload the file directly from your computer or from Google Drive or Dropbox. One downside of this application is that you can only compress video files that are up to 100 MB.
Final Thoughts
Adding a relevant video clip in the presentation slide can make the presentation much more interesting, engaging, and helps a lot in delivering your message clearly. Adding a video on Google Slides is a very simple task.
Hope this article was of some help to you to clear any confusion regarding how to add a video on Google Slides. Have a nice day!