![How to Hide Slides in Google Slides? [Complete Guide!]](https://artofpresentations.com/wp-content/uploads/2021/09/Featured-Image-How-to-Skip-Slides-in-Google-Slides.jpg)
When using Google Slides, there are times when you don’t want to include a particular slide in your presentation, but you don’t want to delete the slide either! Perhaps, the work on a particular slide is incomplete. This is where the feature to hide slides in Google Slides comes in handy!
To hide a slide in Google Slides, first, select the slide from the slide navigation pane on the left part of the screen. Then, right-click on it and choose the “Skip” option. This will skip or hide your slide when giving the presentation in the present mode.
In this article, I’ll explain the complete process in further detail. Plus, I’ll also show you a trick or two on how to hide slides when printing! That, and much more!
So, let’s get started!
1. How to Hide a Slide in Google Slides?
Google Slides allows you to hide a slide in the presentation view without deleting it. If you have worked very hard on a slide but do not want to show it in the presentation, you can simply hide it.
Here’s what you need to do –
Step-1: “Right Click” on the slide
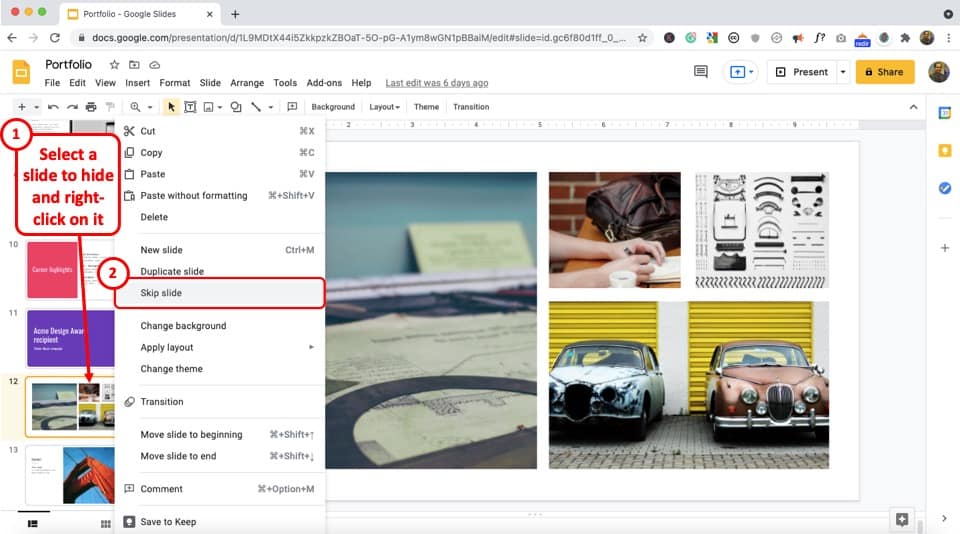
From the slide navigation pane, select the slide you want to hide and then “Right Click” on the slide to open a dropdown menu.
Step-2: Click on “Skip Slide”
From the dropdown menu, click on the “Skip Slide” option to select it. You will see a checkmark appear by the “Skip Slide” option. Thus, the slide will be hidden from the presentation.
Step-3: Verify that the slide is hidden
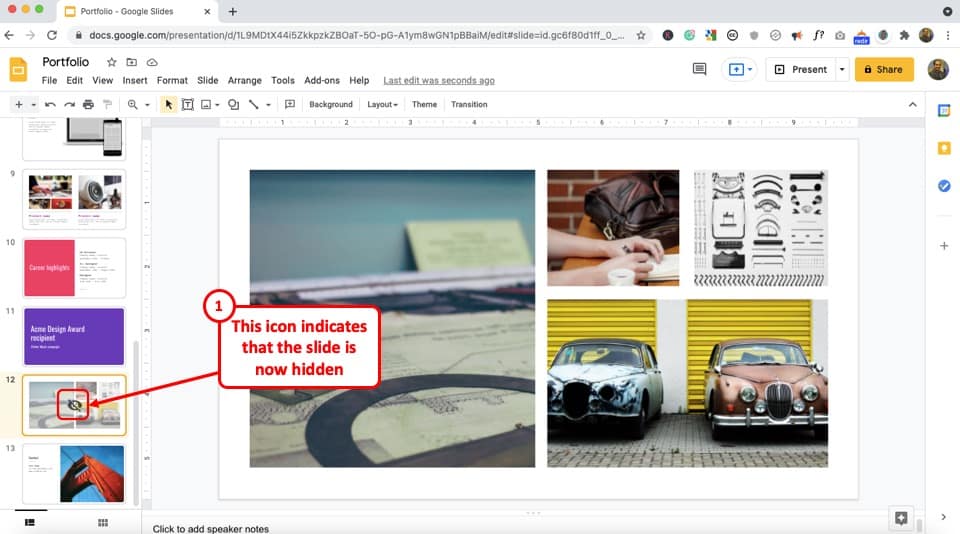
Once you have successfully hidden a slide, you should notice that the slide has become a bit transparent. Furthermore, a crossed-out eye icon now appears on the slide.
This indicates that the slide is now hidden.
2. How to Unhide a Slide in Google Slides?
If you want to show a hidden slide in the presentation view, you can unhide it. Unhiding a slide in Google Slides is just as simple as hiding it.
You can follow the 2 quick steps below.
Step-1: “Right Click” on the hidden slide
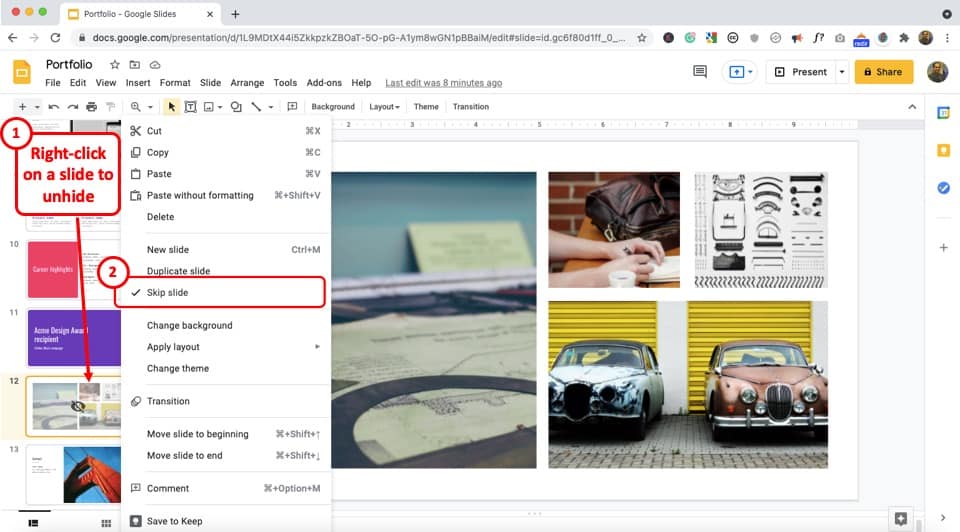
First, scroll through the slide navigation pane to find the hidden slide you want to unhide and “Right Click” on the hidden slide to open a dropdown menu.
Step-2: Click on “Skip Slide”
Now all you have to do is click on the “Skip Slide” option to deselect it. You will see the checkmark beside the “Skip Slide” option disappear.
This will unhide the hidden slide and show it in the presentation.
3. How to Hide Skipped Slides when Printing Handouts in Google Slides?
In Google Slides, you can skip a slide without having to delete it. However, the skipped slide can still appear when you are printing handouts.
Here’s what you need to do to hide the skipped slides when printing –
Step-1: Click on “File”
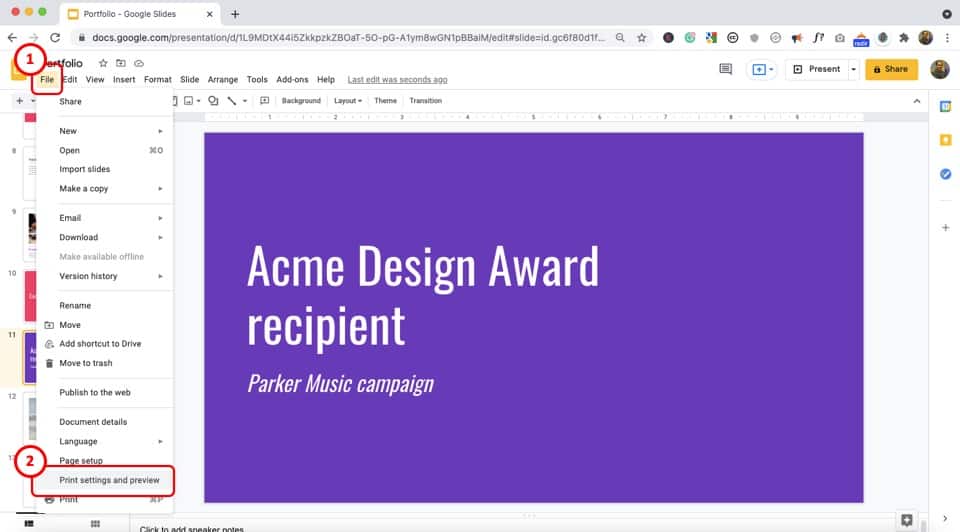
Click on the “File” tab from the ribbon, located at the top of your screen. This will open a dropdown menu.
Step-2: Click on “Print settings and preview”
From the dropdown menu, click on the “Print settings and preview” to open the preview screen.
Step-3: Unselect the “Include skipped slides” option
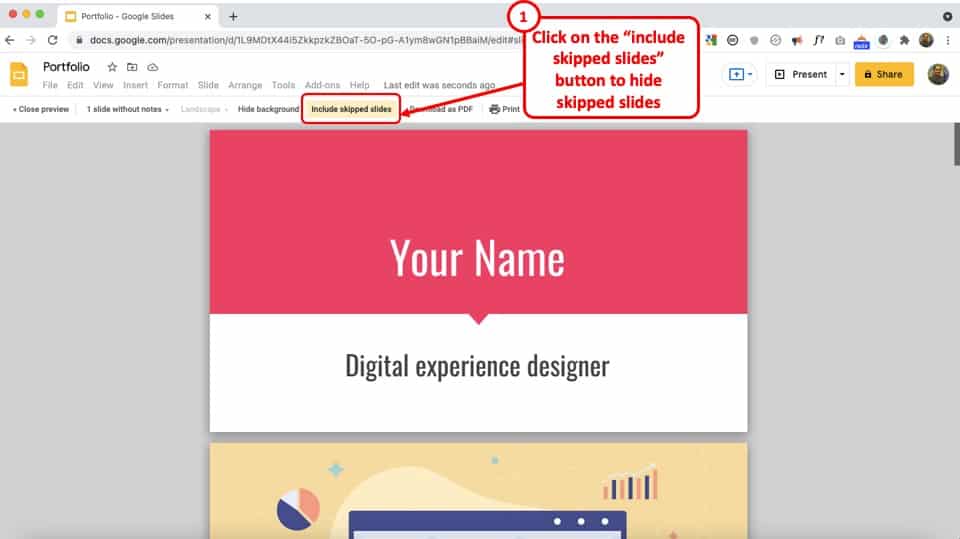
In the preview menu, you will see that the “Include skipped slides” option is automatically selected by default. Click on the “Include skipped slides” option to unselect it.
The hidden slides will disappear from the preview.
Step-3: Print Your Slides

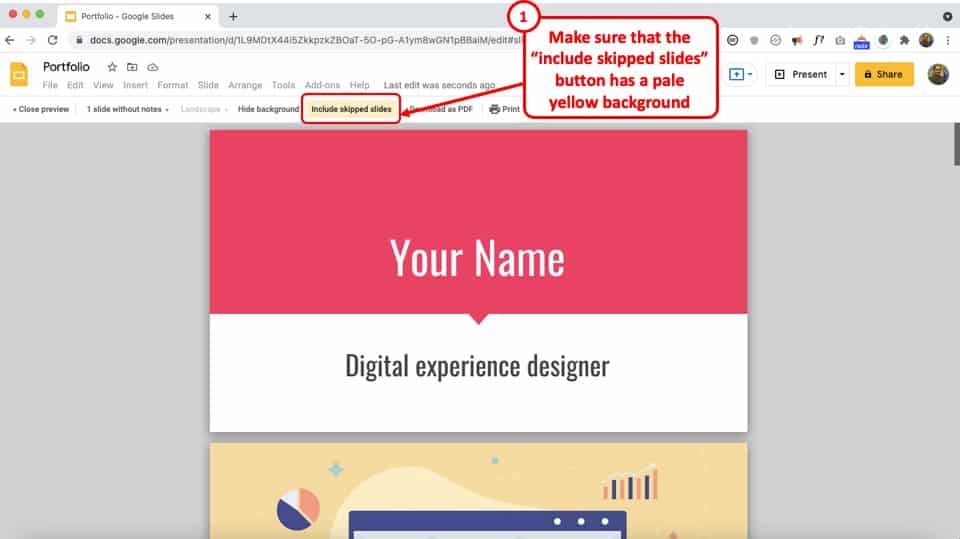
The final step is to print the slides. Make sure that the “Include skipped slides” button is not selected.
If the background of this button is white, this means that Google Slides will not include the skipped slides when printing.
4. How to Include Skipped Slides when Printing Handouts in Google Slides?
Even after hiding some slides from the Google Slides presentation, you can still include them when printing handouts.
The process is quite similar to the one described in the previous section. For convenience, let me share it with you again.
Step-1: Click on “File”
The first step is to click on the “File” tab from the ribbon to open the dropdown menu.
Step-2: Select the “Print settings and preview” option
Click on the “Print settings and preview” option from the “File” menu. This will lead you to the preview screen.
Step-3: Click on “Include skipped slides”
You will see the “Include skipped slides” option in the “Print settings and preview” menu already selected by default.
If it is not selected, click on the “Include skipped slides” option. The print preview will reload and show the skipped slides.
Remember, the pale yellow background of the “Include skipped slides button” indicates that the hidden slides will be included when printing.
Step-4: Click on the “Print” option
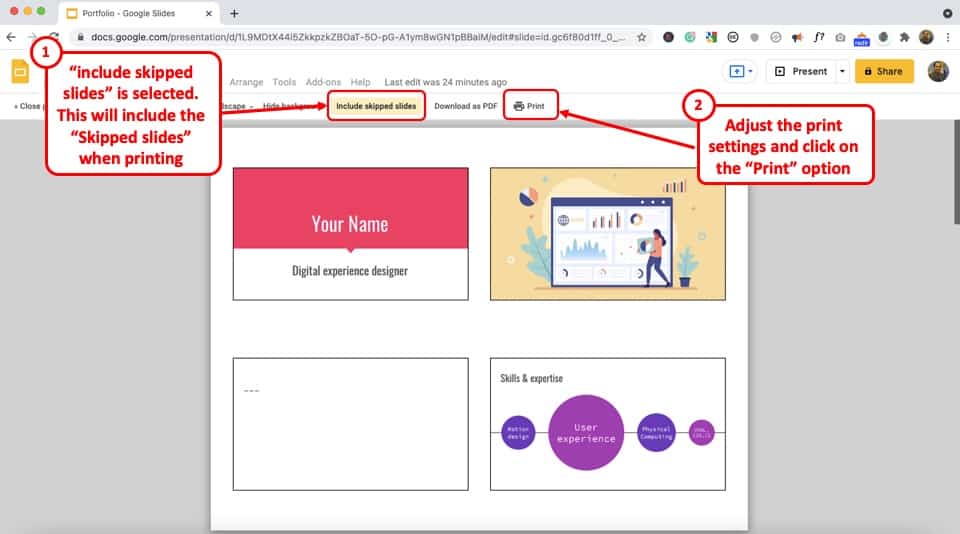
Finally, you can edit the handout layout and click on the “Print” option to print out the Google Slides handouts including the skipped slides.
Alternatively, you can press the “Ctrl+P” keys on your keyboard to get the job done.
If you want to know more on how to edit the layout in print preview, check out my other article on how to print Google Slides.
5. How to Hide Slide Navigation Pane in Google Slides?
In Google Slides, there is no option to hide the slide navigation pane when editing. However, when presenting, the slide navigation pane will automatically disappear in Google Slides.
To go to the presentation mode, all you have to do is click on the “Present” button located at the top right corner of your screen. Alternatively, you can press the “Ctrl+F5” keys on your keyboard to do the same.
6. How to Hide Navigation Bar When Presenting in Google Slides?
When you enter the presentation mode in Google Slides, the slide navigation pane on the left will automatically disappear.
You can obviously use the “Present” option to enter the presentation mode. To enable the “Present” option, simply click on the “View” tab, and from the dropdown, click on “Present“.
As stated above, you can also press the Ctrl+F5 keys to quickly enter into “present” mode.
But, did you know, you can also use the “Preview” option to preview the presentation and hide the slide navigation pane at the same time?
Let me show you how that’s done!
Step-1: Click on the “Address Bar” of your browser
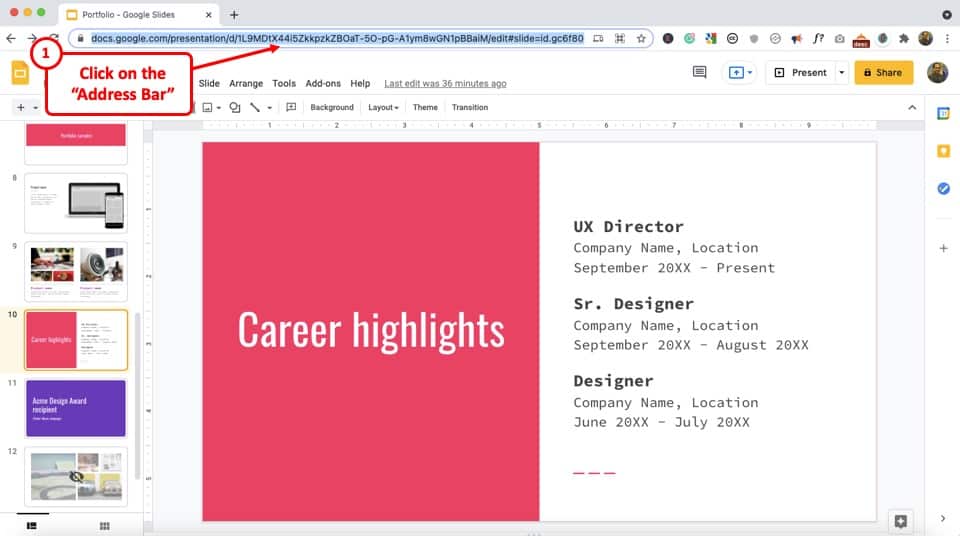
The first step is to click on the “Address Bar” of your browser window located at the top of the screen.
The “Address Bar” is where you typically enter a URL or a search query in your web browser. Clicking on it will select the entire text in the “Address Bar.” Click on the “Address Bar” again to unselect the text.
Step-2: Delete the last part of the link starting from “edit#”
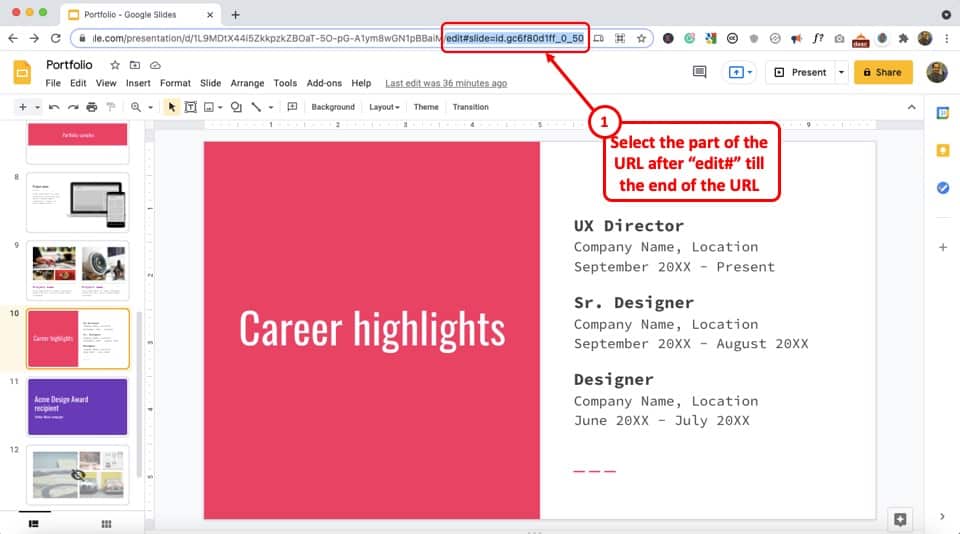
Now find the “edit#” part of the link in the “Address Bar.” Select the part of the link starting from the “edit#” to the end of the link. Then press the “delete” key or the “backspace” key on your keyboard to delete the selected part of the link.
Step-3: Type “preview?rm=minimal”
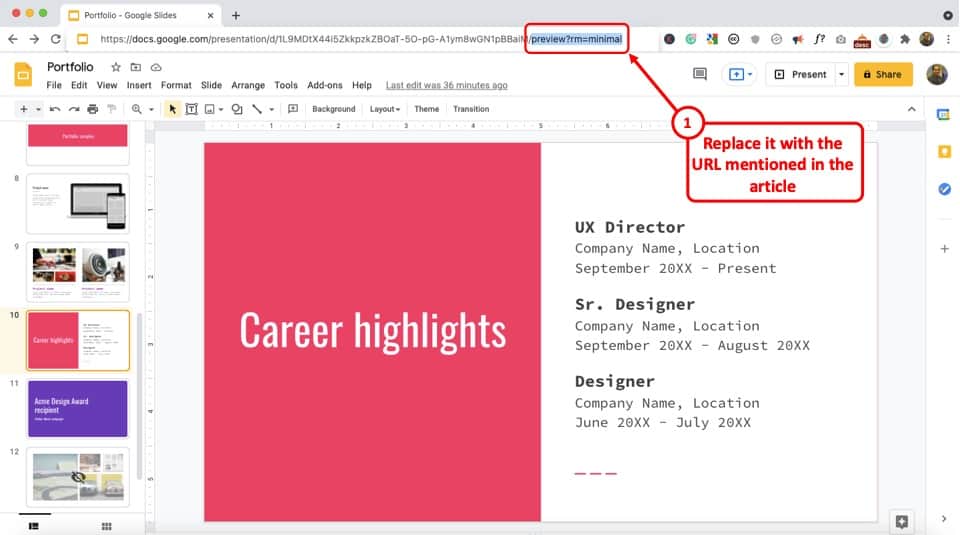
Next, you have to type in “preview?rm=minimal” at the end of the link inside the “Address Bar.” This will replace the previously deleted part of the link.
Step-4: Preview Your Google Slides Presentation
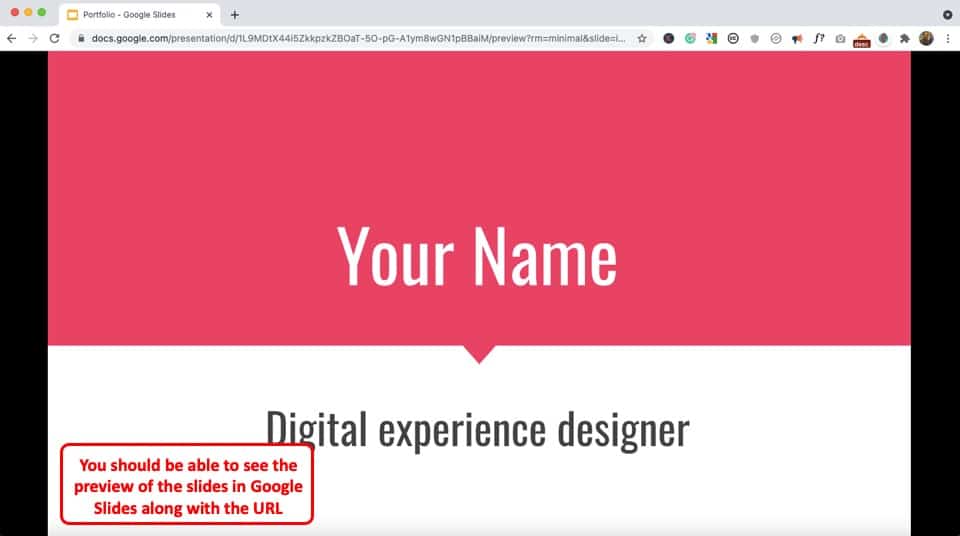
Press the “Enter” key on your keyboard to open the newly edited link and you will be taken to a Google Slides presentation window with no navigation bar.
For navigation, press the “Left Arrow” button on your keyboard to open the previous slide. Similarly, you can press the “Right Arrow” button on your keyboard to open the next slide.
Alternatively, you can use the “Up Arrow” and the “Down Arrow” keys on your keyboard respectively to get the job done.
To get back to the edit mode, you will have to use the back button of your browser (which may be annoying for some people). You can also open the presentation again by entering the slides.google.com URL in the address bar, and opening the corresponding presentation.
7. How to Hide the Menu Bar in Google Slides?
Google Slides allows you to hide the menu bar located at the top of the screen. By hiding the menu bar, you can expand the editing screen.
To hide the menu bar in Google Slides, find the upward-facing arrow located on the top right corner of the screen. Then click on the arrow or “Hide the menus” button.
Alternatively, you can press the “Ctrl+Shift+F” keys on your keyboard to hide the menu bar in Google Slides. To know more, check out my other article on Toolbar in Google Slides.
Another thing that you can do is view the presentation in full-screen mode
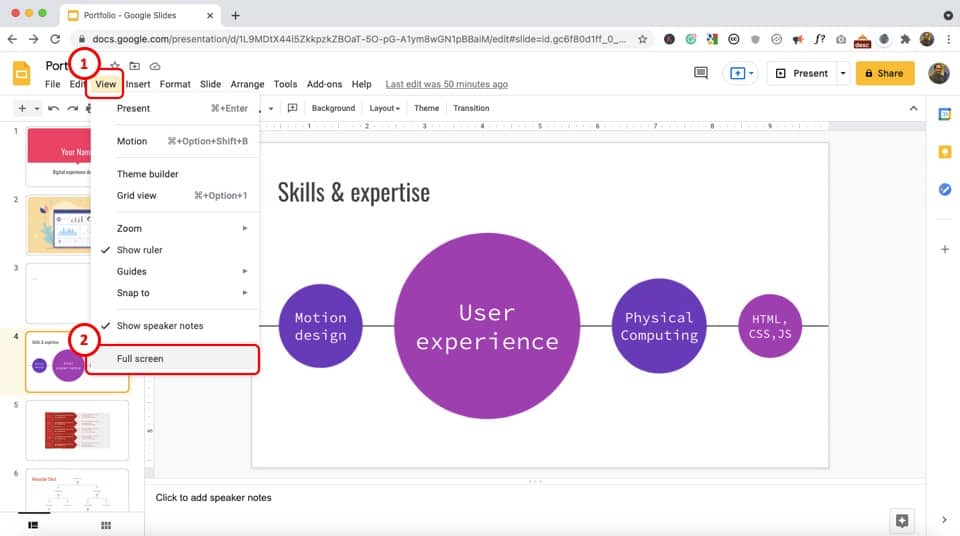
To enter your Google Slides presentation in full-screen mode, simply click on the “View” tab. Then, from the dropdown, click on the “Full Screen” option.

When in full-screen mode, you won’t be able to see the toolbar and you will have more space to showcase your slides.
To exit the full-screen mode and to go back to the editing mode in Google Slides, simply click on the “Esc” or the escape key on your keyboard.
More Related Articles
- Want to Use SmartArt in Google Slides? [Here’s What You Need to Do!]
- Google Slides Add-ons: Top 5 Add-ons That You Should Use!
- How to Share Google Slides the Correct Way! [No More “Need Permission” Errors]
- Convert PDF to Google Slides [A Great Hack!]
- How to Insert Equations in Google Slides? [Complete Tutorial!]
Credit to drobotdean (on Freepik) for the featured image of this article (further edited)