Any presentation made in Google Slides can be converted to different format files using simple steps. In this article we will demonstrate how to convert a Google Slides presentation to PowerPoint.
To convert Google Slides to PowerPoint, first select the “File” menu. Then, click on “Download” and finally choose the “Microsoft PowerPoint” option in the pop-up menu. Your file will now be downloaded onto your device as a PowerPoint.
To learn more on this conversion method and to see what else can be done using the same simple steps please read further on.
1. Can You Open Google Slides in PowerPoint?
You can open a Google Slides presentation in Microsoft PowerPoint. Google Slides allows you to easily convert a presentation file into a PowerPoint file. You can find the “Microsoft PowerPoint (.pptx)” option in the “File” menu in Google Slides.
2. How to Convert Google Slides to PowerPoint?
It is easy to convert a Google Slides file into a PowerPoint format using the “File” menu. All you have to do is to follow the 3 quick steps.
Step-1: Click on the “File” format
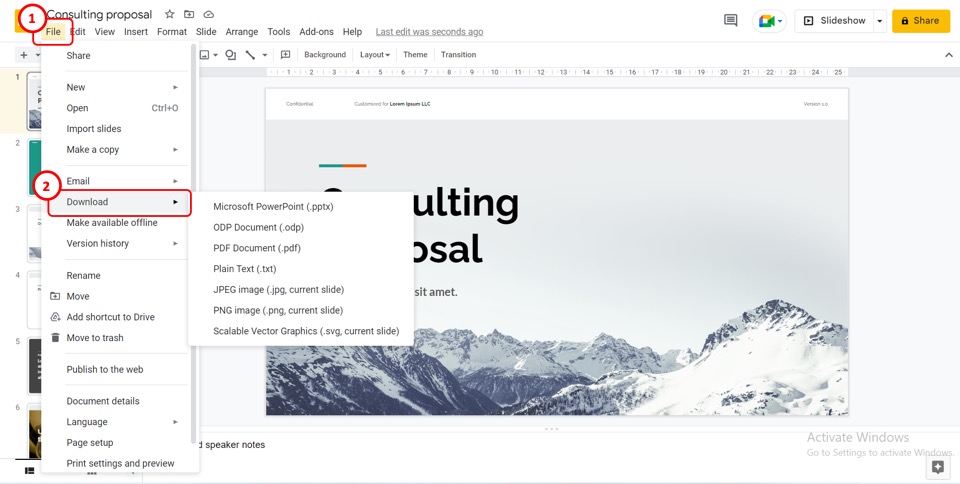
In the menu bar at the top of the screen, click on the “File” menu. In the dropdown menu under the “File” tab, click on the “Download” option.
Step-2: Click on the “Microsoft PowerPoint (.pptx)” option
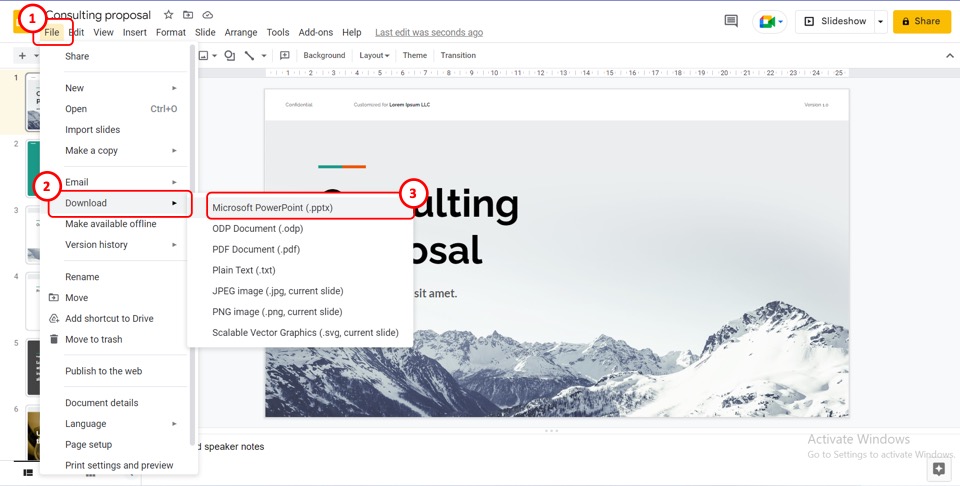
Another drop-down menu will appear by the “Download” option in the “File” menu. To convert Google Slides to PowerPoint, you have to click on the “Microsoft PowerPoint (.pptx)” option.
Step-3: Click on the converted PowerPoint file
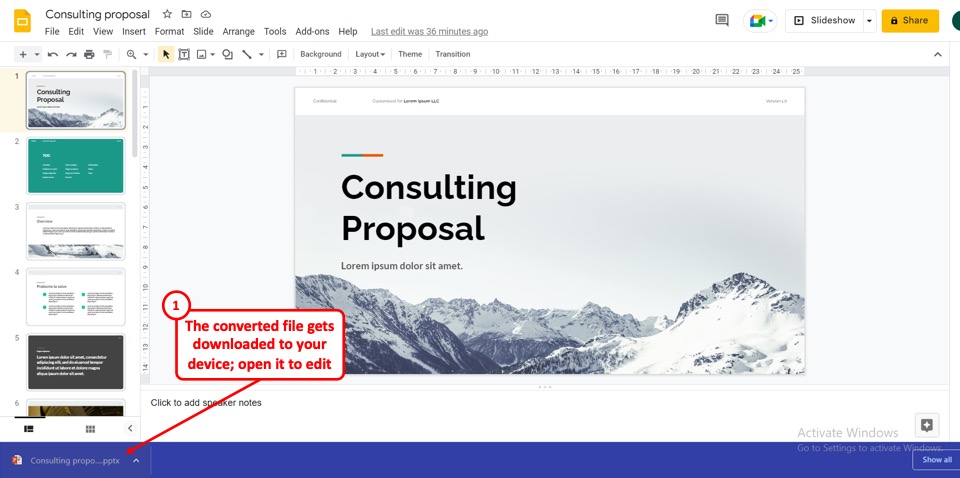
When you click on the “Microsoft PowerPoint (.pptx)” option in the “File” menu, the Google Slides presentation will download on your device as a Microsoft PowerPoint file. Once the file downloads, click on the downloaded PowerPoint file to open and edit it.
3. How to Convert Google Slides To PowerPoint Without Losing Formatting?
When converting a Google Slides file to a PowerPoint presentation, some of the formattings may change. This can happen if the Google Slides presentation includes any object like fonts, animations, audio, etc. that is not supported by Microsoft PowerPoint.
To convert Google Slides to PowerPoint without losing formatting, you can download the slides as images. All you have to do is to follow the 7 easy steps.
Step-1: Click on the “File” format
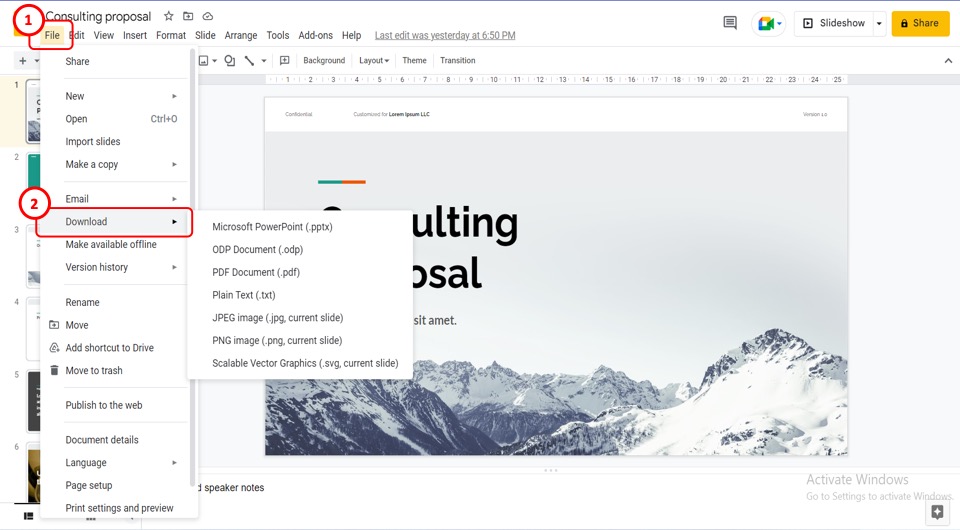
The first step is to open the Google Slides presentation that you want to convert to Microsoft PowerPoint. In the menu bar located at the top of the screen, click on the “File” tab.
Step-2: Click on the “Download” option
In the dropdown menu under the “File” tab in the menu bar, click on the “Download” option. This will open a pop-up menu by the “Download” option (as shown above).
Step-3: Click on the “PNG image” option
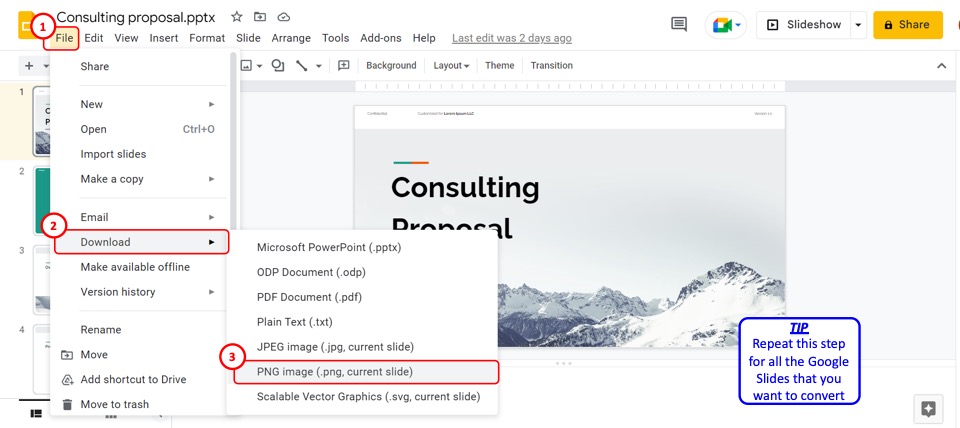
In the pop-up menu by the “Download” option in the dropdown “File” menu, click on the “PNG image (.png, current slide)” option to download the open slide. Then repeat the step for each slide that you want to convert to Microsoft PowerPoint.
Step-4: Click on the “Format Background” option
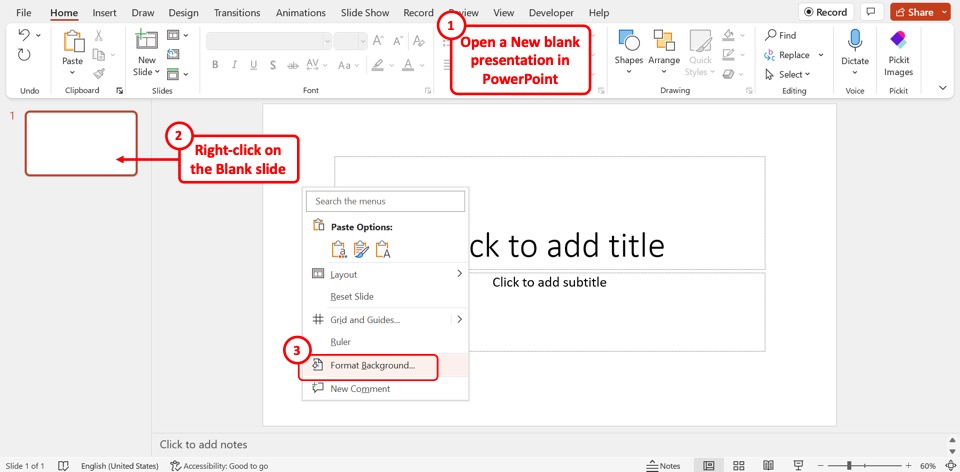
The next step is to open a new presentation file in Microsoft PowerPoint. Then “Right Click” on the blank slide. Click on the “Format Background” option in the right-click menu.
Step-5: Click on the “Picture or texture fill” option
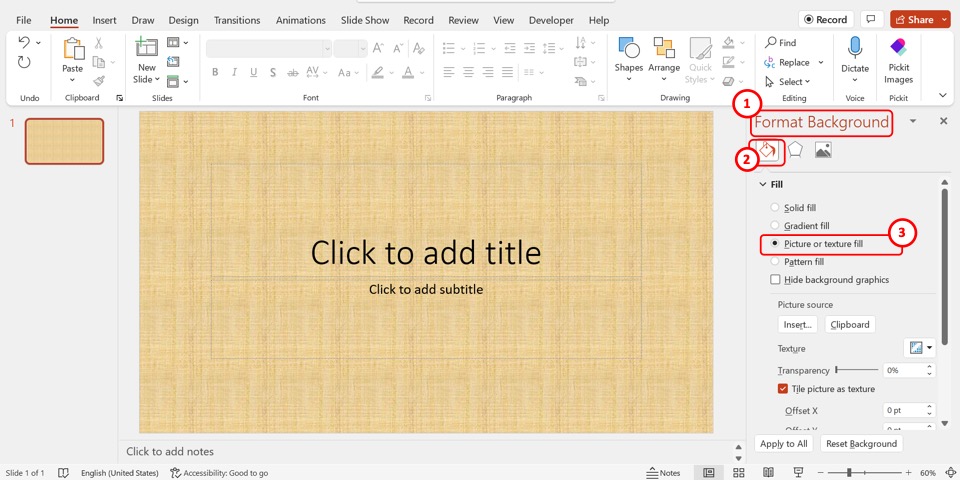
At the top of the “Format Background” sidebar on the right side of the screen, click on the “Fill” icon. In the “Fill”section of the sidebar, click on the “Picture of texture fill” option.
Step-6: Click on the “From a File” option
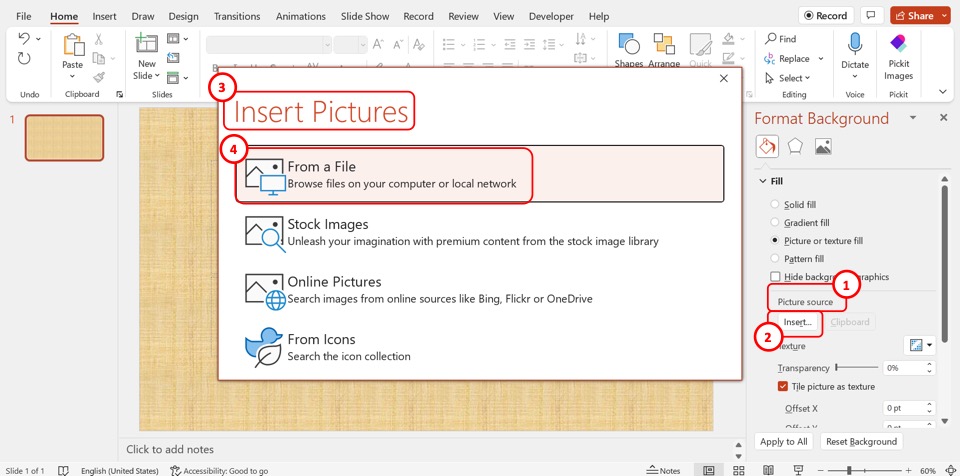
In the “Picture source” section of the “Format Background” sidebar, click on the “Insert” button. This will open the “Insert Pictures” dialog box. In the dialog box, click on the “From a File” option.
Step-7: Click on the “Insert” button
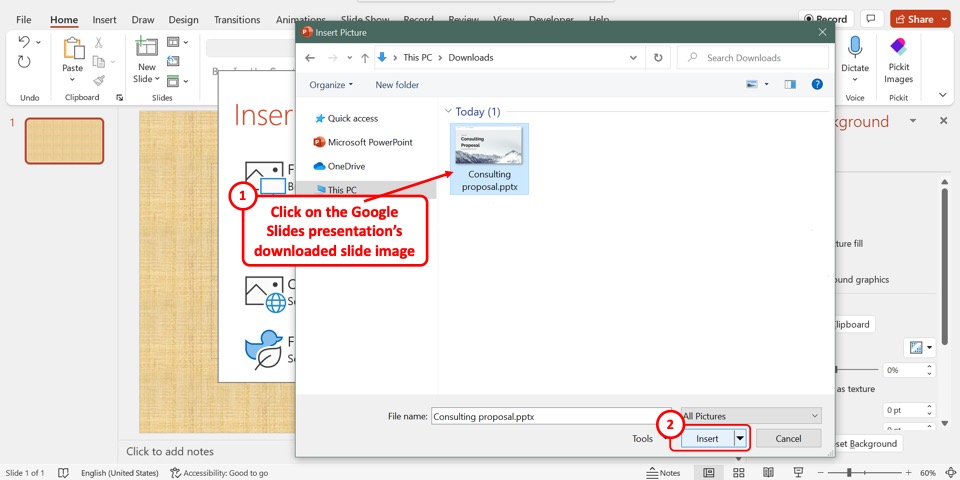
In the “Insert Pictures” pop-up window, select the Google Slides presentation slide downloaded as an image. Then all you have to do is click on the “Insert” button at the bottom of the pop-up window to convert the slide to PowerPoint without losing formatting.
4. How to Export Google Slides with Audio to PowerPoint?
To export a Google Slides presentation with audio to PowerPoint, all you have to do is follow the steps detailed in section 2. However, if you find the audio missing in the converted PowerPoint presentation, you can download the audio from Google Slides and insert it into PowerPoint.
To do so, follow the 5 quick steps.
Step-1: “Right Click” on the Audio
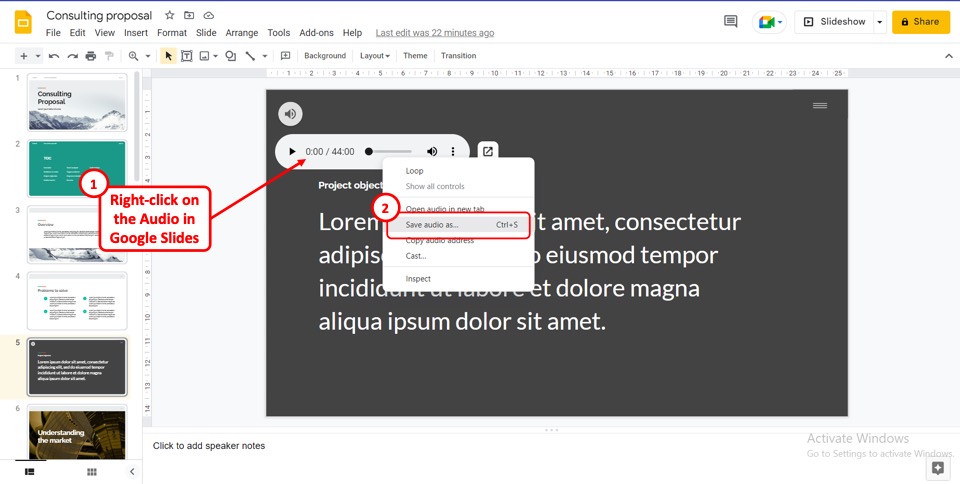
In Google Slides, “Right Click” on the audio. In the right-click menu, click on the “Save audio as..” option. Alternatively, you can select the audio and press the “Ctrl+S” keys on your keyboard. This will open the “Save as” pop-up window.
Step-2: Click on the “Save” option
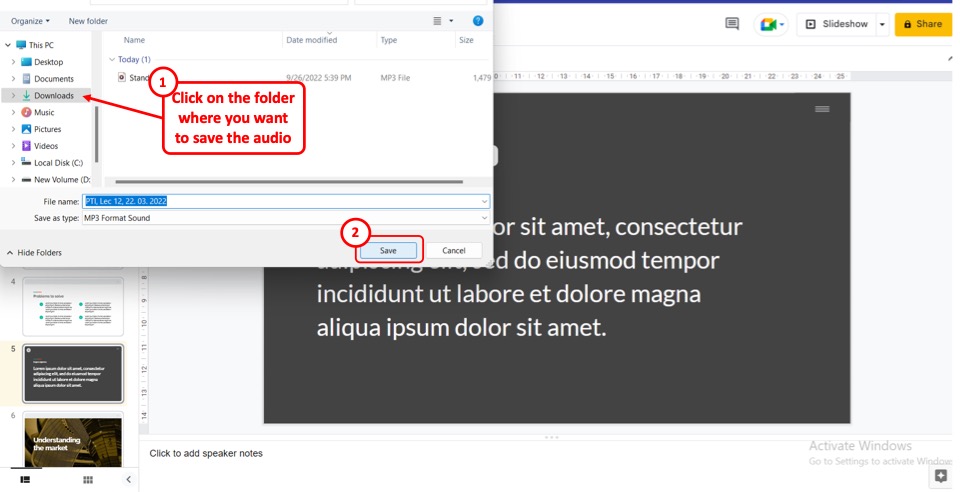
In the “Save As” pop-up window, select the folder on your desktop where you want to download the audio. Then you have to click on the “Save” option at the bottom of the pop-up window to download the audio from Google Slides.
Step-3: Click on the “Insert” option
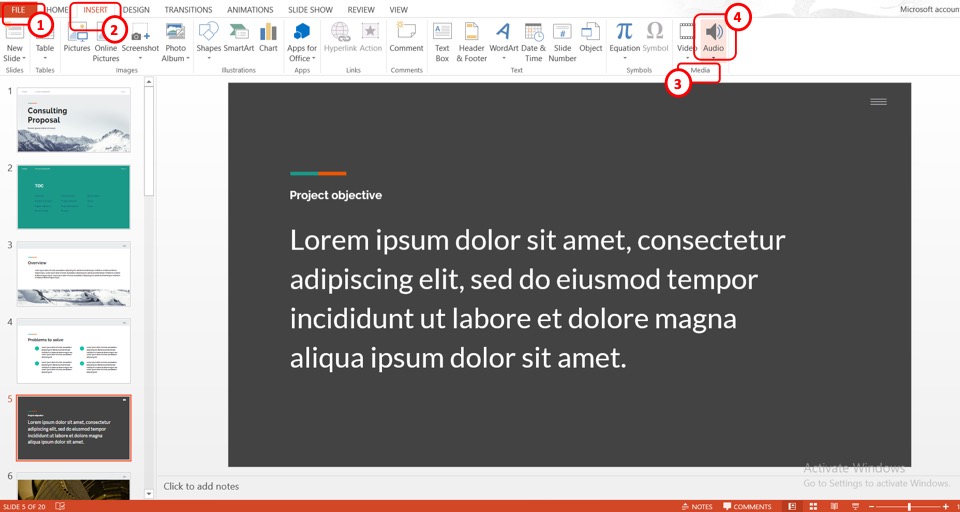
The next step is to open the PowerPoint presentation converted from Google Slides. In the menu ribbon located at the top of the screen, click on the “Insert” tab. In the “Media” group of the “Insert” menu, click on the “Audio” option.
Step-4: Click on the “Audio on My PC..”
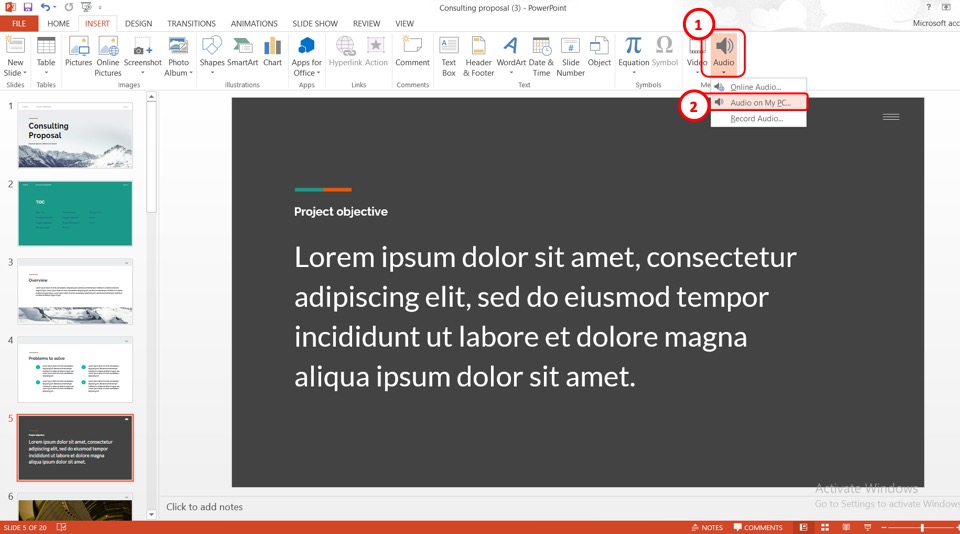
In the dropdown menu under the “Audio” option, click on the “Audio on My PC..” option. This will open the “Insert Audio” dialog box.
Step-5: Click on the “Insert” option
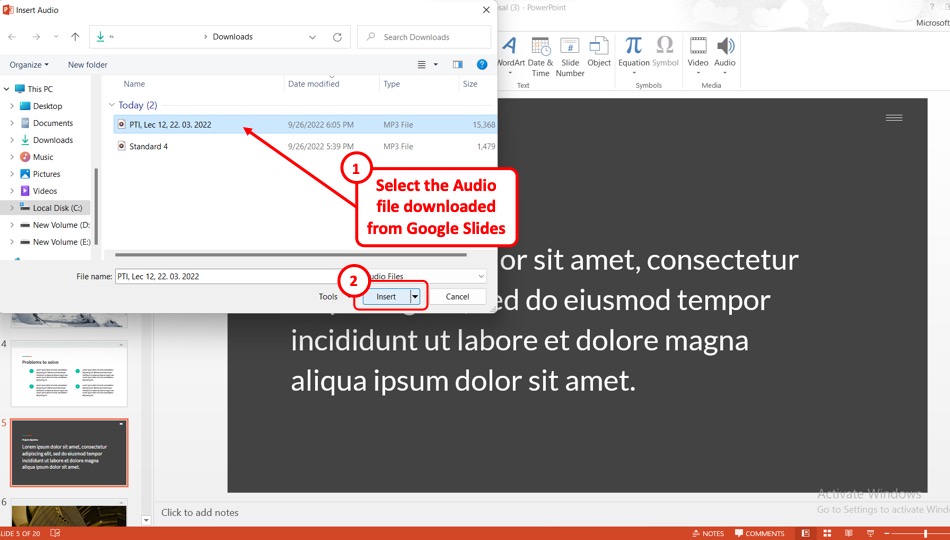
In the “Insert Audio” dialog box, select the audio downloaded from Google Slides. Then all you have to do is click on the “Insert” option at the bottom of the dialog box to insert the audio into the converted Microsoft PowerPoint presentation.
5. How to Export Google Slides with Animations to PowerPoint?
In Microsoft PowerPoint, all animations available in Google Slides are available. To export a Google Slides presentation with animation to PowerPoint, all you have to do is download the presentation as a Microsoft PowerPoint file.
All the animations will be automatically retained. To convert a Google Slides presentation with audio, follow the 4 simple steps.
Step-1: Click on the “File” menu
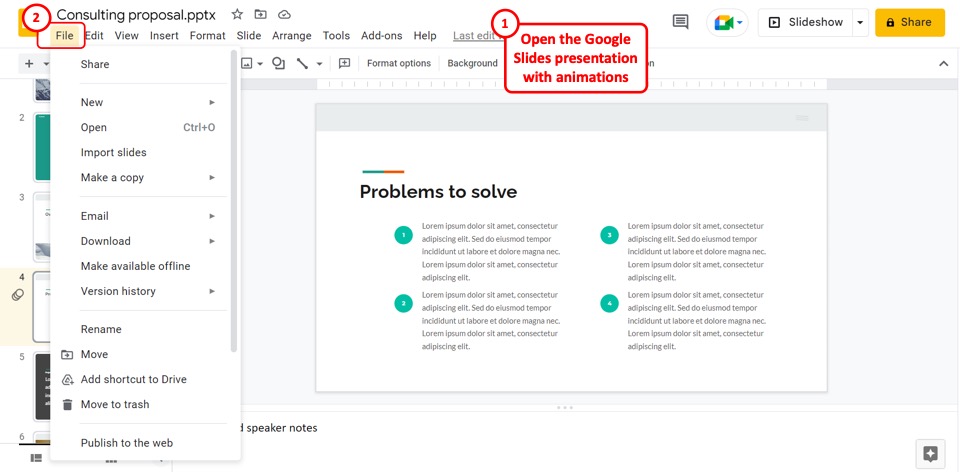
The first step is to open the Google Slides presentation with animations that you want to convert to PowerPoint. In the menu bar located at the top of the screen, click on the “File” menu.
Step-2: Click on the “Download” option
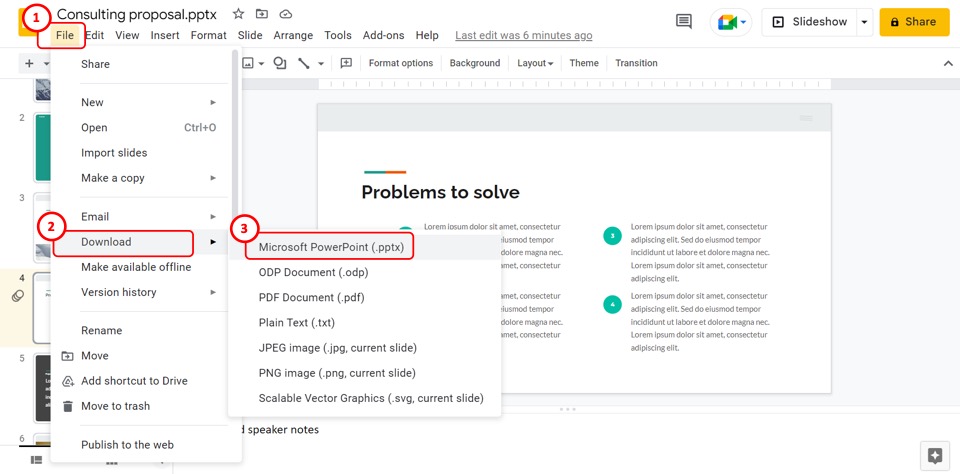
In the dropdown “File” menu, click on the “Download” option. Then click on the “Microsoft PowerPoint (.pptx)”option in the pop-up menu by the “Download” option to save the Google Slides presentation as a PowerPoint file.
Step-3: Click on the “Slide Show” tab
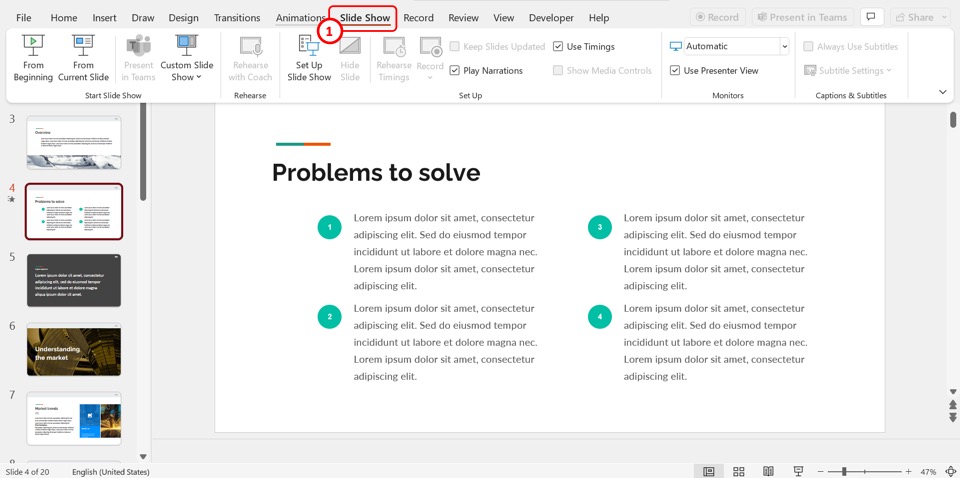
Now you can open the PowerPoint presentation to preview the animations. In the menu bar in PowerPoint, click on the “Slide Show” tab.
Step-4: Click on the “From Beginning” option
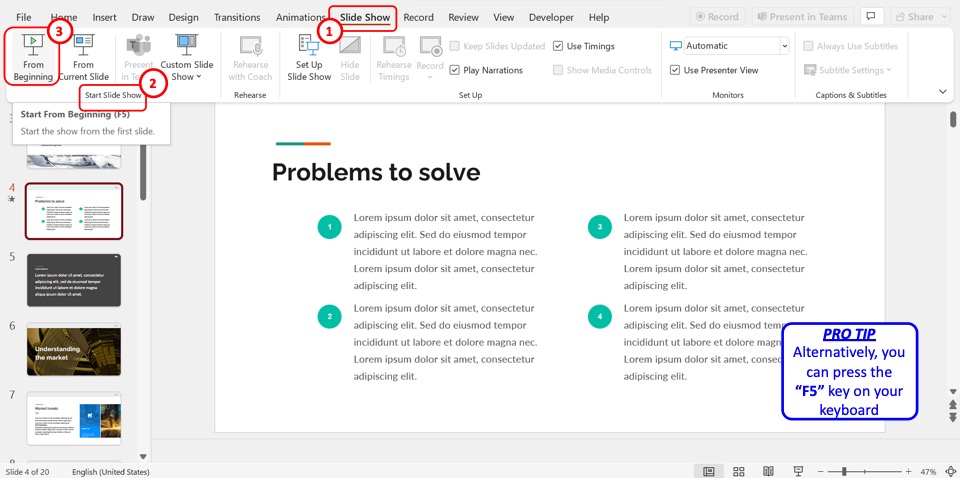
In the “Start Slide Show” group of the “Slide Show” menu, click on the “From Beginning” option. You can alternatively press the “F5” key on your keyboard to start the presentation to preview the animations downloaded from Google Slides.
6. How to Stop PowerPoint from Changing Formatting?
Once you convert the Google Slides presentation to Microsoft PowerPoint, the formatting is likely to change when editing the PowerPoint slides. To stop PowerPoint from changing the formatting, follow the 7 quick steps.
Step-1: Click on the “File” tab
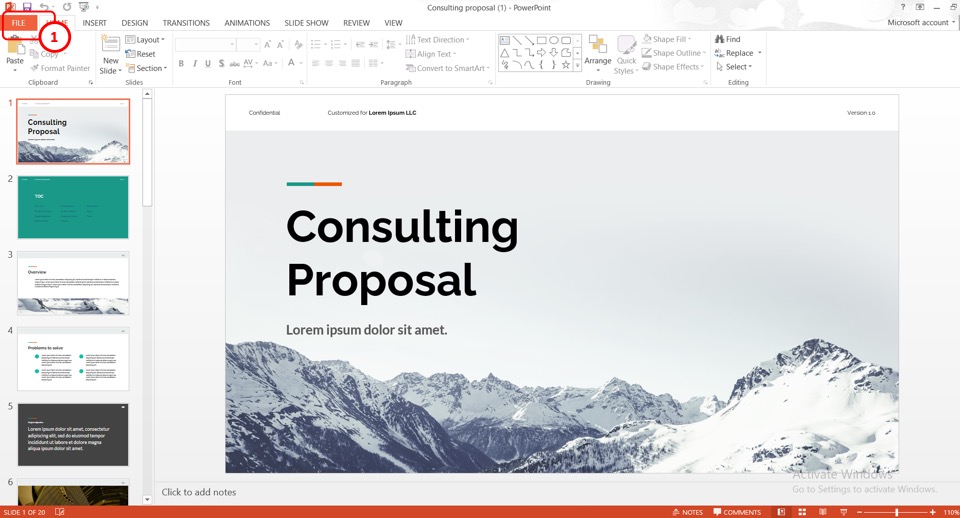
The first step is to open the downloaded Microsoft PowerPoint file. In the menu ribbon located at the top of the screen, click on the “File” tab.
Step-2: Click on the “Options” option
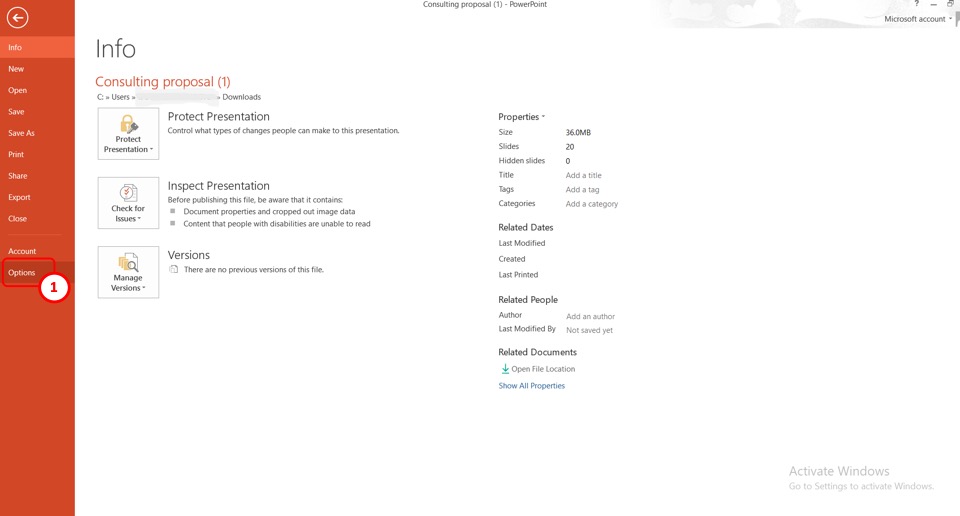
The next step is to open the “PowerPoint Options” dialogue box. To do so, click on the “Options” option in the sidebar on the left side of the “File” screen.
Step-3: Click on the “Proofing” option
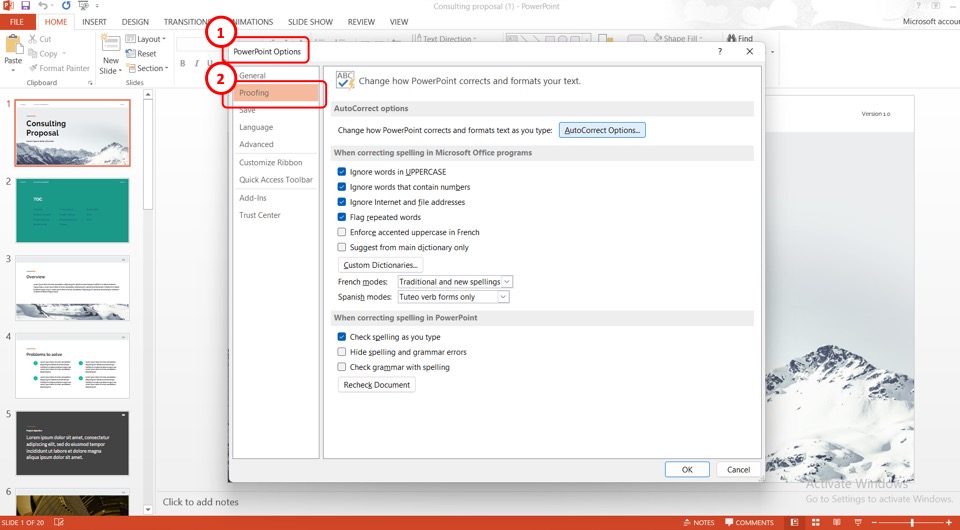
When you click on the “Options” option, the “PowerPoint Options” dialog box will appear in the middle of the screen. In the left column of the dialog box, click on the “Proofing” option.
Step-4: Click on the “AutoCorrect Options” button
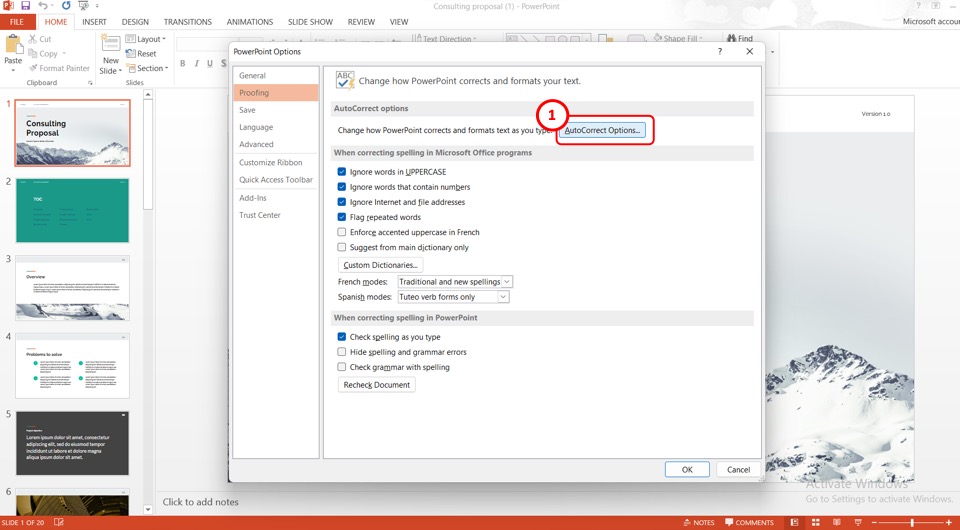
The next step is to click on the “AutoCorrect Options..” button in the right column of the “PowerPoint Options” dialog box. This will open the “AutoCorrect” dialog box.
Step-5: Click on the “AutoFormat As You Type” tab
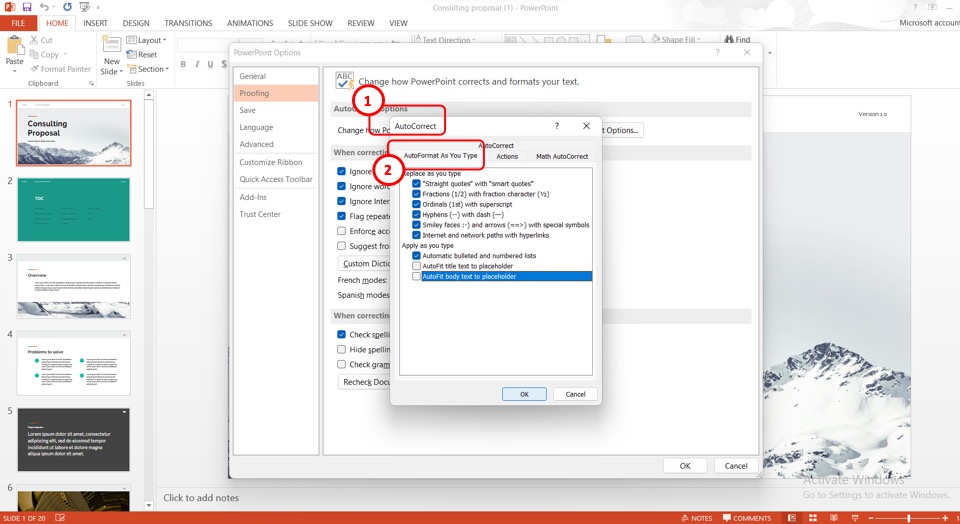
In the “AutoCorrect” dialog box, click on the “AutoFormat As You Type” tab located at the top.
Step-6: Click on the “AutoFit body text to placeholder” option
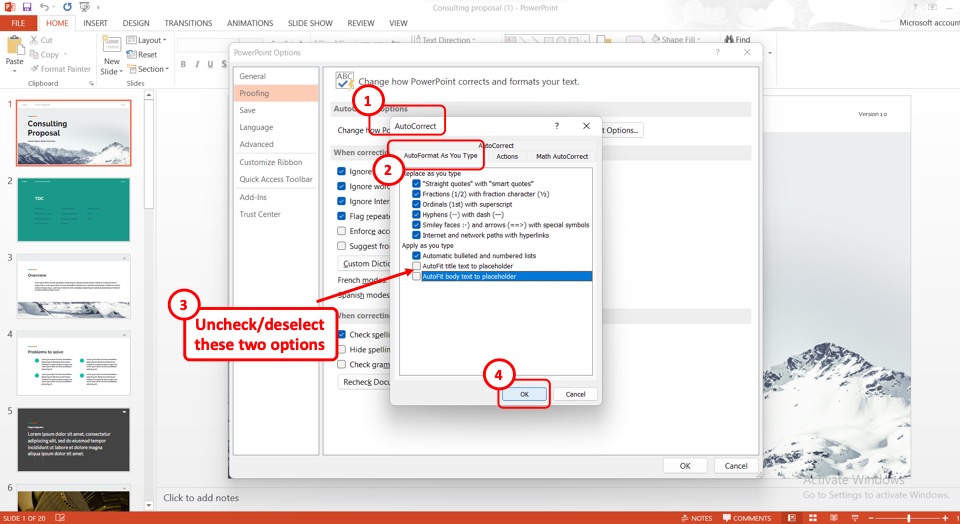
In the “Apply as you type” section of the “AutoCorrect” dialog box, you have to deselect or uncheck the “AutoFit title text to placeholder” option and the “AutoFit body text to placeholder” options. To do so, click on the options. The checkmarks by the options will disappear.
Step-7: Click on the “OK” button
Finally, all you have to do is click on the “OK” button at the bottom of the “AutoCorrect” dialog box to stop auto-formatting. Then click on the “OK” button at the bottom of the “PowerPoint Options” dialog box to return to editing the presentation (as shown above).
7. How to Edit Google Slides Presentation in PowerPoint?
Google Slides allows you to export a presentation to Microsoft PowerPoint without any changes in formatting. You can also edit the exported Google Slides presentation in PowerPoint. All you have to do is follow the 3 simple steps.
Step-1: Click on the “File” menu
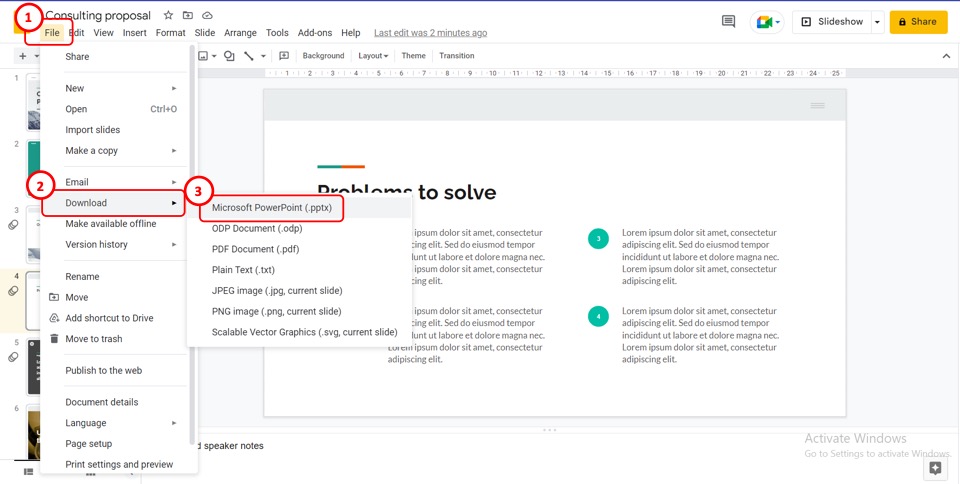
The first step is to convert the Google Slides presentation into a PowerPoint file. To do so, click on the “File” menu which is the first option in the menu bar at the top of the screen.
Step-2: Click on the “Microsoft PowerPoint (.pptx)” option
In the dropdown menu under the “File” tab, click on the “Download” option. Now all you have to do is click on the “Microsoft PowerPoint (.pptx)” option in the pop-up menu by the “Download” option to save the file as a PowerPoint presentation (as shown above).
Step-3: Click on the “Enable Editing” option
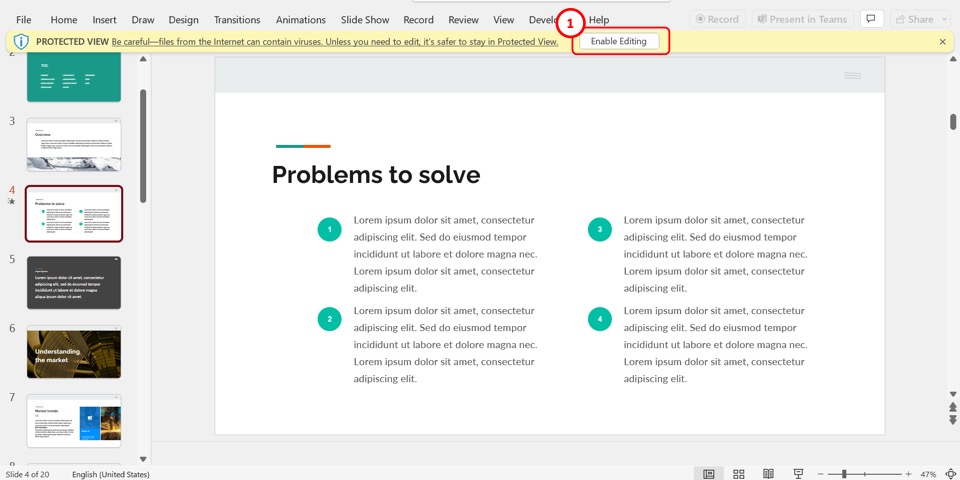
The final step is to open the converted PowerPoint file. The Microsoft PowerPoint presentation will open in “Protected View” format which is not editable.
To edit the presentation, click on the “Enable Editing” option in the yellow message bar under the menu ribbon located at the top of the screen. You can now edit the Google Slides presentation using the editing features available in PowerPoint.
8. How to Convert Google Slides to PDF?
Google Slides allows you to convert a presentation file into PDF using the “File” tab. Converting a presentation into a PDF file allows you to easily print the slides without losing formatting. To convert a presentation file into a PDF, follow the 2 quick steps.
Step-1: Click on the “File” tab
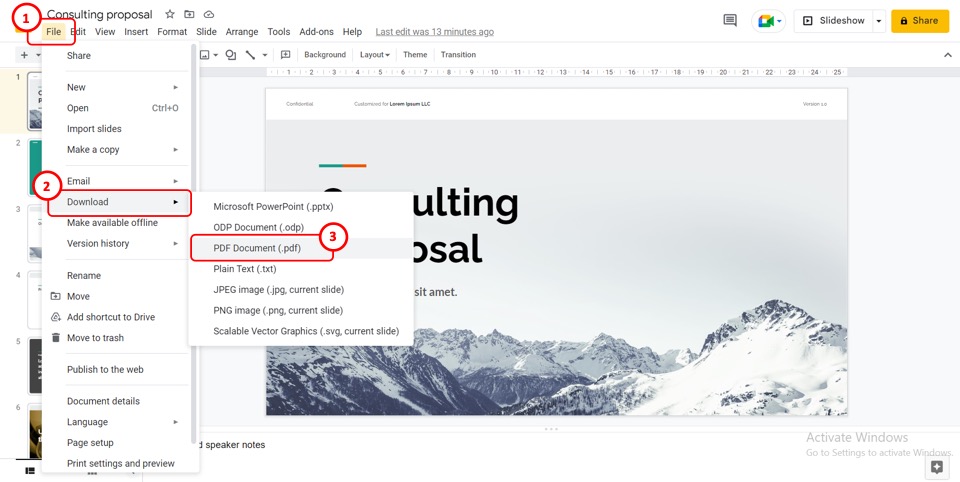
First, you have to open the Google Slides presentation that you want to convert to PDF. Then click on the “File” tab in the menu bar at the top of the screen. In the dropdown “File” menu, click on the “Download” option.
Step-2: Click on the “PDF Document (.pdf)” option
In the pop-up menu by the “Download” option in the “File” menu, click on the “PDF Document (.pdf)” option to convert the Google Slides presentation to a PDF document (as shown above).
9. How to Convert Google Slides to Keynote?
Since Keynote is a part of Apple’s iWork productivity suite, you cannot directly convert a Google Slides presentation to Keynote.
To convert a Google Slides presentation to Apple Keynote, you have to download the presentation as a Microsoft PowerPoint file first. Unfortunately, Keynote will show that some fonts and other formatting are missing from the converted file since it does not support all the formatting available in Google Slide.
9.1 How to Convert Google Slides to Keynote on Mac?
You can easily convert a Google Slides file to Keynote on Mac. All you have to do is follow the 4 quick steps.
Step-1: Click on the “File” format
The first step is to open the Google Slides presentation. Then click on the “File” tab in the menu bar at the top of the screen.
Step-2: Click on the “Download” option
In the “File” dropdown menu, click on the “Download” option. Then click on the “Microsoft PowerPoint (.pptx)”option from the pop-up menu by the “Download” option.
Step-3: Click on the “File” tab
Now you have to open the Keynote application on your Mac device. Click on the “File” option on the top left corner of the screen. It will open a dialog box.
Step-4: Select the PowerPoint file
In the dialogue box, select the downloaded PowerPoint file. Then all you have to do is click on the “Open” option to convert the PowerPoint file to a Keynote application.
9.2 How to Convert Google Sides to Keynote on iPad
To convert a Google Slides presentation to Keynote on an iPad, you have to follow the 4 easy steps.
Step-1: Select the “More” option
The first step is to open the Google Slides presentation on your iPad. Then tap on the “More” option which is the “…”icon on the top right corner of the screen.
Step-2: Select the “Send a Copy” option
When you tap on the “…” icon, a menu bar will appear on the screen. Tap on the “Send a Copy” option from the menu bar. It will open another pop-up menu.
Step-3: Tap on the “PowerPoint” option
Tap on the “PowerPoint” option from the pop-up menu by the “Send a Copy” option to download the Google Slides presentation as a Microsoft PowerPoint file.
Step-4: Click on the “Copy to Keynote” option
Once the Google Slides file is converted into a PowerPoint file, a dialog box will appear on the screen. Now all you have to do is swipe left in the dialog box and tap on the “Copy to Keynote” option. This will open the PowerPoint presentation file in the Keynote application.
Credit to kroshka__nastya (on Freepik) for the featured image of this article (further edited).

![Convert Google Slides to PowerPoint [Without Losing Formatting]](https://artofpresentations.com/wp-content/uploads/2022/11/Featured-Image-COnvert-Google-Slides-to-Powerpoint.webp)