
It is not uncommon to receive a “Request to Access” your Google Slides presentation from the recipient. In some cases, it is intentional. However, in most cases, you will receive the access request because you probably aren’t fully aware of how to give permissions on Google Slides correctly!
In this article, we will do a deep dive into understanding the permissions of Google Slides, learn the types of permissions, and know how to choose which setting to choose!
So, let’s get started!
1. Ways to Give Permissions or Access to Google Slides?
To share a Google Slides presentation, you have to use the big orange “Share” button which is located at the top right corner of the Google Slides window. There are 3 ways in which you can share your Google Slides presentation.
Methods to Share a File in Google Slides
| S. No | Method of Sharing | Will You Get an Access Request? | Will the Recipient Directly Access the Slides? |
|---|---|---|---|
| 1 | Share with Specific People | No | Yes, the recipient will receive an email to access the |
| 2 | Sharing a Link (Restricted) | Yes | You need to send the link to the recipient, and you will get a request to access the file |
| 3 | Sharing a File Link (Publically) | No | Anyone with the link can open the file |
| 4 | Publish to the Web | No | No sharing option is required. The file is published on a website. |
The “publish to the web” option is specifically meant for those who want to share a presentation of a google file on a website. In such a scenario, the question of restricting access may not exist (as the intention is to share it publically).
Now let’s look at how to share a Google Slides file in these three ways in detail –
1a. Share with Specific People
To share your Google Slides presentation with specific people, follow the simple steps described below.
Step-1: Click on the “Share” button.
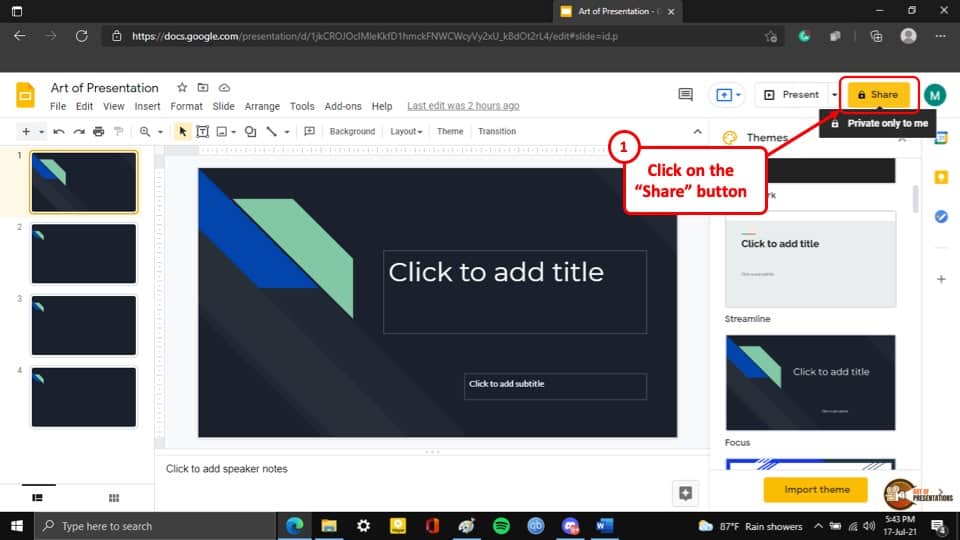
At first, you have to click on the “Share” button that has the sign of a lock on it. A pop-up window will appear on the screen
Step-2: Add the email address of the recipients
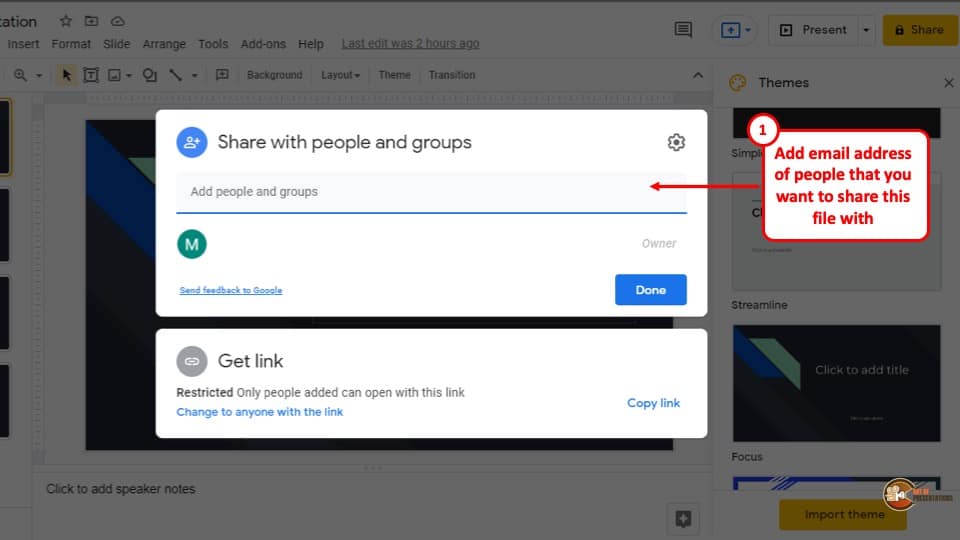
In the pop-up window, type in the email addresses of the people you want to share your Google Slides presentation within the “Recipient address” box that says “Add people and groups”
Step-3: Click on the “Done” button
In the last step, after you have entered the email addresses, click on the blue “Done” button which is located at the bottom right corner of the pop-up window and an email containing the access link to your file will be sent to the entered email addresses.
1b. Share a link to the File
To share a link to the file, you have to click on the “Share” button and open the pop-up window.
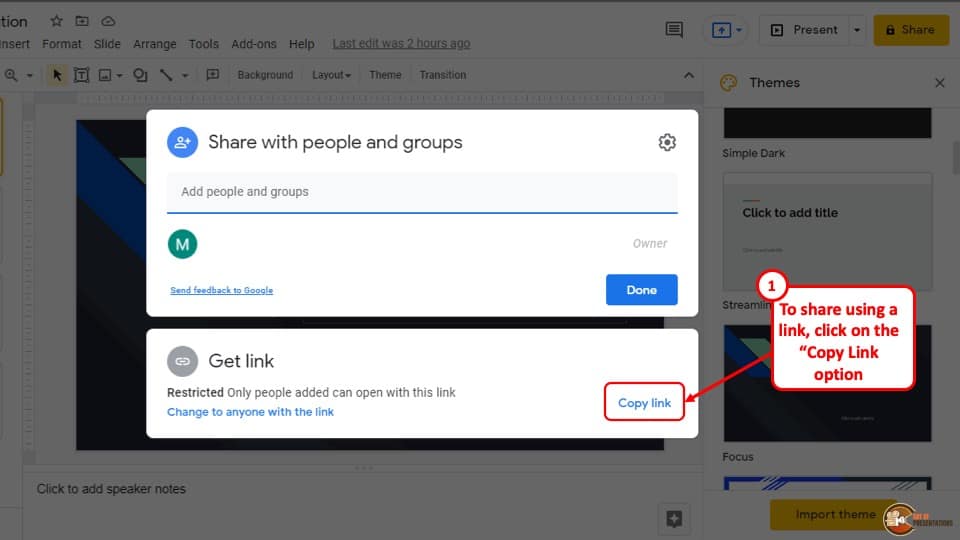
From the pop-up window, click on the “Copy link” button located at the bottom right of the lower part of the pop-up window.
After you have clicked the “Copy link” button, the link to your Google Slides presentation will be saved on the clipboard of your computer. However, only the people you give access to will see your Google Slides presentation with this link.
1c. Share a File Publicly
To share your Google Slides, publicly you have to change the permissions of the file. To do that click on the “Share” button to open the pop-up window and follow the simple steps described below.
Step-1: Click on the “Change to anyone with the link” button
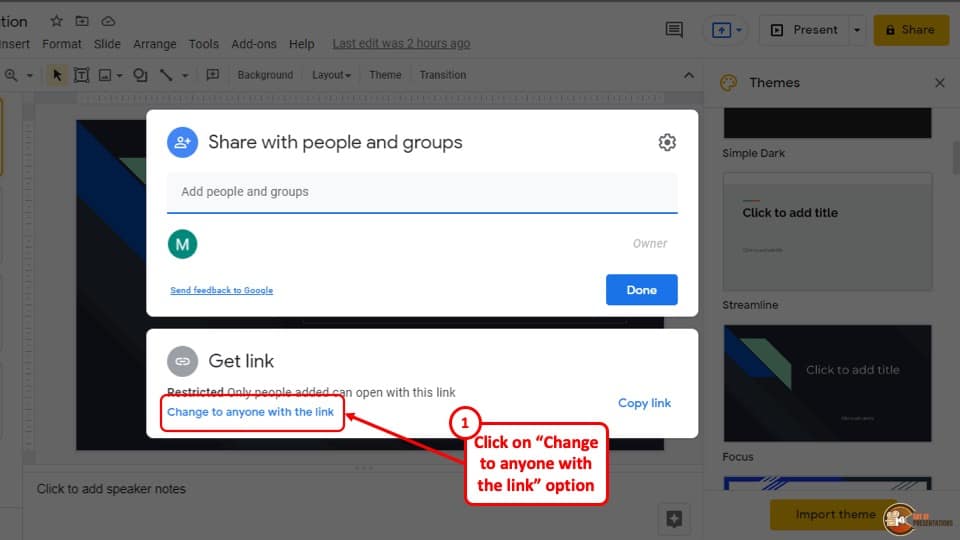
The first step is to click on the blue highlighted button that says, “Change to anyone with the link”. This will expand the lower part of the pop-up window and contract the upper part of the pop-up window.
Step-2: Click on the “Copy link” button
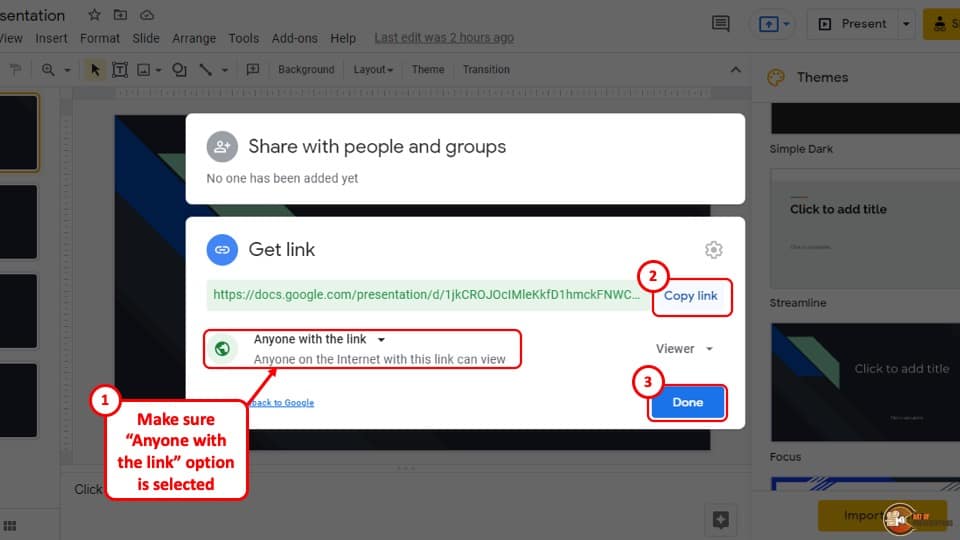
After the lower part of the pop-up window expands, the permission will change automatically to “Anyone with this link”.
Now, all you have to do is click on the blue “Copy link” button which is located at the top right of the lower part of the pop-up window and click on the blue “Done” button.
Anyone with that link will be able to view your Google Slides presentation.
2. How to Limit Access to the Shared Google Slides?
You can change the limit of access to your shared Google Slides presentation into 3 different roles. These different roles grant a certain level of access to your Google Slides presentation to the people who have that link to the file.
The three different roles are described below –
The “Viewer” role
The “Viewer” role gives the user the access to only view your Google Slides presentation. They can make no changes or comment on your presentation.
The “Commentor” role
The “Commentor” role allows the user to view and also comment on your Google Slides presentation
The “Editor” role
The “Editor” roles give extensive access to your Google Slides presentation to the user with the link. Users with this link can view, comment, and also edit your presentation.
3. How to Change Sharing Permissions on Google Slides?
To change the sharing permissions of your Google Slides presentation, you have to click on the “Share” button and expand the lower part of the pop-up window which is called the “Get link” portion. The rest of the process is described in 2 easy steps below.
Step-1: Click on the “Access limit” drop-down menu
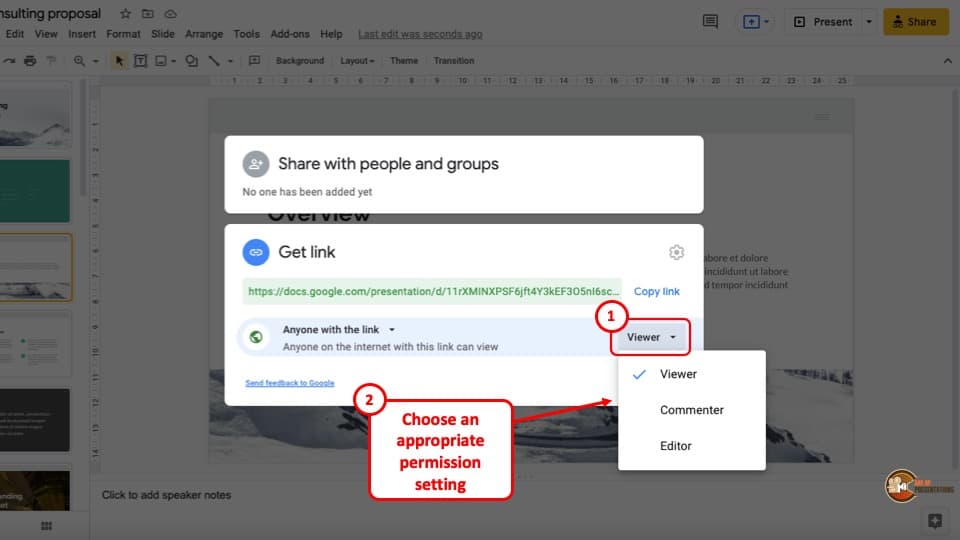
At first, you have to click on the “Access limit” drop-down menu which is the button that says “Viewer”. The default role is designated to a publicly shared link in the “Viewer” role. This will open a drop-down menu.
Step-2: Select the preferred role for the link
From the drop-down menu, select the role you want to assign to the recipient. The link will be generated for your Google Slides presentation. You can then click on the blue “Done” button located at the bottom right corner of the pop-up window.
This will automatically update the access permission of that link.
4. How to Grant a Video Access to Google Slides?
Sometimes users may have trouble accessing videos that are present in your Google Slides presentation. They might be prompted that they need access to open the video file. This may occur due to the audio not being embedded in your Google Slide presentation.
To resolve this issue, you can upload the Google Slides presentation and the video file in the same folder on your Google Drive and give the users the link to that Google Drive folder. T
he process of uploading your Google Slides presentation and audio in the same folder and getting a sharable link in your Google Drive is given below.
Step-1: Open a new folder
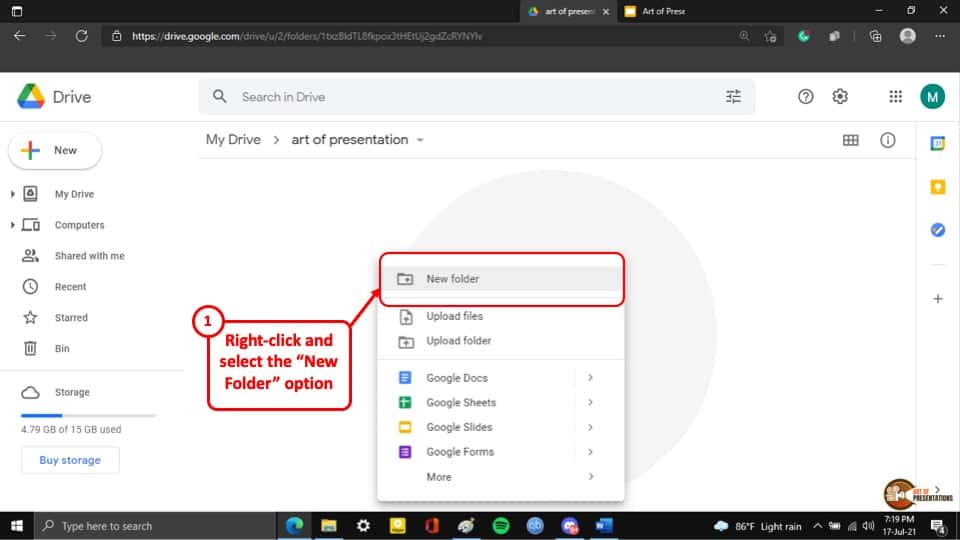
At first, go to your Google Drive and open a new folder. All you have to do is “Right-click” on your computer’s mouse and select “New Folder” from the drop-down menu.
Step-2: Upload the files
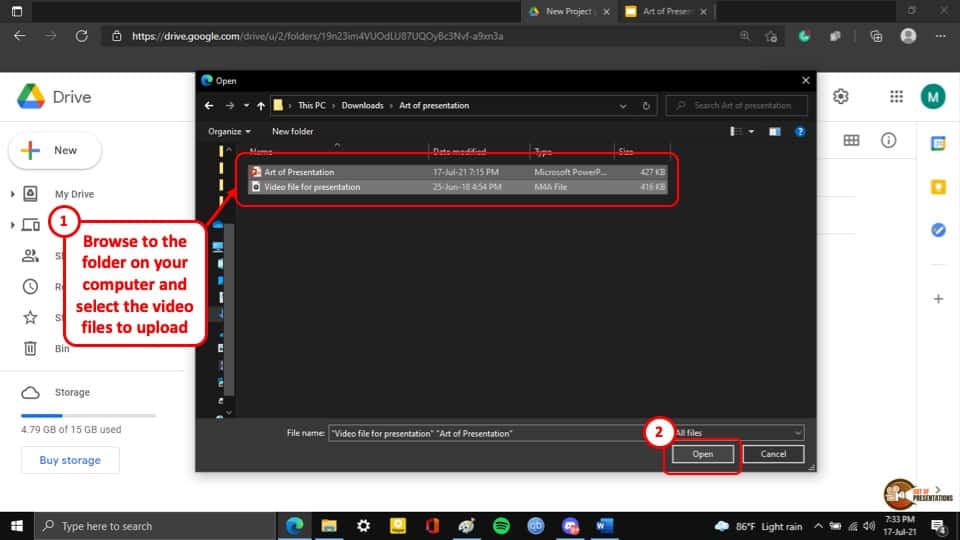
After you have created a new folder, “Right-click” on the mouse of your computer again and select the “Upload files” option. This will open a pop-up window. From that pop-up window, select your presentation file and the video file that is in your presentation.
After that click on the “Open” button at the bottom right corner of the pop-up window and the files will being to upload automatically.
Step-3: Get the shareable link
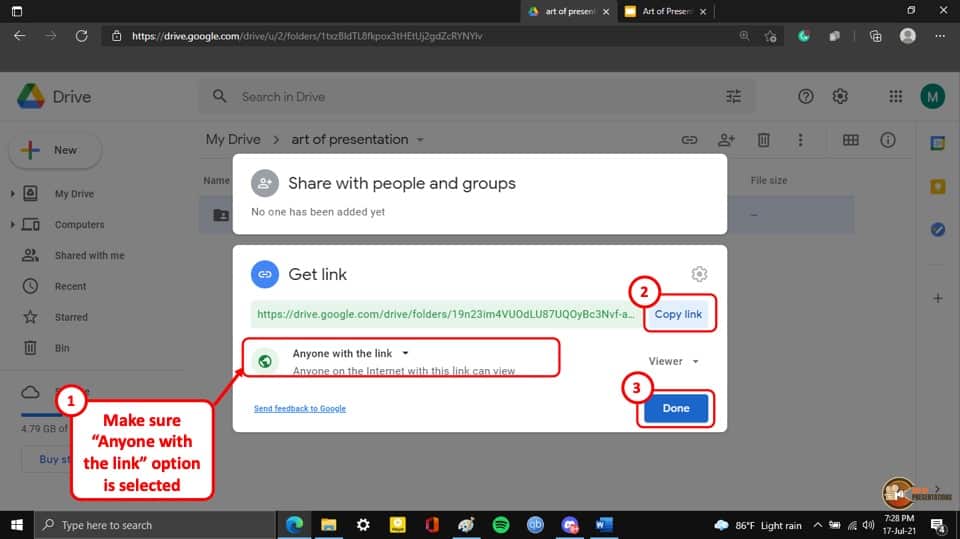
After you have finished uploading the files to the new folder in your Google Drive, “Right-click” on the folder and select the “Get link” option from the drop-down menu.
Now all you have to do is change the permissions to “Anyone can view” and anyone with that link will be able to view your presentation while also getting access to the video file in the presentation.
5. How to Give Audio Permissions on Google Slides?
The process of giving audio permission on Google Slides is the same as giving video permissions in Google Slides.
Simply upload the Presentation file and the audio file in the same folder in Google Drive and share a viewable link to the users and they will be able to get access to the audio file.
You can do this by following the simple steps described in the previous section above.
Credit to Cookie_studio (on Freepik) for the Featured Image (further edited) for this article.