![How to Format Slides in Google Slides? [Complete Guide!]](https://artofpresentations.com/wp-content/uploads/2022/11/Featured-Image.jpg)
Google Slides is a great cloud tool for you to create presentations whether you are a student or a business executive. However, with mismatched layouts and backgrounds, the audience can get a negative impact or easily get distracted from the message you want to deliver. So, it is important that your presentation must look professional and consistent.
Do you want to learn how well you can streamline your slides while creating a presentation?
To change the background of slides, choose “Change Background” from the “Slide” menu. Click on “Color” or “Choose image” to set a color or an image as the slide background. To add it to all slides, click on the “Add to theme” button in the dialog box of “Change Background”.
Google Slides allows an easy way to make sure that your set style of slides remains true to your brand or the message you want to convey. In this article, we will provide a complete guide about how to set images or any basic color as slides background, edit master slides, change layouts, themes or even the size of the slides.
Let’s get started!
1. How to Add Background Color to a Slide in Google Slides?
In Google Slides, you can add background color to a slide using the “Change background” option. All you have to do is follow the 3 simple steps.
Step-1: Click on the “Change background” option
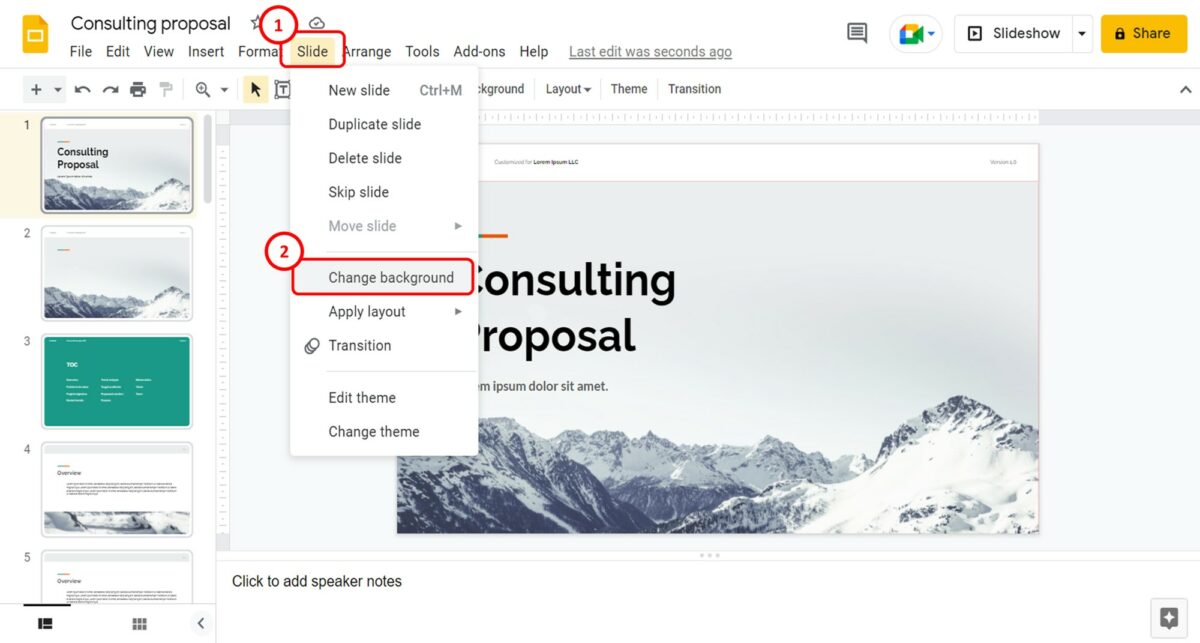
The first step is to open the slide. Then click on the “Slide” option in the menu bar at the top of the screen. Click on the “Change background” option in the “Slide” menu.
Step-2: Click on the “Color” option
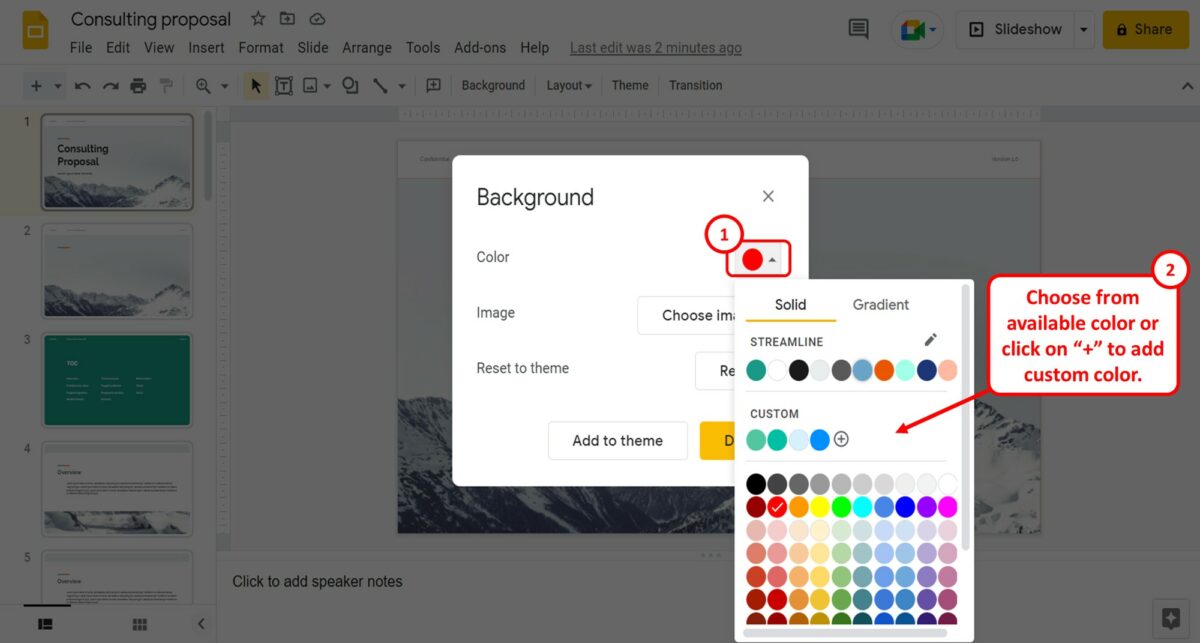
In the “Background” dialog box, click on the arrow in the “Color” box. This will open a dialog box. You can select a background color from the dialog box.
You can also click on the “+” icon under the “Custom” section to add a custom color to the slide background.
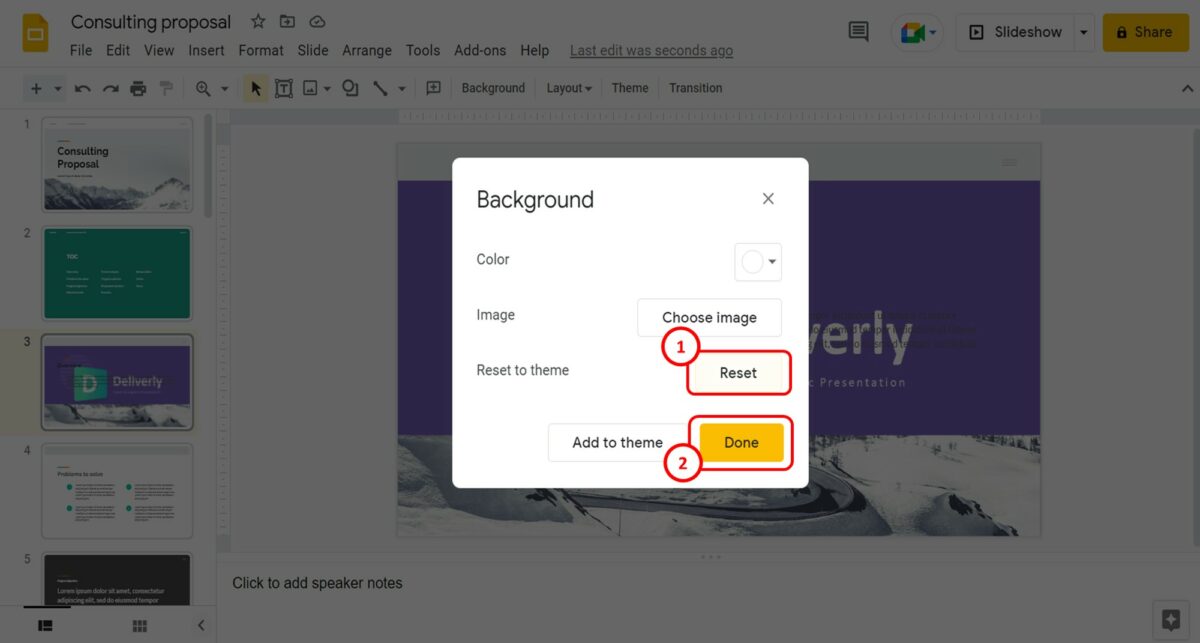
Step-3: Click on the “Done” button
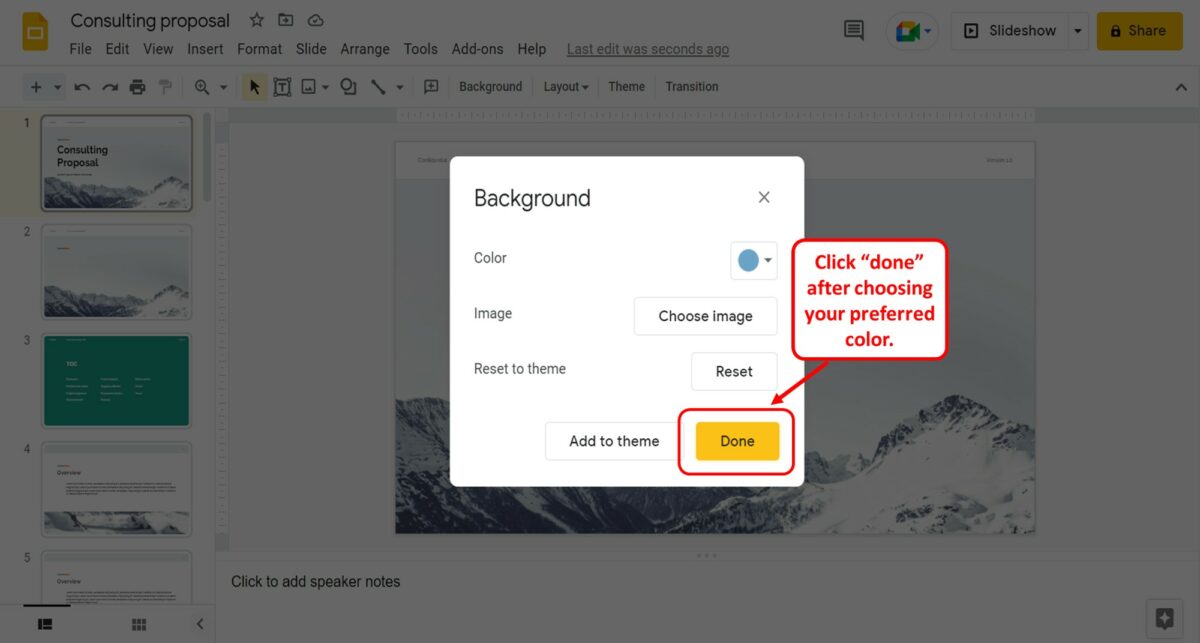
After selecting the preferred background color, all you have to do is click on the “Done” button at the bottom of the “Background” dialog box to change the background color of the open slide.
1.1 How to Add Background Color to All Slides in Google Slides?

To add a background color to all the slides in a Google Slides presentation, you have to first open the “Background” dialog box and select a background color. Refer to section 1 for the detailed steps.
Then all you have to do is click on the “Add to theme” button at the bottom of the “Background” dialog box to add the selected background color to all the slides.
1.2 How to Remove Background Color of Slides in Google Slides?
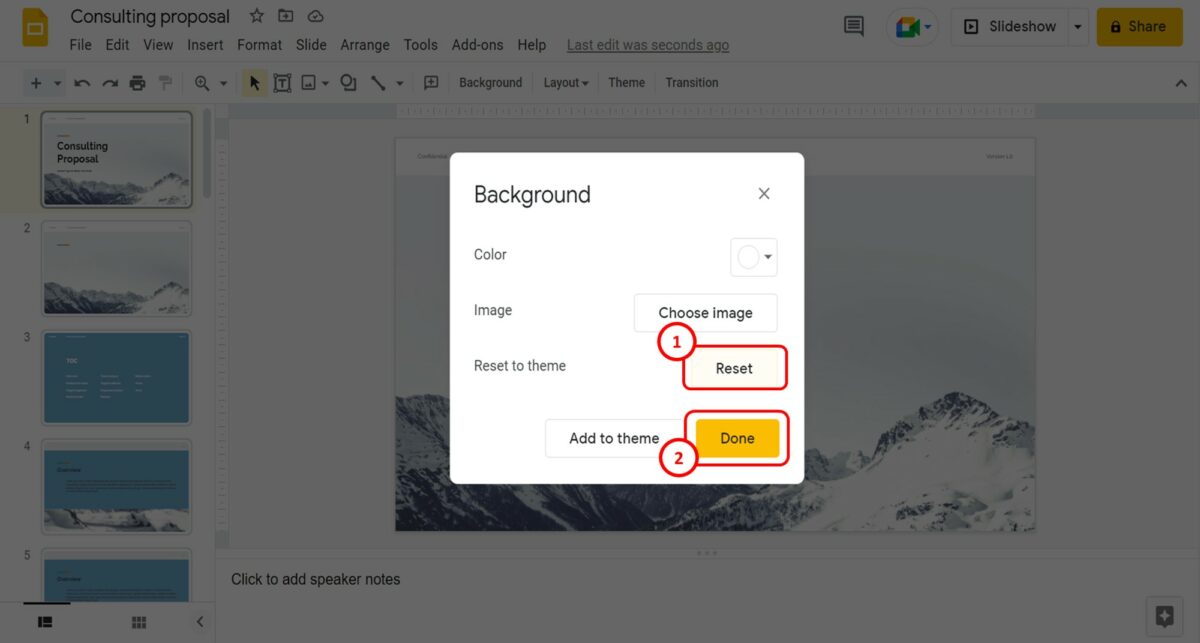
In the “Background” dialog box, you can remove a background color added to a Google Slides slide. To do so, click on the “Reset” option in the “Background” dialog box. Then all you have to do is click on the “Done” button to remove the background color.
2. How to Add Background Image to Slides in Google Slides?
In Google Slides, you can add a picture as the background of a presentation slide. To add a background image to a slide, follow the 4 quick steps.
Step-1: Click on the “Change background” option
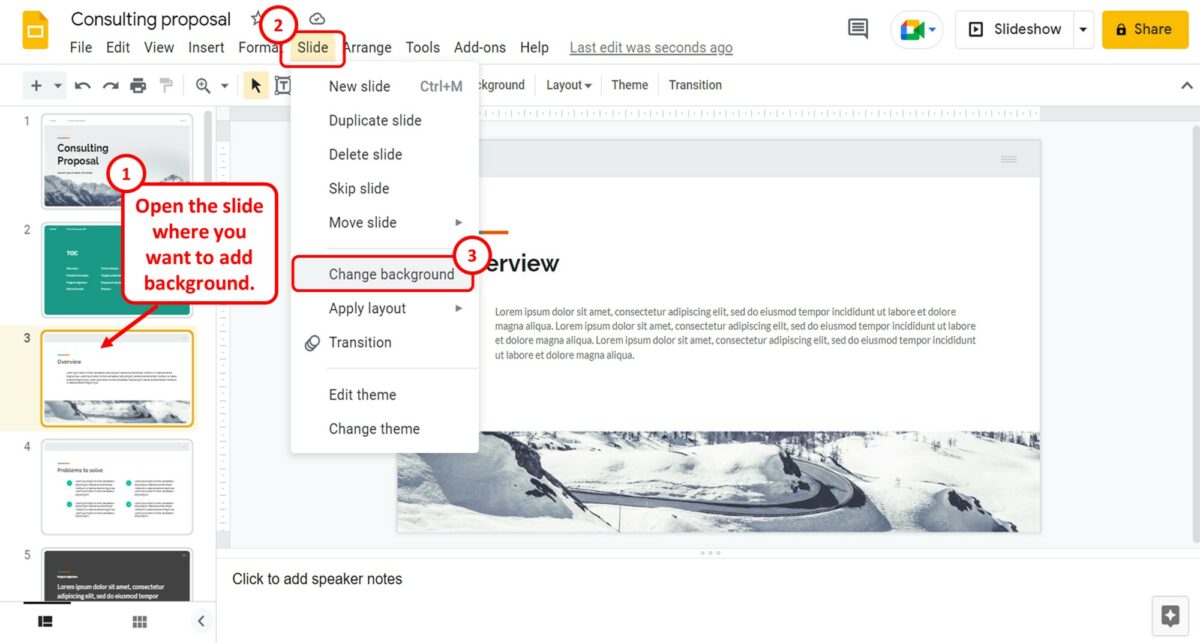
In the presentation, you have to first open the slide where you want to add the background image. Then click on the “Slide” tab in the menu bar located at the top of the screen. In the “Slide” menu, click on the “Change background” option.
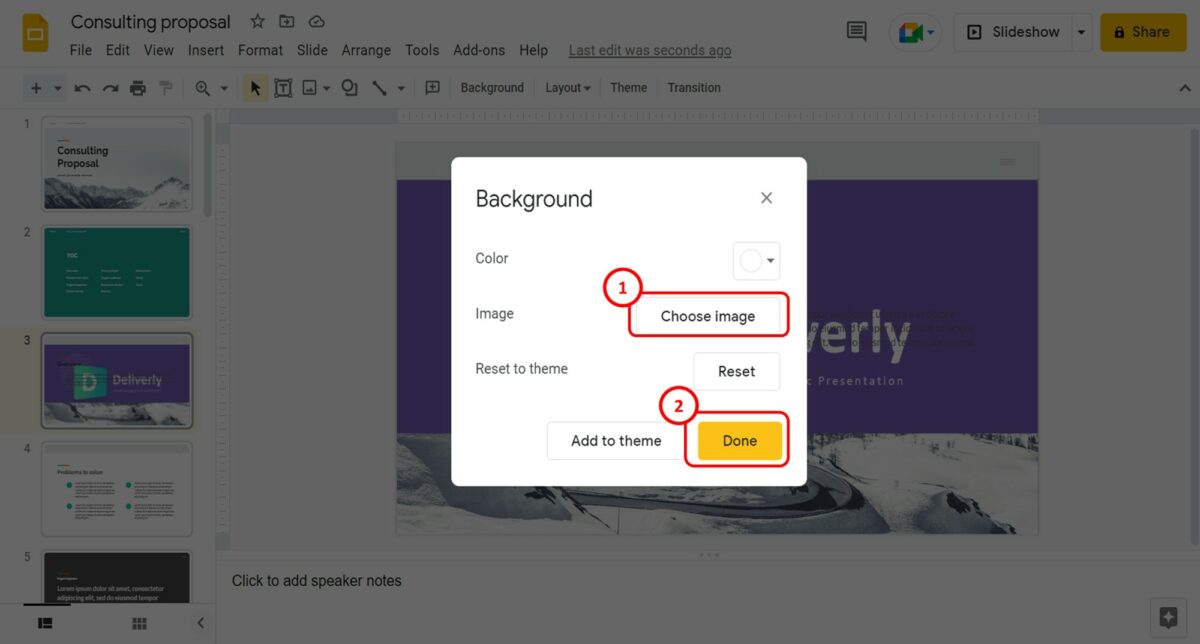
Step-2: Click on the “Choose image” option

In the “Background” dialog box, click on the “Choose Image” option. This will open the “Insert background image” dialog box.
Step-3: Select the image source
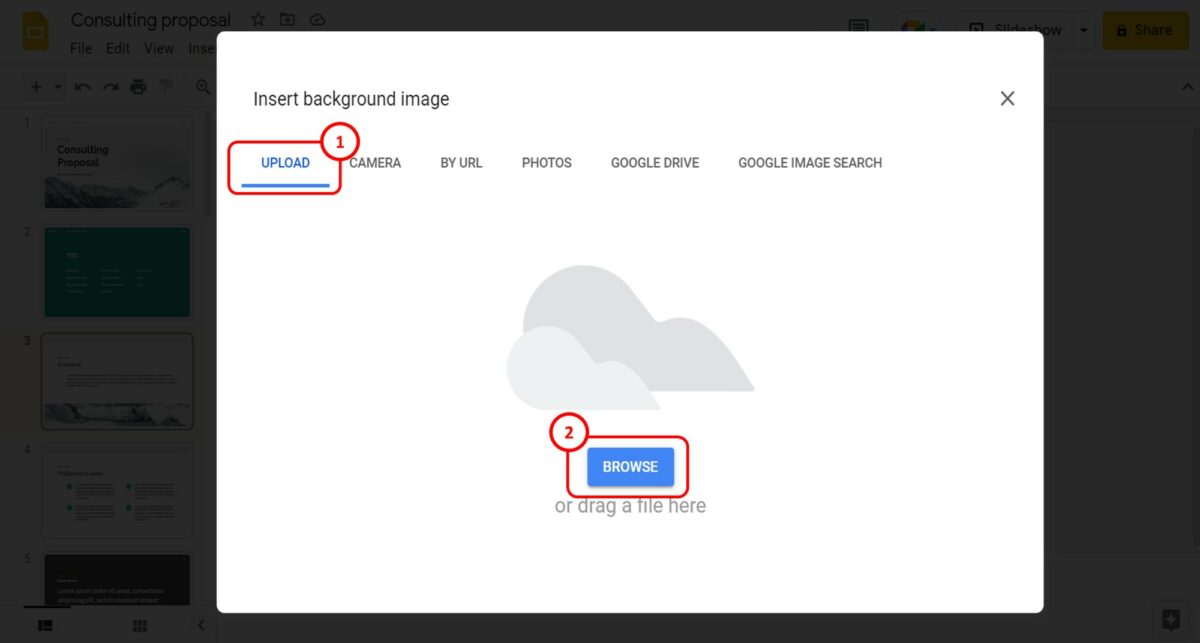
In the “Insert background image” dialog box, click on the image source in the top row. To insert a picture from your device, click on the “Upload” option. Then click on the “Browse” button to select an image from your device.
Step-4: Click on the “Done” button
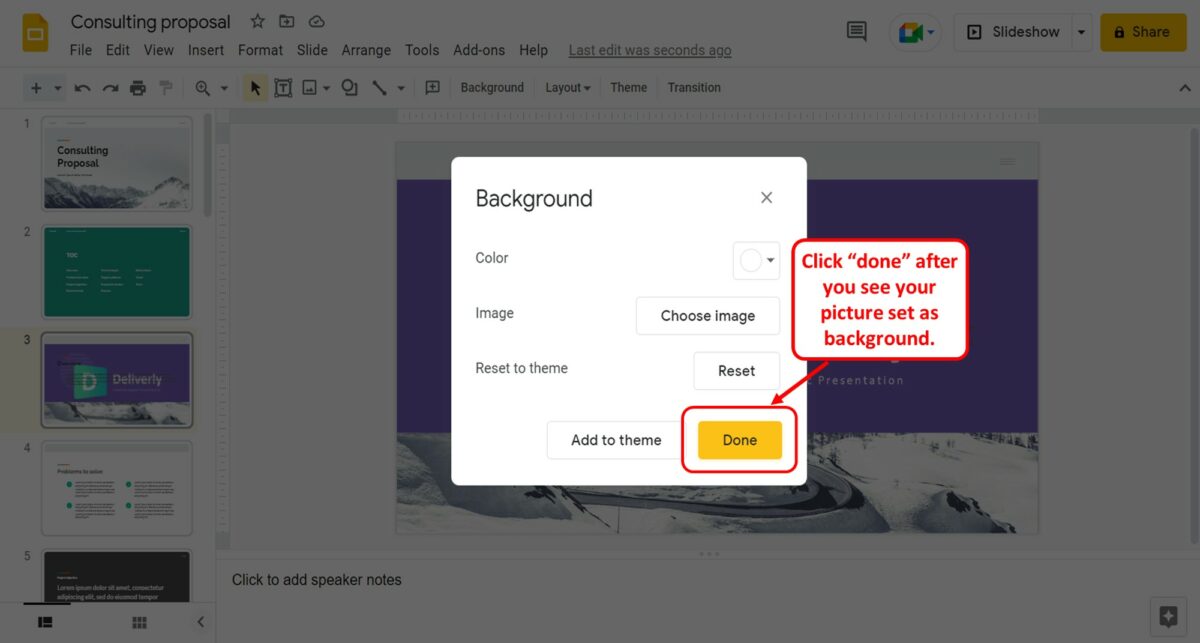
The selected image will automatically be set as the background of the open slide. To save the new image as the slide background, all you have to do is click on the “Done” button at the bottom of the “Background” dialog box.
2.1 How to Change Background Image from Slides in Google Slides?
To change the background image of a slide in Google Slides, you have to follow the same steps as adding a new picture as the slide background. For the detailed steps, refer to section 2 of this article.
2.2 How to Remove Background Image from Slides in Google Slides?
To remove the background image from a slide, you have to first open the “Background” dialog box from the “Slide” option in the menu bar. Then all you have to do is click on the “Reset” button in the “Background” dialog box to remove the background image.
3. How to Change Slide Size in Google Slides?
Google Slides offers the “Page Setup” feature that you can use to change the size of the slides in a presentation. To learn more about slide sizes in Google Slides, you can read my article here. To change the slide size, follow the 3 quick steps.
Step-1: Click on the “Page Setup” option
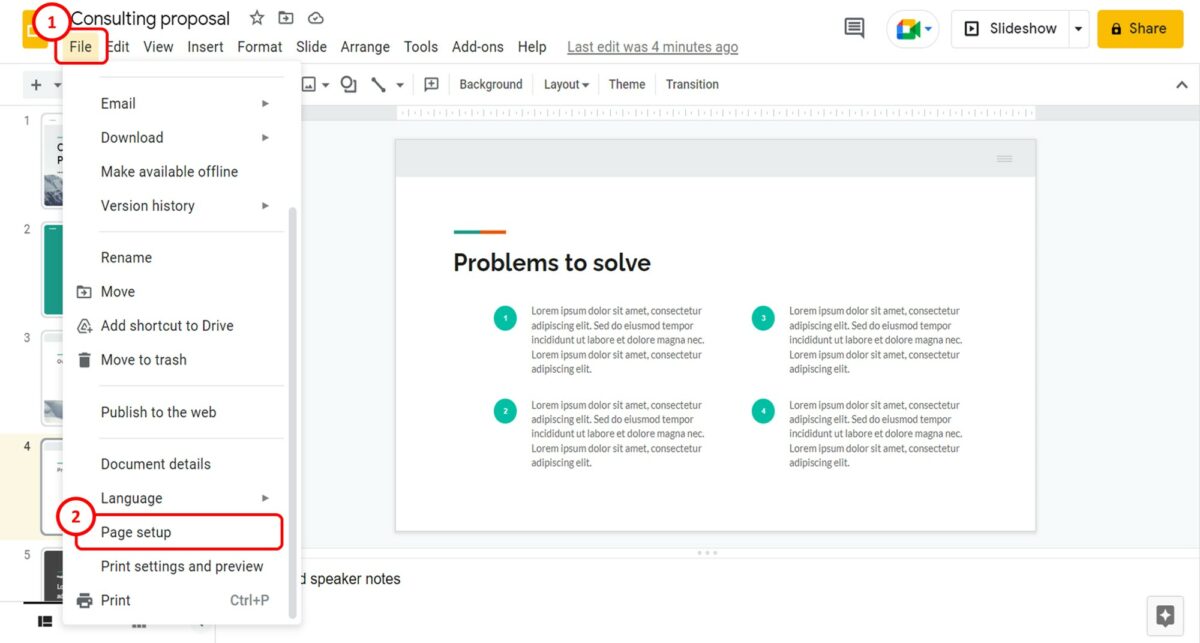
In the menu bar at the top of the screen, click on the “File” option. In the dropdown “File” menu, click on the “Page setup” option to open the “Page setup” dialog box.
Step-2: Click on the “Page Size” box
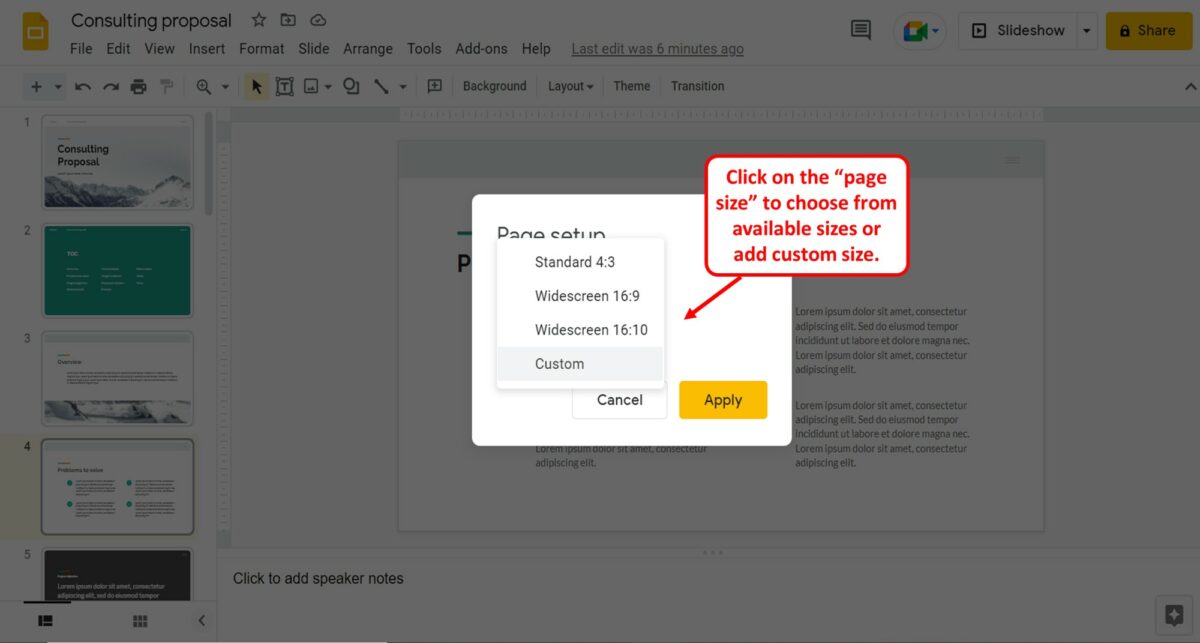
In the “Page setup” dialog box, click on the “Page size” box. Now you can select a preferred page size option in the pop-up menu. You can also click on the “Custom” option to customize the slide size.
Step-3: Click on the “Apply” button
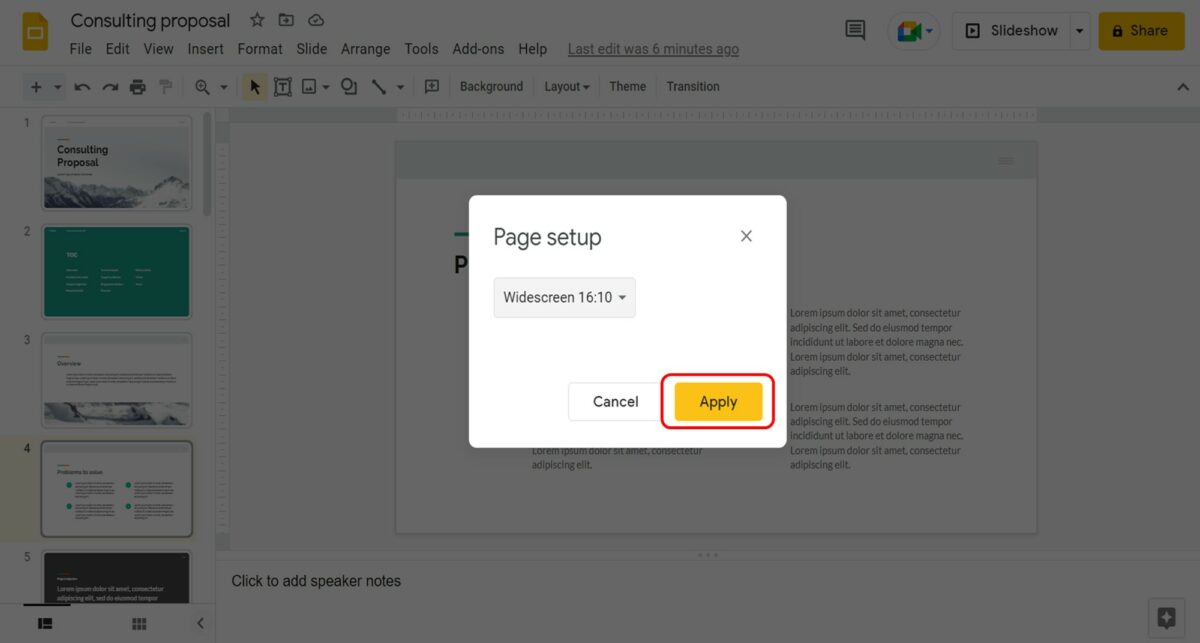
Finally, all you have to do is click on the “Apply” button at the bottom of the “Page setup” dialog box to change the slide size.
4. How to Change Theme for Only One Slide in Google Slides?
In a Google Slides presentation, you cannot use multiple themes in a single file. For each presentation file, you can only use one theme. To change the theme for only one slide in the presentation, you can edit that slide as a separate file. Then copy the slide and paste it into the original file.
5. How to Edit Master Slides in Google Slides?
The “Theme builder” option in Google Slides allows you to edit the master slide and the slide layouts in the presentation. You can read my other article on slide master in Google Slides to learn more about using and editing the master slide in Google Slides.
To edit the master slide, follow the 4 simple steps.
Step-1: Click on the “Theme builder” option
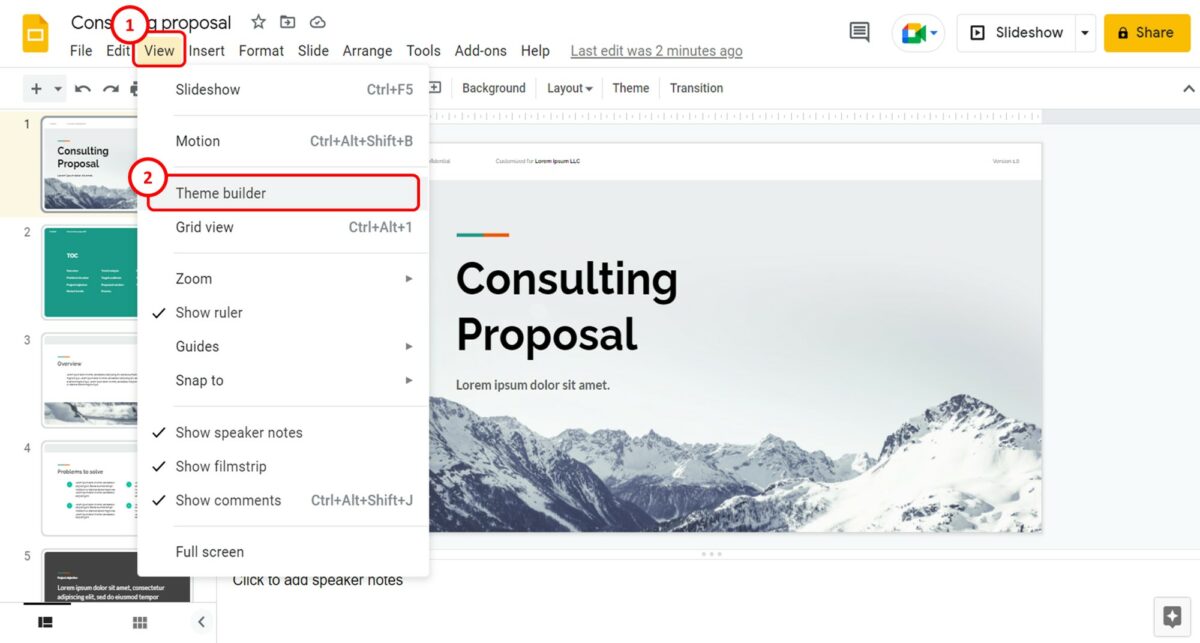
The first step is to click on the “View” option in the menu bar located at the top of the screen. In the dropdown “View” menu, click on the “Theme builder” option.
Step-2: Click on the “Theme” slide
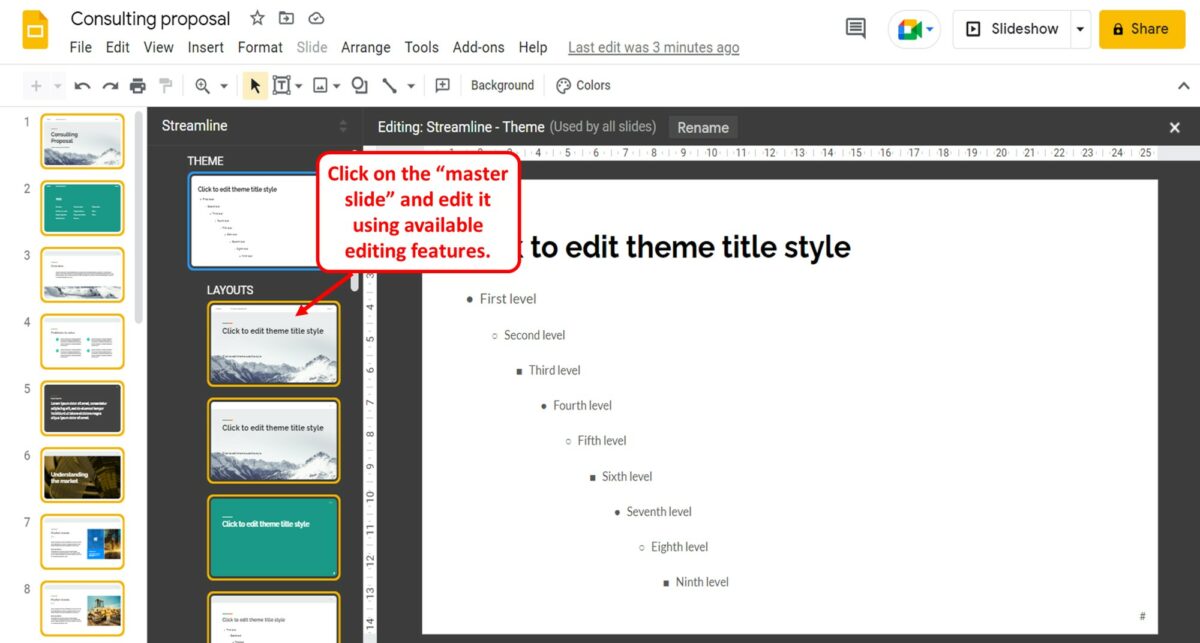
In the “Theme builder” screen, click on the master slide which is the slide under the “Theme” section. It is located in the slide layout pane on the left side. Now you can edit the master slide using the features available in the toolbar and the menu bar at the top of the screen.
Step-3: Click on a “Layouts” slide
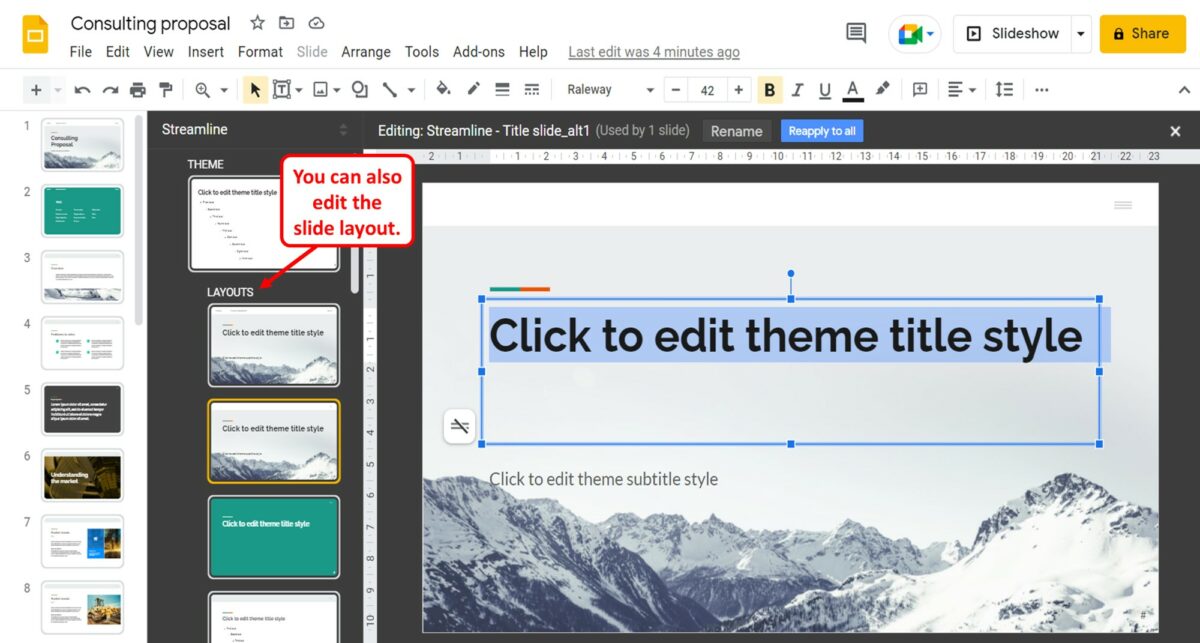
You can also edit the slide layouts in the “Theme builder” screen. The slide layouts are available under the “Layouts” section in the slide layout pane on the left side.
Step-4: Click on the “Close” option
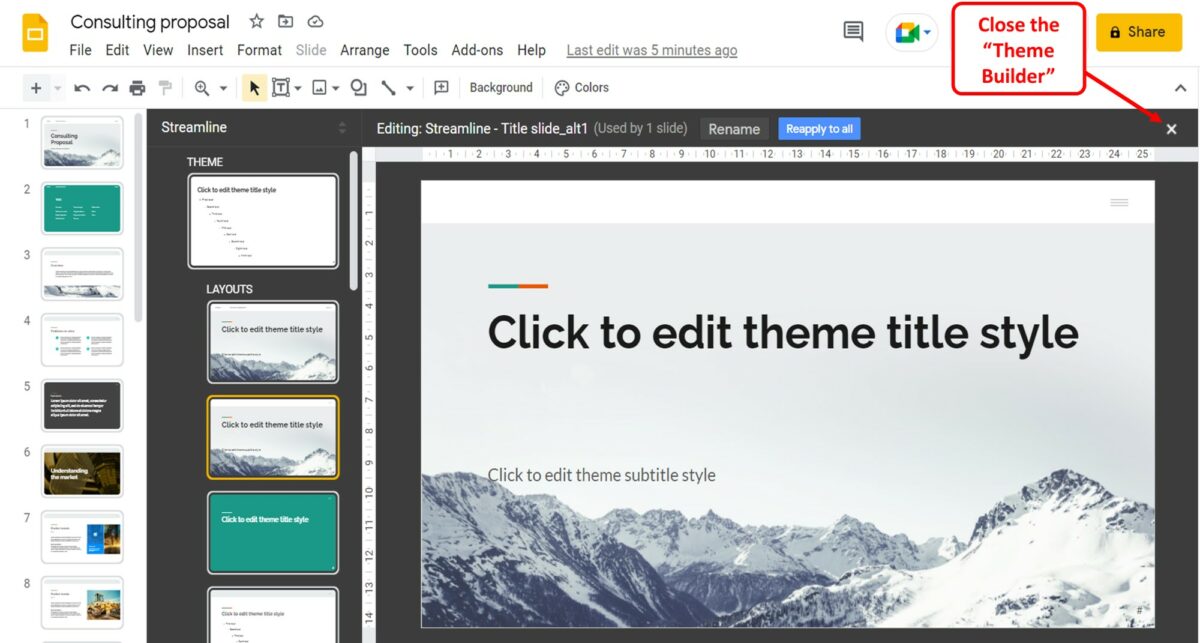
Finally, you can click on the “Close” option which is the “X” icon at the top right corner of the “Theme builder” screen. This will return the screen to the normal view after automatically saving the changes to the master slide.