
Using themes or templates to make your presentation look visually appealing is not uncommon. However, knowing how to edit the themes in Google Slides requires more than just day-to-day knowledge!
To edit themes in Google Slides, click on the “View” tab. From the dropdown, click on the “Theme Builder” option. This will open the “Master View” in Google Slides. You can edit the theme colors, text colors, slide layouts, and other aspects using the “Master View”.
Editing a theme in Google Slides allows you to customize several different aspects of the theme. In this article, I will share with you key things that you need to know in order to edit themes in Google Slides. You will get visual references so that you can implement the same changes in your Google Slides presentation as well!
So, let’s get started!
1. How to Edit a Theme in Google Slides?
The first thing that we need to know is how to edit a theme in Google Slides.
To edit a theme in Google Slides, you have to go to the “Edit Theme” feature which is a new update in Google Slides as of May 2021. The process of accessing the “Edit Theme” feature is described in easy steps below.
Step-1: Click on the “Slide” tab
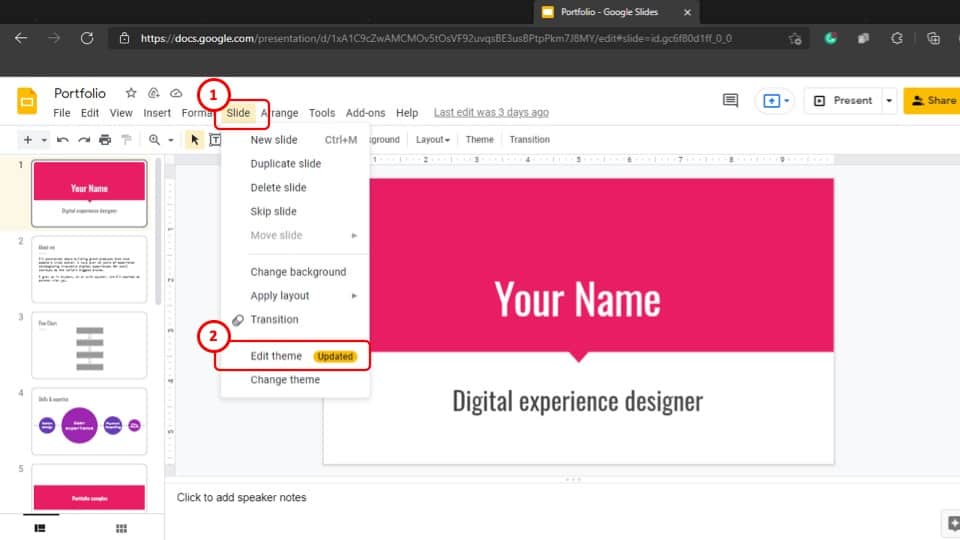
The first step is to click on the “Slide” tab in your Google Slides which is the 6th tab in the ribbon. A down-down menu will appear on your screen.
Step-2: Click on the “Edit Themes” option
After you have opened the drop-down menu, select the “Edit Themes” option. This will change the view of the Google Slides presentation and allow you to edit the theme which your presentation is using.
There are quite a few things that you can change about the theme using this “Theme Editor” option in Google Slides. We shall learn more about it in detail in the remaining sections of the article.
2. How to Access and Edit Slide Master in Google Slides?
In the latest update of Google Slides, the “Slide Master” view has changed and the new name given to it is “Theme Builder” (as mentioned above).
It can now be accessed in two ways. The first way of accessing the new “Slide Master” view is to go to the “Edit Theme” feature as explained in the previous section.
The other is to go to the “Theme Builder” feature from the “View” tab. The process of accessing the “Theme Builder” feature is described in 2 easy steps below.
Step-1: Click on the “View” tab
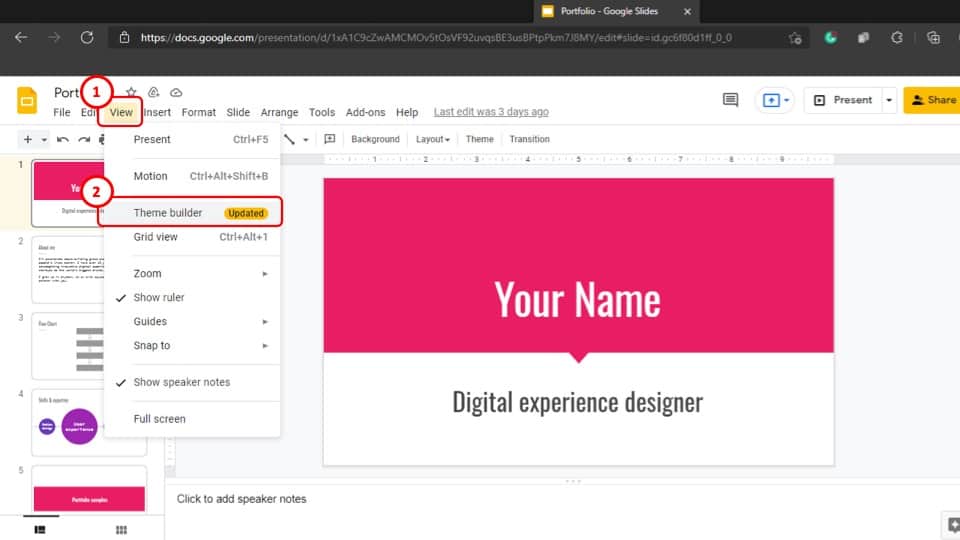
The first step of this process is to click on the “View” tab from the ribbon of your Google Slides presentation. It is the 3rd tab in the ribbon. Upon clicking on the “View” tab a pop-up window will appear on your screen.
Step-2: Select the “Theme Builder” feature
After that, click on the “Theme Builder” option. This will change the view of your Google Slides presentation and give you access to the “Slide Master” view.
The theme builder option will also lead to the same “Slide Master View” window in Google Slides just as the “Edit Theme” option does.
2a. How to Add a Text Placeholder in Slide Master in Google Slides?
Text placeholders are great as they can allow the end-user to know exactly where to add text on the slide.
To add a text placeholder in “Slide Master” in your Google Slides presentation, go to the “Theme Builder” feature as described in the section above and follow the easy steps described below.
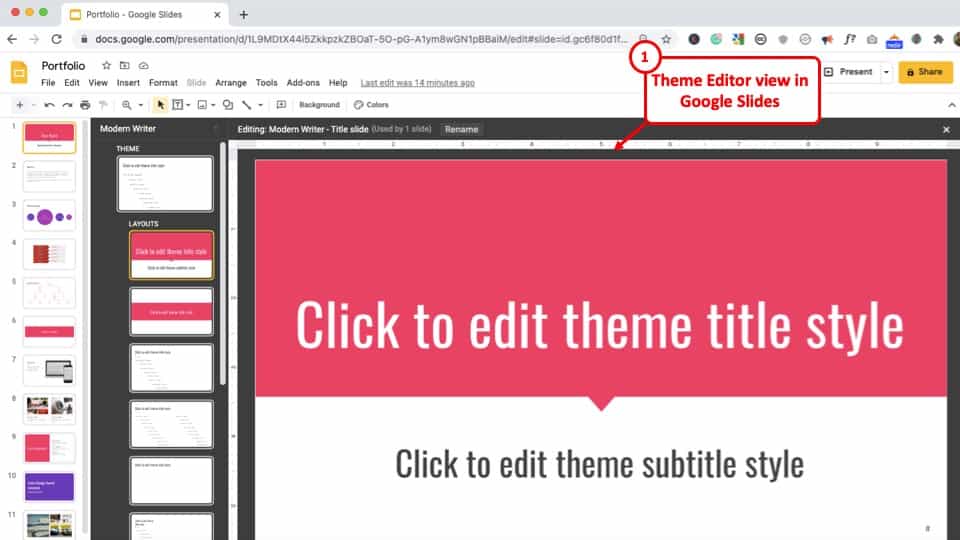
Step-1: Open the Theme Editor View
You can use any of the two methods described in the previous sections to open the “Master View” or the “Theme Editor View” in Google Slides. You can click on the “Slides” menu and then choose the “Edit Theme” option.
Alternatively, you can also click on the “View” menu, and choose the “Theme Builder” option.
Step-2: Select the “Placeholder” option
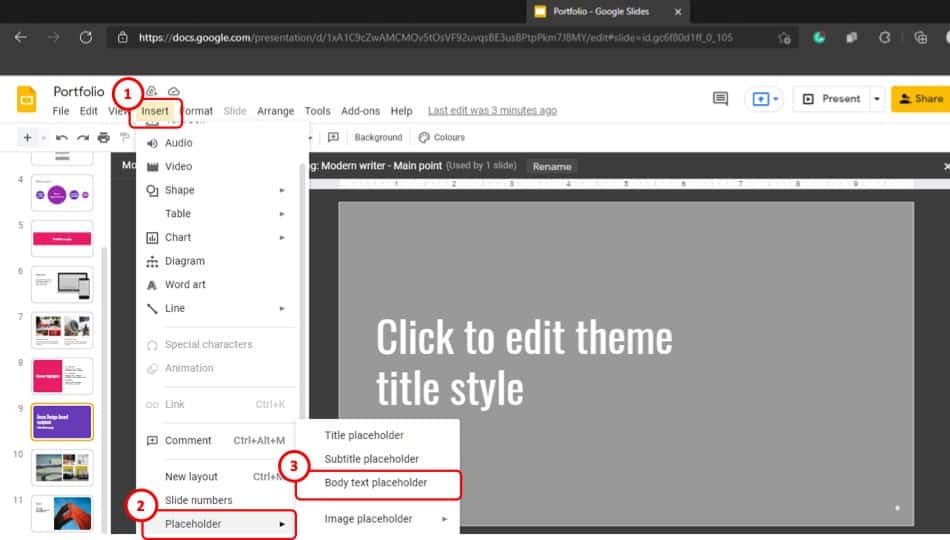
To begin, go to the slide layout in which you want to add a text placeholder and then select the “Placeholder” option. It is located in the “Insert” tab, which is the 4th tab in the ribbon of your Google Slides presentation. The “Placeholder” option is the last option in the “Insert” tab.
Step-3: Select your preferred placeholder
Now all you have to do is to select the type of placeholder you wish to add to your slide layout.
Click on the placeholder type from the three options and then insert it to your slide layout by dragging the cross-shaped cursor on your preferred area in the slide.
For adding text, simply select the “Body text placeholder” and add that to the slide.
2b. How to Add an Image Placeholder in Slide Master in Google Slides?
The process of adding an image placeholder in the “Slide Master” view of your Google Slides presentation is very similar to adding a text placeholder. Click on the “Placeholder” option and follow the steps described below.
Step-1: Select the “Image Placeholder” option
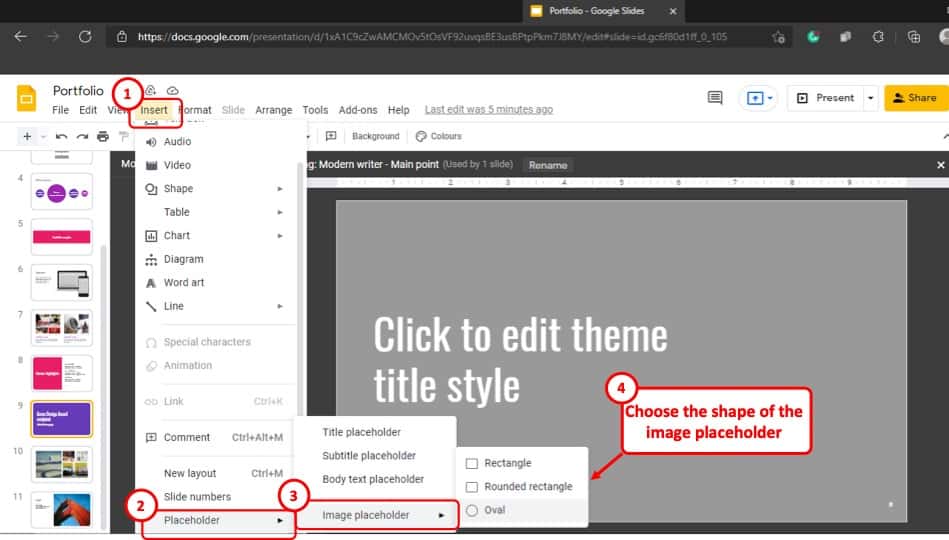
After you have selected the “Placeholder” option, click on the “Image Placeholder” option which is the last option in the “Placeholder” drop-down menu.
Step-2: Select your preferred style of image placeholder
After you click on the “Image placeholder” option, another drop-down menu will appear on your screen, with 3 options to choose from. Simply select the style of the image placeholder and add it to the slide by dragging the crossed cursor on your preferred area on the slide.
3. How to Change Theme Colors in Google Slides?
To learn how to change the theme colors of your Google Slides presentation, open the “Slide Master” view and follow the 3 simple steps described below.
Step-1: Open the Theme Editor view
The first step is to open the theme editor view in order to change the theme colors in Google Slides. You can do that by following any one of the two methods mentioned in section 1 and 2 of this article above.
Step-2: Select the “Colors” editing tool
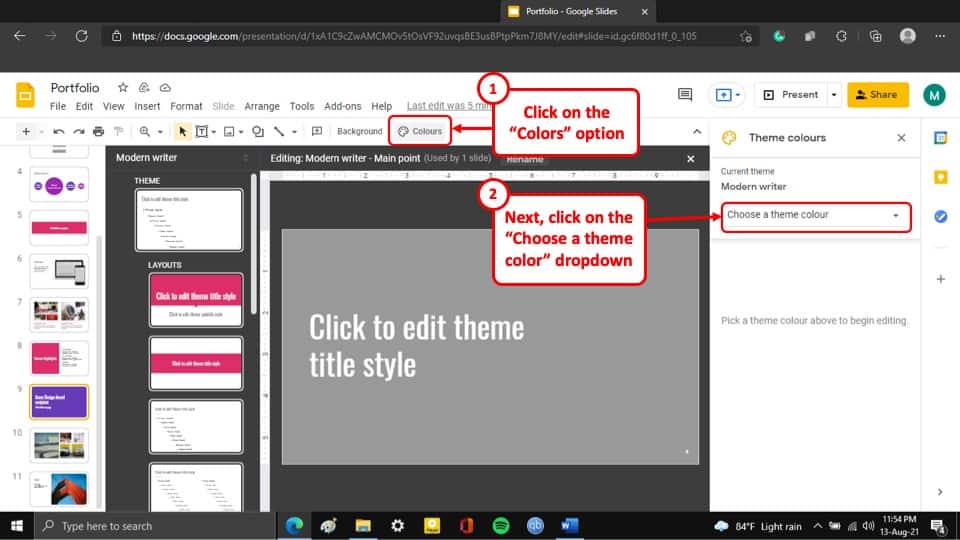
The first step is to select the “Colors” tool, which is located in the editing tools bar below the ribbon. The “Colors” tool button is the last button in the editing tools bar.
After you select the “Colors” tool button, the “Theme colors” sidebar will appear on the right of your screen. From the sidebar, click on the “Choose a theme color” drop-down box.
Step-3: Choose the Theme Color matching with the Slide Layout
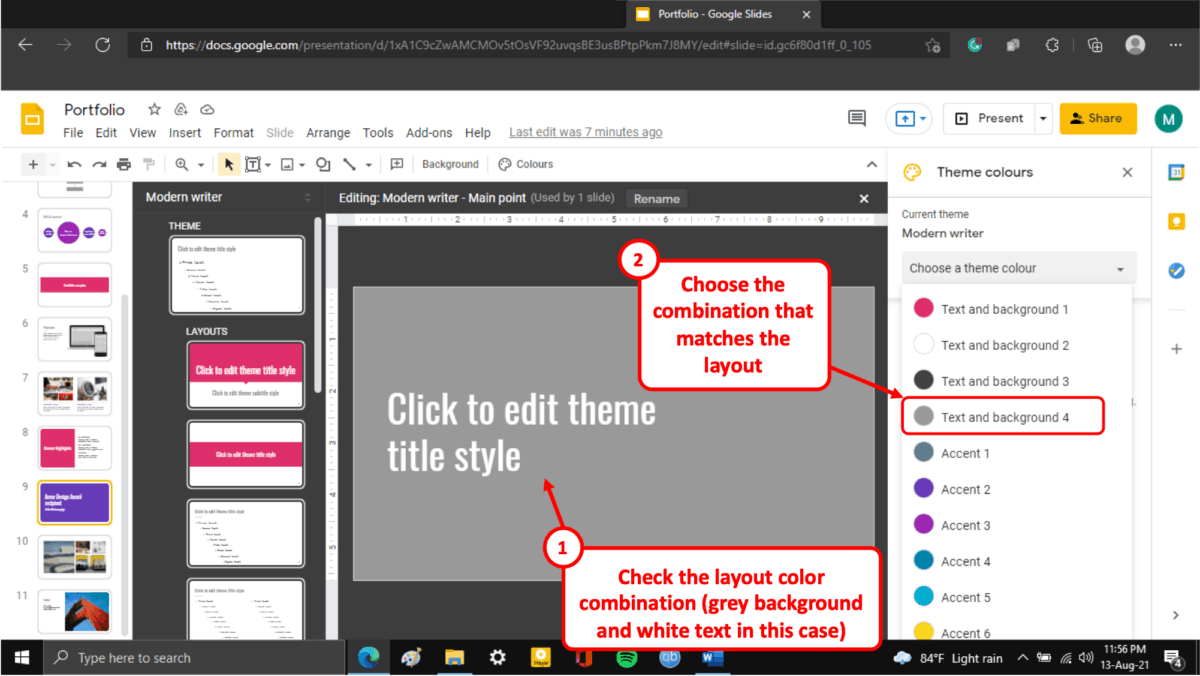
This step is quite important in order to change the right set of colors.
You want to make sure that you change the theme color that matches with that of the slide layout. In the above image example, the background has a grey color with white text.
So, from the panel, choose the “Text and background 4” option that indicates the grey color of the background.
Step-4: Change the theme colors
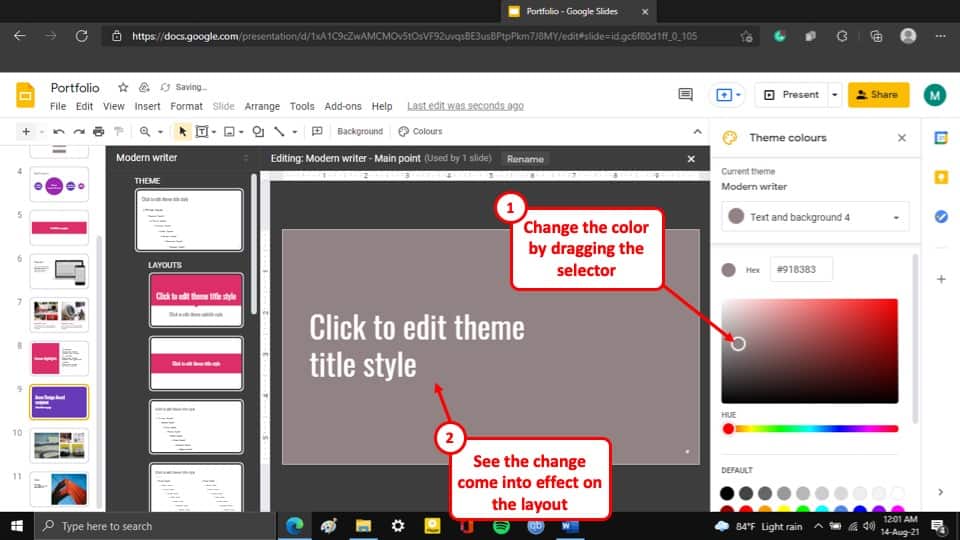
Click on the layer of the color you want to change in the theme of your Google Slides presentation and select your preferred color. After you have selected your preferred new color, the color of the theme will change accordingly.
4. How to Change Themes in Google Slides?
To change the theme of your Google Slides presentation, follow the two simple steps described below.
Step-1: Select the “Themes” option
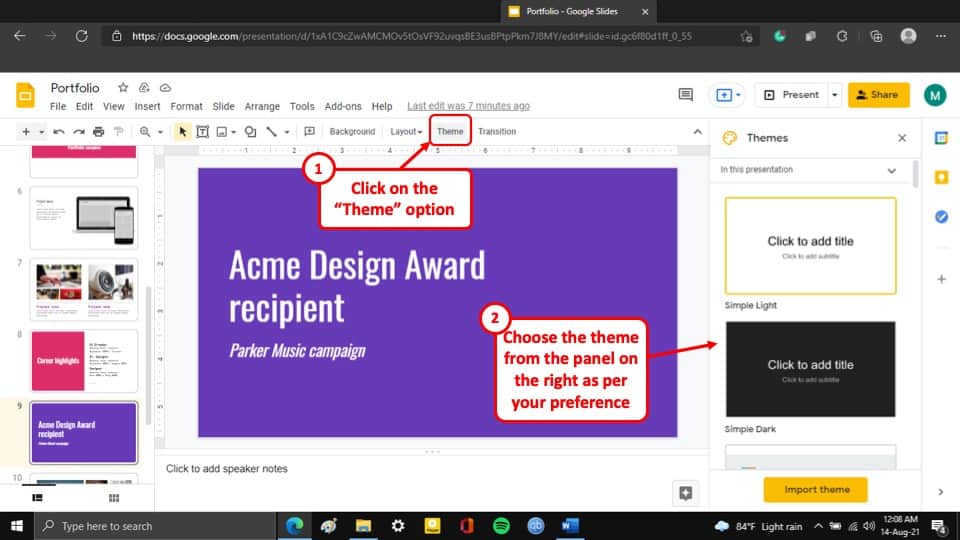
The first step of changing the theme of your Google Slides presentation is to select the “Theme” option in the editing tools bar, which is right below the ribbon. The “Theme” option is the second to last option in the editing toolbar.
Step-2: Select your preferred theme
After you select the “Theme” option, the “Themes” sidebar will appear on the right of your screen.
This will give you a number of themes to choose from. Simply select your preferred theme for your Google Slides presentation, and the theme of the presentation will be changed accordingly.
4b. Can you Change Theme for One Slide in Google Slides?
Unfortunately, you can’t change the theme of just one slide in your Google Slides presentation. However, you can change the background of the slide and edit the slide specifically to fit your preferred theme for the slide.
5. How to Get More Themes for Google Slides?
One of the best features of Google Slides is that you can get access to a virtually infinite number of slides.
You can either use an add-on in your Google Slides to select themes with the click of a button or you can download thousands of templates provided by third-party websites on the internet.
Below are my top three picks of the most popular websites where you can find themes that best fit your style.
- Envato Market – Envato Market is a great option when you just need one presentation template or a graphic. It is reasonably priced so you can easily afford to buy any template. Plus, there thousands of templates available that provide various graphic elements!
- Envato Elements – Envato Elements, just like Envato Market, allows you to get access to several best-in-class design templates. The best part of Envato Elements is that you get unlimited downloads. You can literally take a subscription for one month and download as many presentation templates as you want!
- Slides Go – You can also use Slides Go to access presentation templates. Unfortunately, graphics are usually not available but you can get templates for your presentation. The options are quite limited as of now but some of the templates look interesting.
6. Top Presentation Templates for Google Slides
In this section, I will be recommending 3 of my handpicked Google Slides templates that will help you make a bigger impact with your presentation, make them look more sophisticated and professional.
Here are my top 3 picks for the Google Slides template –
2. Business Proposal PowerPoint Template
The three templates put together will provide you with a ton of different design options to choose from, along with various infographic options! Although these have been primarily designed for PowerPoint, they work equally well on Google Slides too.
One challenge that you may face is that the designs of each of the templates don’t exactly match each other. That will be true for any two presentation templates that you purchase.
One way to fix that is to go with the unlimited download option with Envato Elements as mentioned in the previous section. This will allow you to download any presentation even if you like just one slide of that presentation!
Credit to drobotdean (on Freepik) for the featured image of this article (further edited).