![How to Edit Images in Google Slides? [The EASY Way!]](https://artofpresentations.com/wp-content/uploads/2022/11/Featured-Image-3.jpg)
Images add aesthetics to your presentation but sometimes you think of skipping the idea of adding images to your slides. It is because you find them inappropriate and mismatched with your presentation. Some of the problems you face include relocation, cropping, rotating, resizing or even less brightness and dull color.
Fortunately, you can carry out a number of built-in image editing functions in Google Slides which allows you to adjust your desired images according to your preference and add more value to your presentation.
To edit images in Google Slides, first you have to select the image and then choose relevant options from the toolbar to crop, resize, and add borders to the image as well as from “Format Options” to lock image position, make adjustments such as recolor, transparency, contrast and add drop shadows.
If you’re struggling with editing images in your slides and actively looking for some easy ways to do that, you have reach out to the right post. In this article, we have explained EVERYTHING you need to know about how to edit images in Google Slides. Here’s how:
1. How to Insert an Image in Google Slides?
In Google Slides, you can insert an image using the “Insert” menu. You can read more about inserting images in Google Slides in my article titled “how to Insert Images in Google Slides?“.
Meanwhile, here’s a summary of what you need to do to insert an image in Google Slides –
Step-1: Click on the “Insert” menu
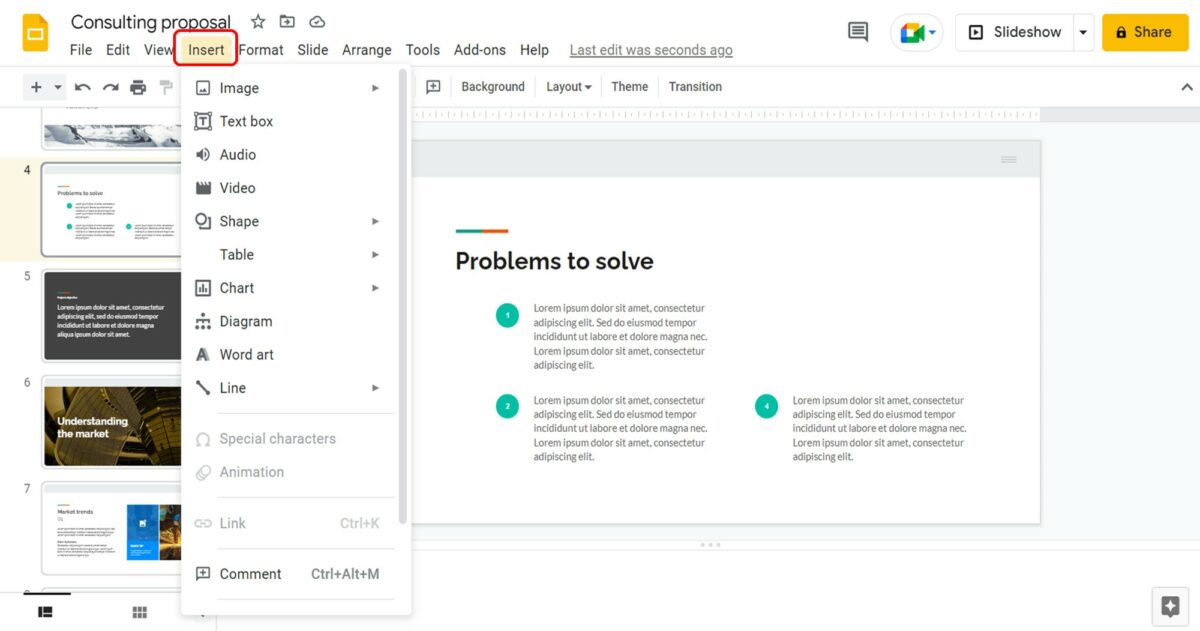
In the menu bar at the top of the screen, click on the “Insert” menu. It is the fourth tab in the menu bar.
Step-2: Select the picture source
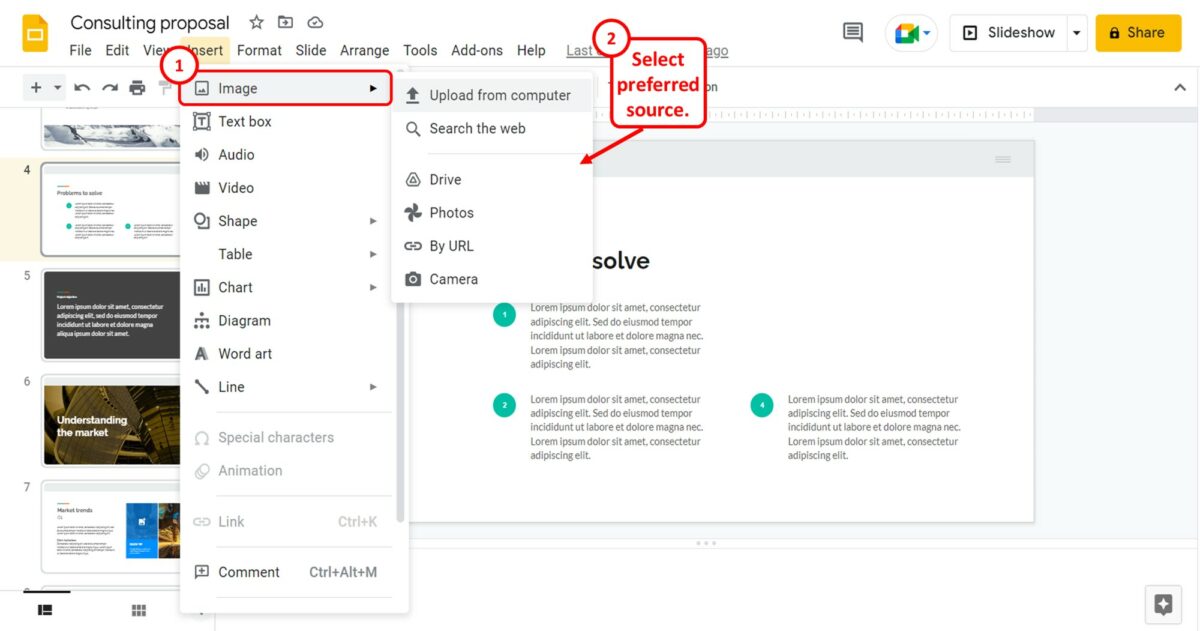
The next step is to click on the “Image” option from the “Insert” menu. In the secondary menu by the “Image” option, click on the source of the picture you want to insert into the presentation slide.
2. How to Move an Image in Google Slides?
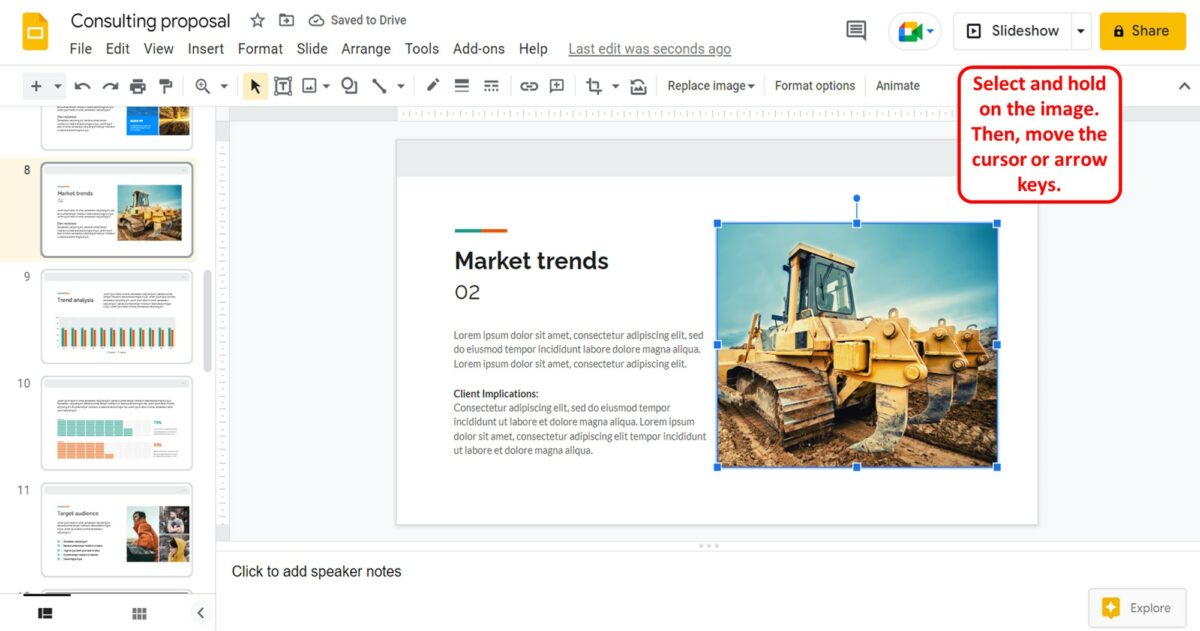
To move an image in Google Slides, all you have to do is click and hold on to the image. Then you can move your cursor to move the image with it.
Alternatively, you can click on the image to select it. Then use the arrow keys on your keyboard to move the image.
2.1 How to Lock the Position of an Image in Google Slides?
In Google Slides, there is no option available to lock an image in place. However, you can use some tricks to lock the position of an image in a slide. All you have to do is follow the 6 simple steps.
Step-1: Click on the “Zoom out” option
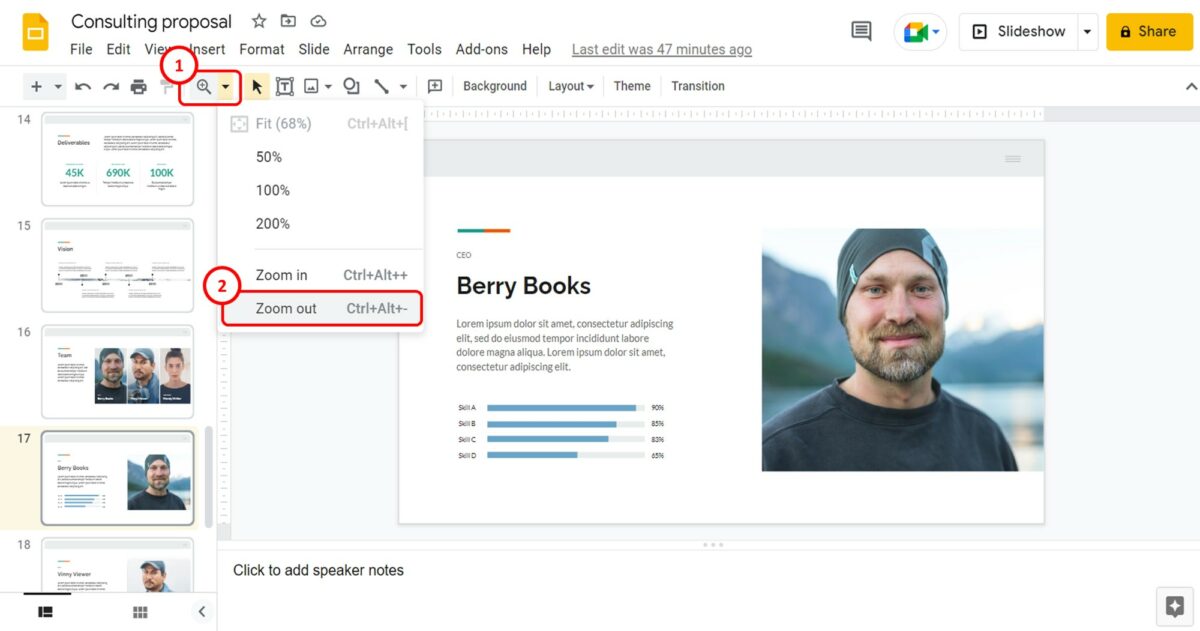
The first step is to zoom out the slide. Click on the down arrow by the “Zoom” option in the toolbar. Then click on the “Zoom out” option from the dropdown menu.
Step-2: Click on the “Shapes” option
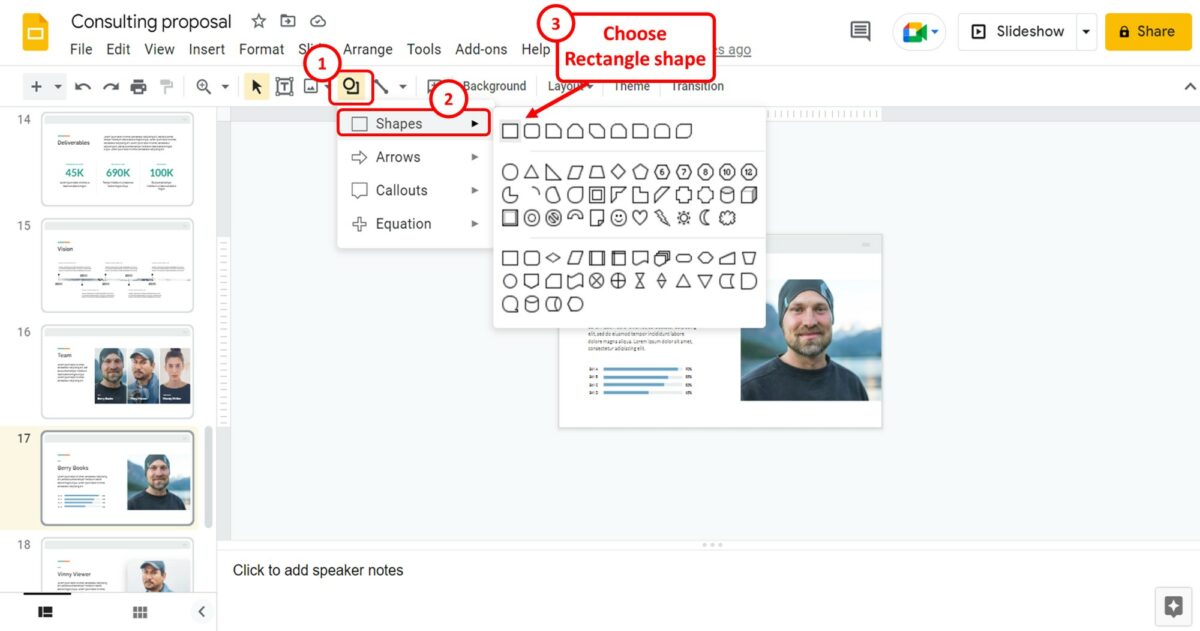
Now you can click on the “Shape” icon in the toolbar. In the dropdown menu, click on the “Shapes” option and select the rectangle shape from the list.
Step-3: Draw the shape

The next step is to draw the shape. You have to draw a shape large enough to cover not only the slide but also the entire visible area.
Step-4: Click on the “Fill color” option
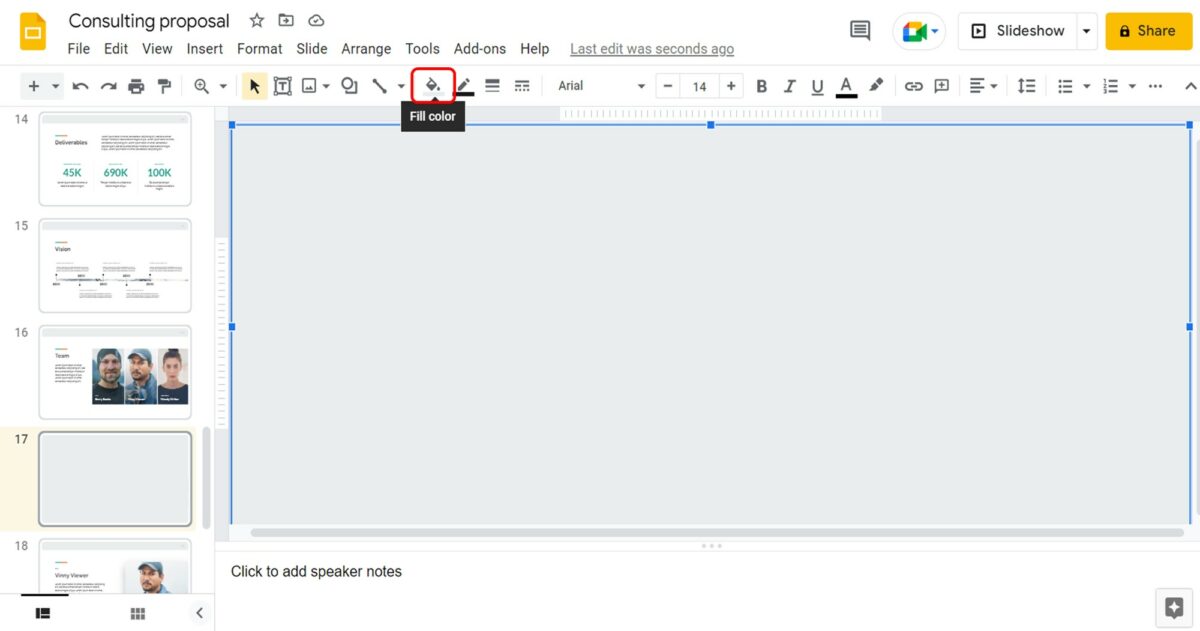
Click on the “Fill color” icon which looks like a paint bucket in the toolbar. This will open the dropdown menu with color options.
Step-5: Click on the “Transparent” option
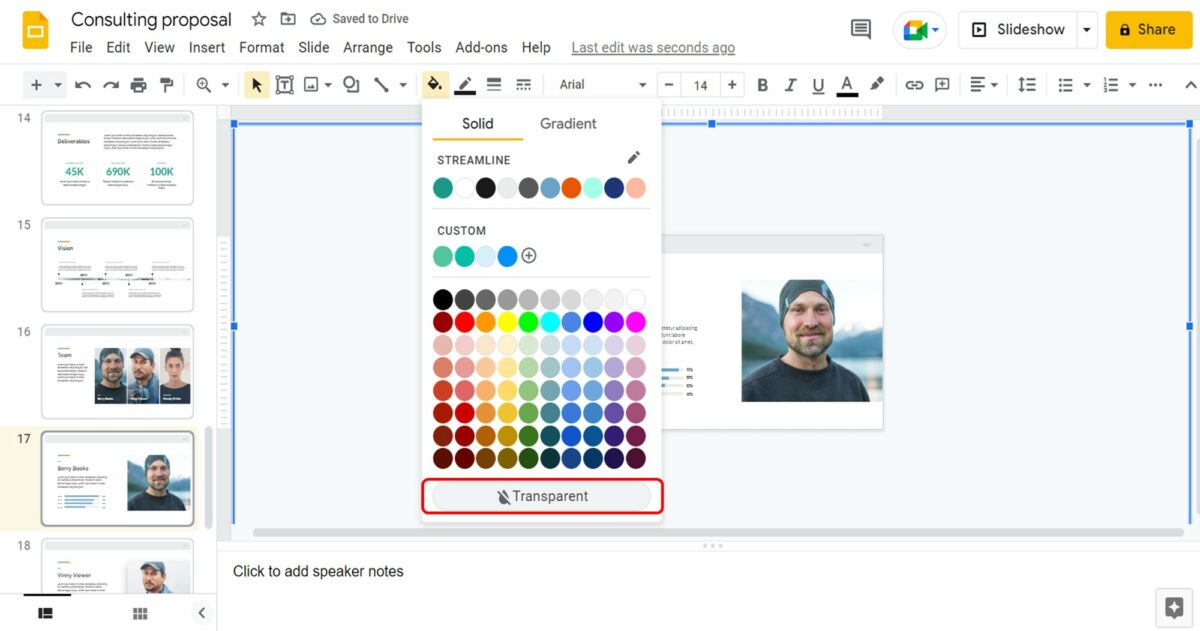
In the dropdown menu under the “Fill color” option, click on the “Transparent” option at the bottom. This will make the shape transparent and the slide under it visible.
Step-6: Click on the “Zoom in” option
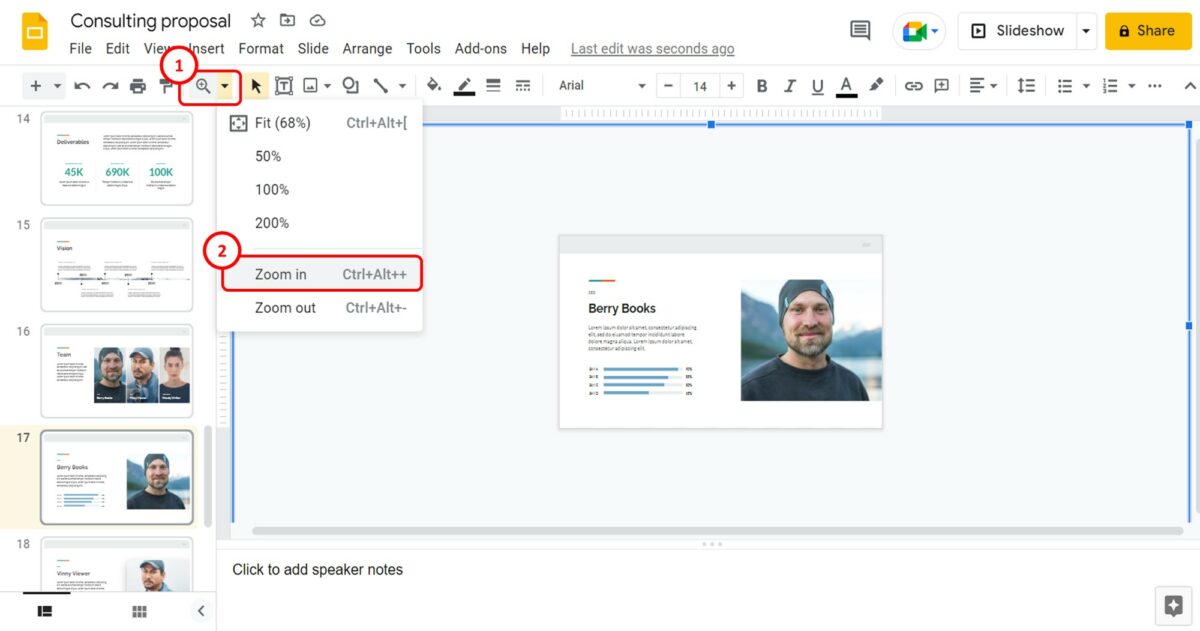
Now you have to click on the “Zoom” option in the toolbar. Then click on the “Zoom in” option from the dropdown menu to return the zoom to normal. The objects in the slide including the images will be locked in place and you will be unable to select them.
3. How to Resize an Image in Google Slides?
Google Slides allows you to easily resize an image after you insert it into a slide. There are multiple ways to resize an image on a slide.
3.1 Method 1 – Using the Corner of an Image
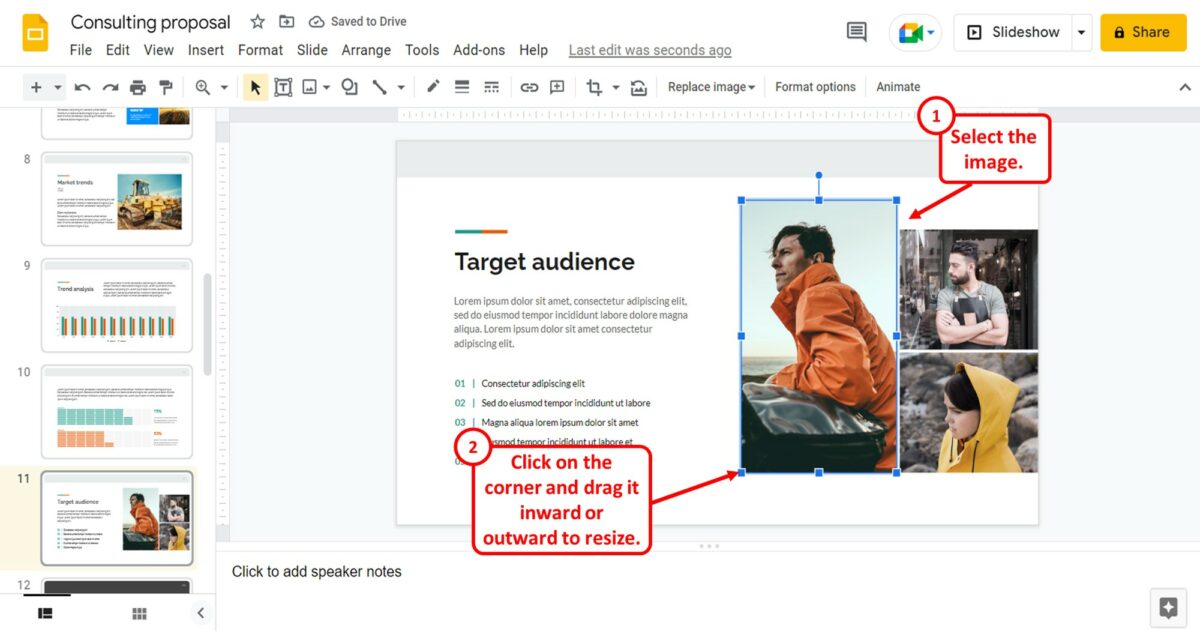
To resize an image using the corners, you have to first click on the image to select it. You will see tiny blue squares appear on all corners of the image. All you have to do is click on the corner and drag it inward or outward to make the image smaller or larger in size.
3.2 Method 2 – Using the Format Options
The “Format options” feature in Google Slides allows you to customize the dimensions of an image on a slide. You can use this feature to create a custom size for an image. To resize an image using “Format options”, follow the 4 simple steps.
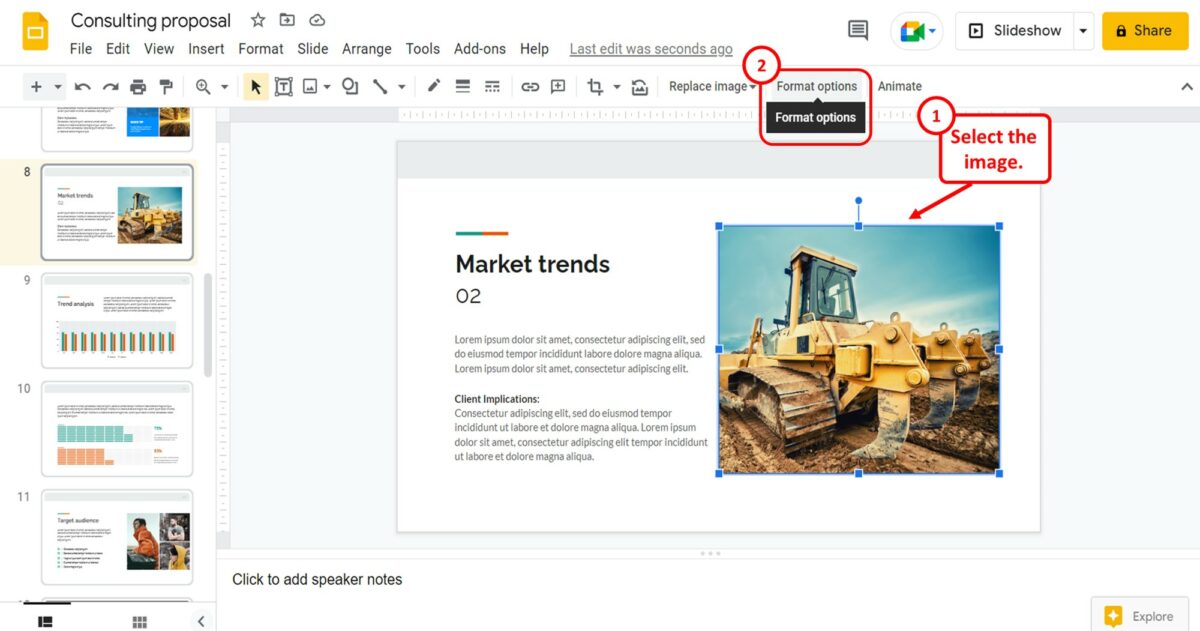
Step-1: Click on “Format options”
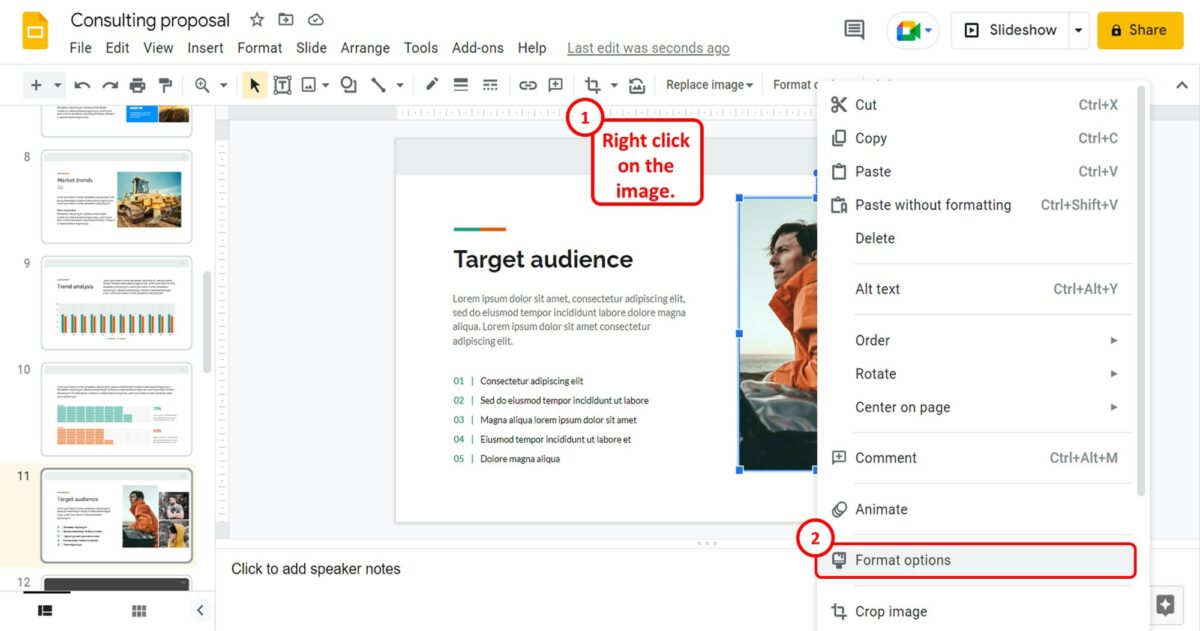
The first step is to “Right Click” on the image that you want to resize. Then click on “Format options” from the right-click menu.
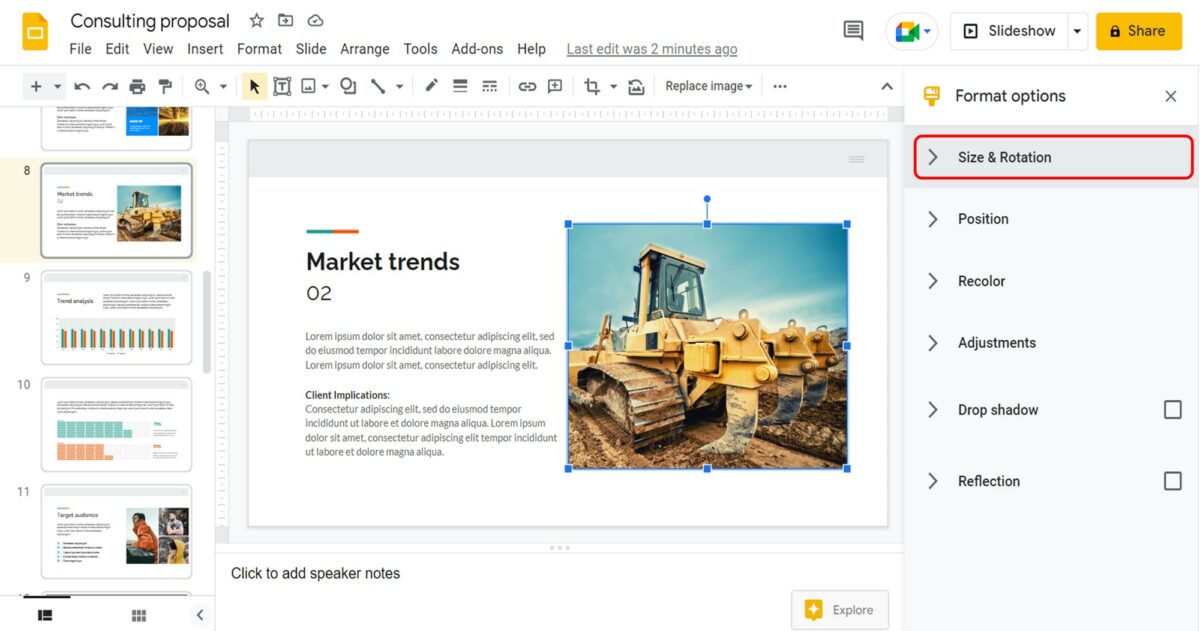
Step-2: Click on the “Size and Rotation” option
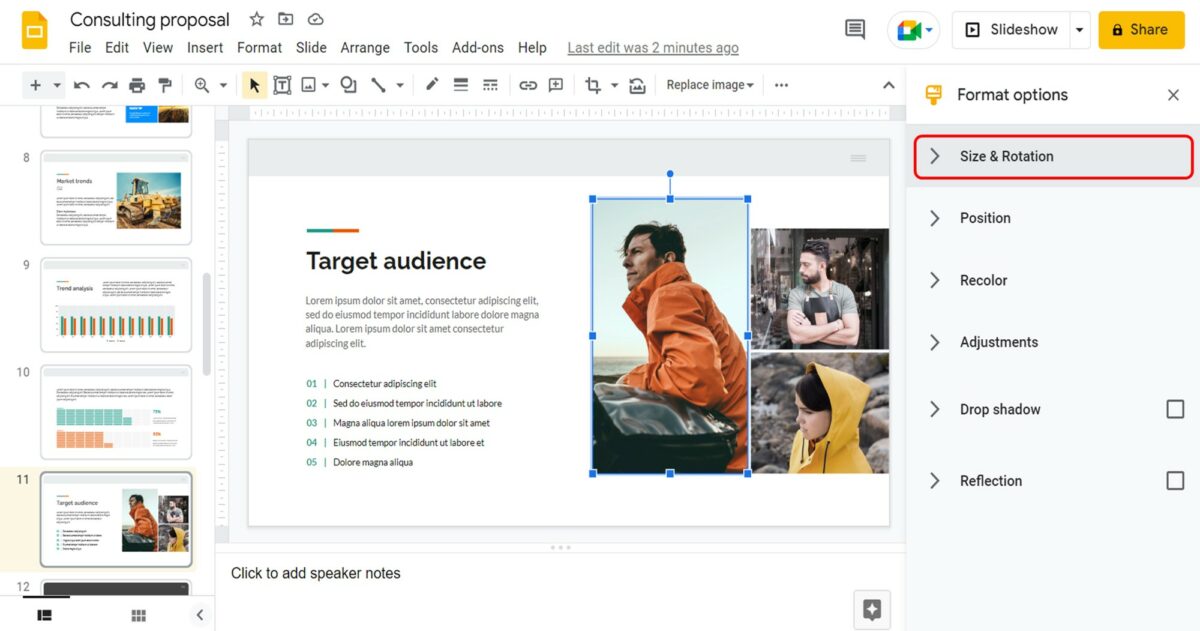
In the “Format options” sidebar on the right side of the screen, click on the “Size and Rotation” option.
Step-3: Click on the “Width” box
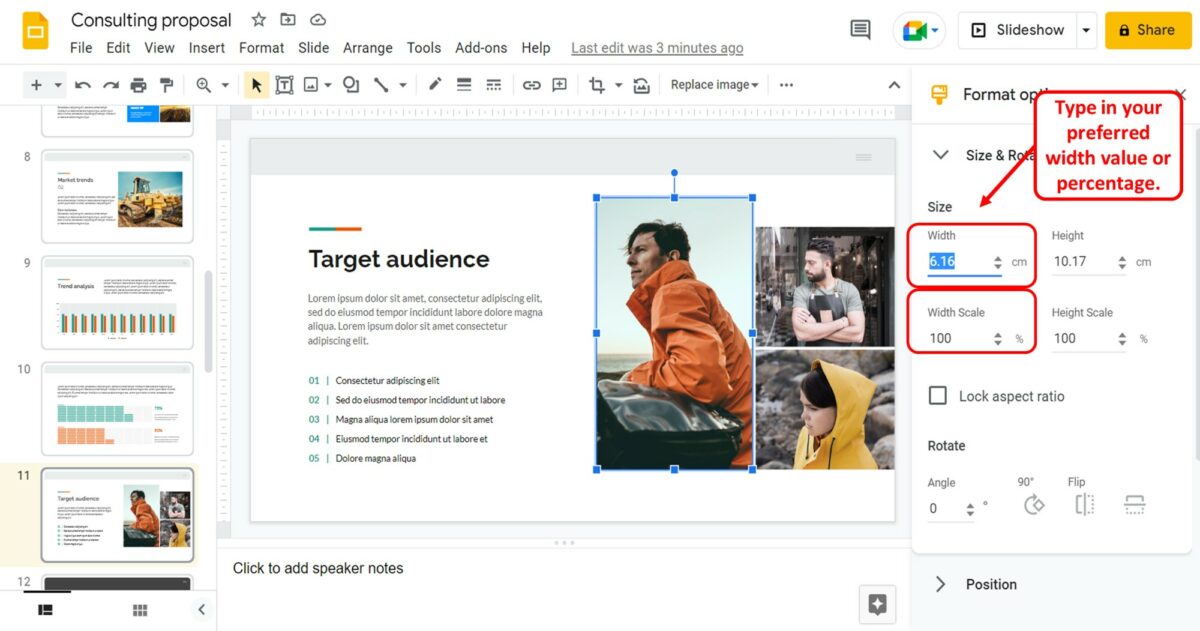
Under the “Size and Rotation” section, you have to now click on the “Width” box. Then type in the preferred width for the image in centimetres. You can also click on the “Width scale” box to customize the width scale.
Step-4: Click on the “Height” box
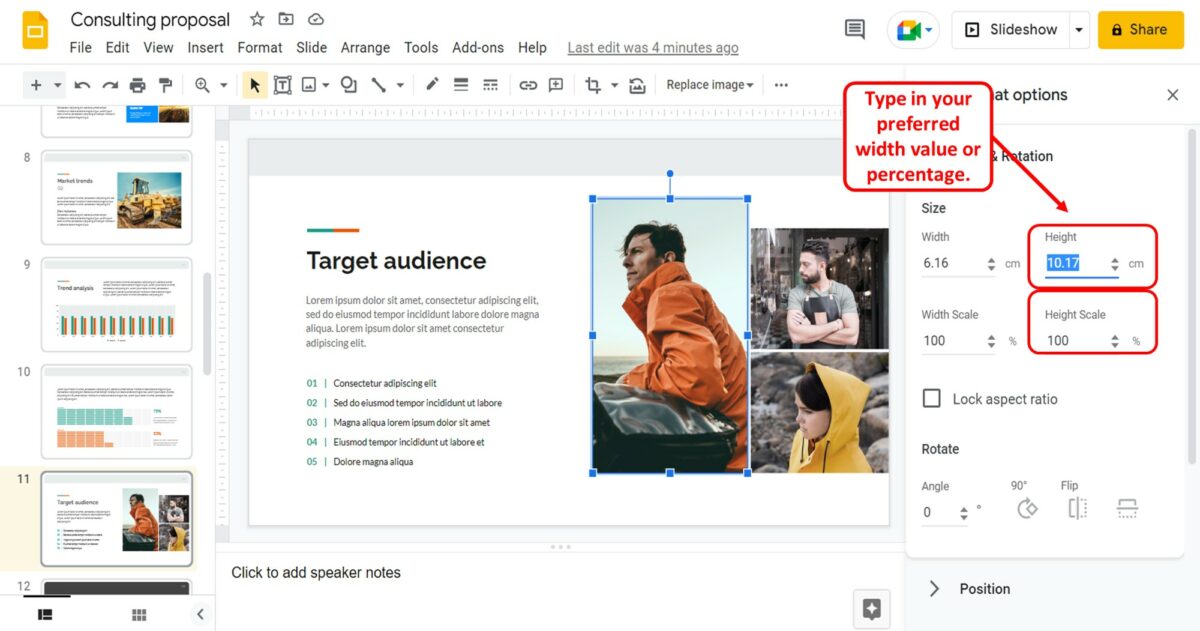
Similarly, you can click on the “Height” box and type in the preferred height of the image in centimetres. You can also click on the “Height scale” box to customize the height scale.
3.3 How to Lock Aspect Ratio of Image in Google Slides?
Locking the aspect ratio of a picture allows you to resize the image without changing the height-to-width ratio of the image. To lock the aspect ratio of an image in Google Slides, follow the 3 easy steps.
Step-1: Click on “Format options”
The first step is to click on the image that you want to lock the aspect ratio. Then click on the “Format options” option in the toolbar.
Step-2: Click on the “Size and Rotation” option
In the “Format options” sidebar on the right side of the screen, click on the “Size and Rotation” option.
Step-3: Click on the “Lock aspect ratio” option
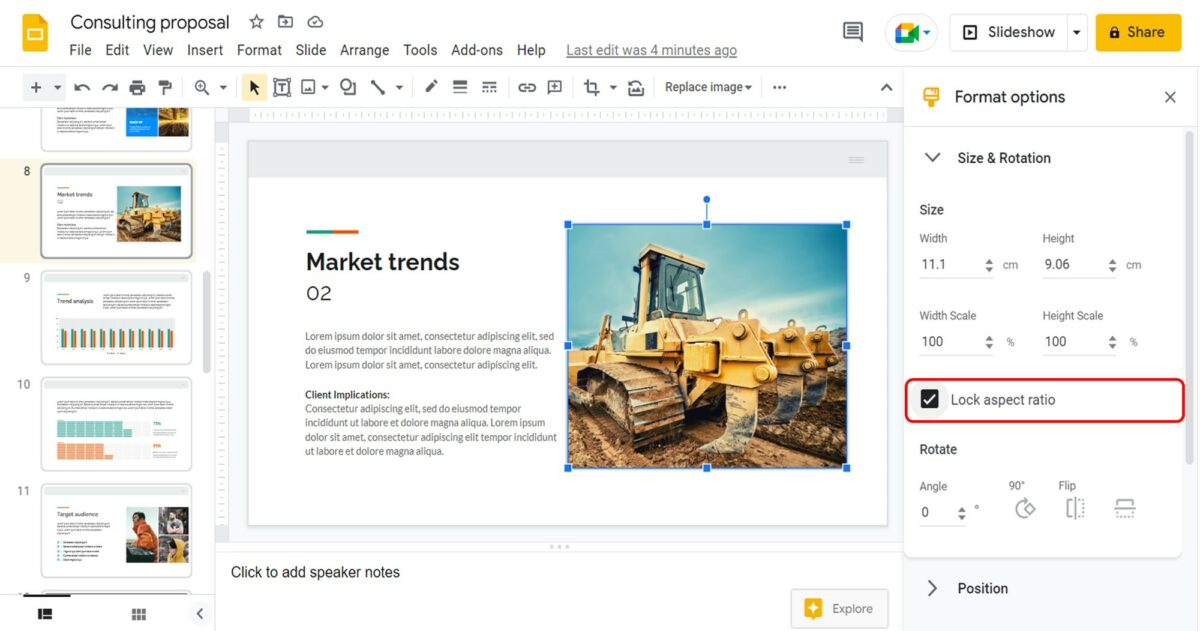
Under the “Size and Rotation” option in the “Format options” sidebar, all you have to do is click on the “Lock aspect ratio” option. A checkmark will appear by the option showing that the aspect ratio is now locked.
4. How to Crop an Image in Google Slides?
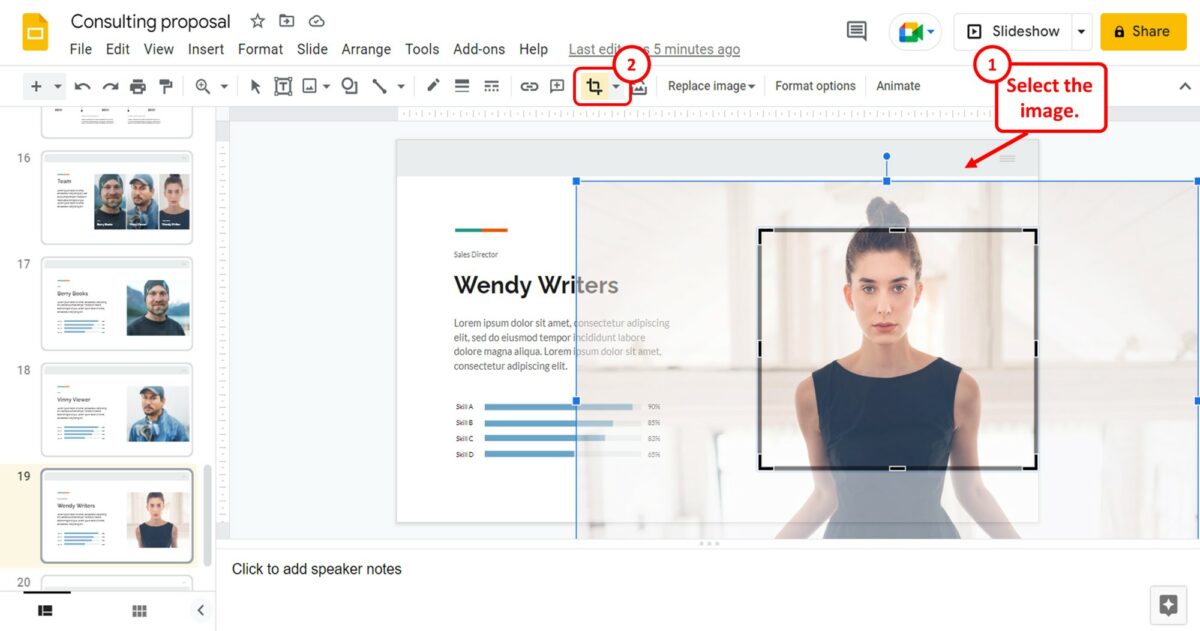
In Google Slides, you can easily crop an image inserted in a slide. All you have to do is select the image and then click on the “Crop” option in the toolbar.
Alternatively, you can “Double-click” on the image. Then drag the corners of the cropped part to increase or decrease the clear part of the picture. The shadowed part of the picture will be cropped out. You can read my other article here to learn about the different methods you can use to crop an image in Google Slides.
4.1 How to Make Image Fit to Slide in Google Slides?
In Google Slides, there is no option available to make an image fit to the slide. To make an image fit to the slide, you can insert the image as a background image. All you have to do is follow the 4 quick steps.
Step-1: Click on the “Background” option
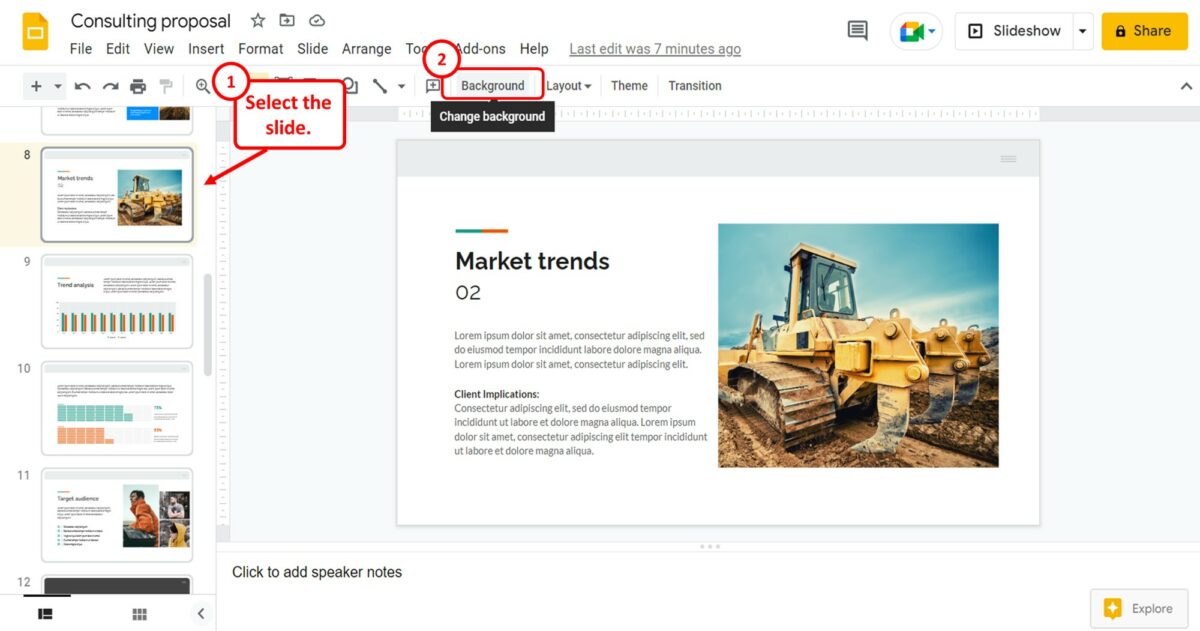
The first step is to open the slide where you want to insert the image. Then click on the “Background” option from the toolbar at the top of the screen.
Step-2: Click on the “Choose image” option
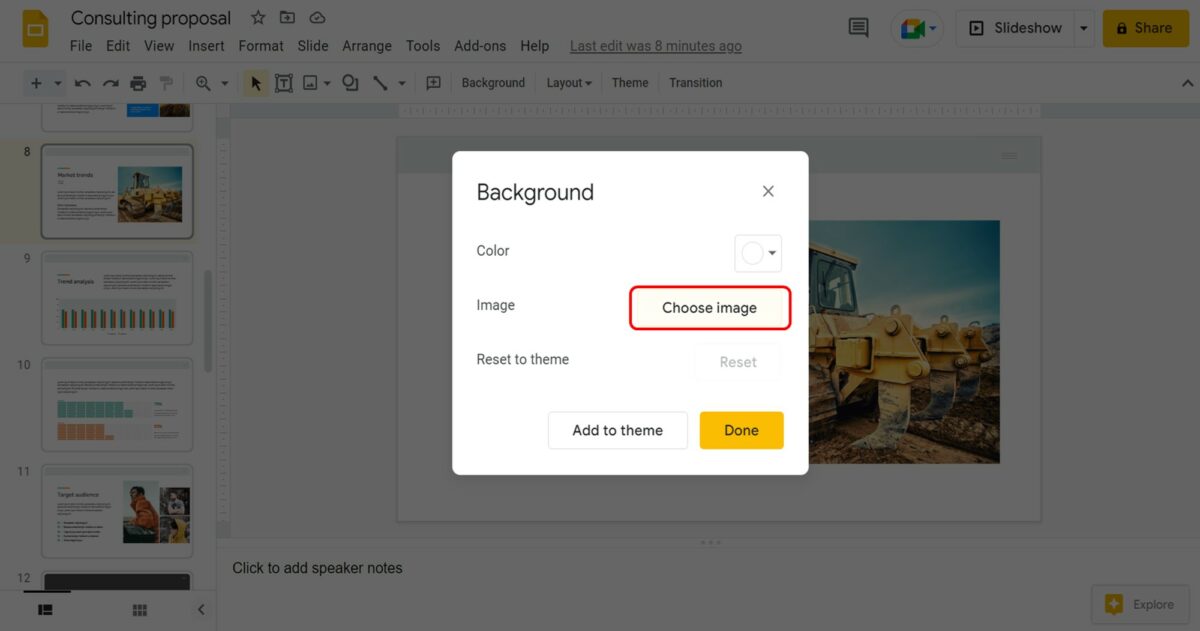
In the “Background” dialog box, click on the “Choose image” box. This will open another dialog box.
Step-3: Select the image source

In the “Insert background image” dialog box, click on the image source. The selected source will open in a new window where you can select the image to insert it into the slide.
Step-4: Click on the “Done” button
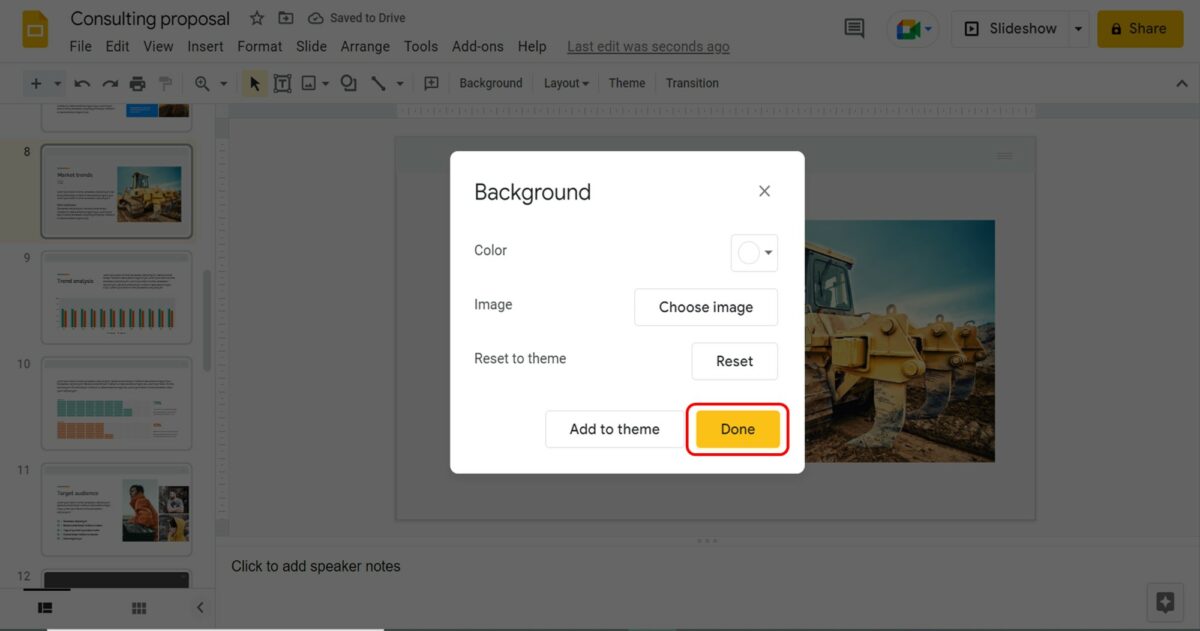
Finally, all you have to do is click on the “Done” button to insert the image fitted to the open slide.
5. How to Add Border to an Image in Google Slides?
Using the toolbar located at the top of the screen under the menu bar, you can easily add borders to a picture inserted in Google Slides. All you have to do is follow the 3 quick steps.
Step-1: Click on the “Border dash” option
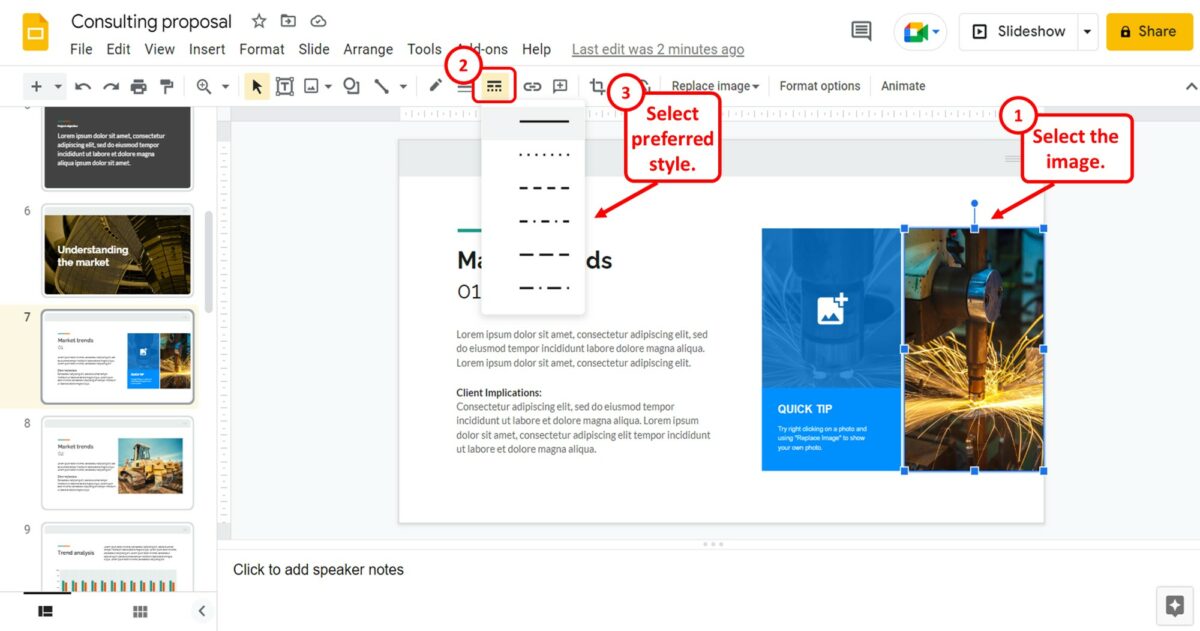
The first step is to select the image where you want to add the border. Then click on the “Border dash” option in the toolbar. The “Border dash” icon looks like three horizontal dashed lines. You can then select your preferred border style from the dropdown list.
Step-2: Click on the “Border weight” option
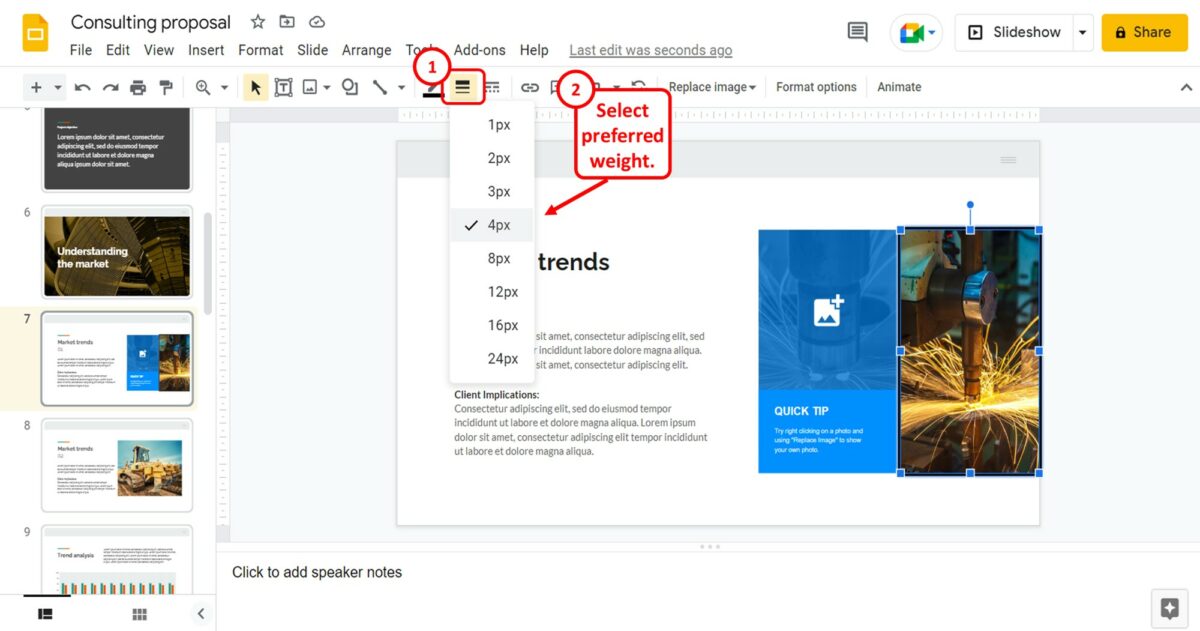
The next step is to click on the “Border weight” option in the toolbar. The “Border weight” icon looks like three horizontal thick lines and is located on the left of the “Border dash” icon. You can then select the preferred border thickness from the dropdown list.
Step-3: Click on the “Border color” option

The final step is to click on the “Border color” option located to the left of the “Border weight” option in the toolbar. In the dropdown menu under the “Border color” option, you can now select a preferred color for the image border.
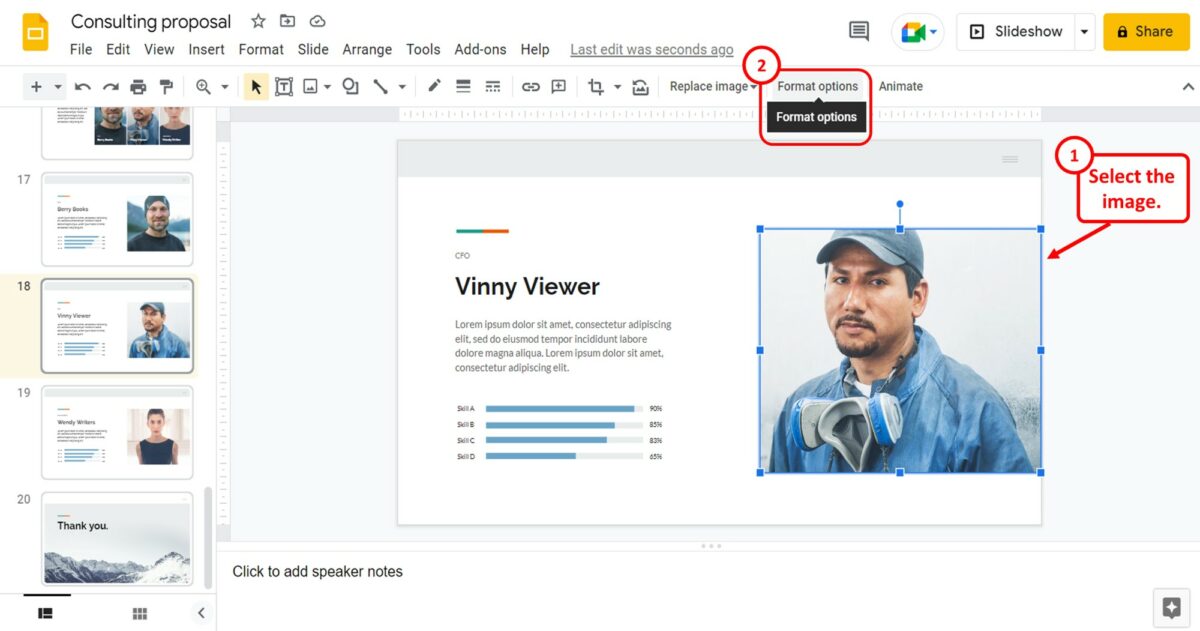
6. How to Format an Image in Google Slides?
To format an image in Google Slides, you can use the “Format options” sidebar. All you have to do is follow the 2 easy steps.
Step-1: Click on the “Format options” option
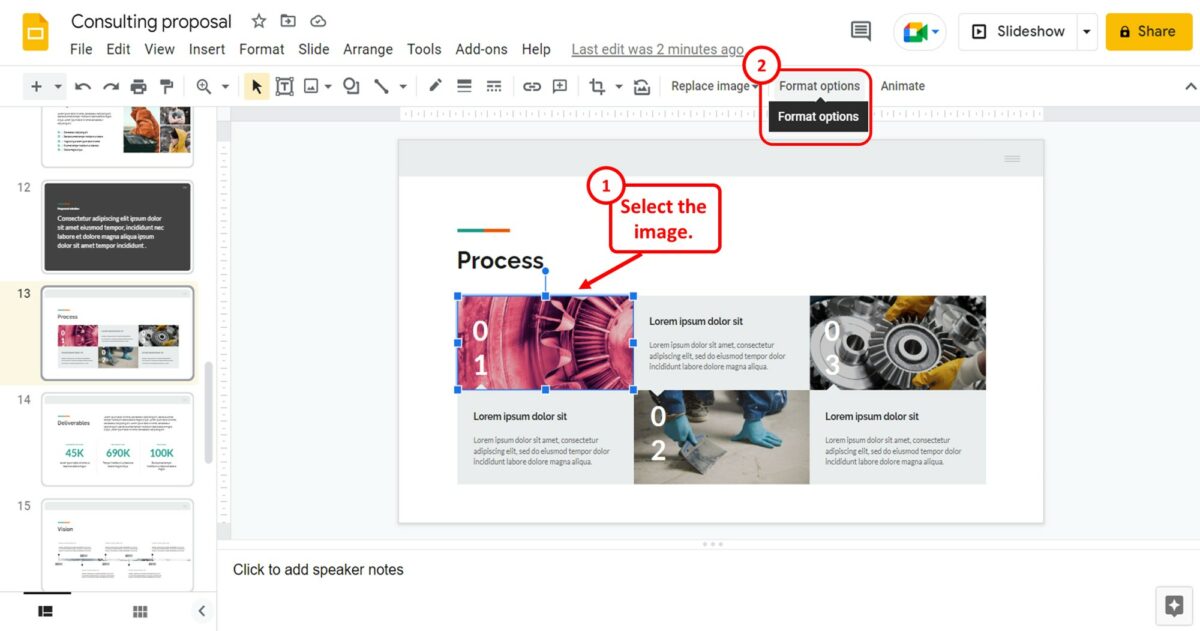
The first step is to select the image that you want to format. Then click on “Format options” from the toolbar at the top of the screen.
Step-2: Click on the “Adjustments” option
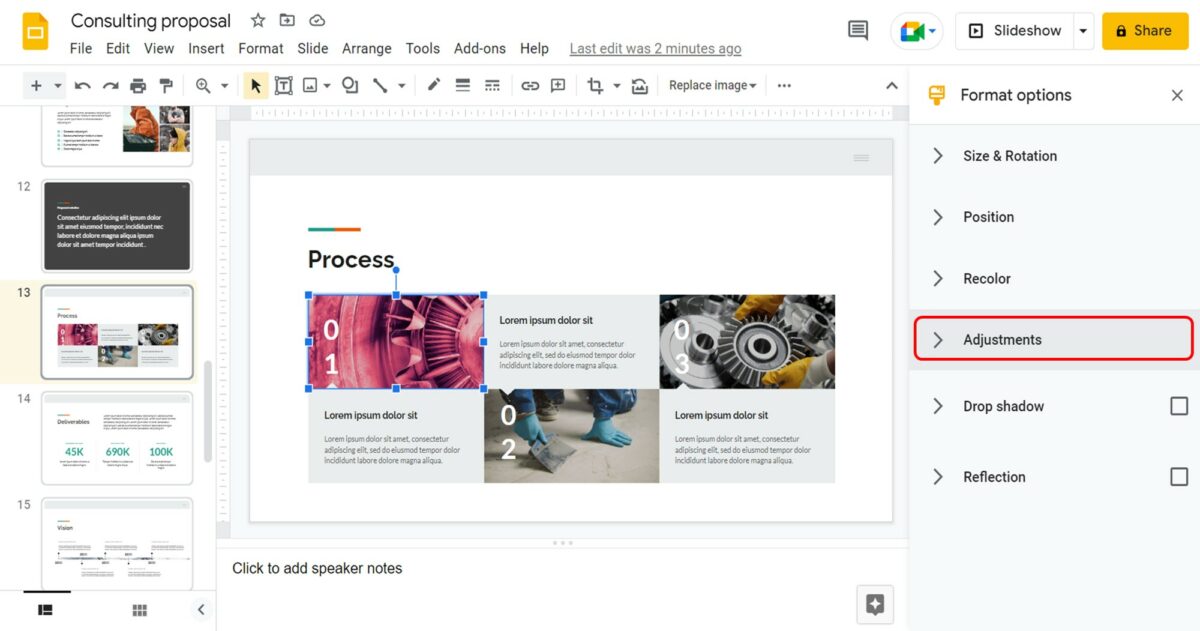
In the “Format options” sidebar, click on the “Adjustments” option. You can use the features available under the “Adjustments” section to format the selected image.
6.1 Add Transparency to a Picture
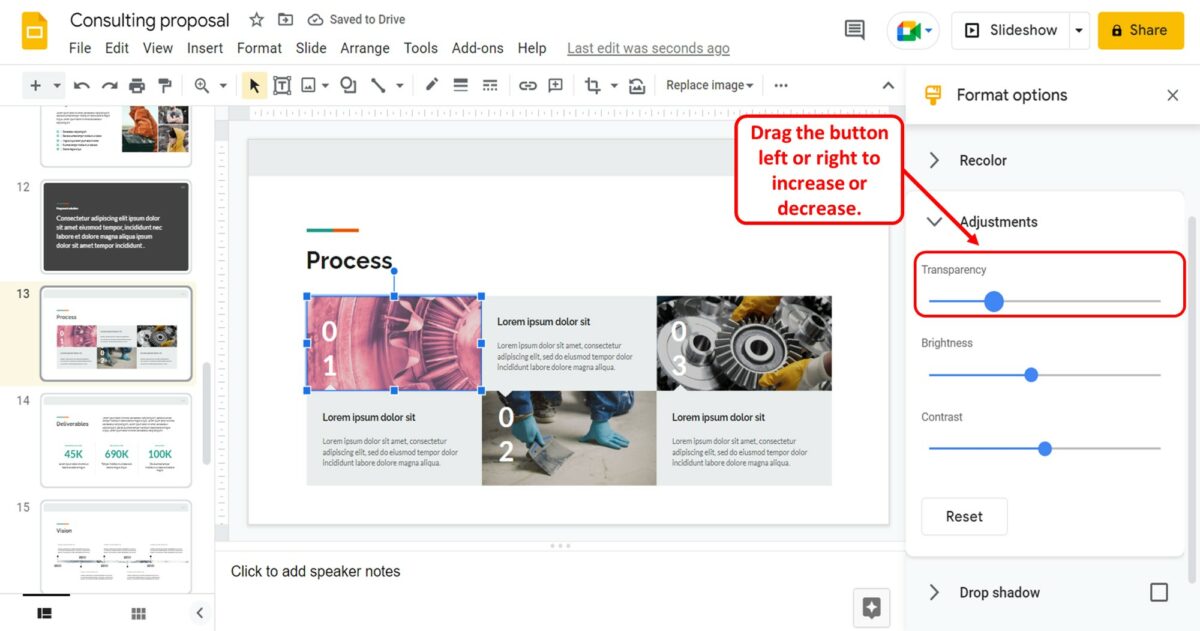
To add transparency to the selected picture, all you have to do is drag the “Transparency” slider under the “Adjustments” section in the “Format options” sidebar. You can drag it to the right to increase transparency and to the left to decrease transparency.
6.2 Change Brightness of an Image
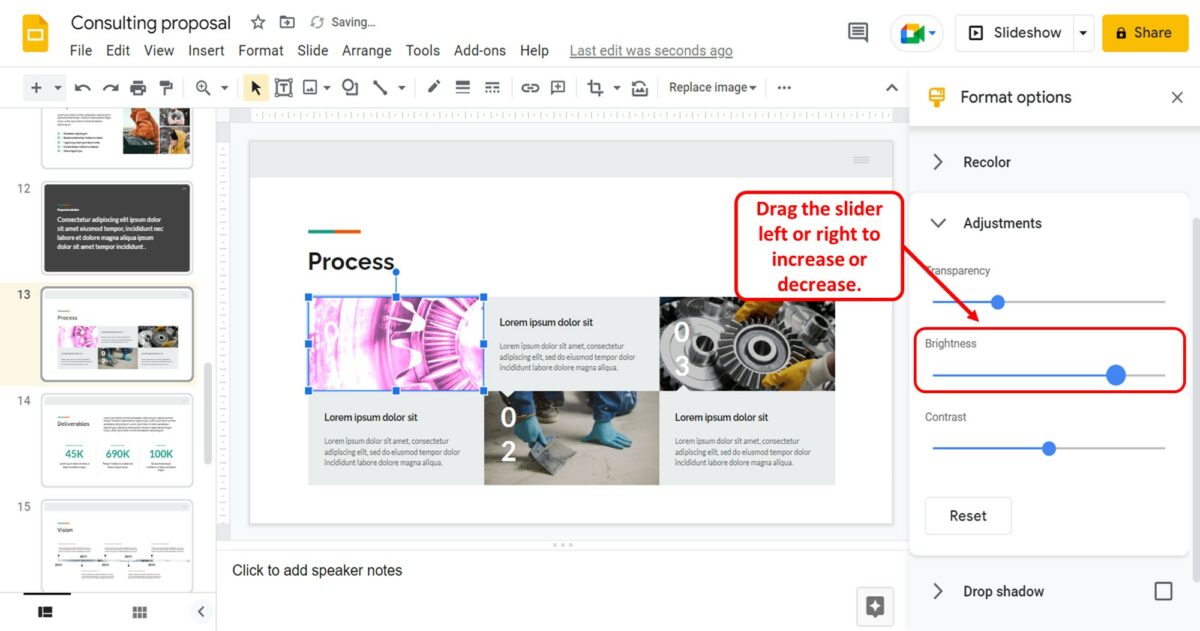
In the “Adjustments” section of the “Format options” sidebar, drag the “Brightness” slider left or right to decrease or increase the brightness of the image.
6.3 Adjust Contrast of an Image
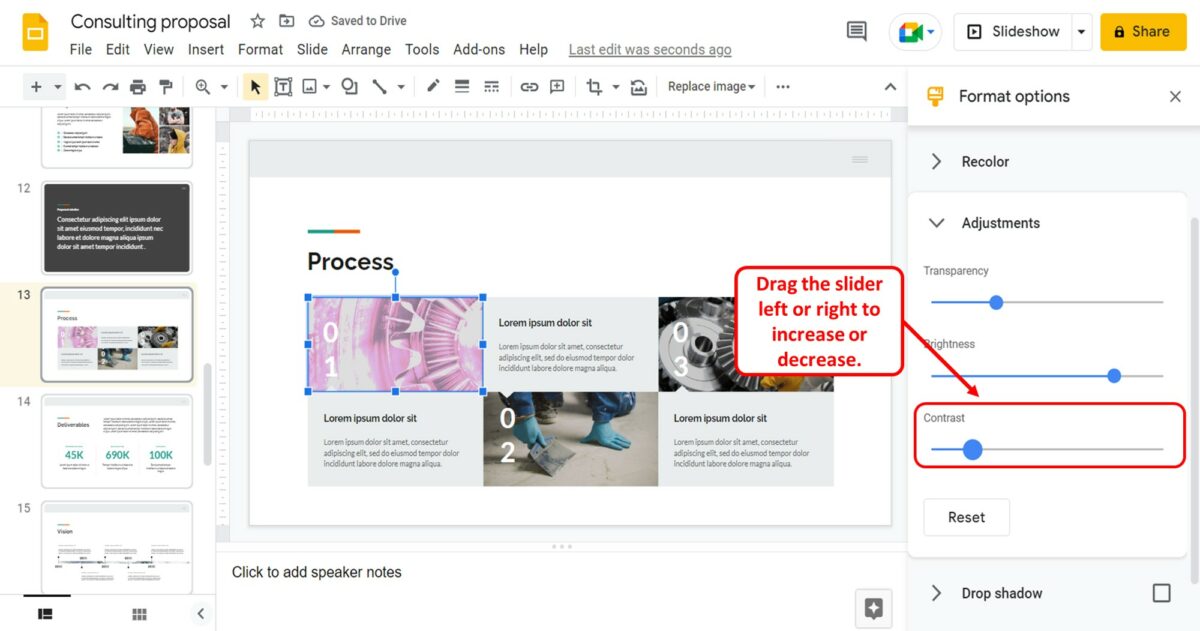
Adjusting the image contrast allows you to customize the color difference between each object in an image. To adjust the contrast, all you have to do is drag the “Contrast” slider.
7. How to Recolor Images in Google Slides
In Google Slides, there are a few preset color options that you can use to recolor an image on a slide. To recolor an image, follow the 3 quick steps.
Step-1: Click on “Format options”
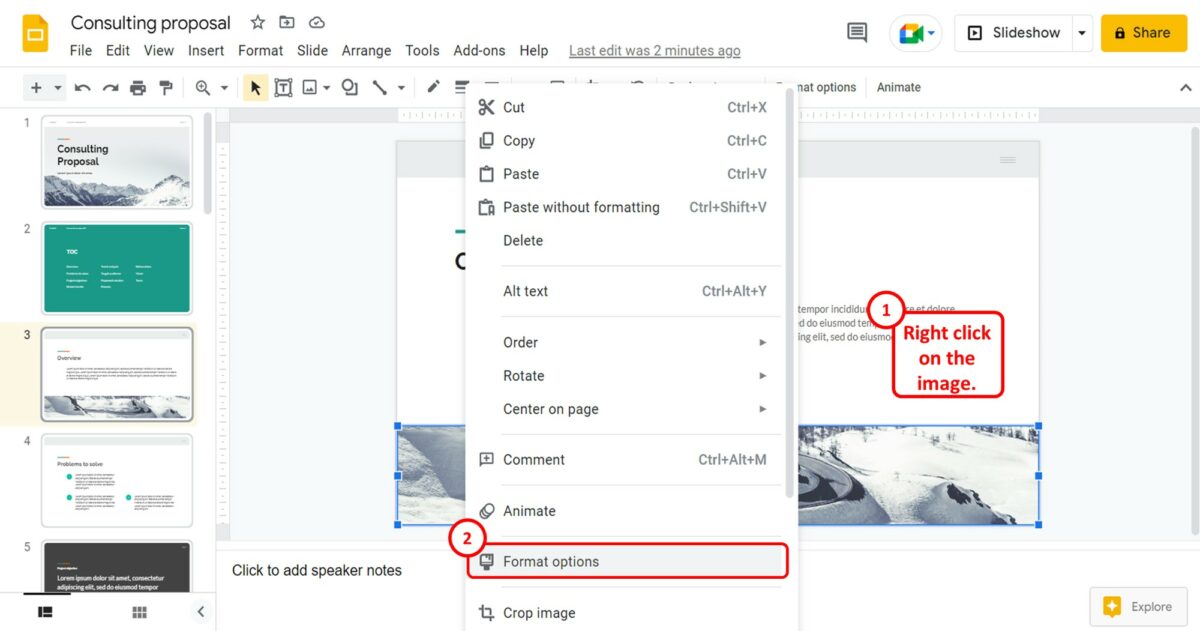
The first step is to “Right Click” on the image that you want to recolor. In the right-click menu, click on the “Format options” option.
Step-2: Click on the “Recolor” option
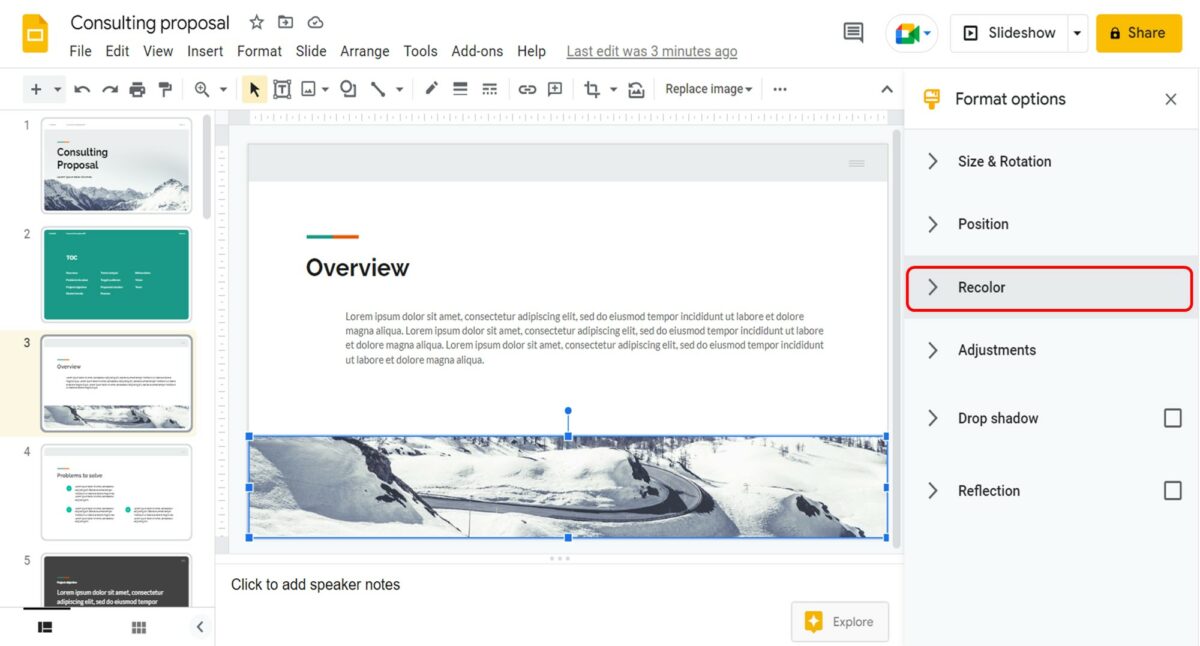
In the “Format options” sidebar on the right side of the screen, click on the “Recolor” option.
Step-3: Click on the “No Recolor” box
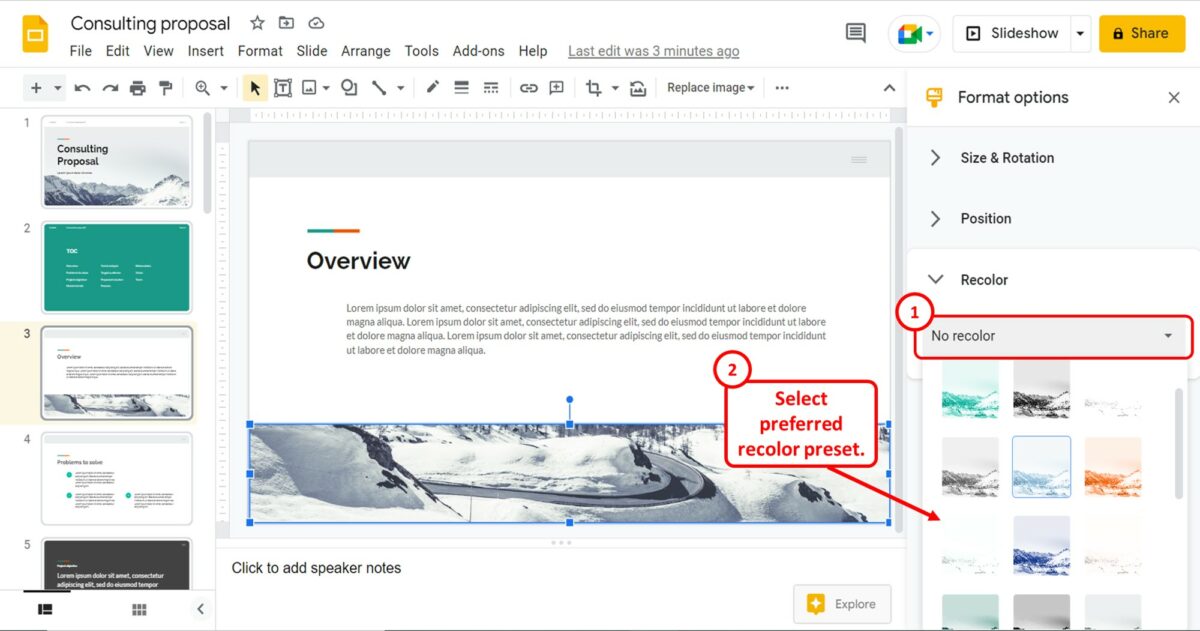
In the “Recolor” section of the “Format options” sidebar, click on the “No recolor” box. Now all you have to do is click on the preferred recolor preset from the dropdown list to recolor the selected image.
8. How to Rotate or Flip an Image in Google Slides?
To quickly rotate or flip an image in Google Slides, you can use the “Format options” sidebar. All you have to do is follow the 4 simple steps.
Step-1: Click on “Format options”

In the open slide, click on the image that you want to flip or rotate. Then click on the “Format options” option in the toolbar.
Step-2: Click on the “Size and Rotation” option
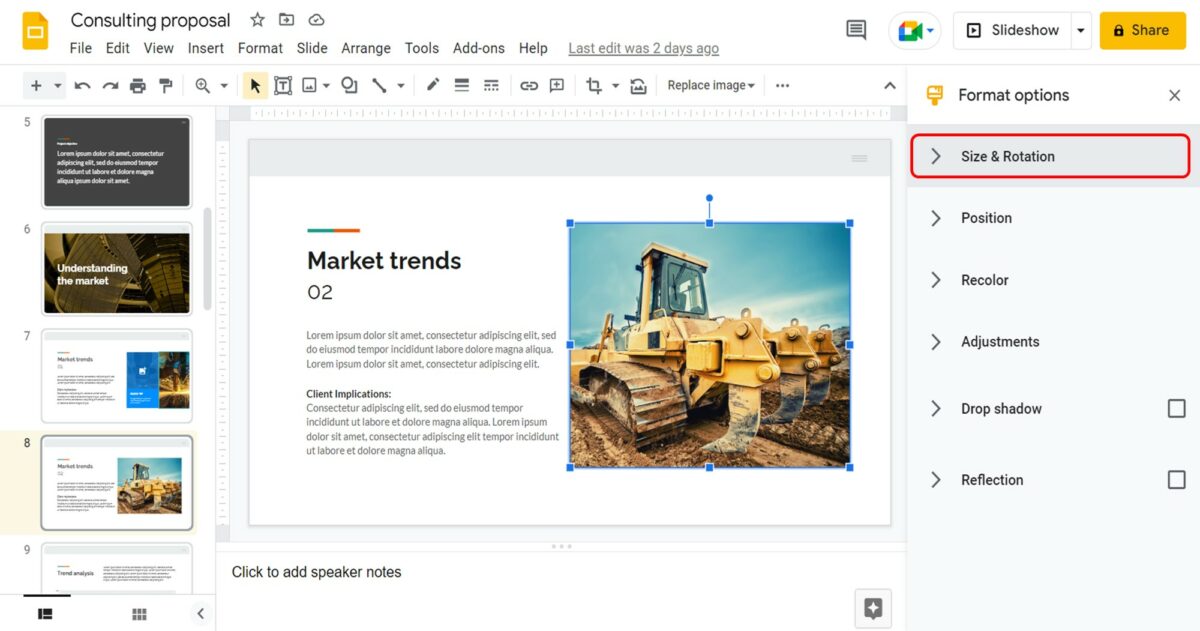
The next step is to click on the “Size and Rotation” option in the “Format options” sidebar on the right side of the screen.
Step-3: Click on the “Angle” box
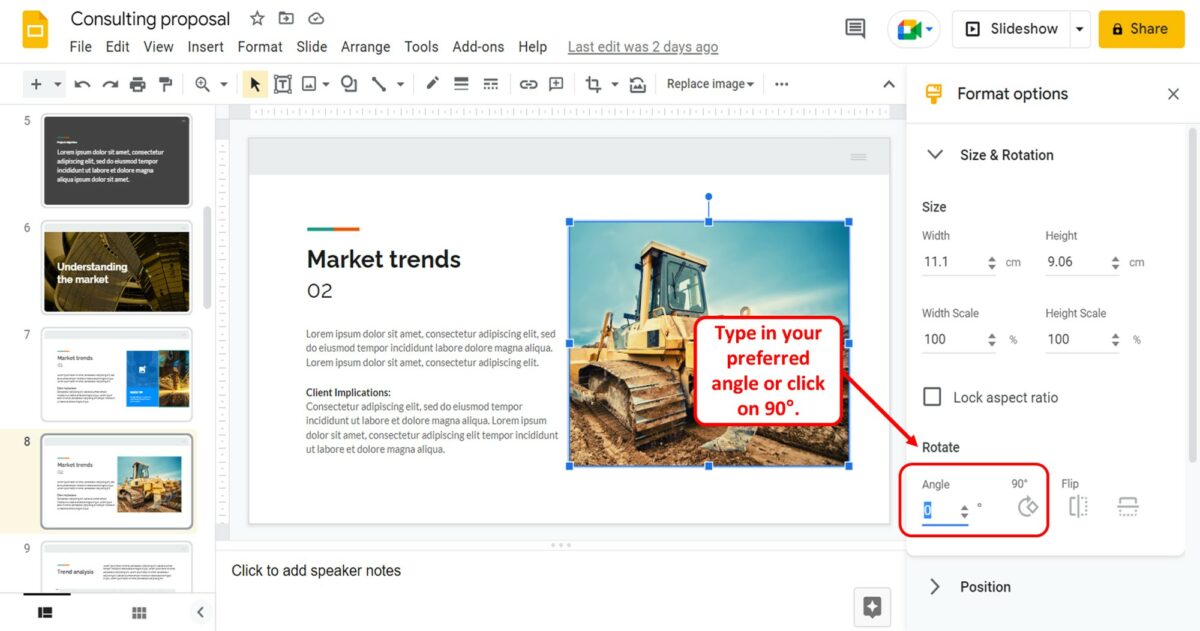
To rotate the image, click on the “Angle” box under the “Rotate” section of the “Size and Rotation” option in the “Format options” sidebar. All you have to do is type in the preferred angle of rotation in the “Angle” box. You can also click on the “90°” option to rotate the image by 90°.
Step-4: Click on the “Flip” option
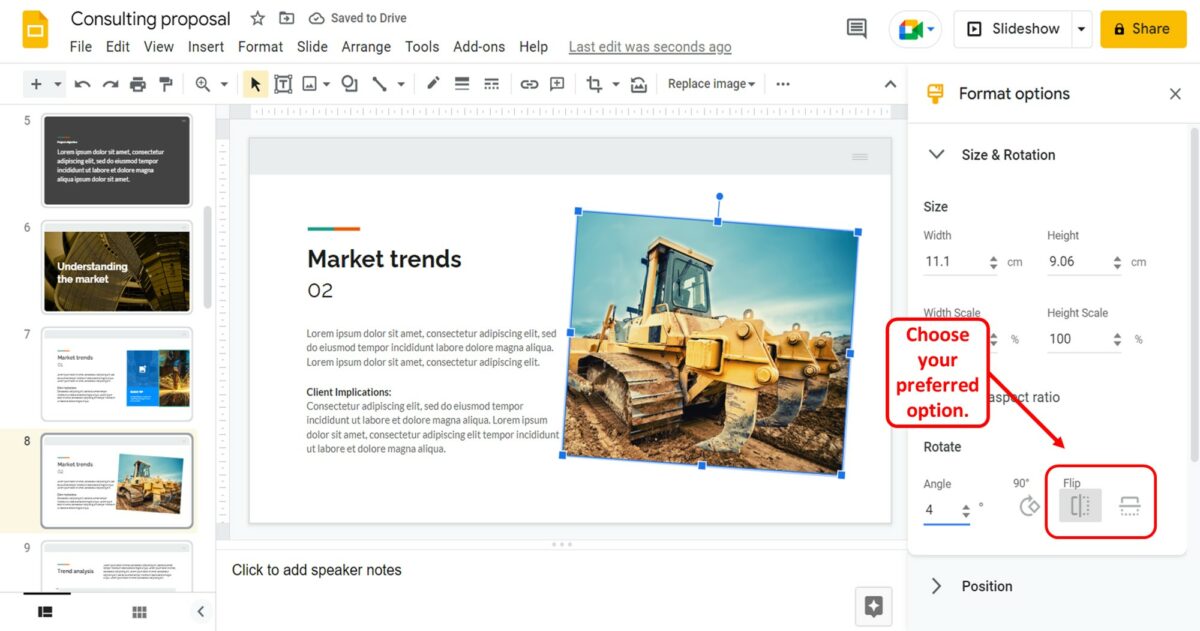
To flip the image, click on the “Flip horizontally” or the “Flip vertically” options available under the “Flip” option in the “Format options” sidebar.
9. How to Add Drop Shadow to an Image in Google Slides?
The “Drop shadow” feature in Google Slides adds a shadow under the selected image in a slide to give it a 3D effect. To add a drop shadow to an image, follow the 2 easy steps.
Step-1: Click on “Format options”
The first step is to click on the image to select it. Then click on the “Format options” option in the toolbar. This will open a sidebar.
Step-2: Click on the “Drop shadow” option
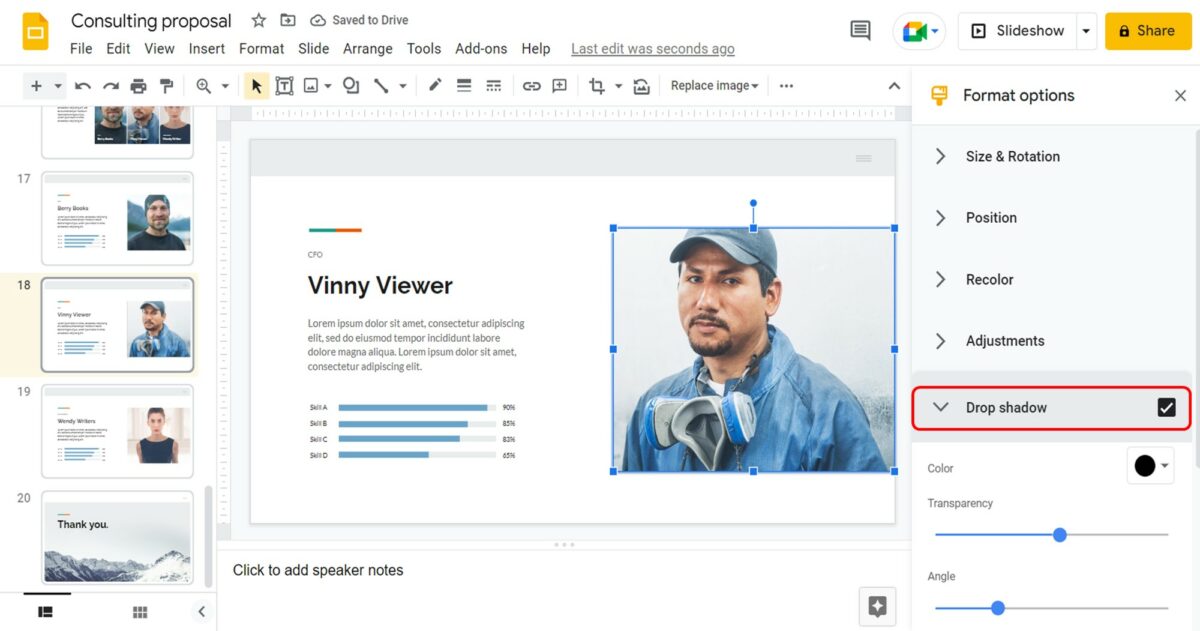
In the “Format options” sidebar, click on the “Drop shadow” option. This will add a drop shadow to the selected image. You can also customize the drop shadow using the options available under the “Drop shadow” section in the “Format options” sidebar.
9.1 Adding Transparency to the Drop Shadow
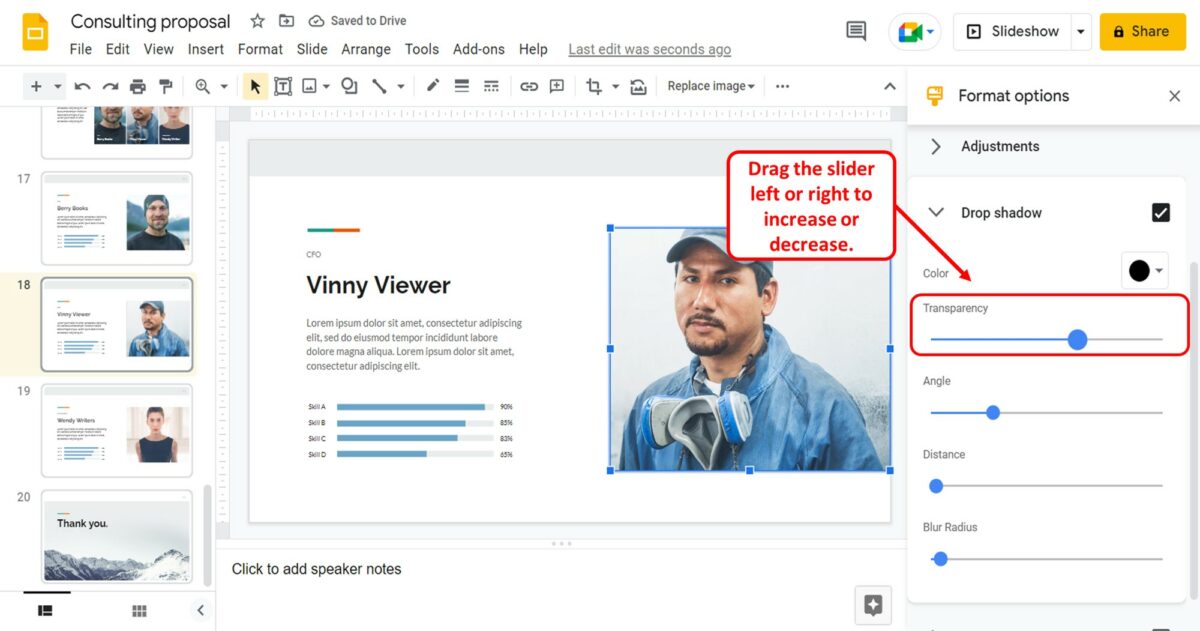
To add transparency to the drop shadow, all you have to do is drag the “Transparency” slider under the “Drop shadow” section in the “Format options” sidebar. You can drag it to the right to increase transparency and to the left to decrease transparency.
9.2 Changing Drop Shadow Angle of an Image
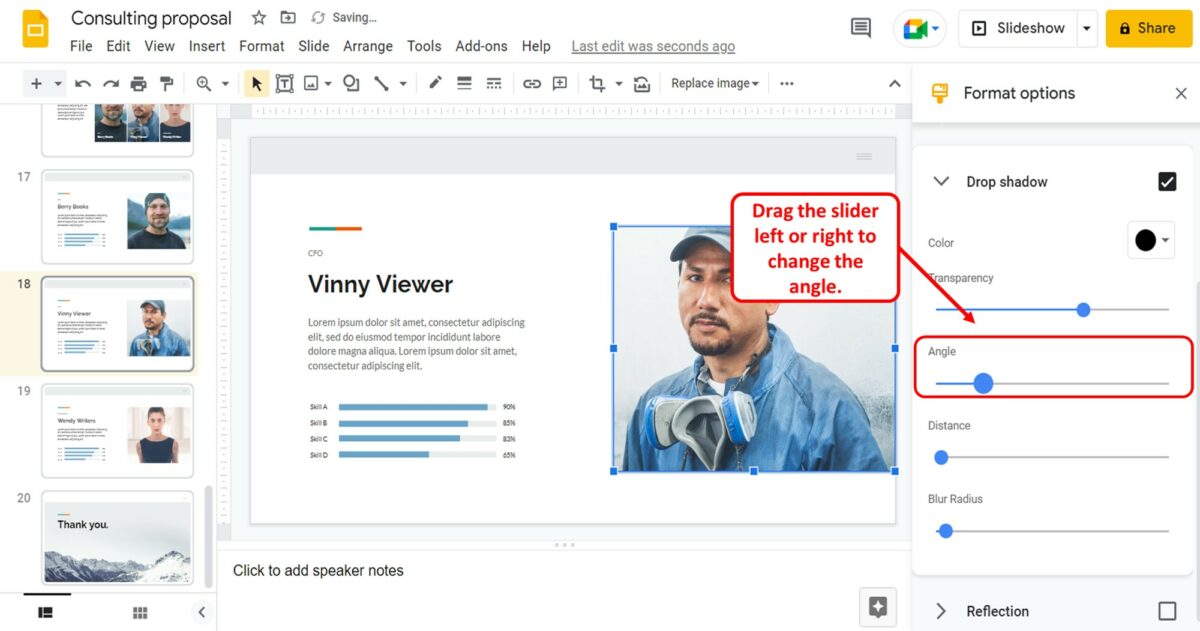
In the “Drop shadow” section of the “Format options” sidebar, you can drag the “Angle” slider to change the angle of the drop shadow in different directions.
9.3 Drop Shadow Distance
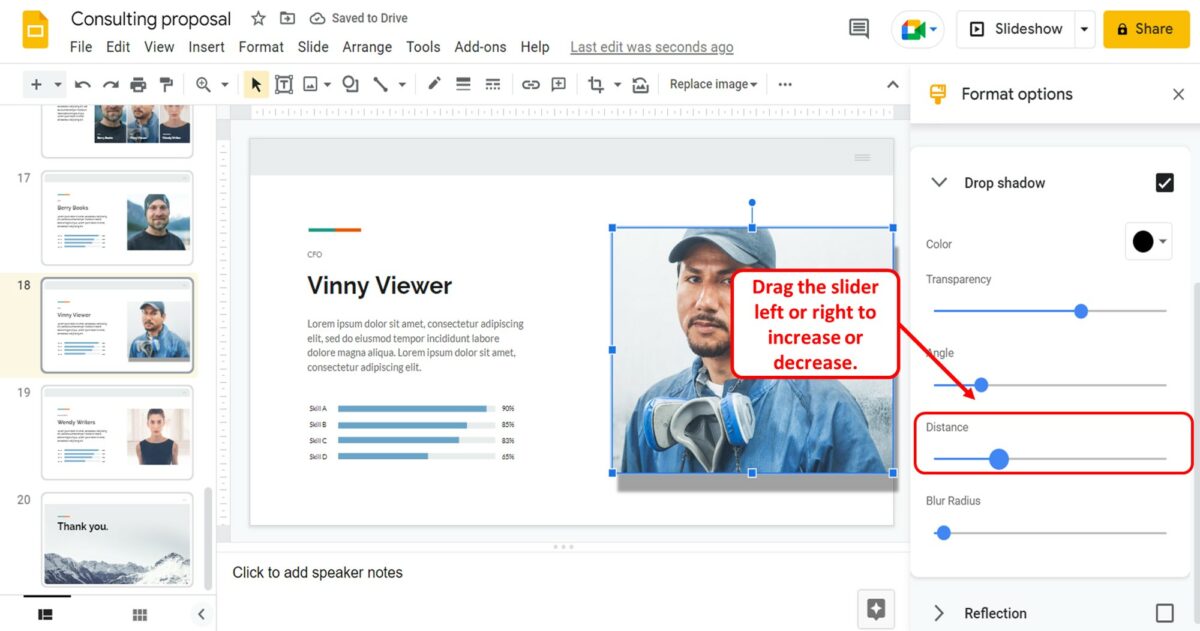
The “Distance” option in the “Drop shadow” section allows you to customize the distance between the image and its drop shadow. You can drag the “Distance” slider left or right to decrease or increase the drop shadow distance.
9.4 Blur Radius of the Drop Shadow
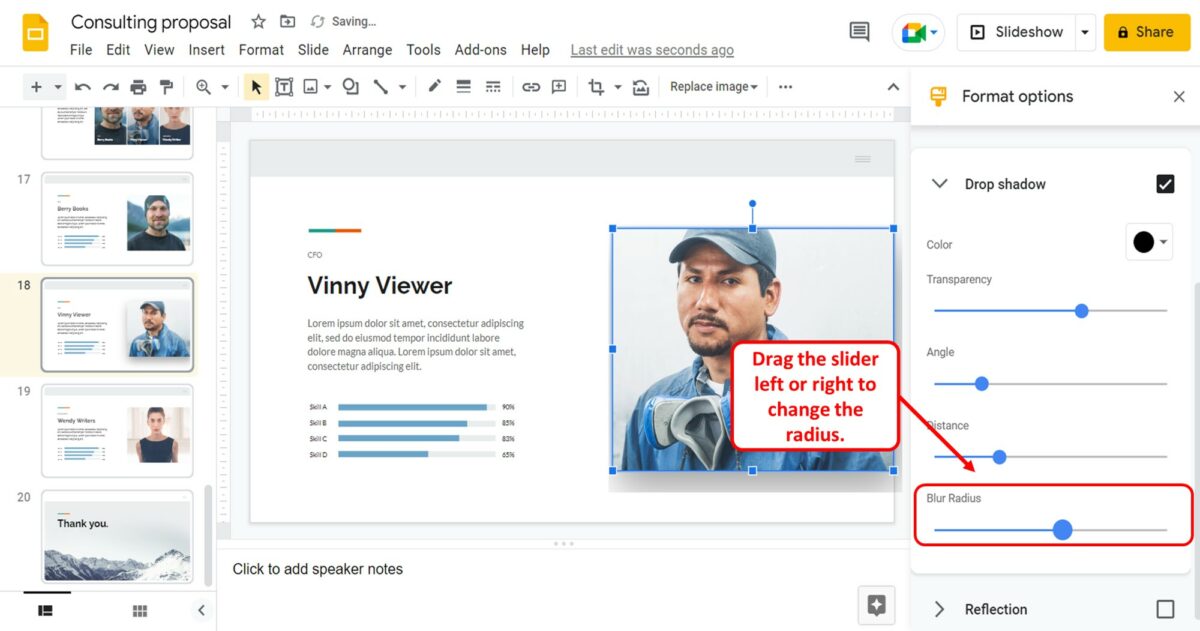
To change the blur radius of the drop shadow added to an image, all you have to do is drag the “Blur Radius” slider in the “Drop shadow” section of the “Format options” menu.
10. How to Reset Image Edits in Google Slides?
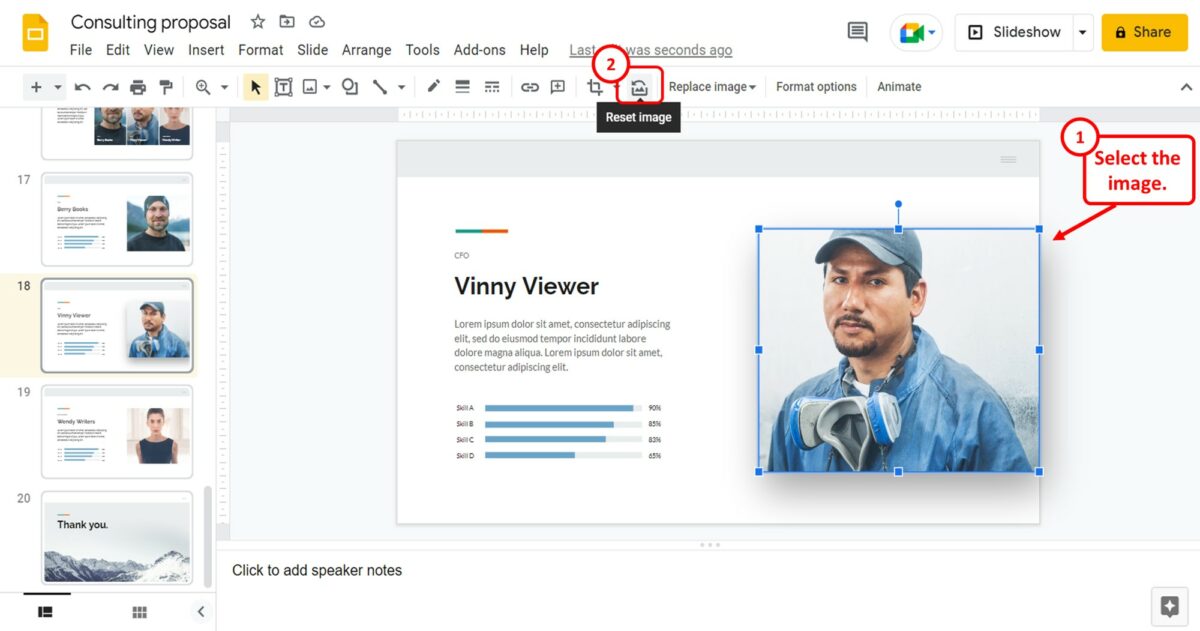
To reset all the edits applied to an image in Google Slides, you have to first click on the image to select it. Then all you have to do is click on the “Reset image” icon in the toolbar located under the menu bar at the top of the screen.