![How to Edit Footer in PowerPoint? [An EASY Solution!]](https://artofpresentations.com/wp-content/uploads/2021/08/Featured-Image-How-to-Edit-Footer-in-PowerPoint_optimized.jpg)
I know the feeling! You try clicking, double-clicking, and everything else that you know, and you still can’t select the elements in the footer! It is really annoying, to say the least. Does that mean, you can’t edit the footer in PowerPoint? Well, you can!
To edit the footer in PowerPoint, click on the “View” tab. Then, select the “Slide Master” view. Select the “Master Slide” or the first slide. From this slide, you can add, edit or remove the footer in PowerPoint. Changes to the master slide will apply to all slides.
Some elements in the footer of a presentation are easier to edit than others. This is based on how they are placed when designing the presentation. If they are present directly on the slide, you may find it easier to edit. However, if the objects are placed using the “Slide Master”, this article will help you fix the problem!
My goal with this article is to help you understand everything you need to know about editing or adding a footer in PowerPoint.
So, let’s get started!
1. How to Change Footer Text in PowerPoint?
As mentioned earlier, if you are unable to select the footer elements directly on the slide, you will have to go to the “Slide Master” view and change the footer in the “Master Slide.”
Don’t worry, I’ve described the complete process in a step-by-step manner below.
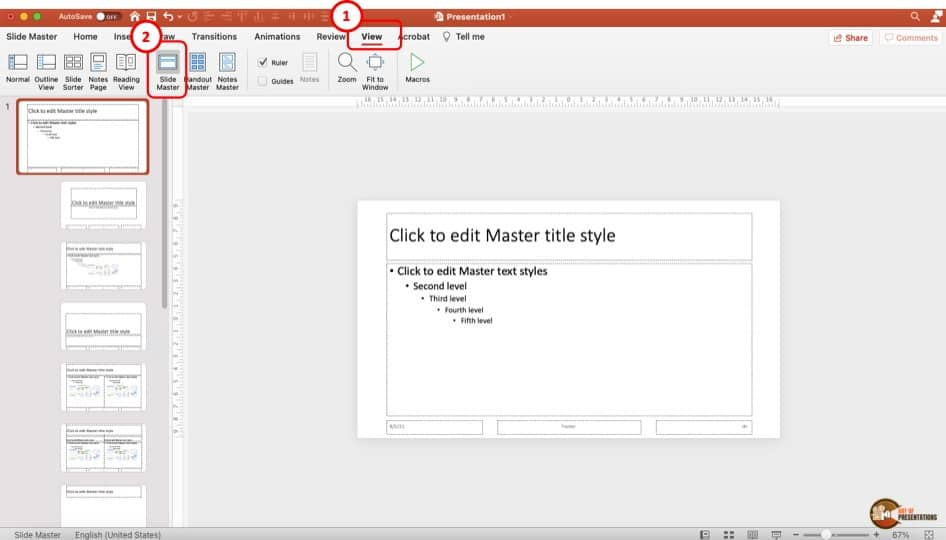
Step-1: Select the “Slide Master View” option
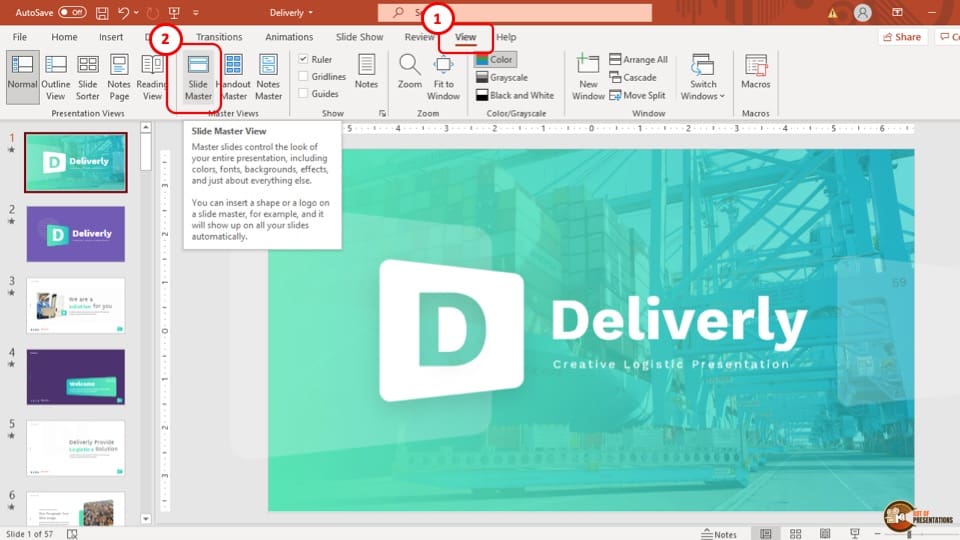
The first step of the process is to go to the “View” tab from the ribbon the select the “Slide Master View” option, which is located inside the “Master Views” section.
This will take you to the “Slide Master” view.
Step-2: Select the “Footer” in the “Master Slide”
After you have opened the “Slide Master” view, you will notice that the slides in the “Slide Navigation” bar have changed.
Here, you can edit almost all parts of the layout of the slides in your presentation. The first slide in this view, the slide that is a little bit to the left from all the other slides is the “Master Slide”.
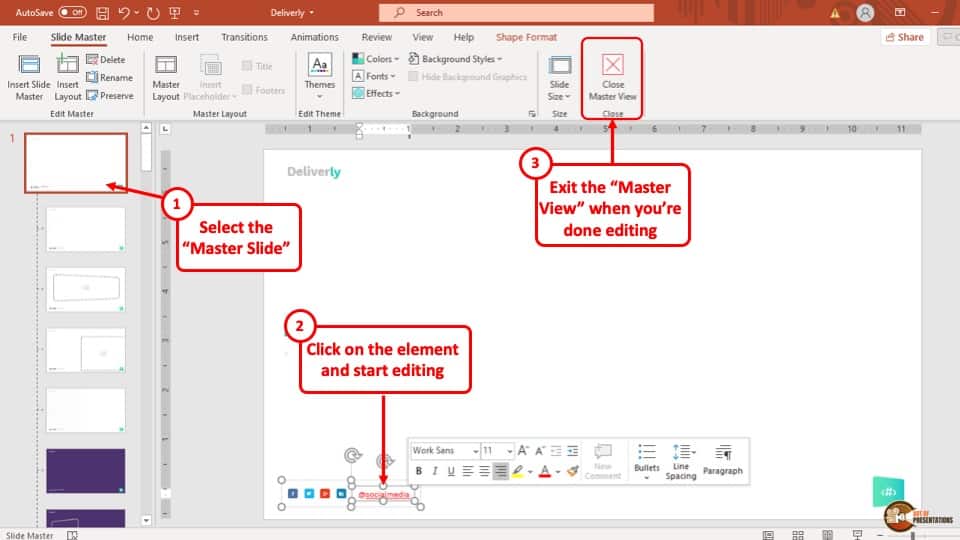
In this step, you have to select the footer which will enable you to edit the text inside the “Text Box” of the footer.
Step-3: Edit the text
In this step, after you select the “Text Box” of the footer, all you have to do is to edit the text of the footer and then select anywhere outside the “Text Box”.
After that, click on the “Close Master Views” option to close the “Slide Master” view and you will notice that the edit in the footer has been updated to all slides.
2. How to Remove Footer from All Slides in PowerPoint?
To remove Footers from all the slides in your PowerPoint presentation, you have to delete the footer in the “Master Slide” in the “Slide Master” view of your presentation.
Go to the “Slide Master” view and follow the process described in the 3 steps below.
Step-1: Open the “Slide Master” View
The first step is to open the Slide Master view in PowerPoint as we did in the previous section.
Step-2: Select the Footer in the “Master Slide”
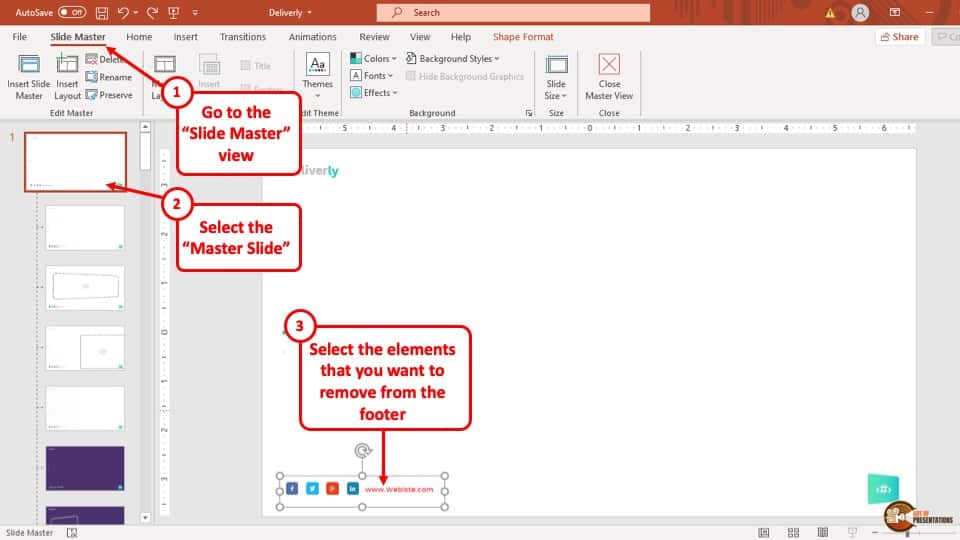
After accessing the “Slide Master” view, the first thing that you have to do is to go to the “Master Slide” and select the “Text Box” of the footer.
To do that, you have to “Left click” once on the “Text Box” and the border of the text box will appear indicating that it has been selected.
Step-2: Press the “Back Space” or “Delete” keys
While keeping the “Text Box” of the footer in the “Master Slide” selected, hit the “Back Space” on the keyboard of your computer and the footer will be removed instantly.
Since edits on the “Master Slides” apply to all the slides that are following the layout, the footers from all the slides will be removed by removing them from the “Master Slide”.
3. How to Add Footer to All Slides in PowerPoint?
Open the “Slide Master” view (as described in the previous sections) and follow the steps given below to add a footer to all slides in PowerPoint.
Step-1: Go to the “Header & Footers” option
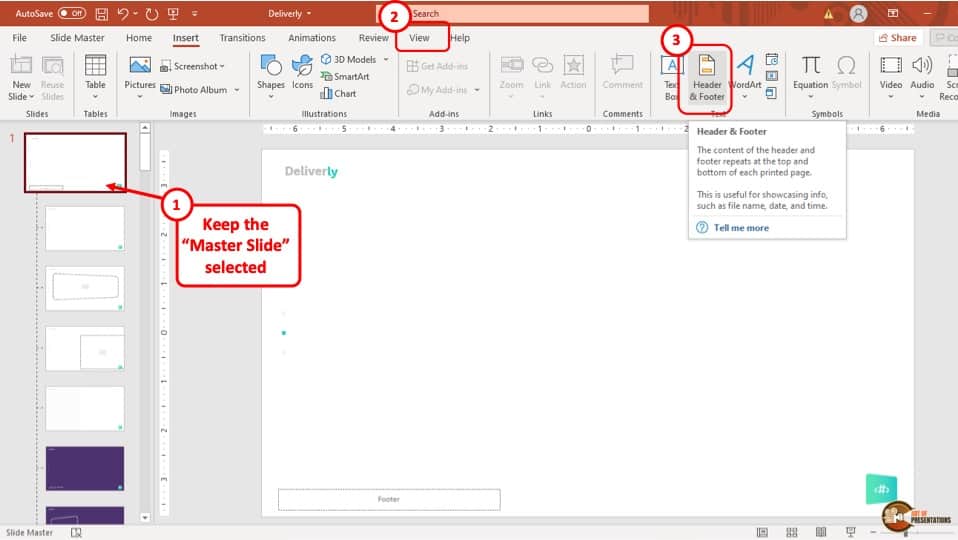
After opening the “Slide Master” view, the first step is to click on the “Header & Footer” option which is located in the “Text” section of the “Insert” tab. This will open a pop-up window.
Step-2: Check the Footer box and type in the text
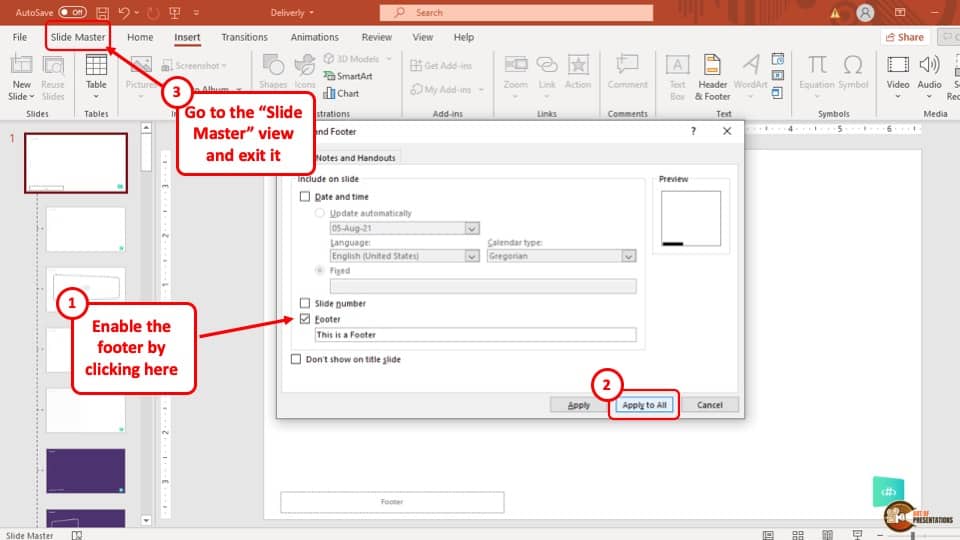
From the pop-up window, click on the box next to the “Footer” option and then type in the text that you want to add in all the slides as a footer inside the rectangular box below.
After that, click on the “Apply to All” button and the footer will be added to all the slides in your PowerPoint presentation.
4. How to Add Logo to a Footer in PowerPoint?
To add a logo in the footer of your PowerPoint presentation, you have to insert an image in the “Master Slide” of your presentation.
Go to the “Master Slide” using the steps described earlier and follow the instructions given below.
Step-1: Open the Slide Master View
As usual, in order to make changes to the complete presentation, you will need to open the “Slide Master”.
Step-2: Insert the Logo to the Master Slide
Once you are in the “Master View”, the first step to adding an image/logo in the footer of your PowerPoint presentation is to upload the logo to your presentation. Go to the “Insert” tab and click on the “Pictures” option, which is located in the “Images” section.
This will open a drop-down menu. From the drop-down menu, click on “This Device.”
Step-3: Select the logo file
After you click on “This Device”, a new window will pop up on your screen. From that window, go to the folder on your computer which contains the logo you want to add and click on it. Then hit the “Open” button at the bottom right corner of the pop-up window to add it to your PowerPoint presentation.
Step-4: Format the logo and place it in the area of the footer
After adding the image to the slide, simply resize it and place it in your preferred area as a footer. This will add the logo to all the slides that are using the layout of the “Master Slide” in your PowerPoint presentation.
5. Can You Add Multiple Footer in a PowerPoint Presentation?
Unfortunately, you can’t add multiple footers in your PowerPoint presentation directly. However, there is a workaround to this problem. The “Master Slide” in the “Slide Master” view is a master key to all the slides with the layout of the “Master Slide”.
You can use two different custom layouts to create a two-footer option. Then, when designing your presentation, simply choose the type of custom layout for the slide depending on the type of footer required.
Let me show you step by step how this can be achieved.
Step 1 – Go to the Slide Master View
As always, the first step is to go to the slide master view. By now, you should know exactly how this can be done. If you are not sure, simply scroll up and read through the first section of this article.
Step 2 – Add a Custom Layout
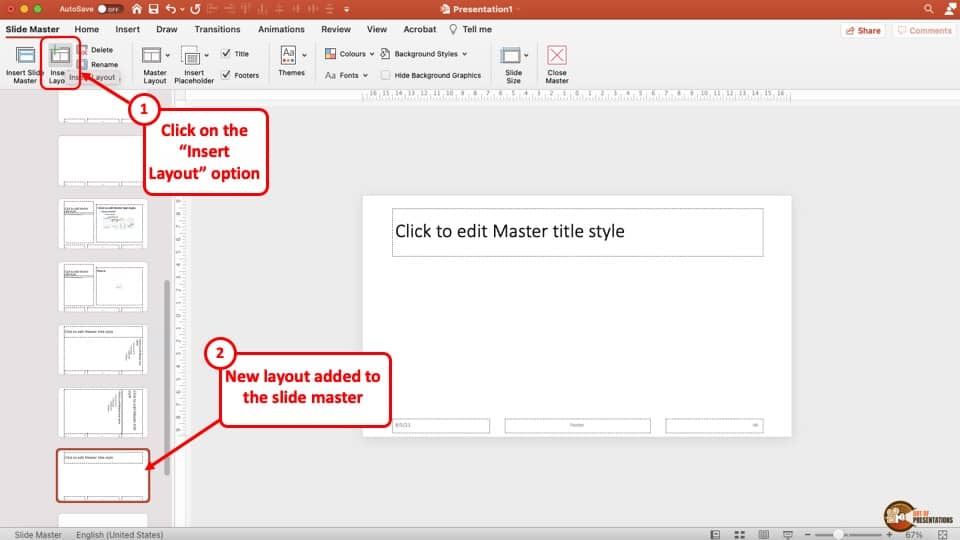
To add a custom layout, simply click on the “Insert Layout” option in the ribbon. This will add a new custom slide layout after the select layout slide.
Step 3 – Delete All Placeholders
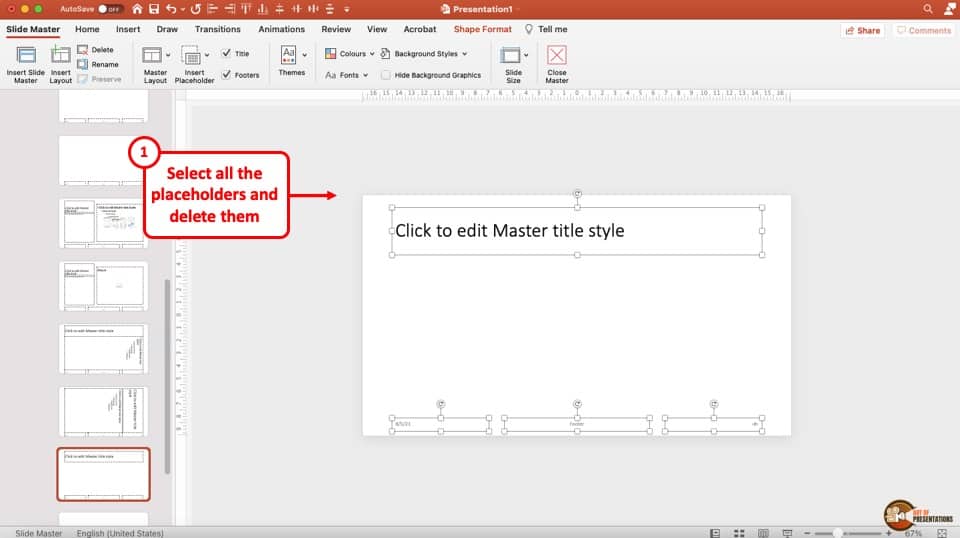
The next thing that you want to do is to delete all the placeholders so that you are left with a blank slide.
To delete, simply click anywhere on the slide (outside the boxes), and press “Ctrl+A”. This is a shortcut to select all. Then, press the “Delete” or “Backspace” key on your keyboard.
You will now be left with a blank custom layout slide.
Step 4 – Duplicate the Blank Custom Layout Slide
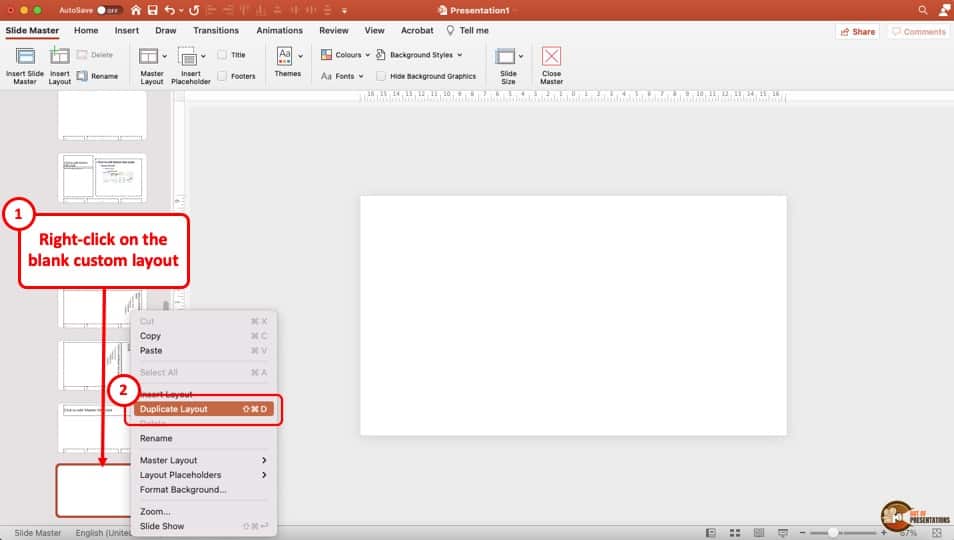
Next, create a copy of this blank custom layout slide that we just created. You can do this by simply using copy and paste in PowerPoint.
Alternatively, you can also right-click on the slide, and from the options, choose “Duplicate Layout“.
Step 5 – Create Multiple Custom Footers
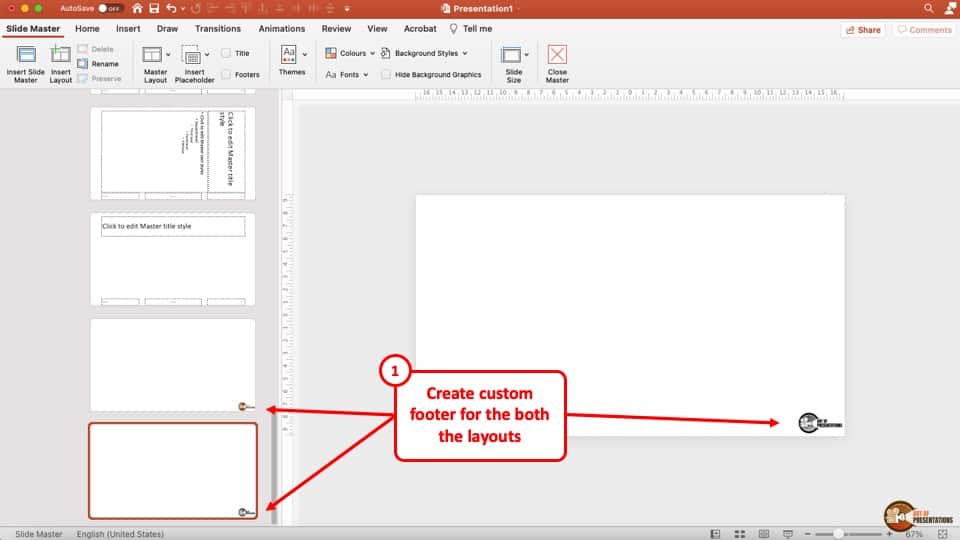
Now, create the two different footers on both the custom layout slides respectively. Do so just as you would on a normal slide.
For the sake of this example, I’ve added the logo of my brand – artofpresentation.
Step 6 – Rename the Custom Layouts
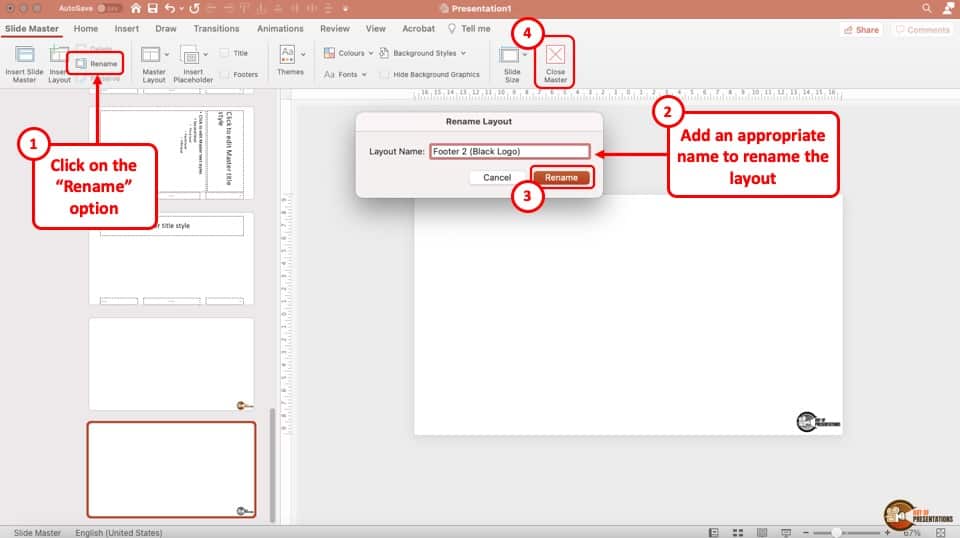
Now, rename the custom layouts so that you are able to easily identify the two layouts with two different footers and exit the slide master view.
Step 7 – Selecting the Layouts
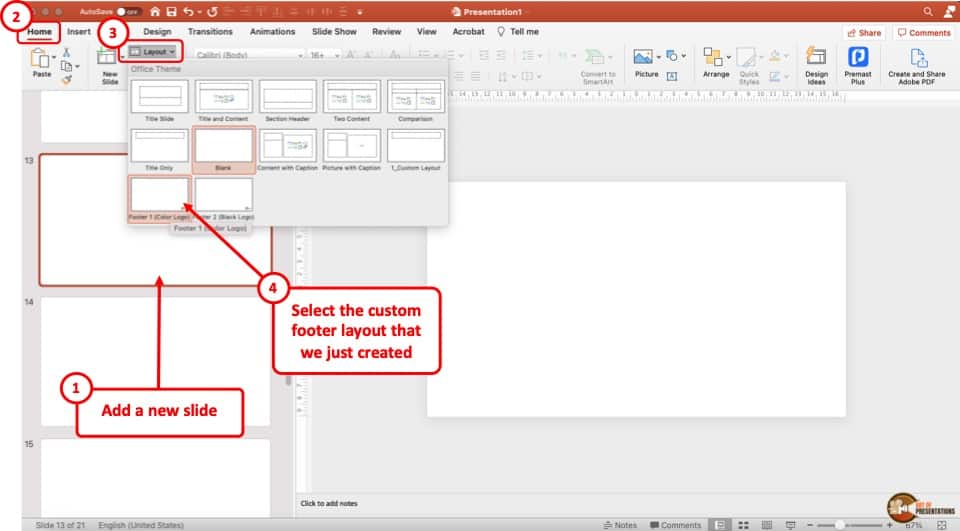
The final step of the process is in the front end.
When inserting the slide with the custom layout option, simply click on the “Home” tab. Then, click on “Layout”. From the dropdown, choose the layout with the custom footer that you want to apply.
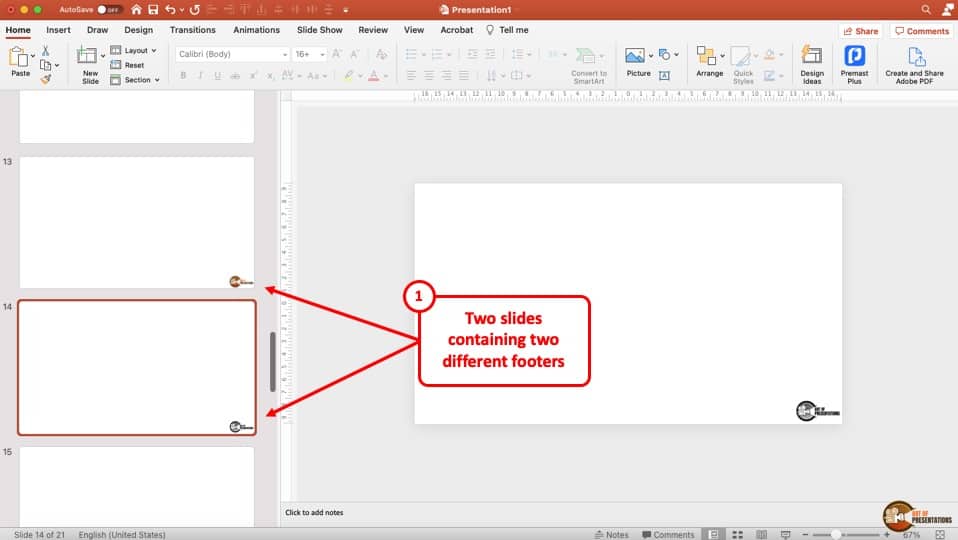
As you can see in the image above, two different footer styles have been applied to two different slides using custom slide layouts in the slide master view.
One thing to remember is that make sure that you delete any pre-existing footer from the “Master Slide” in the slide master view.
You can also add the footer directly to a specific slide in “Normal View”. To do that, create a custom blank layout by deleting the elements as mentioned in the steps above.
Then, in “Normal View”, insert the blank custom layout, and add the elements directly to the footer of a specific slide instead of using the “Slide Master View”.
6. How to Lock Footer in PowerPoint?
There is no direct way to lock the footer of your presentation in Microsoft PowerPoint so that other people with the PowerPoint file cannot edit it.
However, there are third-party software that can help you to do this. I would like to recommend “OfficeOne: Shape Locker.” It is a software that allows you to lock not only the footer in your PowerPoint presentation but also headers, shapes, objects, images, and more.
To use this software, all you have to do is download it from their website using this link and it will be automatically integrated into your PowerPoint. You will find it in the “Design” tab of your PowerPoint presentation.
7. PowerPoint Footer Not Showing? Here’s What to Do!
Some users have complained that they can’t add a footer or the footer that they have added to their PowerPoint presentation is not showing on the slides. This may happen because there is no placeholder for a footer in the “Master Slide” of your PowerPoint presentation.
To add a placeholder in the “Master Slide” of your presentation, follow the simple steps given below.
Step-1: Select the “Master Layout” option
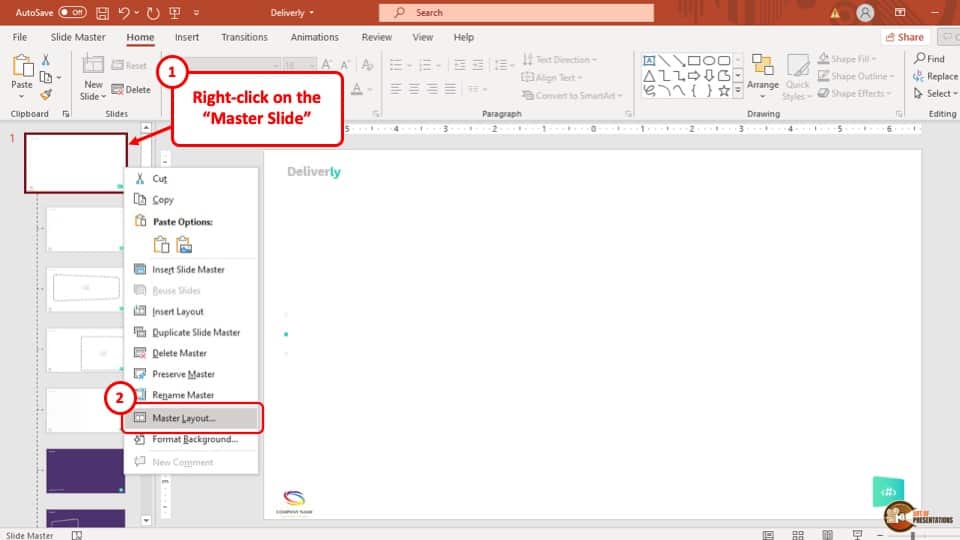
The first step is to “Right Click” on the “Master Slide” and select the “Master Layout” option which is the second to last option in the drop-down menu.
Step-2: Ensure that the “Footer” is enabled
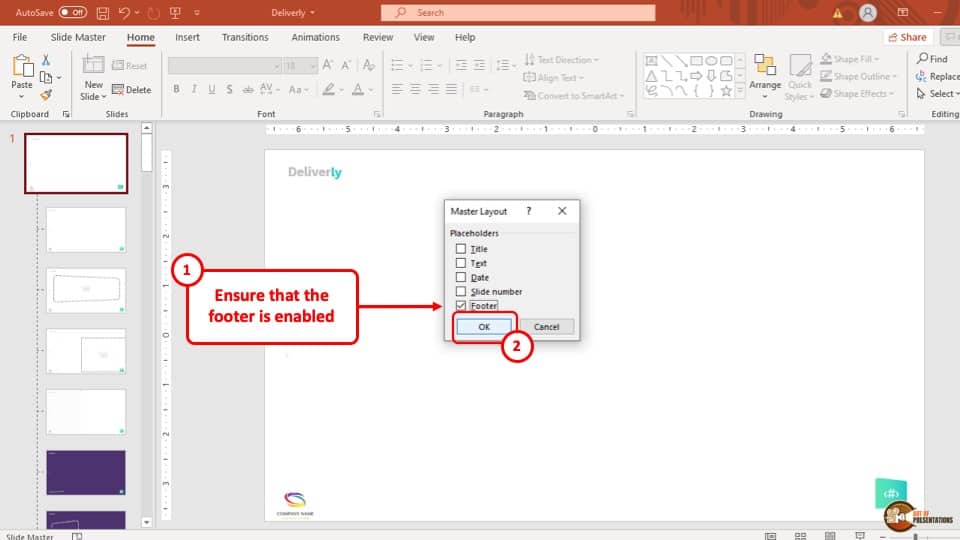
In this last step, all you have to do is to click on the box right before the “Footer” option and then hit the “OK” button at the bottom right corner of the pop-up window.
After that a placeholder for the footer will be added to your “Master Slide” and you will be able to see the footer in your PowerPoint presentation.
Credit to cookie_studio (on Freepik) for the featured image of this article (further edited).