![How to Customize Ribbon in PowerPoint? [Complete Guide!]](https://artofpresentations.com/wp-content/uploads/2022/02/Featured-Image-How-to-Customize-Ribbon-in-PowerPoint.webp)
If your work is heavily centered around Microsoft PowerPoint such that you end up spending a lot of your time working on presentations, I’m confident that you may wonder at some point in time if there was a way to customize the ribbon in PowerPoint and personalize it as per your convenience!
Well, I’m glad to share with you that PowerPoint does allow you to customize the ribbon and add commands of your choosing!
To customize the ribbon in PowerPoint, click on the “File” tab, and click on the “Options” menu. Then, from the “PowerPoint Options” window, click on the “Customize Ribbon” option. Make the changes as per your requirement in order to personalize the ribbon and click “OK”.
Although the above answer tells you how to customize the ribbon in PowerPoint, there are a few additional things that you will need to know in order to personalize the ribbon correctly.
So, in this article, I’ll share with you everything about customizing the ribbon in PowerPoint. By the end of this article, you will have mastered the technique and will be able to create your own tab with personalized commands!
So, let’s get started, shall we?
1. What Parts of the Ribbon Can You Customize in PowerPoint?
First, let’s start with the basics. Let’s first understand what exactly is a ribbon and what parts of a ribbon can you customize.
A ribbon in PowerPoint is basically a strip on the top part of the application that contains tabs and commands grouped together in sections in order to make it easy to locate and access the various features that PowerPoint has to offer!
In Microsoft PowerPoint, you can customize the ribbon to arrange and move the tabs as well as the controls under them according to your preference. You can also hide or unhide the ribbon, hide or add specific commands, and also export or import a customized ribbon!
In the rest of the article, I shall help you understand how to do each of the things that I just mentioned along with other additional things you can do to customize a ribbon in PowerPoint.
1a. Change the order of the tabs and commands on a ribbon
In Microsoft PowerPoint, you can change the order of the tabs in the ribbon menu if you do not like the default order. Refer to section 6 to learn how to reorder tabs in PowerPoint.
1b. Hide or unhide a ribbon
Depending on your preference, you can hide or unhide the menu ribbon in Microsoft PowerPoint.
Hide the ribbon

To hide the ribbon, “Right Click” on the ribbon and click on the “Collapse the Ribbon” option from the pop-up menu.
Unhide the ribbon
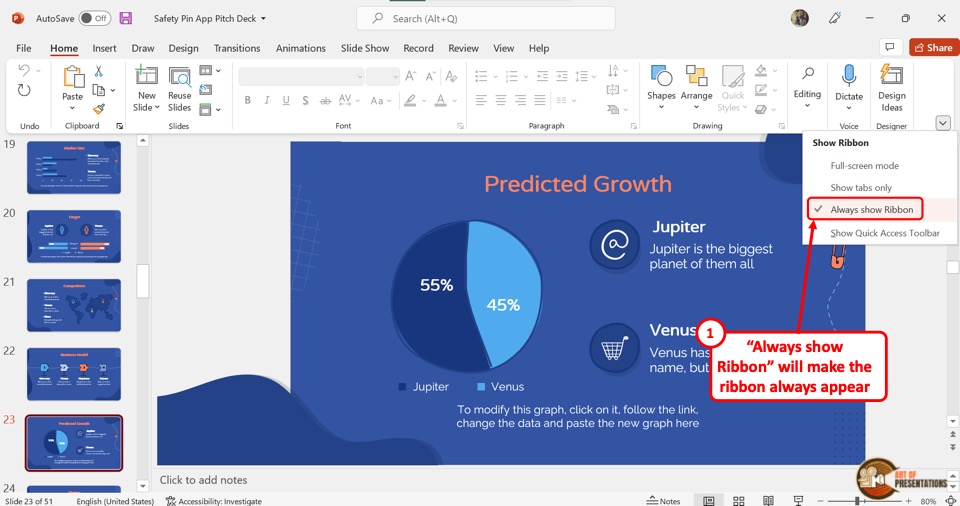
To unhide the ribbon, click on the downward arrow at the bottom right corner of the ribbon. Then select the “Always show Ribbon” option from the dropdown menu.
1c. Hide commands you use less often
Microsoft PowerPoint has a removal feature for commands you use less often. Refer to section 9c in this article to learn about removing commands.
1d. Create a Customized Ribbon
Using the “Customize the Ribbon” option in the menu ribbon, you can create a customized ribbon for your Microsoft PowerPoint application.
In the next section of the article, I will show you the exact steps to take in order to create a customized ribbon in PowerPoint.
1e. Export or Import Customized Ribbon
Once you have created a customized ribbon, you can export or import it using the “Import/Export” feature. Refer to section 10 to read more.
2. How to Customize the Ribbon in PowerPoint?
In order to customize the ribbon in PowerPoint, you will need to access the “PowerPoint Options” window. Once you have the “PowerPoint Options” window open, simply click on the “Customize Ribbon” options to make changes to the ribbon and personalize it further.
There are two ways to access the PowerPoint Options window. Let’s take a look at both the methods below –
Method 1 – Using the “File” Tab
The first method is using the “File” tab in PowerPoint. Here’s what you need to do –
Step 1 – Click on the “File” tab
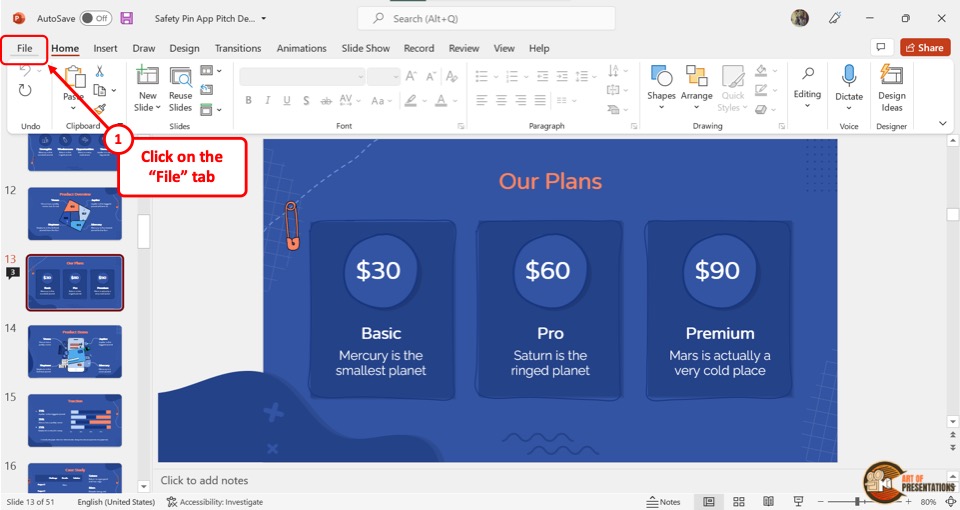
Simply start by clicking on the “File” tab. This will lead you to the backstage view in PowerPoint.
Step 2 – Click on the “Options” menu
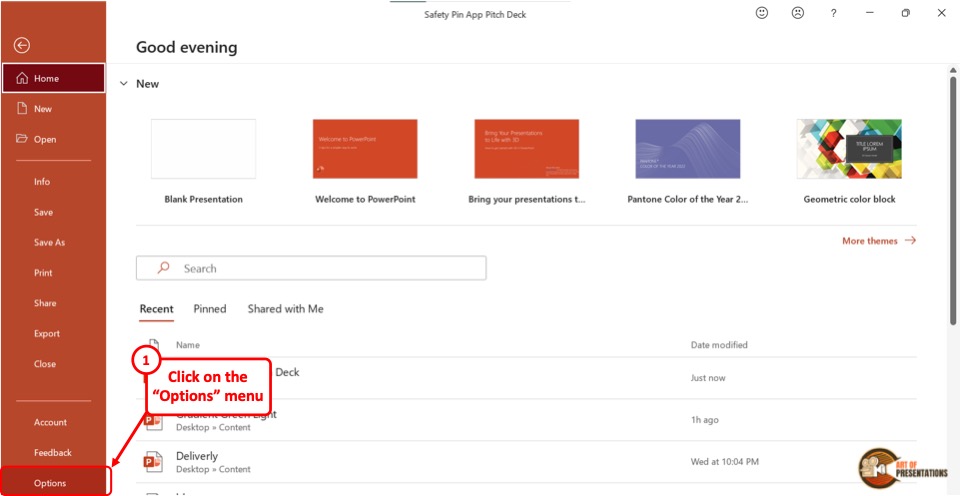
Now, in the backstage view, click on the “Options” menu. This will open the “PowerPoint Options” window.
Step 3 – Click on the “Customize Ribbon” option
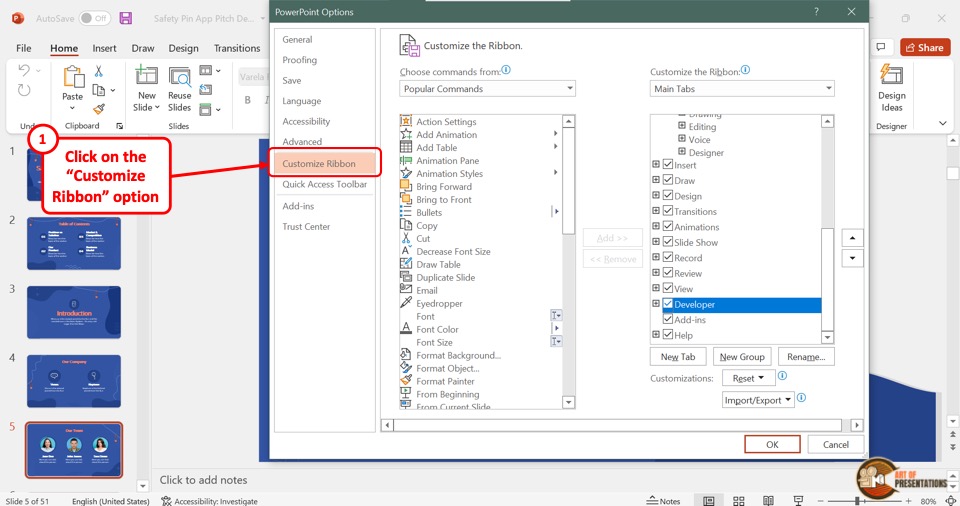
Now, in this “PowerPoint Options” window, click on the “Customize Ribbon” on the left part of the screen.
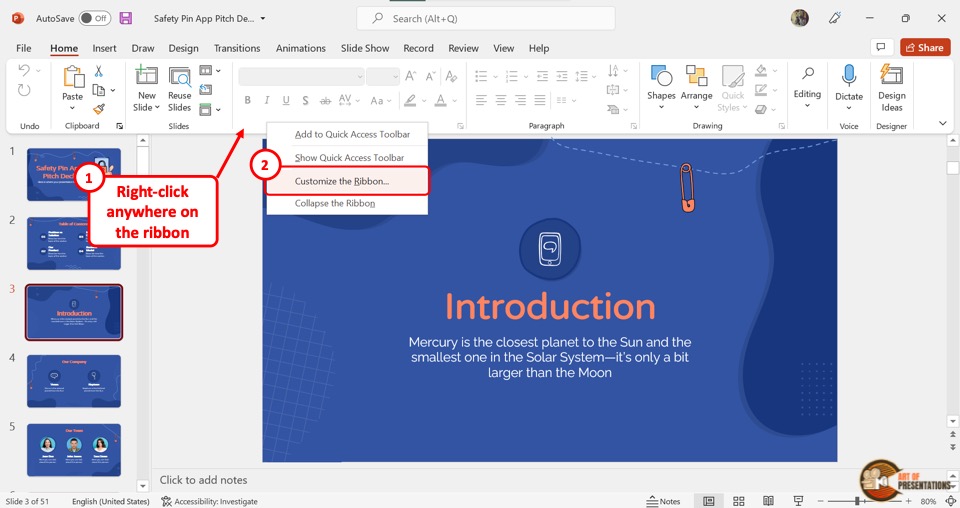
Method 2 – Using the Right-click Option
Another way to access the “Customize Ribbon” option is to use the right-click method. Here’s what you need to do –
Step 1 – Right-click and Select “Customize Ribbon”
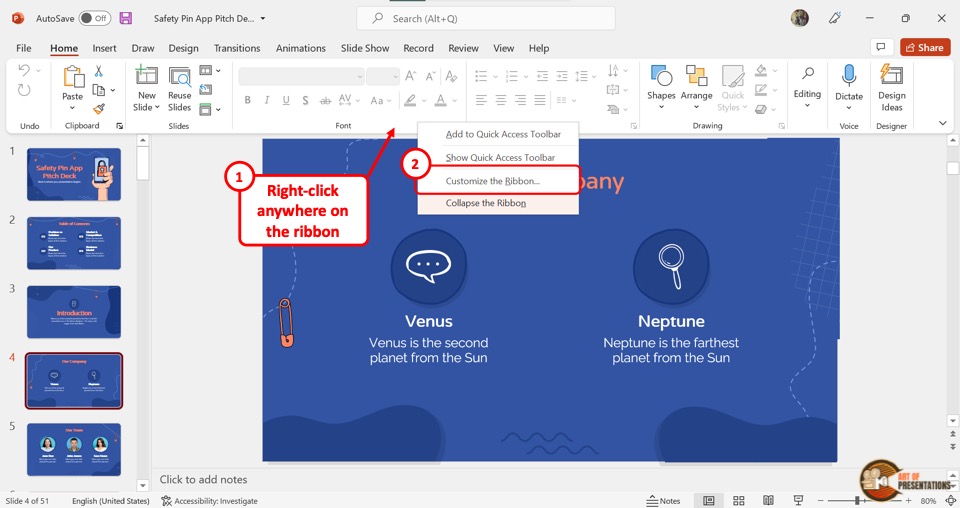
Right-click anywhere on the ribbon. Then, from the options that appear, click on the “Customize the Ribbon” option.
This will open the “PowerPoint Options” window.
Step 2 – Click on the “Customize Ribbon” option
Now, simply click on the “Customize Ribbon” from the options on the left part of the screen.
This will open the section that contains all the options available to customize the ribbon in PowerPoint.
You can use these two methods to access the “Customize Ribbon” settings. From thereon, you can actually do a bunch of different things in order to personalize the ribbon in PowerPoint.
We shall learn the different things you can do to the ribbon in the subsequent sections of the article.
3. What Parts of the Ribbon Can’t You Customize in PowerPoint?
While you can customize the ribbon menu in Microsoft PowerPoint, there are some limitations to the feature. You cannot change the size of the ribbon or the size of text and icons in the ribbon.
3a. Can’t Reduce the size of the ribbon
The size of the ribbon menu in PowerPoint is fixed as the default size. You cannot reduce or increase the size of the ribbon. However, you can expand, collapse or completely hide the ribbon.
3b. Size of Text
The labels and the texts in the PowerPoint ribbon are fixed in size. You cannot increase or decrease it.
3c. Size of the Icons on the Ribbon
Although Microsoft PowerPoint allows you to change the icons for the commands in the ribbon, you cannot change the size of the ions.
4. How to Add Tabs to the Ribbon in PowerPoint
In Microsoft PowerPoint, you can add some default hidden tabs to the ribbon. To do so, follow the 2 quick steps.
Step-1: “Right Click” on the menu ribbon
The first step is to “Right Click” on the ribbon to open a pop-up menu. Click on the “Customize the Ribbon” option from the menu.
Step-2: Click on the preferred tab
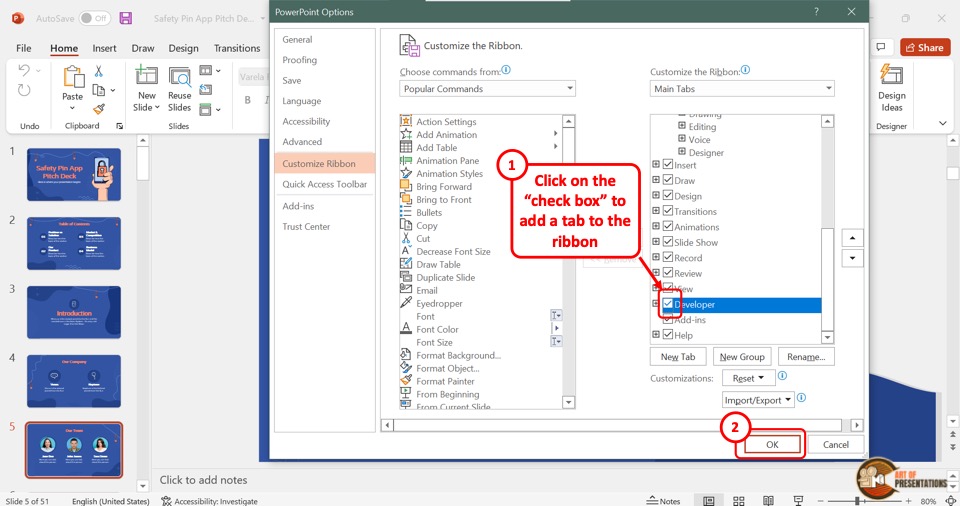
Under the “Main Tabs” section of the “PowerPoint Options” dialog box, click on a tab that you want to add to the ribbon.
A checkmark will appear in the box beside the tab to show that it has been added to the ribbon.
5. How to Remove Tabs from the Ribbon in PowerPoint
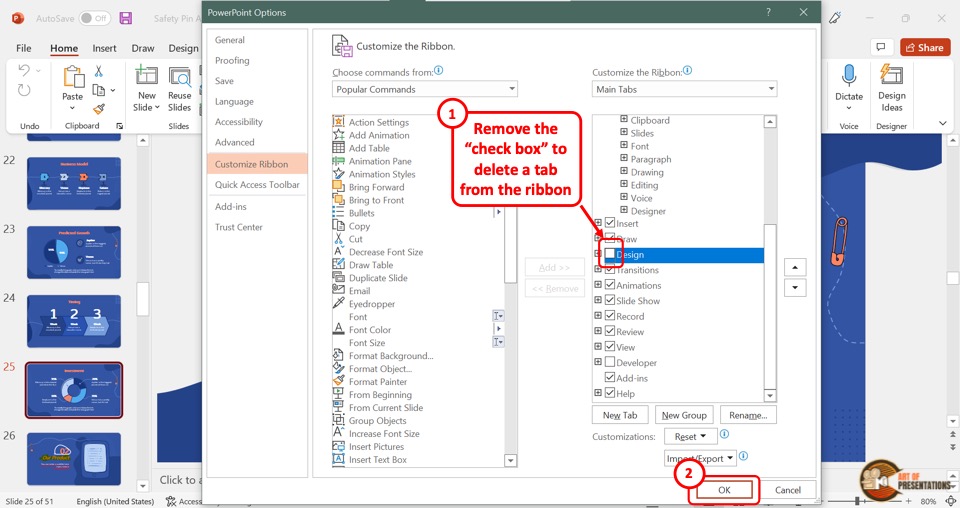
In the “PowerPoint Options” dialog box, you can easily remove tabs from the ribbon.
All you have to do is click on the tab that you want to remove in the right column of the dialog box.
The checkmark before the option will disappear. Then click on the “OK” button to save the changes.
6. How to Change the Order of Tabs on the Ribbon in PowerPoint
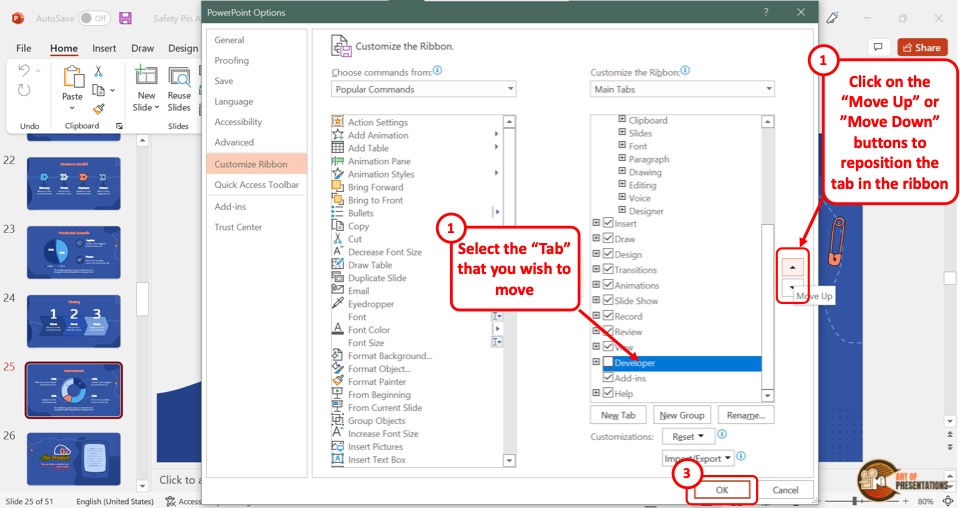
Microsoft PowerPoint allows you to change the order of the tabs in the menu ribbon using the “Customize Ribbon” feature.
In the right column of the “PowerPoint Options” dialog box, select the tab that you want to reorder.
Then click on the “Move Up” button or the “Move Down” button on the right side of the dialog box to reorder the selected tab.
7. How to Create a Custom Tab on the Ribbon in PowerPoint?
Microsoft PowerPoint also allows you to create a custom tab. All you need to do is follow the 3 simple steps.
Step-1: Click on “Customize the Ribbon”
In the menu ribbon at the top of the screen, you have to first “Right Click”. Then click on the “Customize the Ribbon” option from the right-click menu. This will open a dialog box.
Step-2: Click on the “New Tab” button
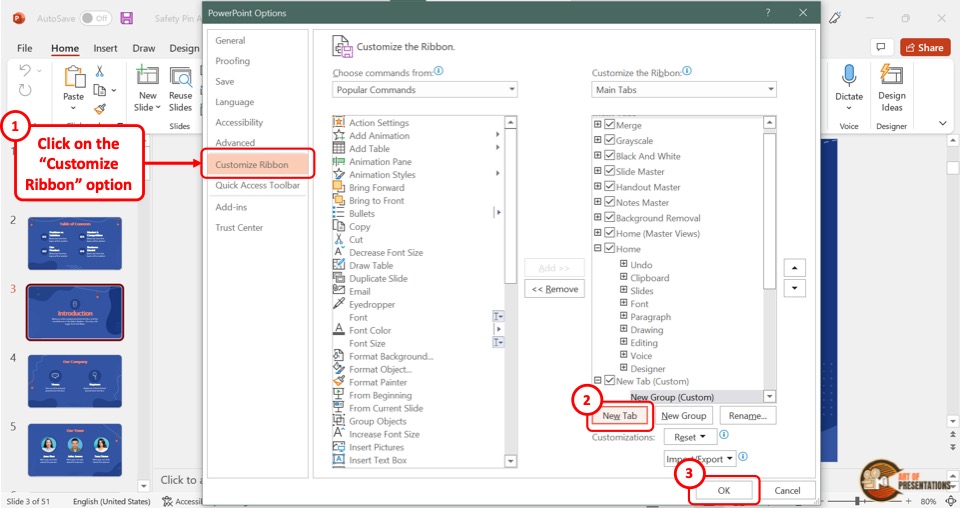
In the “PowerPoint Options” dialog box, you will find two columns in the “Customize Ribbon” screen. Click on the “New Tab” button at the bottom of the right column.
You will see the new tab added in the “Main Tabs” list.
Step-3: Click on the “OK” button
Now all you have to do is click on the “OK” button at the bottom of the dialog box to save the custom tab in the menu ribbon.
7a. Rename a Custom Tab
After creating the custom tab, you can now rename the tab. Follow the 4 quick steps.
Step-1: Click on the “New Tab”
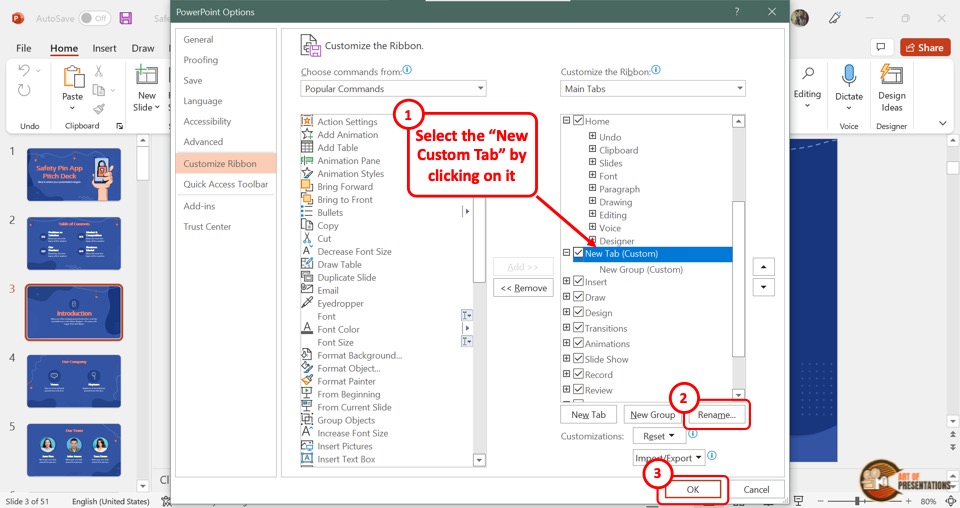
In the right column of the “PowerPoint Options” dialog box, you have to first click on the “New Tab” option under the “Main Tabs”.
Step-2: Click on the “Rename” button
The next step is to click on the “Rename” button at the bottom of the right column (as shown in the image in step 1).
This will launch the “Rename” dialog box.
Step-3: Click on the “Display Name” box
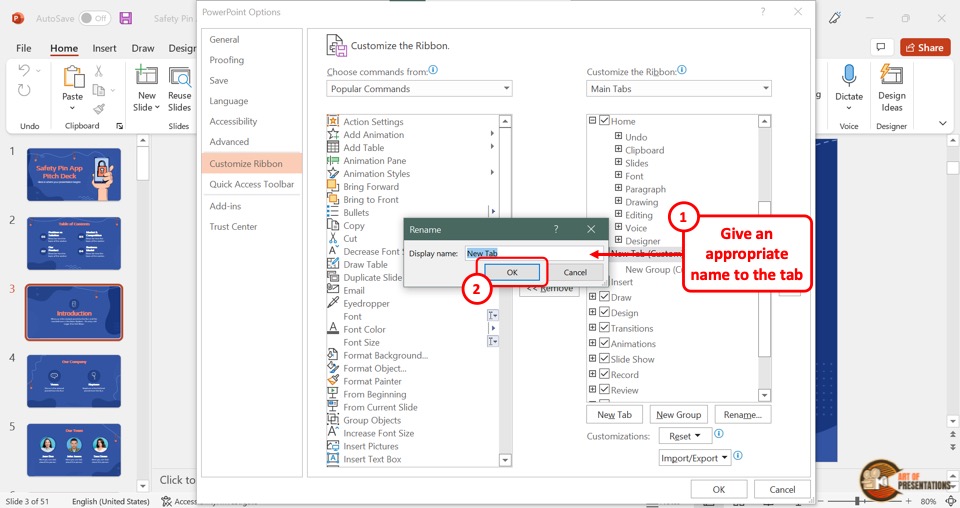
In the “Rename” dialog box, click on the “Display Name” box. Then type in the name you want for the customized tab.
Step-4: Click on “OK”
The final step is to click on the “OK” button at the bottom of the “Rename” dialog box.
Then click on the “OK” button at the bottom of the “PowerPoint Options” to finish the process.
7b. Hide a Custom Tab
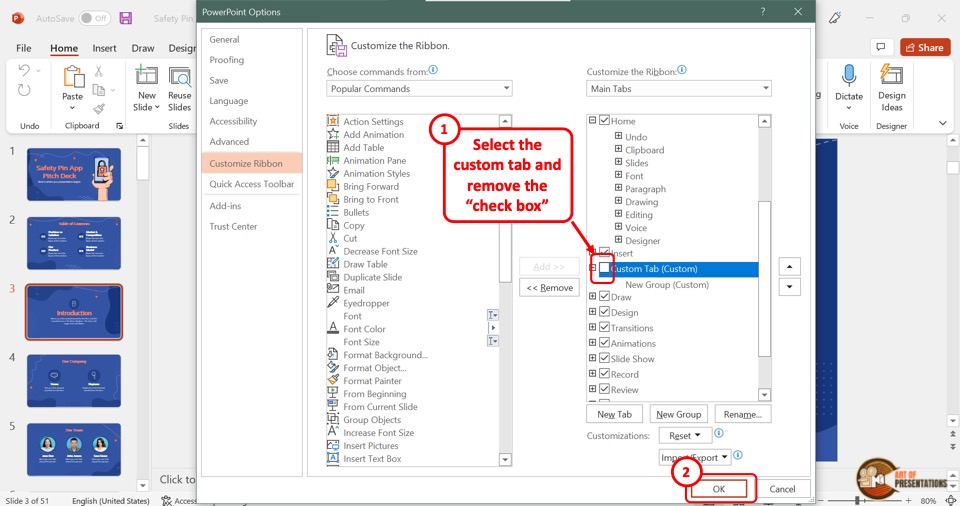
To hide the custom tab, all you have to do is click on the box at the left side of the custom tab in the right column. You will see the checkmark in the box disappear. Now click on the “OK” button to save the change and return to normal view.
7c. Remove or Delete a Custom Tab

Microsoft PowerPoint lets you remove a custom tab with only one click. You have to first select the custom tab from the right column of the “PowerPoint Options” dialog box.
Then all you have to do is click on the “Remove” button that is located between the two columns.
8. How to Customize Groups on a Tab on a PowerPoint Ribbon?
A group on a tab in Microsoft PowerPoint is a set of commands. You can create a customized group on a tab, or customize an existing group.
8a. Add a Custom Group
To add a custom group in a tab in PowerPoint, all you have to do is follow the 3 simple steps.
Step-1: “Right Click” on the menu ribbon
The first step is to “Right Click” on the menu ribbon. Then click on the “Customize the Ribbon” option from the right-click menu.
This will launch the “PowerPoint Options” dialog box with the “Customize Ribbon” option selected.
Step-2: Click on “New Group”
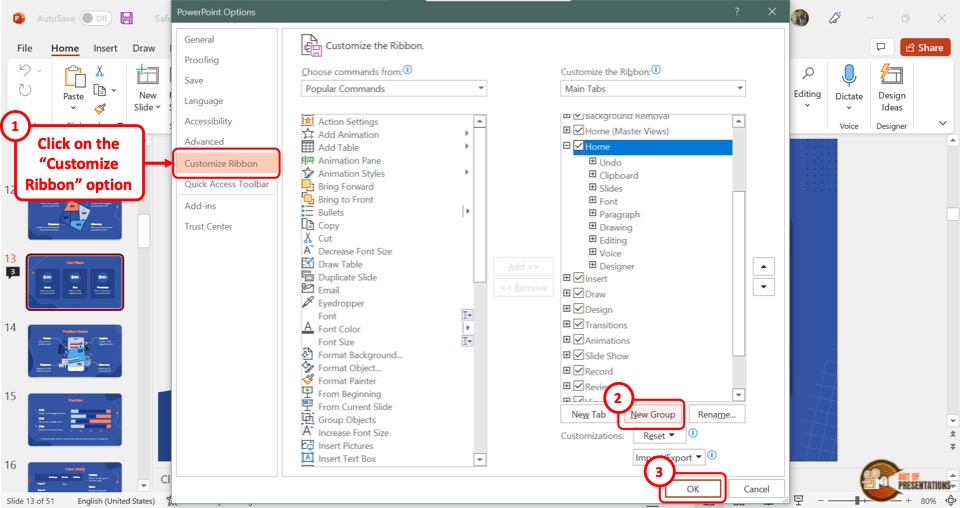
In the right column of the “PowerPoint Options” dialog box, click on the tab where you want to add a custom group.
Then click on the “New Group” button at the bottom of the column. You will see the “New Group (Custom)” added to the list of groups under the selected tab.
Step-3: Click on the “OK” button
Finally, all you have to do is click on the “OK” button at the bottom of the “PowerPoint Options” dialog box to add the custom group.
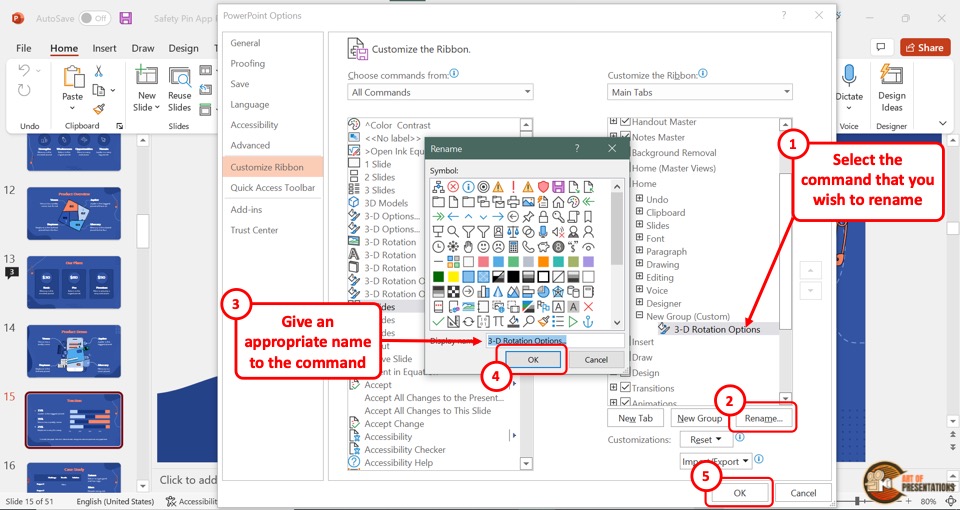
8b. Rename a Custom Group
To rename a custom group in the “Customize Ribbon” screen, follow the 3 quick steps.
Step-1: Click on the “Rename” button
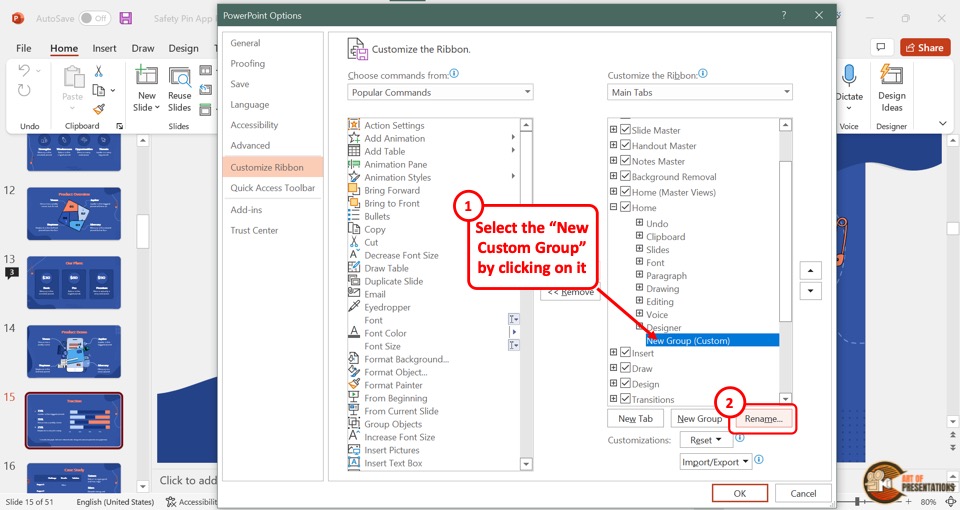
In the right column of the “PowerPoint Options” dialog box, click on the “New Group (Custom)” option to select it. Then click on the “Rename” button at the bottom of the column.
Step-2: Click on “Display Name”
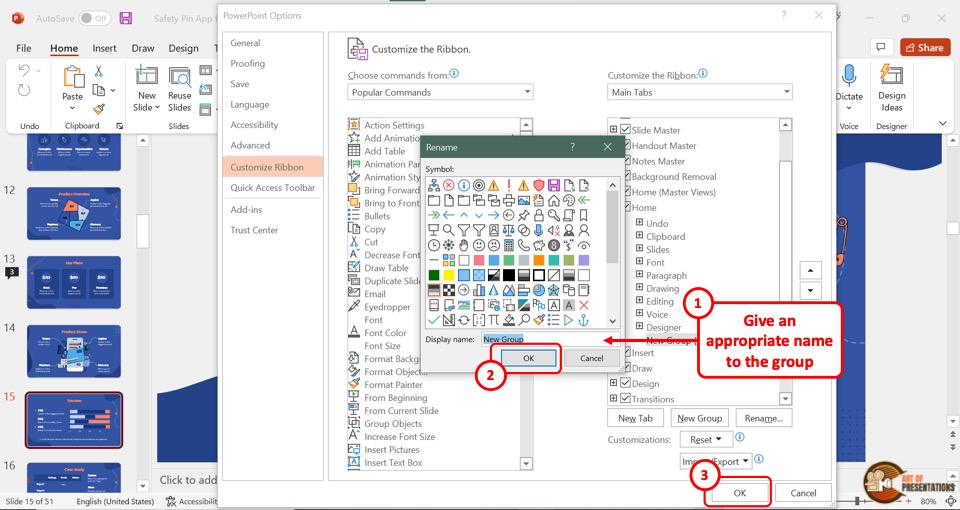
In the “Rename” dialog box, click on the “Display Name” box and type in the new name for the customized group.
You can also choose a symbol for the group from the “Symbol” section of the dialog box.
Step-3: Click on the “OK” button
The final step is to click on the “OK” button at the bottom of the “Rename” dialog box.
Then click on the “OK” button in the “PowerPoint Options” dialog box to save the new name for the customized group.
8c. Change the Order of the Custom Group
To change the order of the custom group, click on the “New Group (Custom)” option in the right column of the “PowerPoint Options” dialog box.
Then all you have to do is click on the “Move Up” or the “Move Down” buttons that look like upward and downward arrows on the right side of the column.
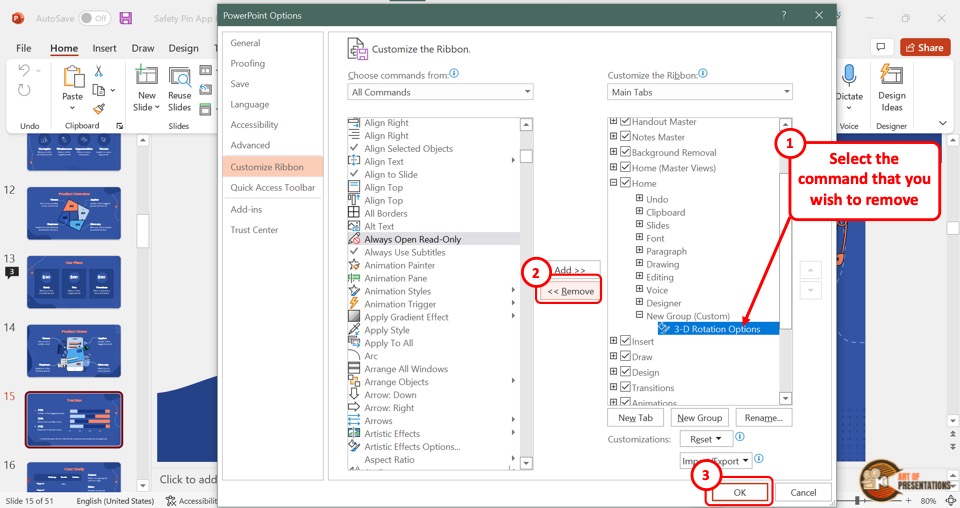
8d. Remove a Custom Group
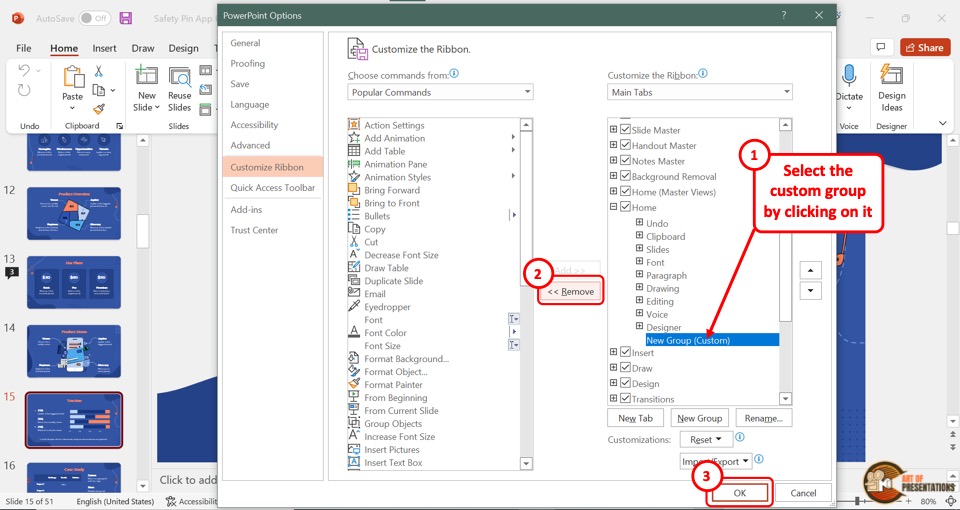
To remove a custom group from a tab in the menu ribbon, you have to first select the custom group from the “Customize Ribbon” option.
Then click on the “Remove” button which is located between the two columns in the dialog box.
9. How to Customize Commands on a Tab on a PowerPoint Ribbon?
In Microsoft PowerPoint, you can customize a tab on the menu ribbon by adding groups and commands in them. PowerPoint allows you to add, rename, and remove commands from custom groups.
However, you cannot customize the commands in a default group under any tab. So, the only way to add or customize commands is to create a new custom tab or a custom group.
9a. Add Commands to a Custom Group
To add commands to the custom group, follow the 3 simple steps.
Step-1: Click on the “Choose Commands From” box
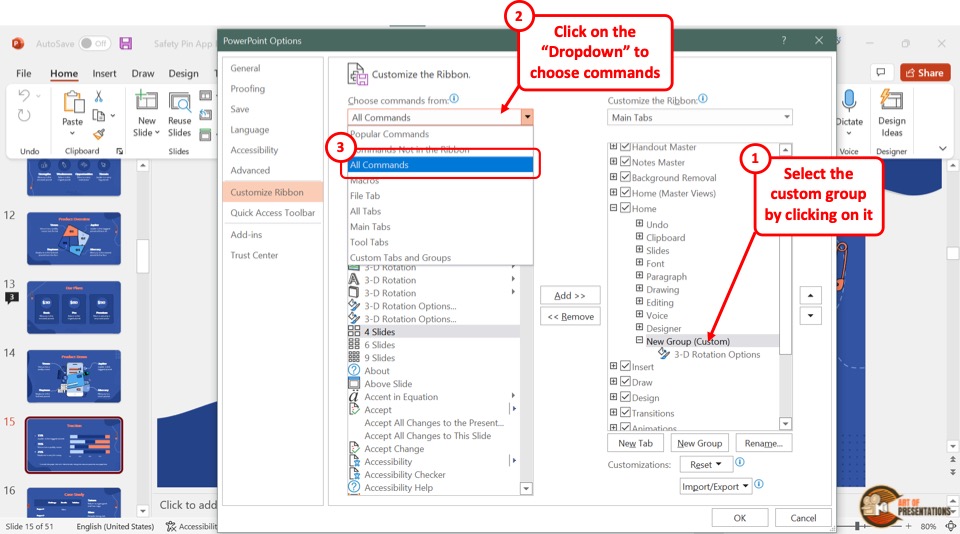
In the “PowerPoint Options” dialog box, you have to first click on the new group from the right column.
Then click on the “Choose commands from” box at the top of the left column. Select the “All Commands” option from the dropdown menu.
Step-2: Click on the “Add” button
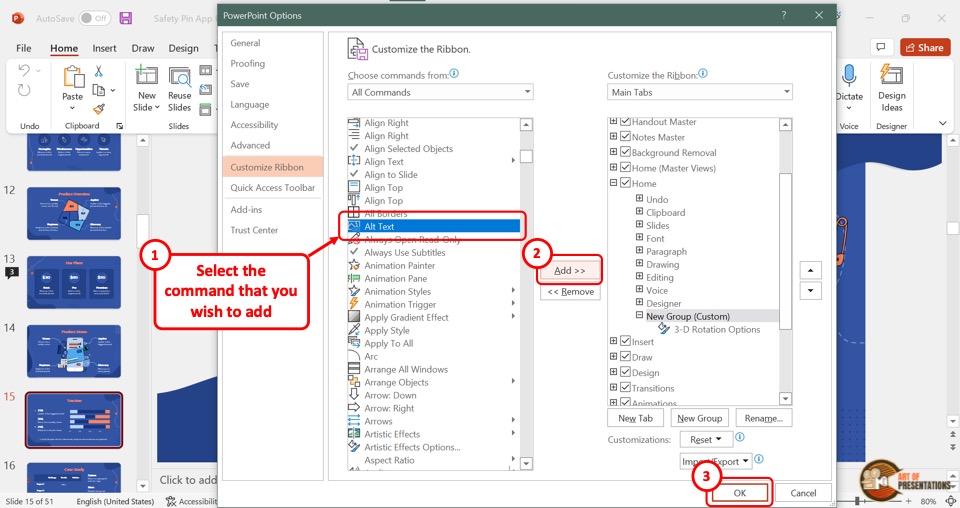
In the left column of the “PowerPoint Options” dialog box, click on your preferred command from the list under “All Commands”.
Then click on the “Add” button between the two columns.
Step-3: Click on “OK”
The selected command will appear under the custom group in the right column. Now all you have to do is click on the “OK” button at the bottom of the dialog box.
9b. Rename Commands to a Custom Group
Microsoft PowerPoint allows you to rename commands after you add them to a custom group.
All you have to do is click on the command in the custom group that you want to rename. Then click on the “Rename” button to launch the “Rename” dialog box.
In the dialog box, type in the new name for the command in the “Display Name” box and then click on the “OK” button.
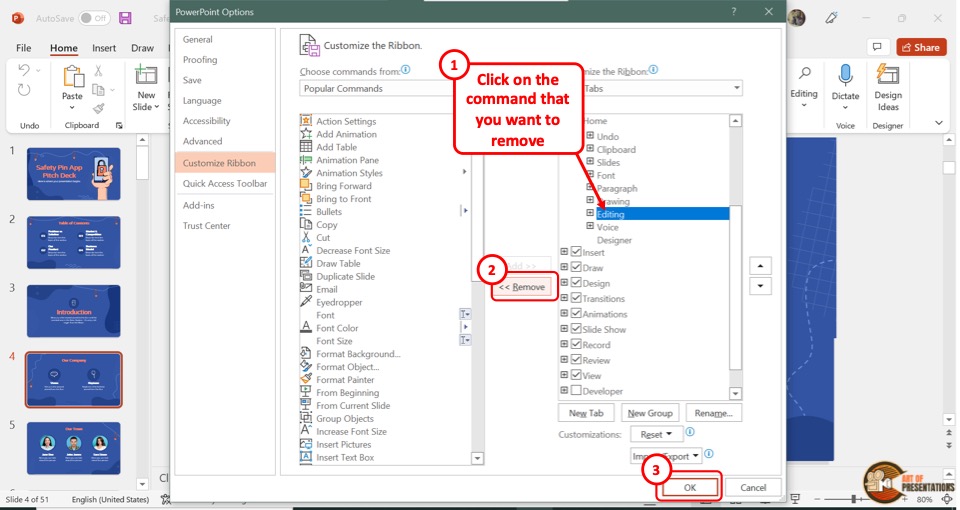
9c. Remove or Delete Commands in a Custom Group
To remove or delete a command from the custom group, you have to first click on it in the “Customize Ribbon” screen of the “PowerPoint Options” dialog box.
Then click on the “Remove” button located between the two columns to remove the command.
10. How to Export or Import Custom Ribbon to Another PowerPoint Application?
If you have already created a custom PowerPoint ribbon, you can import or export it to the other PowerPoint applications. To do so, follow the 4 easy steps.
Step-1: Click on the “Customize the Ribbon” option
In the menu ribbon located at the top of the screen, you have to first “Right Click” on it. Then click on the “Customize the Ribbon” option from the right-click menu.
Step-2: Click on the “Import/Export” button
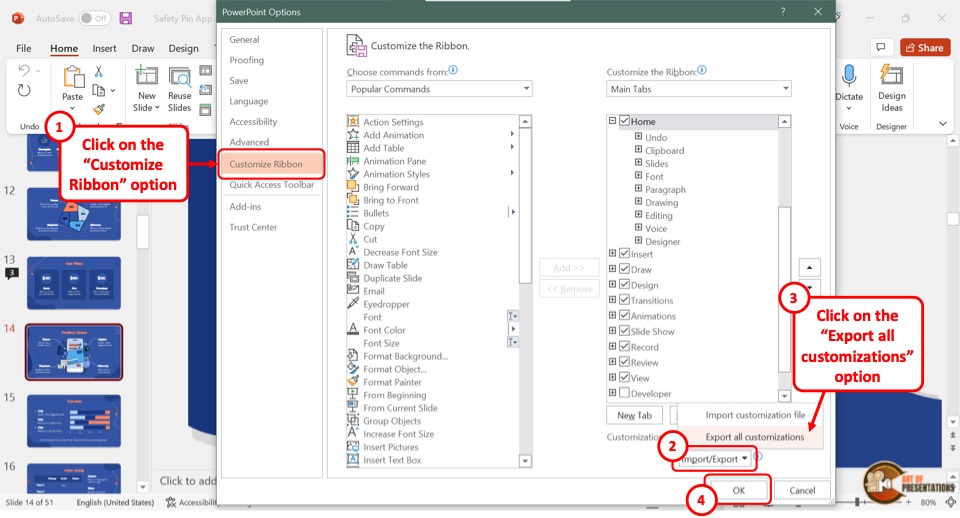
The “PowerPoint Options” dialog box will open with the “Customize Ribbon” option selected.
At the bottom of the right column in the dialog box, click on the “Import/Export” option to open a dropdown menu.
Step-3: Click on the “Save” button to export customizations
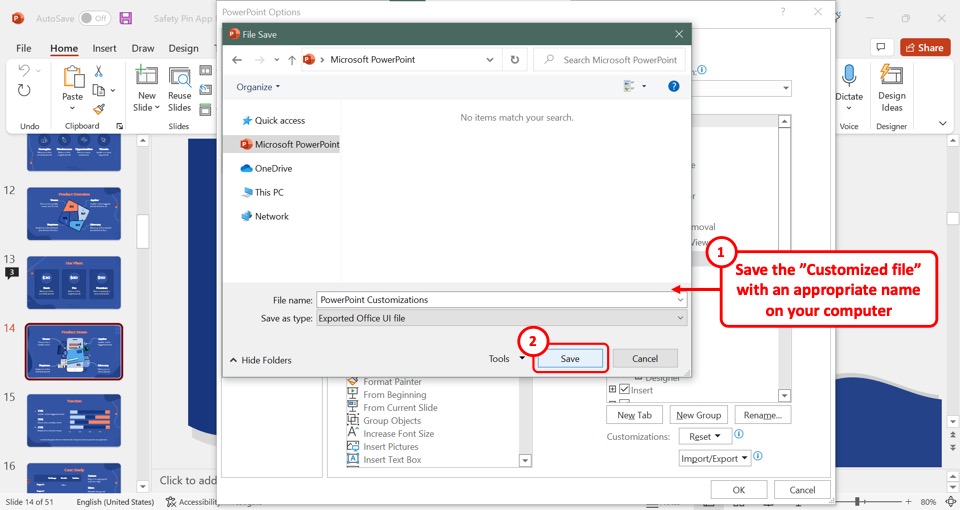
Click on the “Export all customizations” option in the dropdown menu to export a customized ribbon.
This will launch a “File Save” dialog box in which the ribbon file will be exported. Then click on the “Save” button at the bottom of the dialog box.
Step-4: Click on “Open” to import customization
To import a customized tab, click on the “Import customization file” option from the dropdown menu under the “Import/Export” button once again.
In the “File Open” dialog box, browse to the folder where you exported the file, select the ribbon file to import, and then click on the “Open” button.
11. How to Change Ribbon Color in PowerPoint?
Microsoft PowerPoint offers a few theme colors to choose from. You can change the color of the ribbon by changing the theme color. To do so, follow the 4 easy steps.
Step-1: Click on the “File” tab
The first step is to click on the “File” tab in the menu ribbon located at the top of the screen. In the “File” menu, click on the “Options” option from the sidebar.
Step-2: Click on the “General” option
In the “PowerPoint Options” dialog box, click on the “General” option. It is the first option in the sidebar on the left side of the dialog box.
Step-3: Click on “Office Theme”
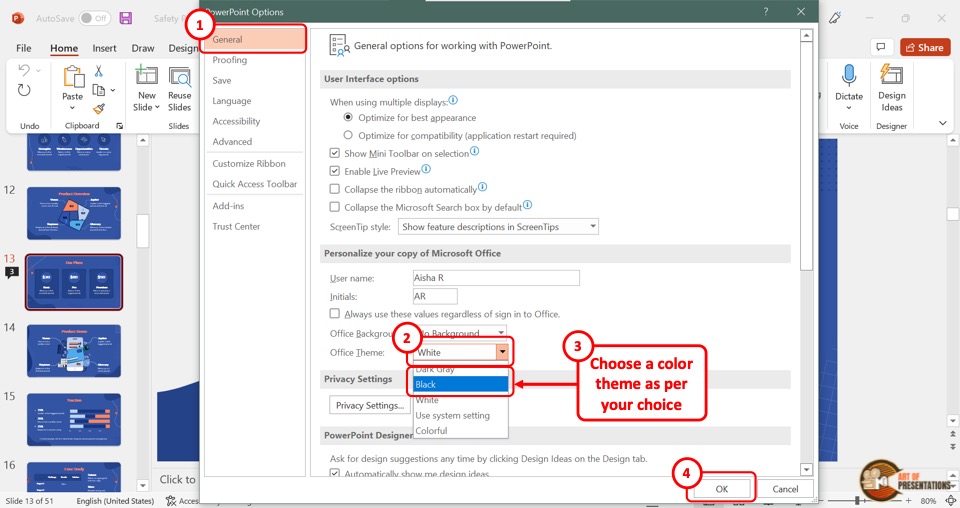
Under the “Personalize your copy of Microsoft Office” section, click on the “Office Theme” box. In the dropdown menu, click on your preferred theme color from the 5 options.
Step-4: Click on the “OK” button
Finally, all you have to do is click on the “OK” button at the bottom of the “PowerPoint Options” dialog box. This will save changes in ribbon color.
12. How to Reset Your Ribbon to Default Settings?
If you would like to remove all the customizations made to the ribbon, you can easily do so. Microsoft PowerPoint allows you to reset the ribbon to the default settings. Follow the 4 simple steps.
Step-1: Click on “Options”
In the menu ribbon, you have to first click on the “File” tab. In the sidebar on the left side of the “File” menu, click on “Options” This will open a dialog box.
Step-2: Click on “Customize Ribbon”
In the “PowerPoint Options” dialog box, click on the “Customize Ribbon” option from the sidebar on the left side of the dialog box.
Step-3: Click on the “Reset” button
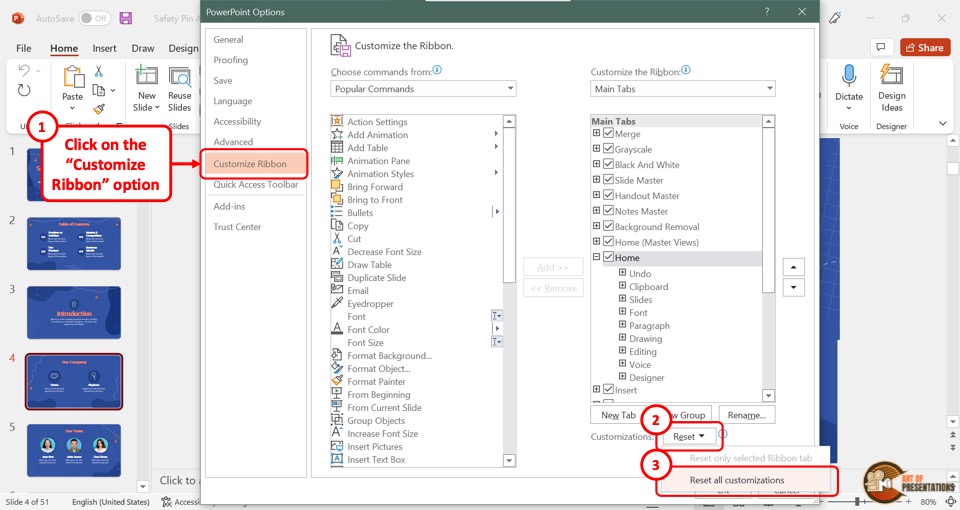
The next step is to click on the “Reset” button located at the bottom of the right column in the “PowerPoint Options” dialog box.
In the dropdown menu, click on the “Reset all customizations” option.
Step-4: Click on “OK”
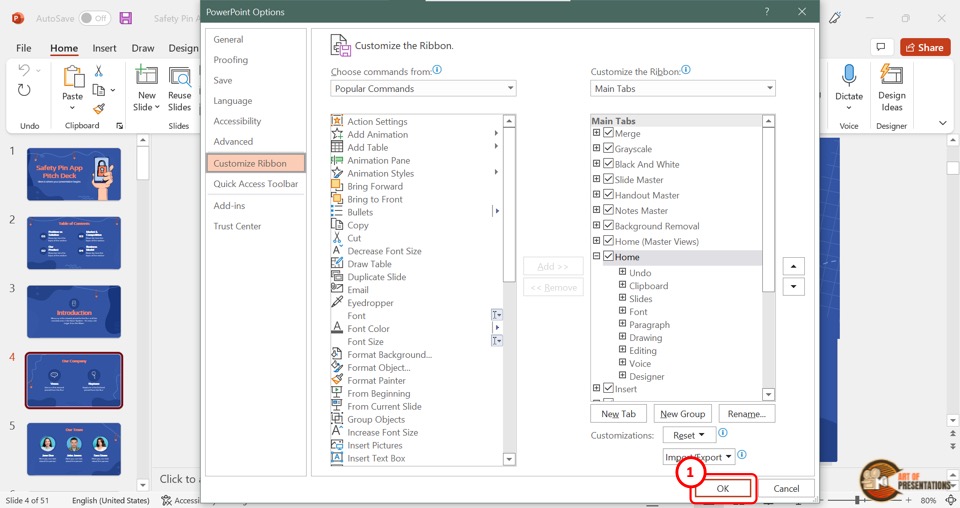
Now all you have to do is click on the “OK” button at the bottom of the dialog box to reset the ribbon to the default settings.
Credit to cookie_studio (on Freepik) for the featured image of this article (further edited)