Today, presentations can be made in several applications available online and offline. Some of the power types are PowerPoint (Microsoft), Google Slides and Canva. Sometimes there may be a need to convert one type to another for ease in access and/or editing
Here’s how to convert a Canva presentation to Google Slides:
- Click “Share” on top-right corner of the Canva file
- Click “More”
- Select “Google Drive” from the “Save” option
- Connect your Google Drive account
- Select the folder in the Google Drive menu
- Finally, click “Choose” to save the file
In this article, we share share the complete details in a step-by-step format with pictures so you know exactly how to save a Canva presentation in Google Slides. Plus, I’ll also share with you a great way to save the presentation in Google Slides even if you don’t want to connect your Google Slides account with Canva!
So, let’s get started!
1. How to Convert Canva Presentation to Google Slides?
Canva presentations can be more visually interesting compared to other platforms since there are numerous templates available on the website. However, you may need to convert a Canva presentation to Google Slides for editing. To convert a Canva presentation, follow the 5 easy steps.
Step-1: Click on the “Share” button
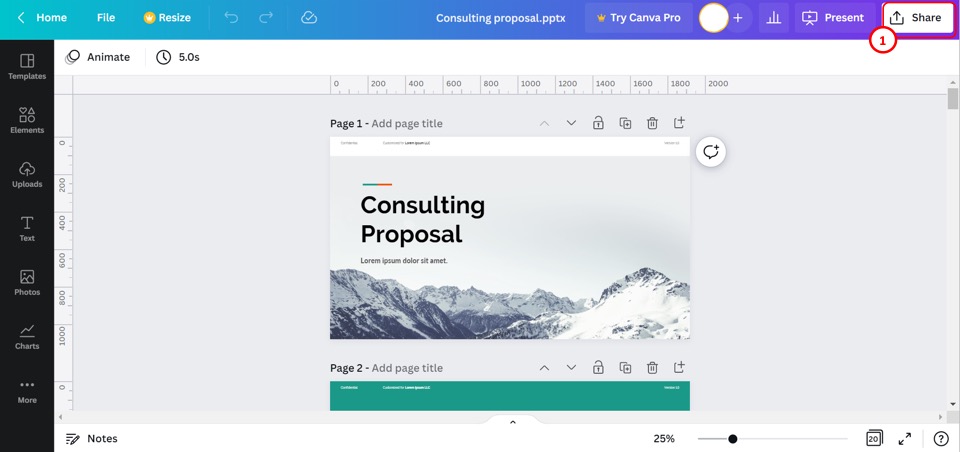
The first step is to open the Canva presentation. Click on the “Share” button on the right at the top of the screen. This will open a dropdown menu.
Step-2: Click on the “More” option
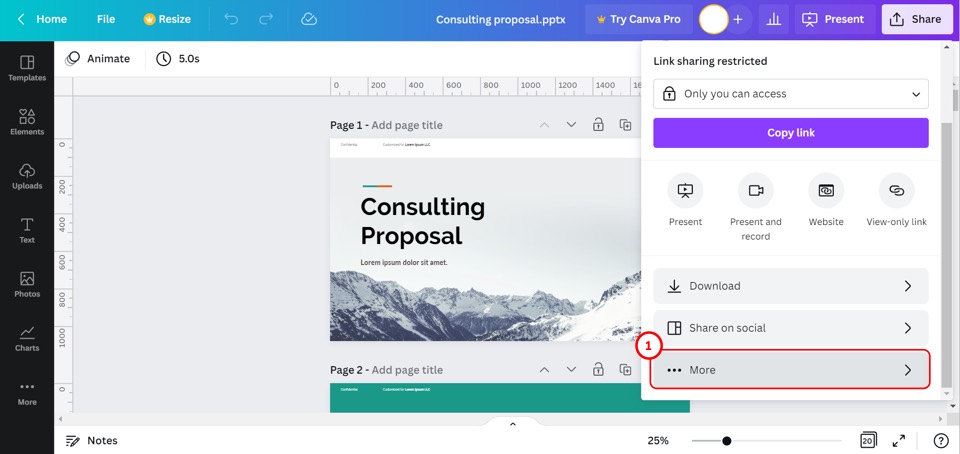
Scroll down in the dropdown menu under the “Share” button. At the bottom of the dropdown menu, click on the “More”option.
Step-3: Click on the “Google Drive” option
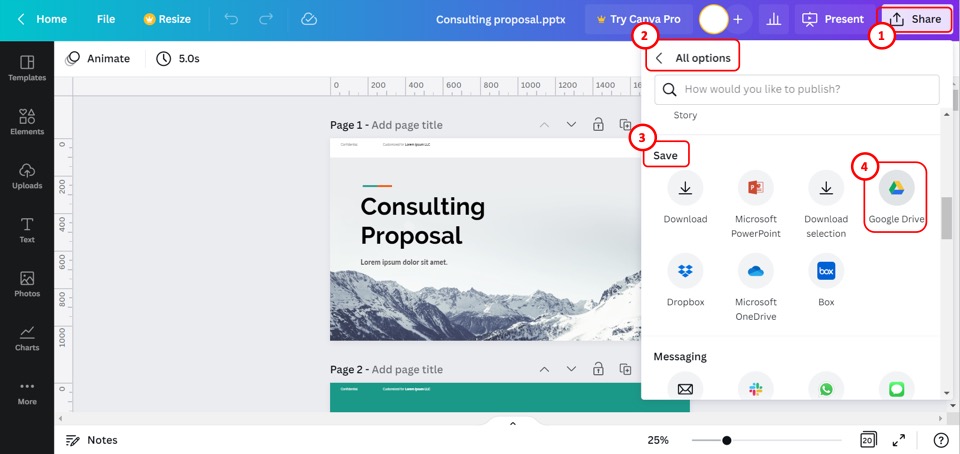
In the “All options” menu under the “Share” option, scroll down to the “Save” section. Then click on the “Google Drive” option in the “Save” section.
Step-4: Click on “Connect to Google Drive”
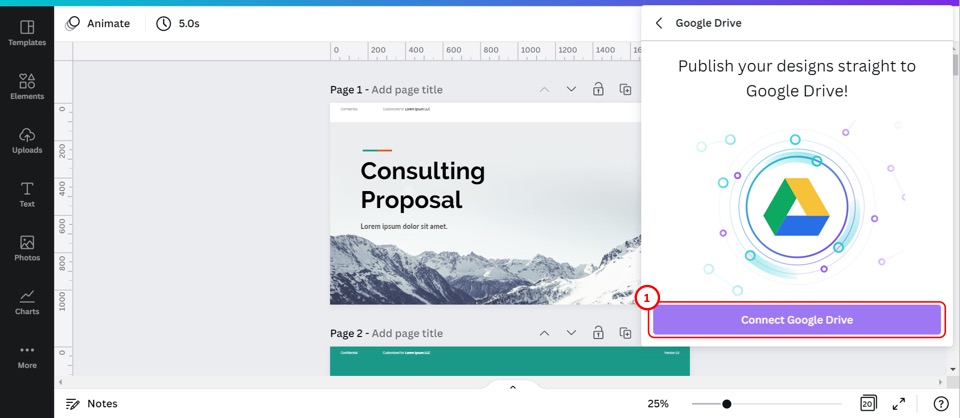
The next step is to click on the “Connect to Google Drive” button at the bottom of the dropdown menu under the “Share” option. This will prompt a pop-up window where you can select a Google account to connect to your Canva account.
Step-5: Click on the “Choose” button
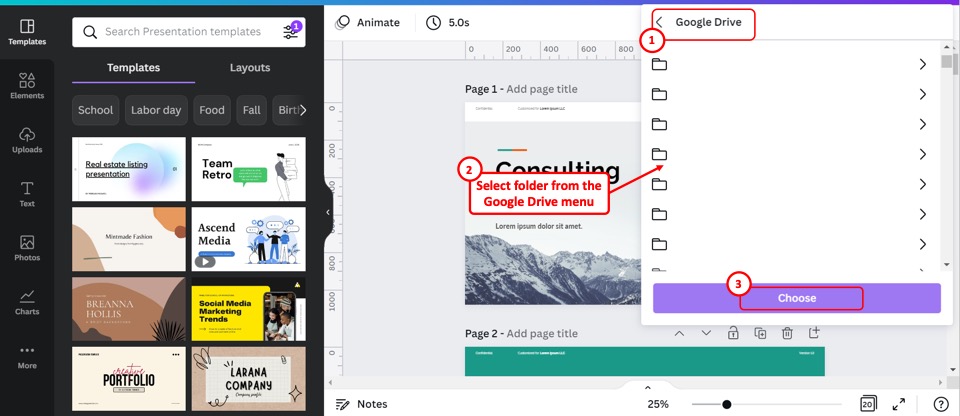
Now all you have to do is click on a folder from your Google Drive in the “Google Drive” dropdown menu. Then click on the “Choose” button to convert the Canva presentation to Google Slides.
2. How to Import Canva Presentation to Google Slides without Connecting to Google Accounts?
To convert a Canva presentation directly to Google Slides, you have to connect your Google account with your Canva account. This gives Canva access to edit and delete files in your Google Drive. To import a Canva presentation without connecting to your Google account, follow the 8 simple steps.
Step-1: Click on the “Share” button
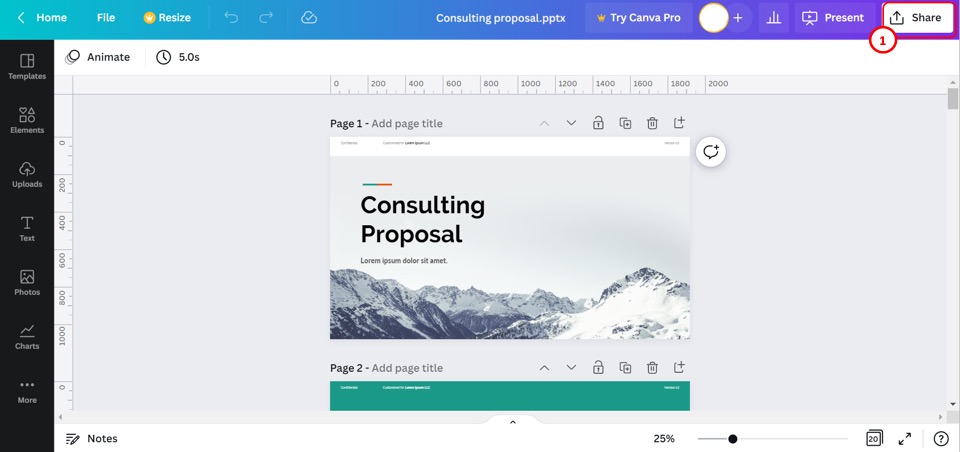
The first step is to open the Canva presentation that you want to import to Google Slides. Then click on the “Share”button at the top right corner of the screen.
Step-2: Click on the “More” option
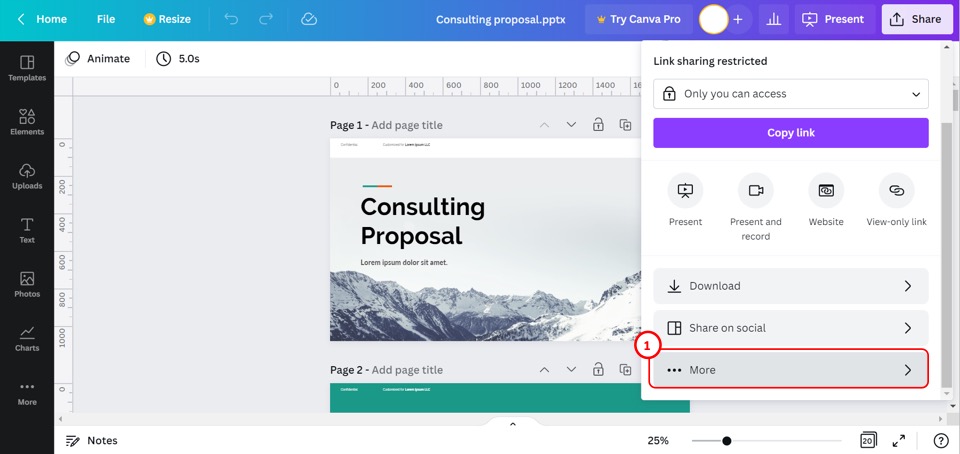
In the dropdown menu under the “Share” option, scroll down. Then click on the “More” option at the very bottom of the dropdown menu.
Step-3: Click on the “Microsoft PowerPoint” option
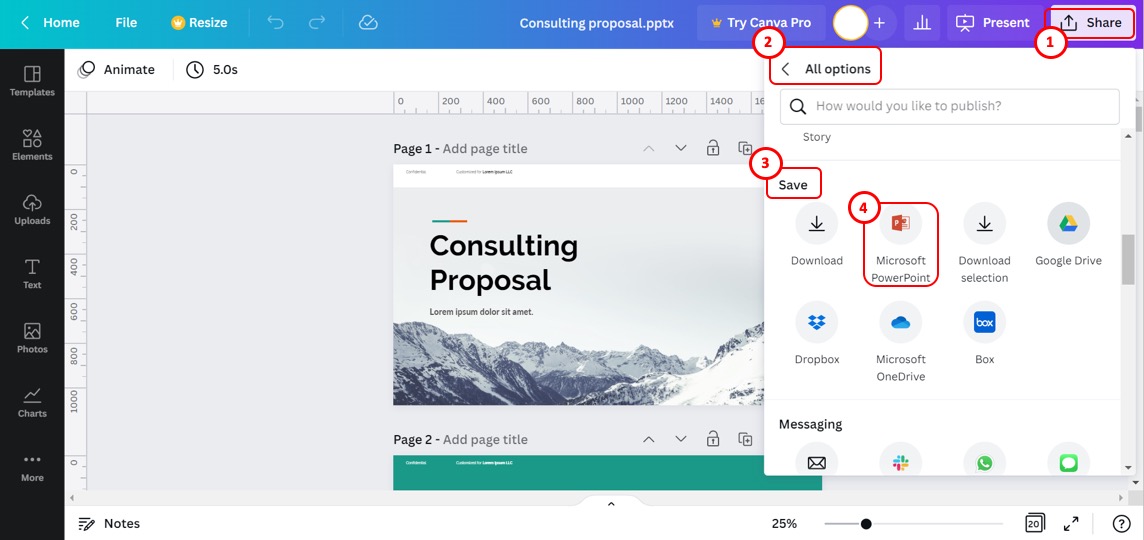
In the “All options” dropdown menu, scroll down to the “Save” section. Click on the “Microsoft PowerPoint” option in the “Save” section.
Step-4: Click on the “Download” button
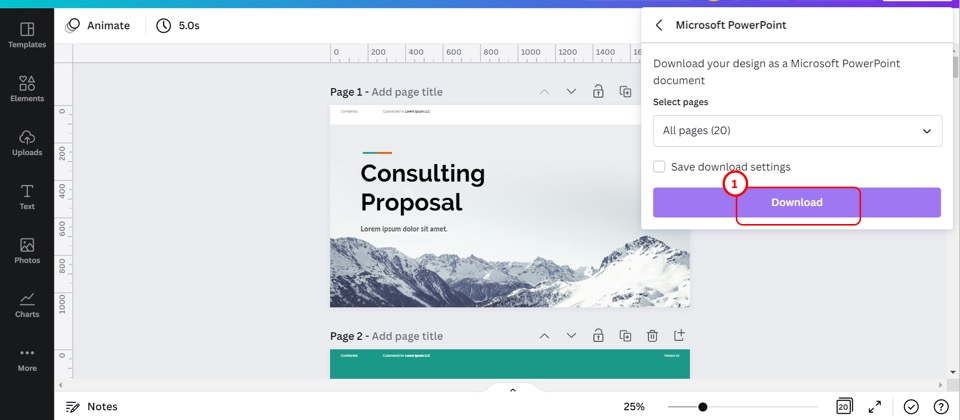
Now all you have to do is click on the “Download” button at the bottom of the dialog box to download the Canva presentation as a Microsoft PowerPoint presentation.
Step-5: Click on the “Import slides” option
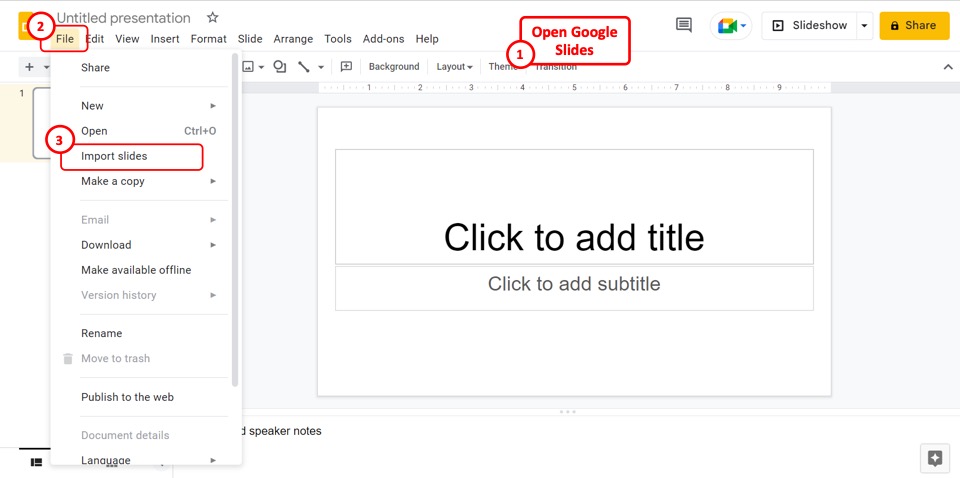
The next step is to open a new Google Slides presentation. In the menu bar located at the top of the screen, click on the “File” tab. Then click on the “Import slides” option in the “File” menu.
Step-6: Click on the “Upload” option
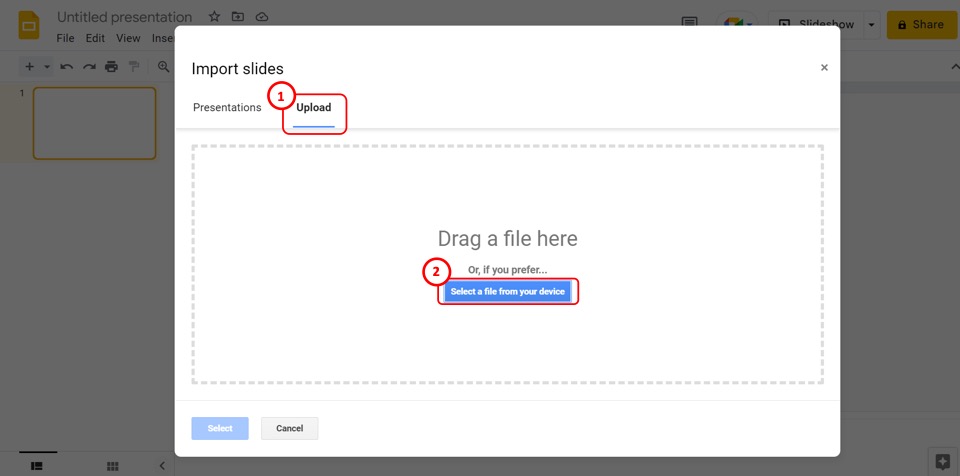
In the “Import slides” pop-up window, click on the “Upload” options on the top. Then click on the “Select a file from your device” button in the middle of the window. This will open the “Open” dialog box.
Step-7: Click on the “Open” button
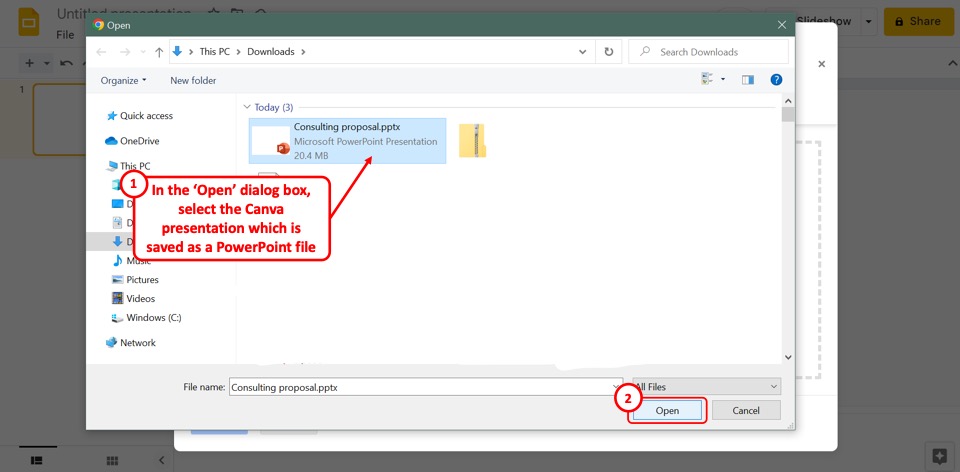
In the “Open” dialog box, select the Canva presentation saved as a Microsoft PowerPoint file. Then click on the “Open”button at the bottom of the dialog box.
Step-8: Click on the “Import Slides” option
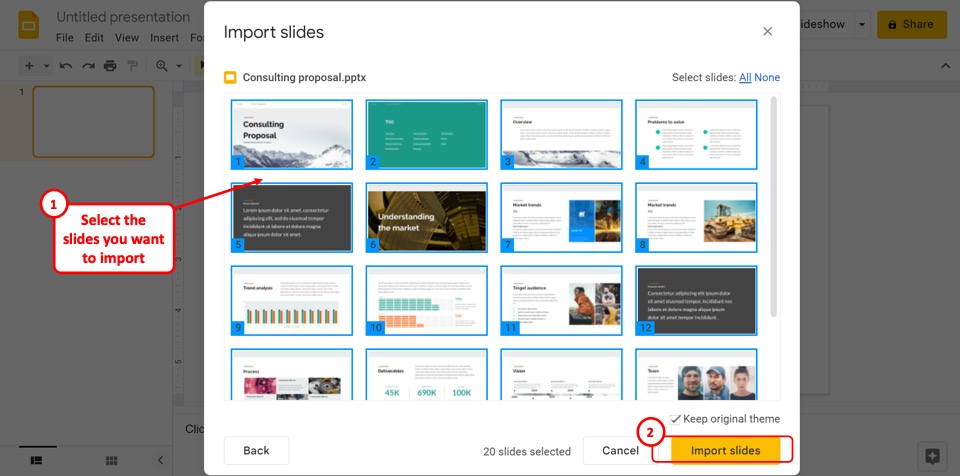
Finally, select the slides that you want to import to Google Slides from the Canva presentation. Then all you have to do is click on the “Import slides” button at the bottom of the “Import slides” dialog box.
3. How to Convert Canva Presentation to Google Slides without Losing Formatting?
Canva supports a much larger variety of designs, fonts, and elements compared to Google Slides or Microsoft PowerPoint. So you may find many elements missing or misformatted when converting a Canva presentation to Google Slides. To convert without losing formatting, follow the 14 simple steps.
Step-1: Click on the “Share” button
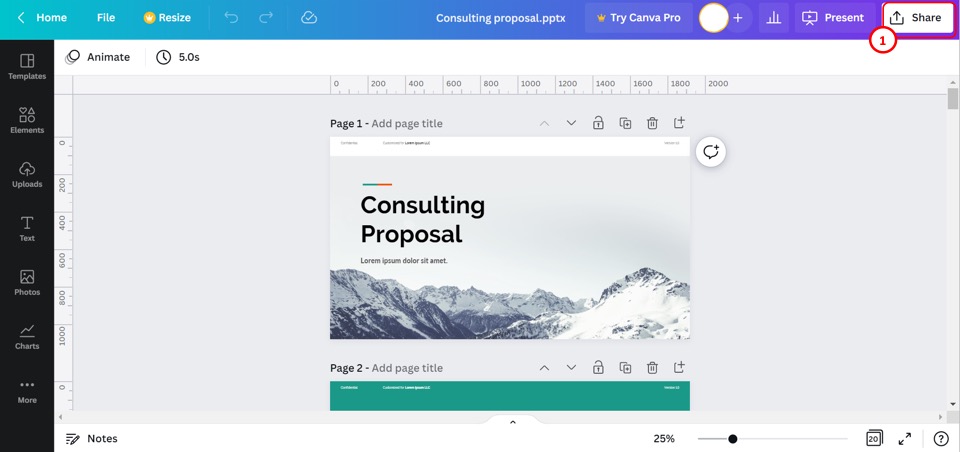
In the Canva presentation, click on the “Share” button located on the right at the top of the screen.
Step-2: Click on the “Download” option
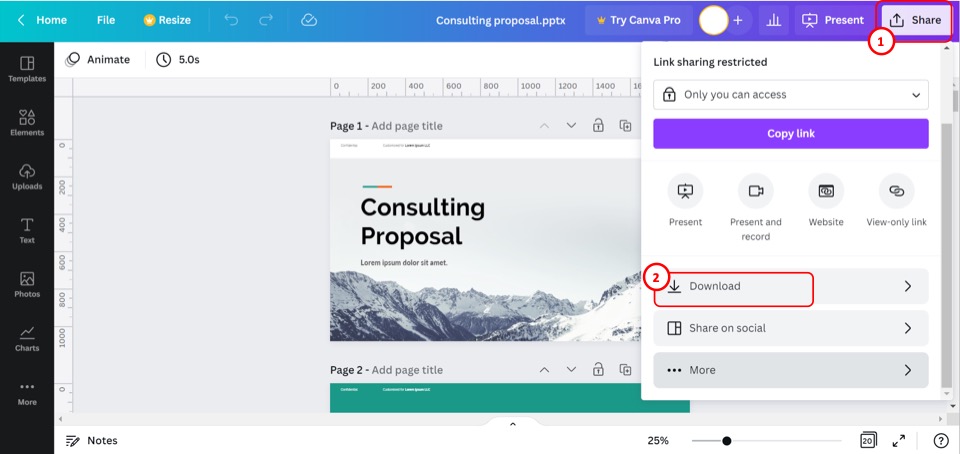
The next step is to scroll down to the bottom of the dropdown menu under the “Share” button. Click on the “Download”option.
Step-3: Click on the “PNG” option
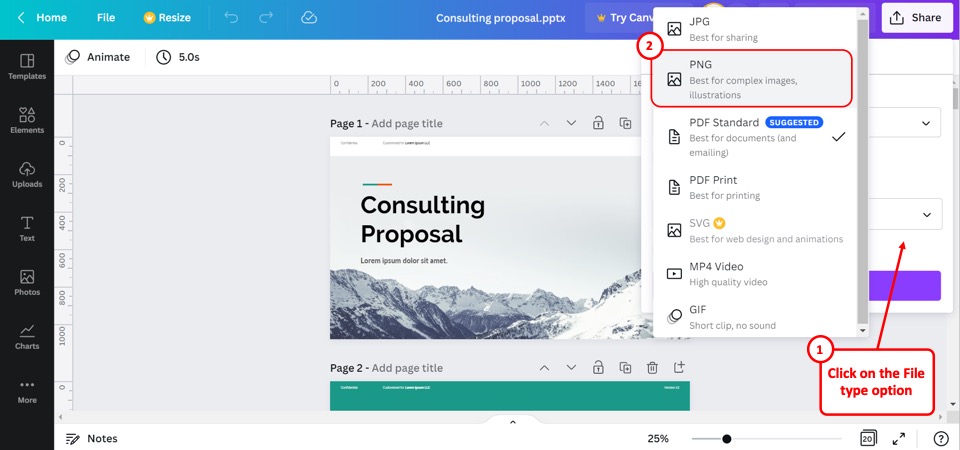
Click on the “File type” box in the dropdown menu under the “Share” option. Then select the “PNG” option from the pop-up list.
Step-4: Click on the “All Pages” option
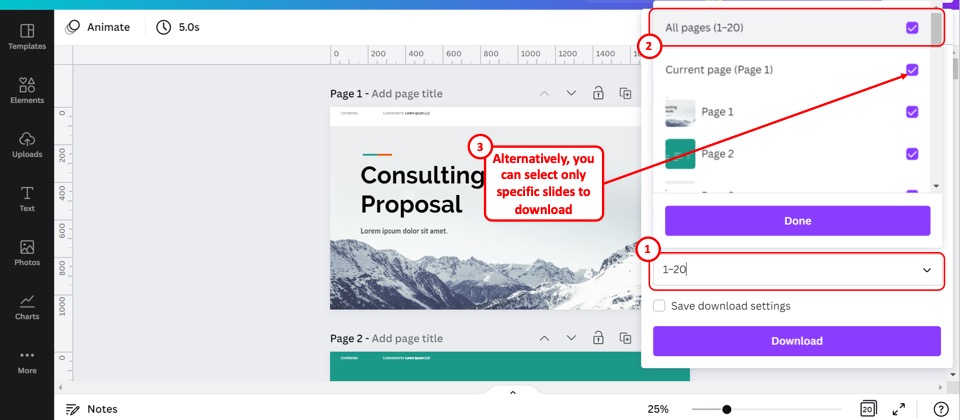
The next step is to click on the “Select pages” box under the “File type” box. In the pop-up list, click on the “All pages”option to download the entire presentation. You can also select specific slides to download.
Step-5: Click on the “Download” button
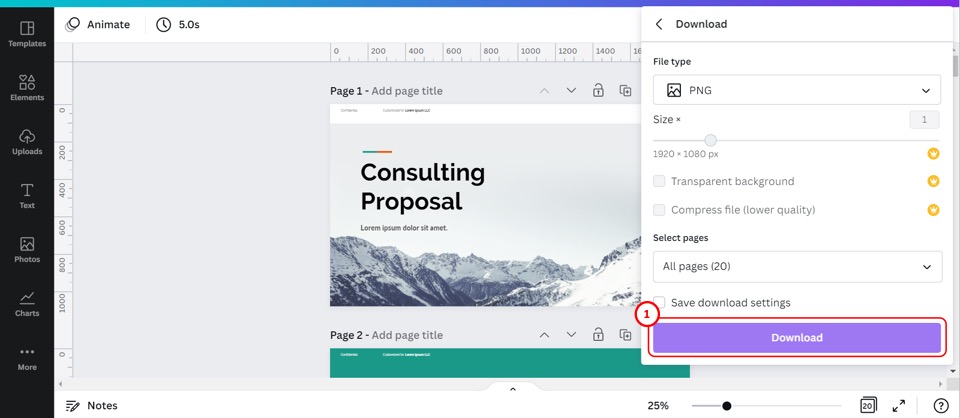
Now all you have to do is click on the “Download” button at the bottom of the dropdown menu to download the selected Canva slides as PNG images.
Step-6: Click on the “Extract All” option
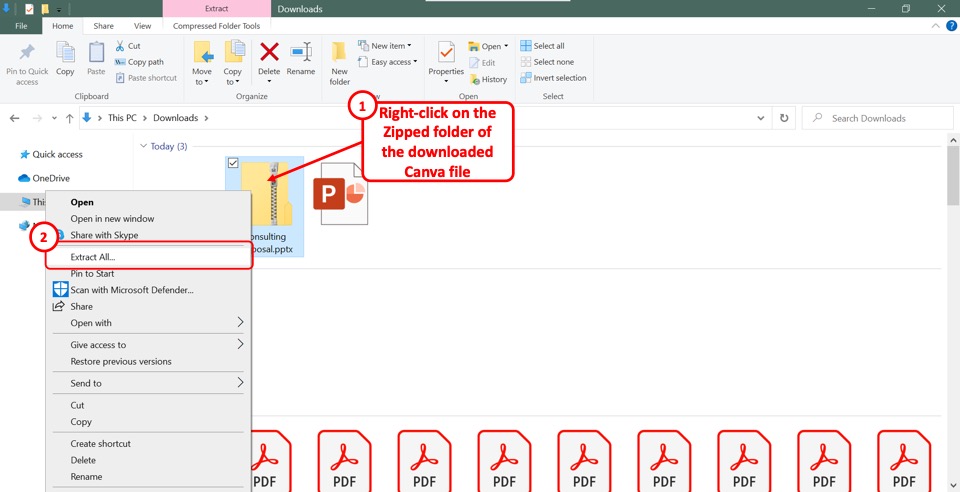
The slides will be downloaded in a zipped folder. To extract them, “Right Click” on the zipped folder in the “File Explorer” window. Then click on the “Extract All” option.
Step-7: Open a new presentation
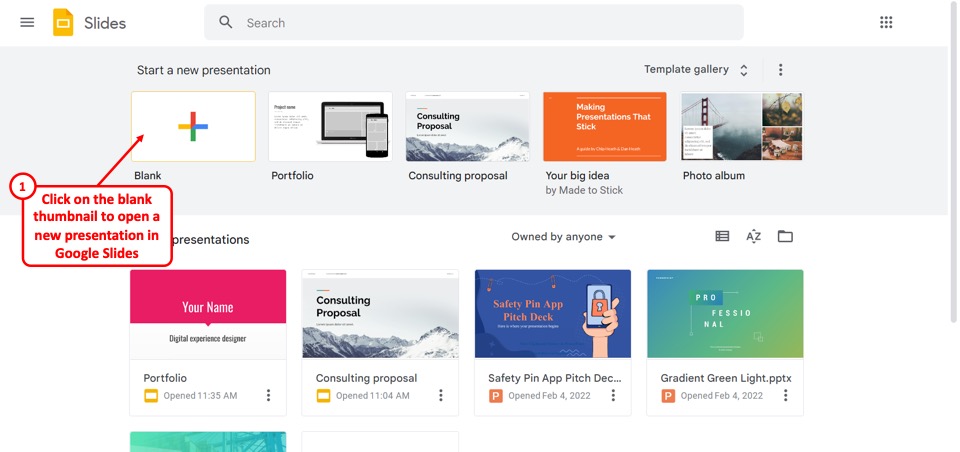
Now you have to open a new presentation in Google Slides where you can add the Canva slides. To do so, click on the “Blank” thumbnail on the Google Slides home screen.
Step-8: Create a blank slide
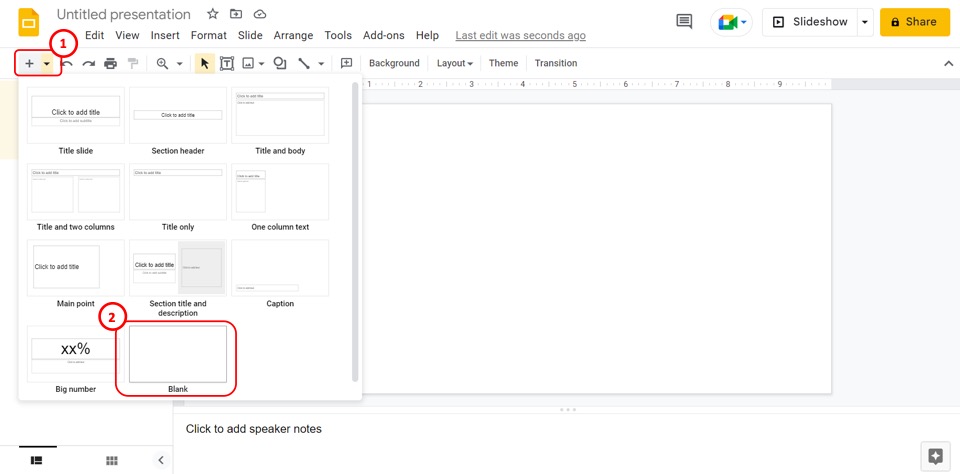
In the toolbar in Google Slides presentation, click on the “New slide with layout” option which is the down arrow by the “+” icon. In the dropdown list under the “New slide with layout” option, click on the “Blank” option to insert slides without any placeholders.
Step-9: Click on the “Duplicate slide” option
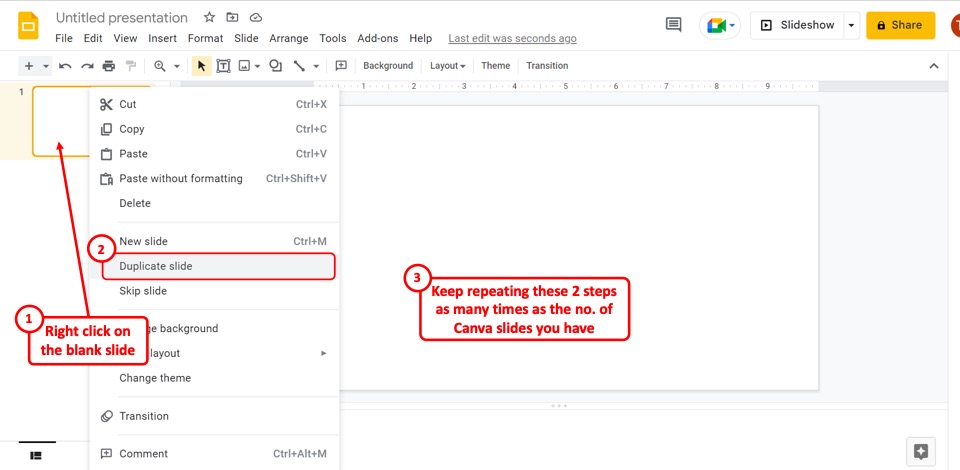
The next step is to create as many blank slides as the Canva presentation slides. To do so, all you have to do is “Right Click” on the blank slide in the slide thumbnail panel on the left side of the screen. In the right-click menu, click on the “Duplicate slide” option and keep repeating until you reach the desired number of slides.
Step-10: Click on the “Choose Image” option
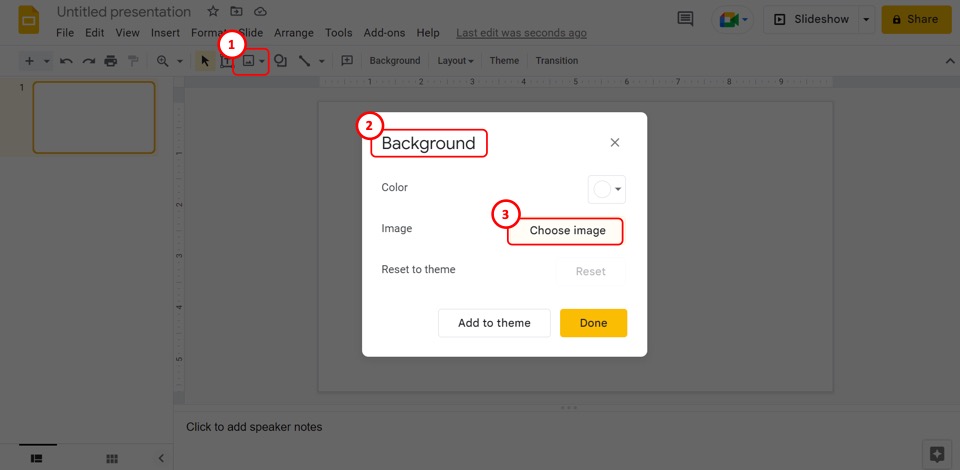
Now all you have to do is insert the Canva slides as background images in Google Slides. Click on the “Background”option in the toolbar located under the menu bar at the top of the screen. In the “Background” dialog box, click on the “Choose image” button. This will open a pop-up window.
Step-11: Click on the “Upload” option
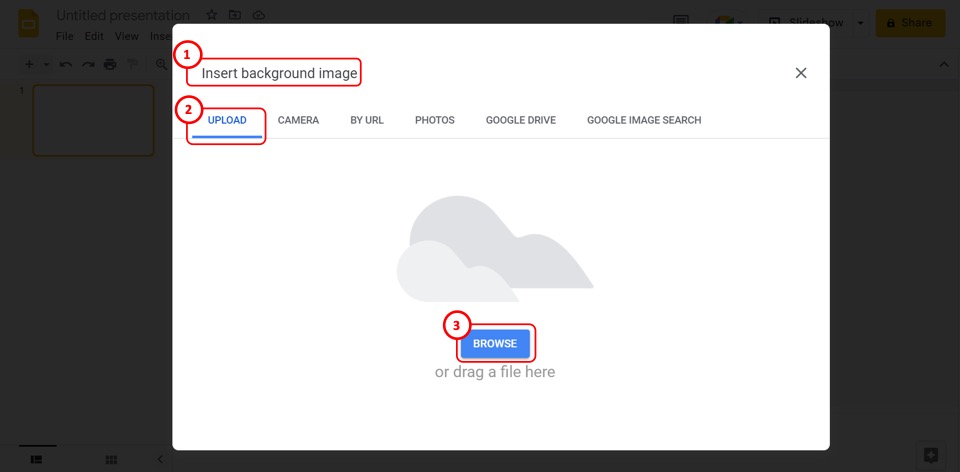
On the top of the “Insert background image” pop-up window, click on the “Upload” option. Then click on the “Browse” button in the middle of the window. This will open the “Open” dialog box.
Step-12: Click on the “Open” button
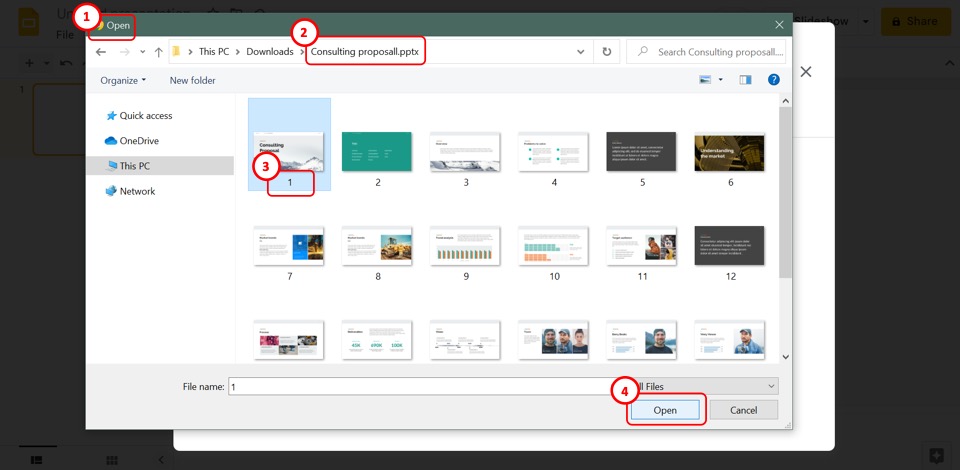
In the “Open” dialog box, open the folder containing the Canva slides downloaded as PNG images. Then click on the image titled “1” to select the first slide. Click on the “Open” button at the bottom of the dialog box.
Step-13: Click on the “Done” button
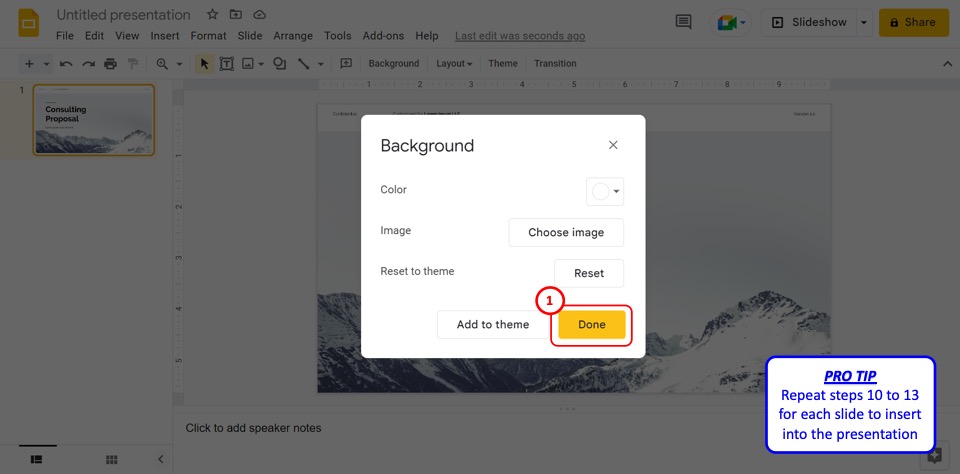
Now all you have to do is click on the “Done” button at the bottom of the “Background” dialog box to insert the first Canva slide into the Google Slides presentation without losing the formatting.
Step-14: Repeat for each slide
Finally, you can repeat steps 10 to 13 for each slide to insert them into Google Slides.
Credit to benzoix (on Freepik) for the featured image of this article (further edited).

![Convert Canva Presentation to Google Slides [Full Guide!]](https://artofpresentations.com/wp-content/uploads/2022/11/Featured-Image-Convert-Canva-Presentation-to-Google-Slides-Full-Guide.webp)