![Change Slide Size in Google Slides! [Complete Guide!]](https://artofpresentations.com/wp-content/uploads/2021/06/Featured-Image-How-to-Change-Slide-Size-in-Google-Slides.jpg)
When you are using Google Slides to create more than just presentations (like creating worksheets, posters, flyers, etc), you need to know how to work with different slide sizes in Google Slides! Fortunately, Google Slides provides several different options to change the size of the slides.
To change slide size in Google Slides, click on the “File” tab. Then, select “Page Setup”. From the window that pops up, choose the “Standard” or “Widescreen” slide size. You can also click on “Custom” to change the orientation of slides or create a unique slide size in Google Slides.
In this articles, we will explore the topic of different slides sizes in Google Slides in detail. Plus, I will also you help you understand how to change the orientation of slides in Google Slides, and how to create A3 or A4 sized slides in Google Slides!
So, without further delay, let’s get started!
1. How to Change Slide Size in Google Slides?
To change the Slide Size of your Google Slides presentation, you have to go to the ‘Page setup’ option on the ‘File’ tab of your ribbon and select your preferred size. The whole process is described in easy steps below:
Step-1: Click on the File Tab
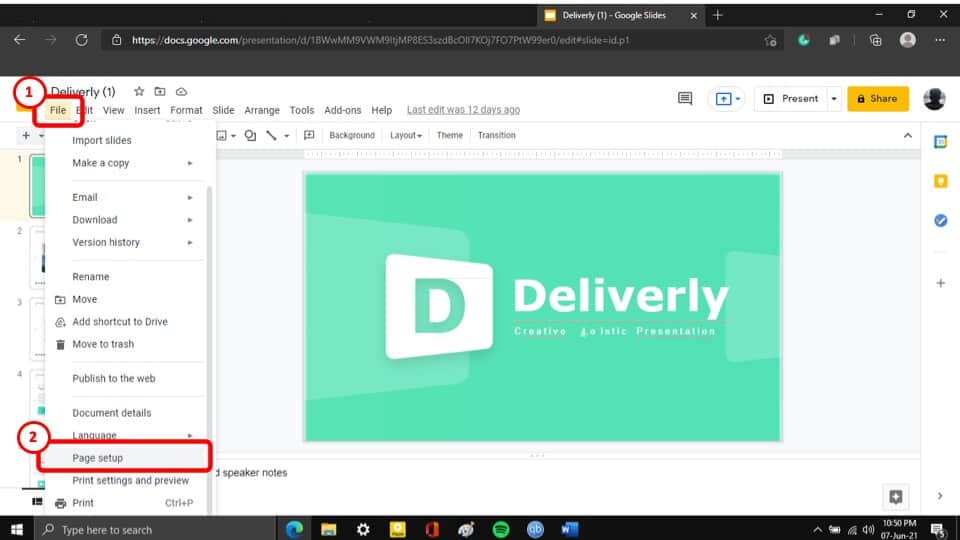
Click on the first tab in the ribbon section of your Google Slides window called the ‘File’ tab which will open a drop-down menu.
Step-2: Click on the ‘Page Setup’ Option.
In the drop-down menu of the ‘File’ tab, scroll down and click on the option that says, ‘Page Setup.’ It is the third to last option in the drop-down menu.
Step-3: Choose your preferred slide size
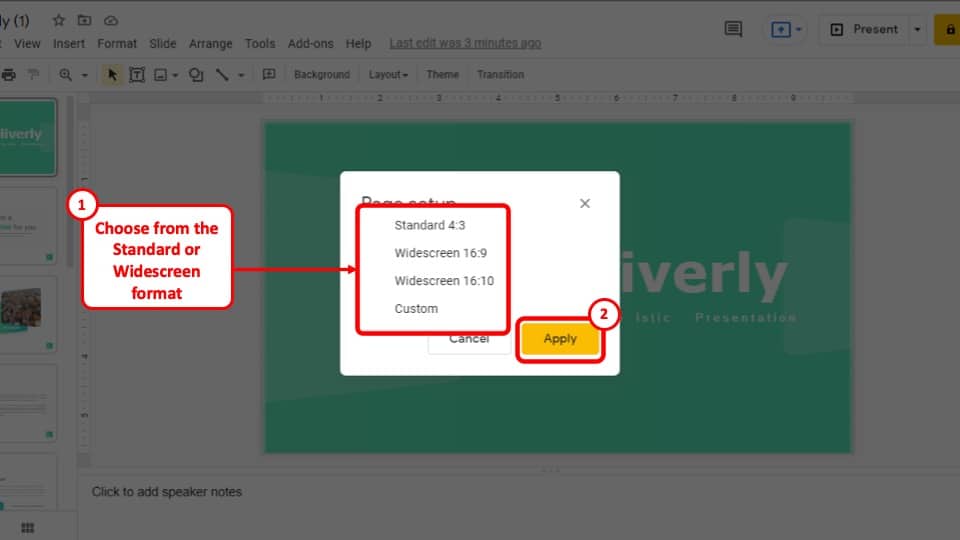
After selecting the ‘Page setup’ option a pop-up window will appear. Click on the ‘Page size’ drop-down menu to find the size options and select the size which you want the slides of your Google Slides presentation to be in.
The default slide size of a Google Slides presentation is the ‘Widescreen (16:9).’ You can change the size of the slides to the available options provided by Google Slides or click on the option that says ‘Custom Slide Size’ to manually input the dimensions of your PowerPoint presentation.
Step-4: Click on the ‘Apply’ button.
After you have selected your preferred slide size for your Google Slides presentation, hit the yellow ‘Apply’ button at the bottom right corner of the pop-up window and the slide size will change accordingly.
2. How to Change the Slide Size of Google Slides to A3
To change the slide size of Google Slides to A3, click on the “File” menu. Then, click on “Page Setup”. On the window that pops up, click on “Custom”. Then, make the width as 11.7 inches (29.71 cm) and height as 16.5 inches (41.91 cm), and click “Apply”.
Since there is no preset option to directly change the slide size of your Google Slides presentation to A3. However, you can manually change the width and length of the slides of your presentation as per the A3 format.
All you have to do is go to the ‘Page setup’ pop-up window by following the steps described in the last section of this article and then follow the 2 easy steps given below.
Step-1: Click Page Setup option from the File Tab
Click on the first tab in the ribbon section of your Google Slides window called the ‘File’ tab which will open a drop-down menu.
Step-2: Select the ‘Custom’ option from dropdown menu
After you go to the ‘Page setup’ option from the ‘File’ tab, click on the drop-down menu from the pop-up window and select the ‘Custom’ option.
Step-3: Change the dimensions to ‘11.7 x 16.5 inches’ and click apply
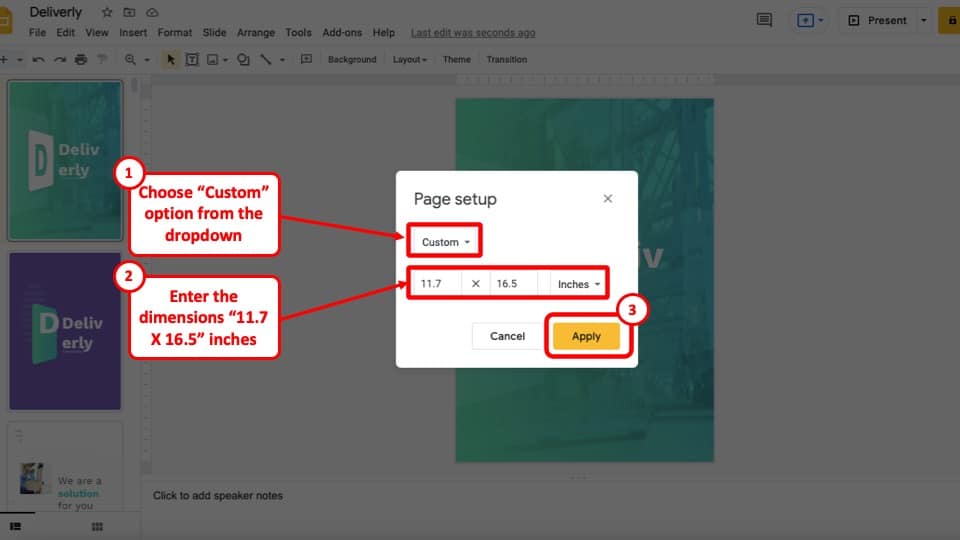
The dimensions of an A3 paper are 11.7 inches in width and 16.5 inches in length. In this step, all you have to do is change the Width of the slide to 11.7 inches in the box on the left and length of the slide to 16.5 inches in the box on the right of the pop-up window.
After that, click on the yellow ‘Apply’ button at the bottom right corner of the pop-up window.
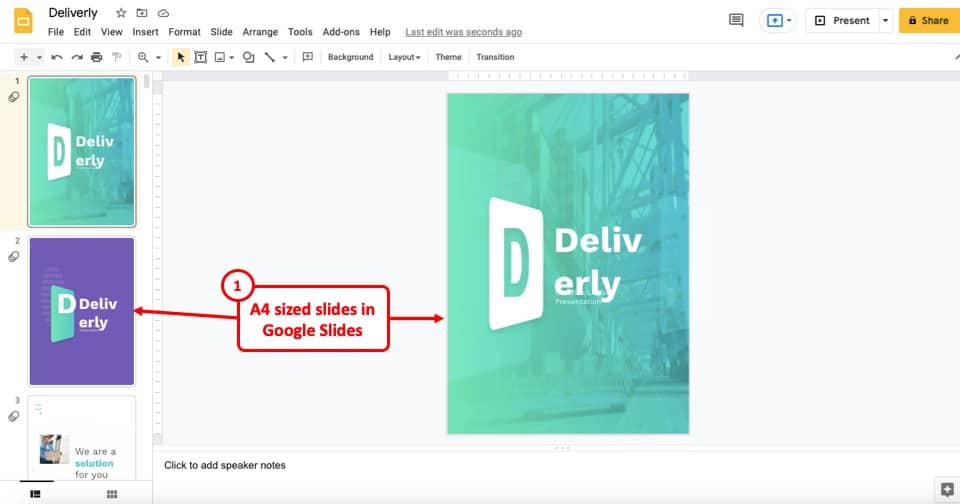
This will change the slide size of your Google Slides presentation to an A3 format.
3. Change the Slide Size of Google Slides to A4
Just as with the A3 slide format size, there is no direct way to change the slide size of your Google Slides presentation to A4.
To change the slide size of Google Slides to A4, go to the “Page setup” option from the “File” menu. Then, from the pop-up window, select the “Custom” option. Now, enter the width as 8.3 inches (21 cms) and length as 11.7 inches (297 cms). Then, click on the “Apply” button.

So, instead of putting the dimensions of the A3 format, you have to input 8.3 inches in the box on the left and 11.7 inches in the box on the right and then click on the yellow ‘Apply’ button to change the slide size of your Google Slides to A4.
4. How to Change the Slide Size of Google Slides on iPad?
Unfortunately, there is no way of changing the size of the slides through the Google Slides app on your iPad. To change the slide size in your Google Slides presentation through an iPad, you have to open the Google Slide presentation through Safari or any other web browser on your iPad. The whole process is described in simple steps below.
Step-1: Copy the link of the presentation to open it from using a web-browser.
The first step of the process is to open the presentation from your Google Slides app and copying the link of the presentation. To do that, tap on the ‘Copy link’ option which is situated in the ‘Share & export’ tab in the three dots icon in the top right corner of the screen which is the ‘Options’ side bar.
Step-2: Open a web-browser and paste the link of the Google Slides presentation to open it.
After copying the link of the Google Slides presentation, paste the link on the browser of your iPad, and tap on the ‘Enter’ button in the keyboard.
Step-3: Tap on the ‘Page setup’ option in the ‘File’ tab
By opening the presentation from a browser, you will notice that it looks exactly like it does on a computer. Simply follow the steps described in the first section of this article and go to the ‘Page setup’ option from the ‘File’ tab. This will open up a pop-up window.
Step-4: Select the preferred slide size and click on the ‘Apply’ button.
In the final step, select your preferred slide size from the ‘Page Size’ drop-down menu and tap the yellow ‘Apply’ button to change the slide size of your Google Slides presentation through an iPad.
5. Can You Change the Orientation of One Slide in Google Slides?
Unfortunately, there is no direct way to change the orientation of a single slide in a Google Slides presentation. You simply cannot mix ‘Portrait’ oriented slides with ‘Landscape’ oriented slides in the same Google Slides presentation by default. However, there are workarounds.
You can add a ‘Rectangle’ shape in a new slide in the ‘Layout’ section of your presentation which will act as a ‘Portrait’ oriented slide by going to the ‘Master Slide’ view.
I have actually already discussed this solution in great detail in another article. I’ve given a step-by-step explanation with pictures to show how to change the orientation of just one slide in Google Slides. So, make sure to check out that article!
More Related Articles
- How to Make Graphs and Charts in Google Slides [The Complete Guide!]
- How to Convert Google Slides to Video [For FREE]
- Do Presentation Clickers Work with Google Slides?
- Can Google Slides Record Audio? Here’s a Quick Fix!
- How to Animate in Google Slides? [A Comprehensive Beginner’s Guide!]
Credit to Senivpetro (on Freepik) for the Featured Image of this Article (further edited)