There are times when you wish to create only one slide of a different size in a PowerPoint presentation. This means you want to have both portrait and landscape slide sizes in the same presentation. Is it possible to do this? This is a question that had us scratching our heads! We did a lot of tinkering and quite a bit of research and we share what we found in this post. But first, let’s answer the question.
Can you change the orientation of a single slide in the same PowerPoint presentation? You CAN NOT create two slides of different sizes or orientations in the same presentation. Unlike Word, PowerPoint does not have this capability! But you can do a couple of other things.
In the rest of the article, I’ll show you a couple of different methods on how you can change the layout of just one slide in PowerPoint. So, let’s get started!
A Quick Note Before We Begin – if you want to make jaw-dropping presentations, I would recommend using one of these Presentation Designs. The best part is – it is only $16.5 a month, but you get to download and use as many presentation designs as you like! I personally use it from time-to-time, and it makes my task of making beautiful presentations really quick and easy!
What are Portrait and Landscape slide orientation in PowerPoint?
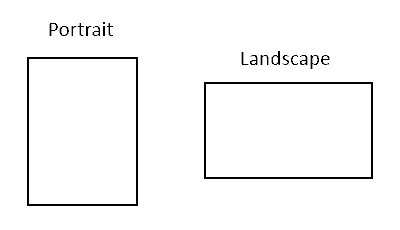
Powerpoint, by design, is made to allow slides to be created in a landscape mode. In this format, the information is mostly created to be read from left to right. This is a natural slide format as it shadows the way our computer screens are designed.
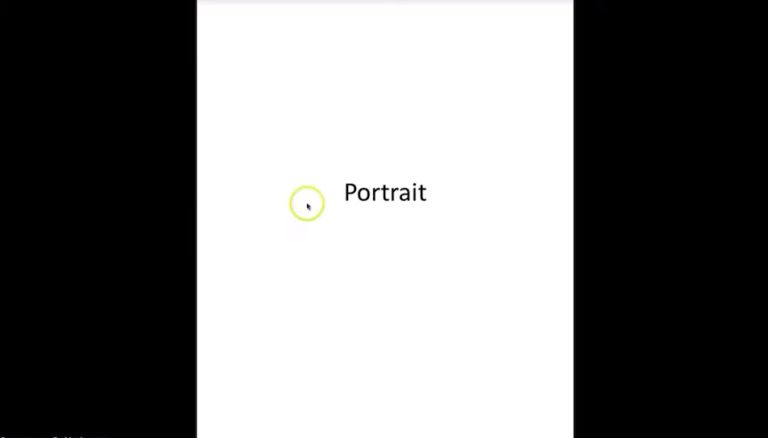
PowerPoint also has a Portrait mode (see image above). This kind of format is higher than it is wider. In the Portrait layout, the information is laid out from top to bottom. It gets its name from the hand-drawn canvas portrait paintings of the yesteryears which were drawn by hand on a canvas of a similar layout.
PowerPoint allows us to efficiently switch between the two slide layout formats. However, the problem is that when you switch between the two layouts, PowerPoint changes all the slides to the chosen layout rather than a single slide.
Is there any work around to show different slide sizes in the same PPT?
PowerPoint is a very powerful tool if it is fully understood. There are several things you can do with PowerPoint which it is not designed to do. For example, you can create social media posts, create videos, business cards, and much more using PowerPoint.
Even so, it is not the perfect application and sometimes you come across a situation where there seems to be no solution. Having a single portrait slide with other landscape slides in PowerPoint is one such issue.
There seem to be only two possible methods to achieve this desired result. Let’s have a look at it.
Method 1 – Embed external links to a slide in Portrait mode
One way to resolve the issue of not being able to insert a single Portrait slide in the middle of a bunch of landscape slides could be using links. Let’s look at a pictorial example. For the sake of this example, we shall denote the presentation in which we need to showcase the portrait slide format as the “Target presentation”.
Step 1 – Create two separate presentations for both layouts and save them
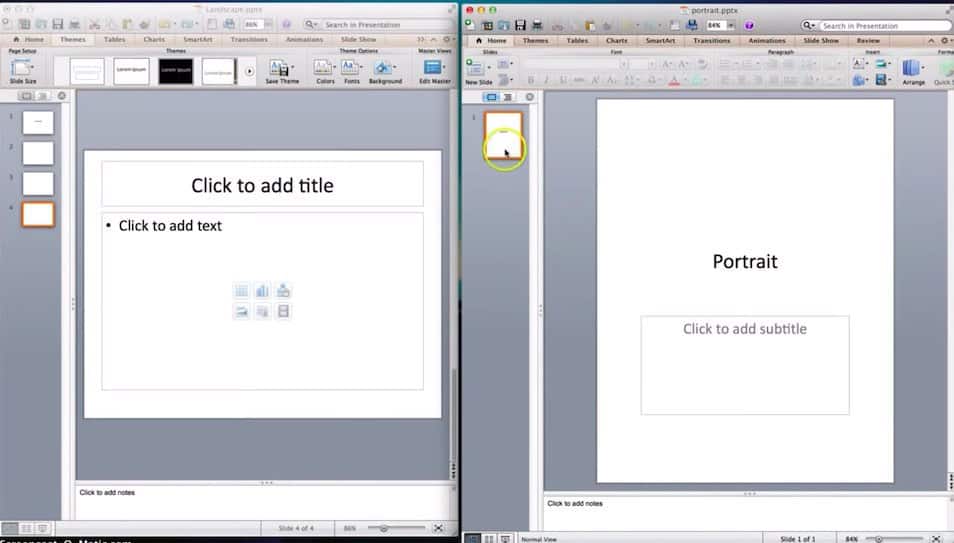
What you need to do is to create two separate PPT presentations. Create your Portrait slide layout separately that you need to put in the target presentation. Therefore, we should have two different presentations as shown in the above image. Make sure to save both presentations before proceeding ahead.
Step 2 – Identify target slide for embedding the portrait layout slide
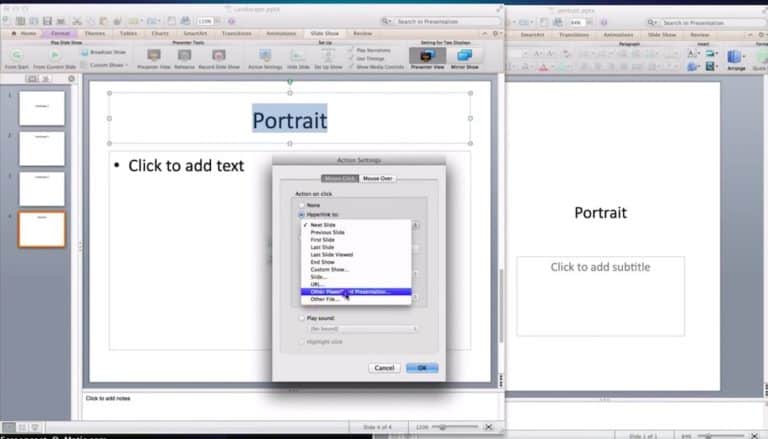
Add text on a blank slide in your target presentation where you intend to display the portrait format slide. Now, what we need to do is insert a hyperlink. This can be easily done by first inserting the text in the text box.
Then go to the “Insert” tab and click on “Action”. (Please note – these instructions are for Mac) A dialogue box will open up. In the dialogue box, select the second option “Hyperlink to”.
Upon choosing the second option, a dropdown menu will show up. You’ll need to scroll down and select “Other PowerPoint presentation”.
Step 3 – Add the hyperlink to embed the portrait slide
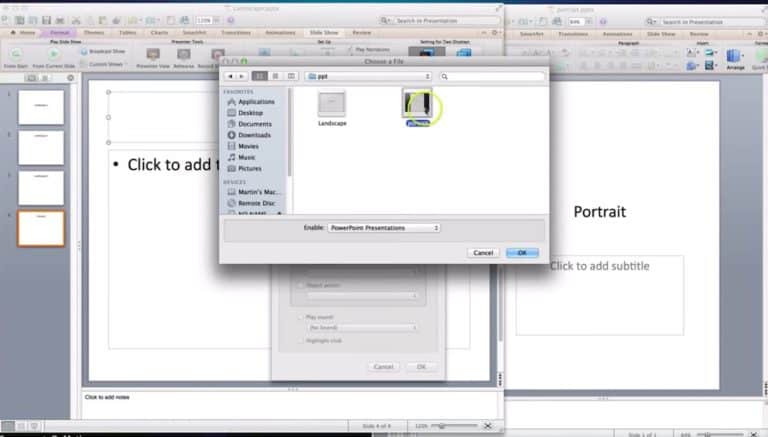
Browse and open the destination folder in which the portrait presentation is saved. Simply, browse to the location of the destination folder, click on the desired portrait powerpoint file and click “OK”. PowerPoint will then ask you to choose the slide number (if you have more than 1 slides in the PPT). Select the slide number that you wish to display, and click “OK”.
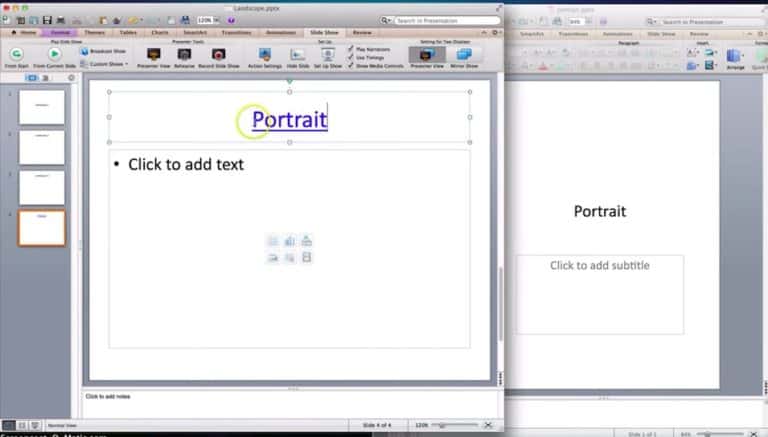
Now you will notice that the text that we have used to link to the portrait file will turn blue and get underlined. This is because it has now become a hyperlink.
Step 4 – Check to verify that the desired result has been achieved
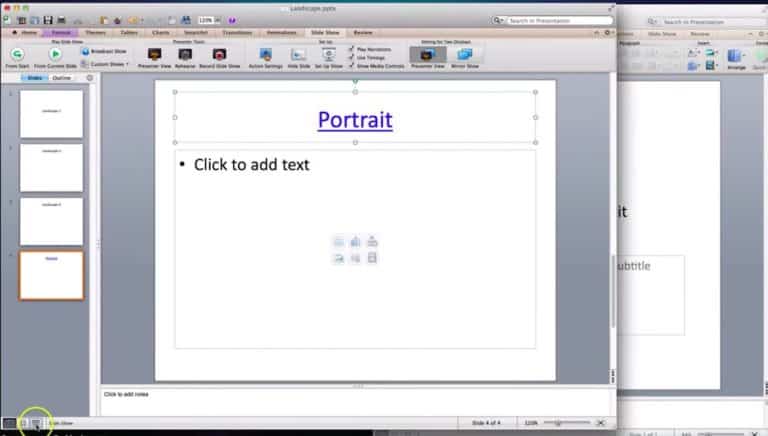
Make the presentation in full screen mode by clicking on the “Slide Show” button on the bottom bar in your target presentation.
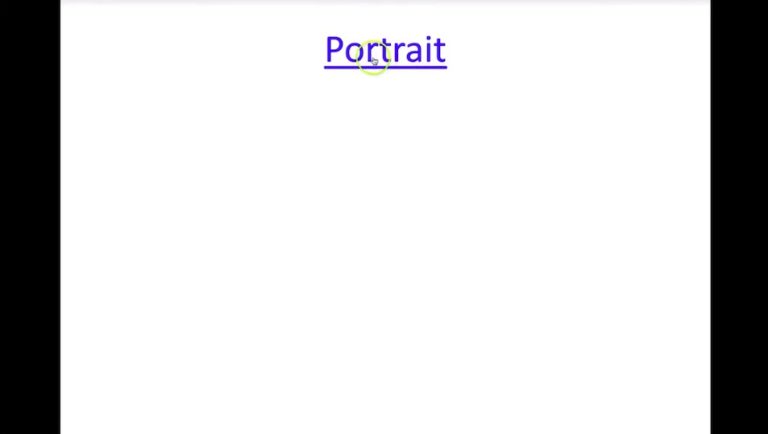
When your presentation turns full screen, you just need to hover over the hyperlinked text and click on it.
You’ll notice that the slide in the portrait mode is now visible in your main presentation. One thing you need to be aware of is that the slide is still not present in the target presentation. All we are doing is tricking PowerPoint to open a slide from a different presentation by creating a hyperlink. Thus, every time you need to open the portrait slide, you’ll need to come to this specific slide that contains the hyperlink and click on it. To go back to your target presentation from the portrait slide, simply press escape button on your keyboard denoted by “Esc” (top left corner of the keyboard)
Method 2 – Copy the contents of your Portrait slide, and paste it in your target PPT as an image
Okay, so this second cool little hack is simple and pretty straightforward. In this method, even though we may not be able to change the slide layout of just one slide, we will be able to achieve the desired result. Let’s have a look at how to do it –
Step 1 – Open both PPTs and add a black box that covers the complete slide in the target presentation
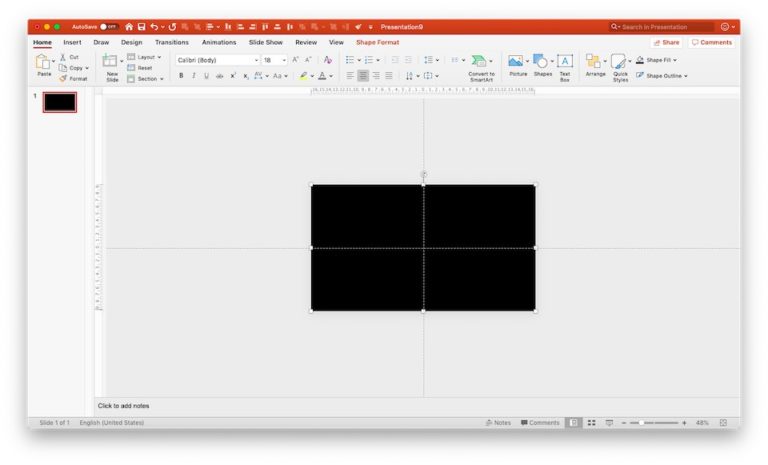
As a first step, open both the presentations. In the target presentation, add a blank slide. Next, insert a shape such that it covers the complete landscape slide end-to-end. Remove the border, and make the color of the shape to black. Adding a black shape is an optional step. The purpose of adding this black box is to mimic the background of a presentation in full screen. You’ll see what I mean in just a minute.
Step 2 – Copy contents of the portrait slide and paste it as an image in the target PPT
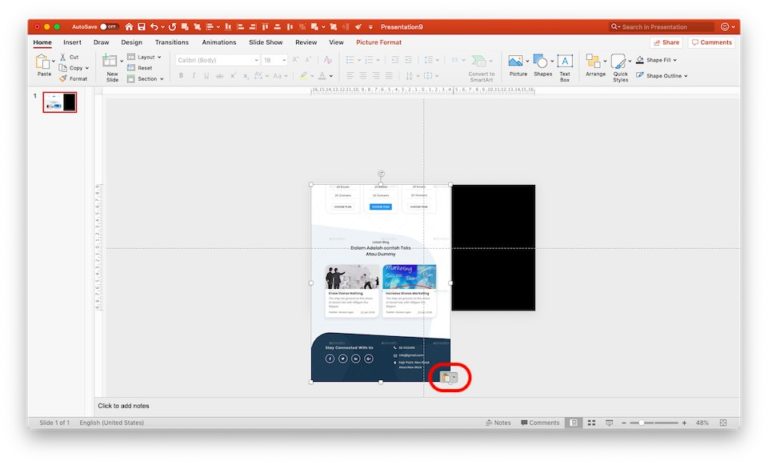
Open the portrait slide layout that you would like to put on the target presentation. Copy all the contents of that slide and paste it on the desired slide in the target presentation. As soon as you paste the items, scroll to the right bottom corner of the items that you have pasted, and you will notice additional pasting options with a clipboard icon that appears. Click on the small box with a clipboard icon, and a dropdown will appear. Simply select the “Paste as picture” option from the dropdown. This will ensure that your portrait slide is now an image.
Step 3 – Resize and align the image to the centre of the slide

Now we need to resize the image to fit the height of the landscape layout. Align the top left corner of the image with the top left corner of the slide (or you could align the top right corner of the image with the top right corner of the slide). Next, we shall resize the image from the diagonally opposite corner (in our example, it will be the bottom right corner). Remember, we should always resize the image proportionately so that it doesn’t distort the image. To do that, simply press the “Shift” key and while dragging the image.
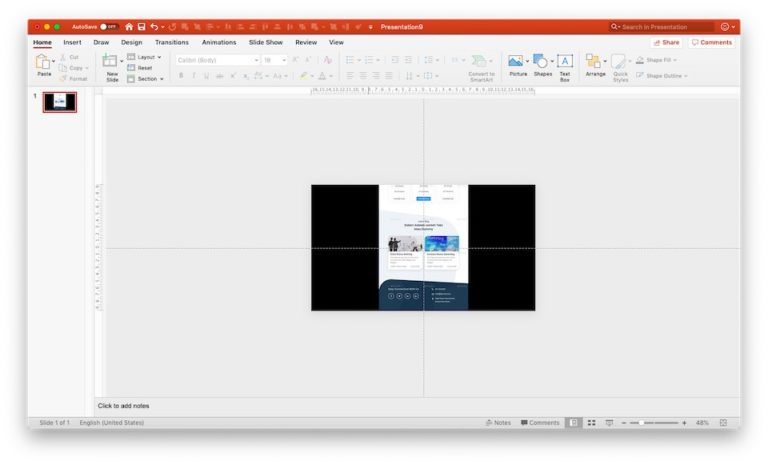
Next, align this image to the centre of the slide. An easy way to align images and shapes in PowerPoint is using “Align tools”. Simply select the image by clicking on it. You’ll notice a “Picture Format” option that appears in the menu bar on the top. Click on the “Align” button. A dropdown will appear. Just select “Align to centre” under horizontal align options. You’ll notice that the image has moved to the centre of the screen.
Step 4 – Check to verify that the desired result has been achieved
Steps described above can help you lock the aspect ratio of any image in PowerPoint. The process is similar when you wish to lock the aspectAs a last step, click on the “Slide Show” button to make the PowerPoint presentation full screen. You’ll notice that you’ve successfully displayed a portrait layout on a landscape slide. While, you may not have been able to change the layout of the slide itself, putting the portrait slide as an image helps us essentially achieve the same result. ratio of not just an image but also of any other shape such as a square, circle or rectangle.
Pro tip – Worry about portrait slides only if the output screen can display in portrait mode
After reading the method 2 described above, I know you’re probably wondering “I didn’t want to paste an image in the slide. I wanted to have a portrait slide inserted in my landscape presentation”. However, you may need to keep in mind that almost all the screens on which you would be displaying your “Portrait” presentation, would by default have a landscape layout. In other words, unless you’re viewing the portrait slide on a screen that displays the output in a portrait mode such as a cell phone, your portrait slide will always have a blank space on the side!
Thus, there can be several other variations to the method 2 described above. For instance, you could also save your portrait slide as a PDF, and copy and paste that PDF file on the target presentation. Even in such a scenario method 2 will work just fine! What matters is to really understand the principle that portrait slides will always have blank space on the sides if the output screen can only display in landscape mode.
Conclusion
As mentioned earlier, there is no straightforward way to have both portrait and landscape slide sizes in the same presentation. Then again, before you break your head over it, you should ask yourself, is it really that important to have a portrait slide in your presentation as the slide may most likely be displayed in a landscape mode due to the output screen layout. If it is important, then you can follow the methods described above.
I hope the tips mentioned in the article were helpful to you, and that it saves you time in the future as well to create an effective presentation.
Our goal on this blog is to create content that helps YOU create fantastic presentations; especially if you have never been a designer. We’ve started our blog with non-designers in mind, and we have got some amazing content on our site to help you design better.
If you have any topics in mind that you would want us to write about, be sure to drop us a comment below. In case you need us to work with you and improve the design of your presentation, write to us on [email protected]. Our team will be happy to help you with your requirements.
Lastly, your contribution can make this world a better place for presentations. All you have to do is simply share this blog in your network and help other fellow non-designers with their designs!
UNLIMITED DOWNLOADS: 1,500,000+ PowerPoint Templates & Design Assets

All the PowerPoint Templates you need and many other design elements, are available for a monthly subscription by subscribing to Envato Elements. The subscription costs $16.50 per month and gives you unlimited access to a massive and growing library of ,500,000+ items that can be downloaded as often as you need (stock photos too)!