Choosing just the right fonts can make a world of difference to your presentation. In order to do that, you should first know how to change the fonts in your PowerPoint presentation in the first place!
To change fonts in PowerPoint –
- Select the Text
- Click on the “Home” Tab
- Click on the “Font” option under the “Paragraph” section.
- Choose the fonts from the dropdown as desired.
In this article, we shall look at multiple different options to change and adjust fonts in PowerPoint. Plus, I will also show you how you can change fonts on all your slides at once!
So, without any delay, let’s get started!
A Quick Note Before We Begin – for this article, I will be using the Delivery PowerPoint Template from Envato. With Envato, you get access to thousands of presentation designs so you never run out of options again. Not only is Envato very affordable, but it is also the best in the market when it comes to presentation templates!
How to Change Fonts in PowerPoint?
Changing fonts for your text on the slide in PowerPoint is very easy.
To change fonts in PowerPoint, select the text first. Then, click on the “Home” tab. Under the “Paragraph” section, click on the “Font” option. Next, from the dropdown, choose the fonts as per your preference.
There are a couple of different methods which you can use to change the fonts. Let’s take a look at both the methods –
Method 1 – Using the “Home” tab
The first method is using the home tab. The paragraph section on the home ribbon allows you to directly change the fonts in PowerPoint. Let’s understand this step by step below –
Step 1 – Select the Text
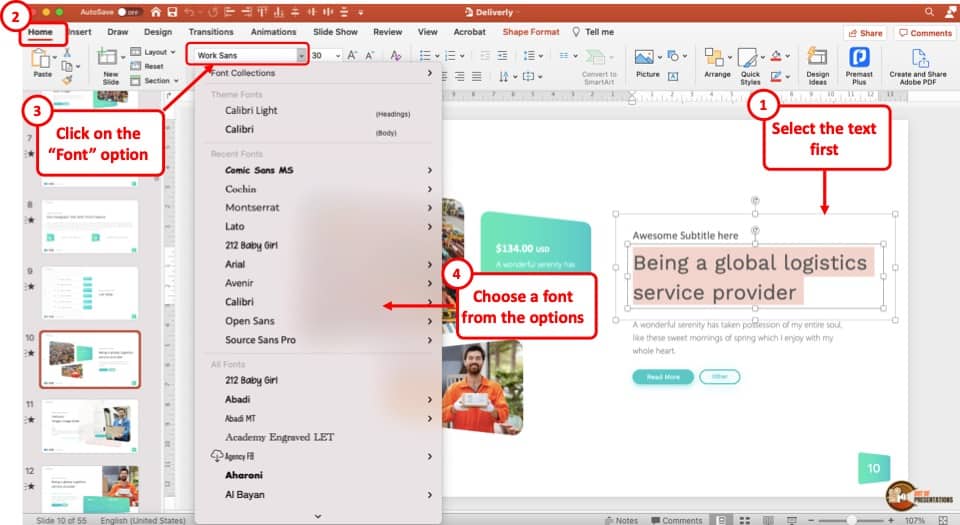
The first step to select the text that needs the font to be changed. You can select the text using the mouse cursor or the shift and arrow keys on your keyboard.
Step 2 – Change the Font
Now, click on the “Home” tab. Then, under the “Paragraph” section, locate the “Font” options. Click on it. A dropdown menu will appear. You can scroll through the list to choose an appropriate font.
Alternatively, if you want to choose a specific font, simply start typing the name of the font in the “Font” section and PowerPoint will auto-populate the name if the font is installed on the computer.
Method 2 – Using the “Font” Dialog Box
Another method to changing the fonts in PowerPoint is by using the font dialog box. Let’s take a look at it –
Step 1 – Highlight the Text
The first step is to highlight the text that you want to change the fonts for.
Step 2 – Right-click and Select “Font” Option
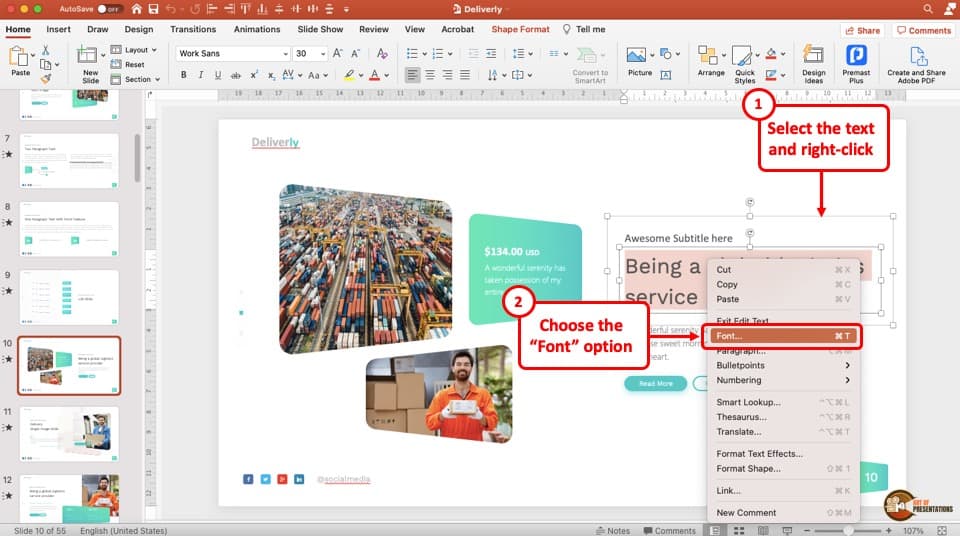
Now, right-click on the highlighted text. A menu with several options will appear. Click on the “Font” option. A new dialog box will appear with several different options.
Step 3 – Choose a Different Font
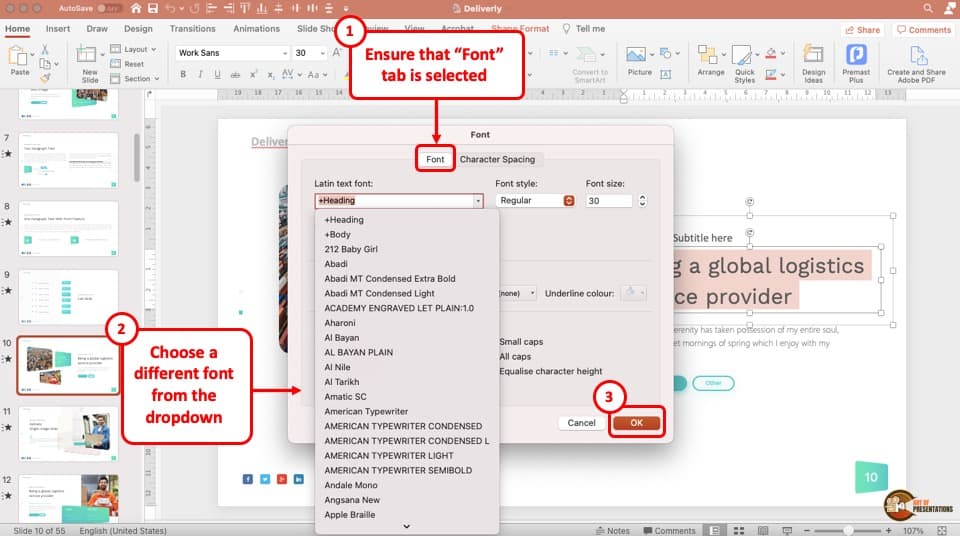
From the “Dialog Box“, first click on the “Fonts” option. Then, click on the “Text Font” and choose a font as per your preference from the dropdown. Finally, click on “OK” to apply the changes.
How to Replace Fonts in PowerPoint?
Microsoft PowerPoint has an excellent feature that lets you replace fonts in any part of your presentation!
To replace fonts in PowerPoint, follow the below mentioned steps –
Step 1 – Click on the “Replace Fonts” Button
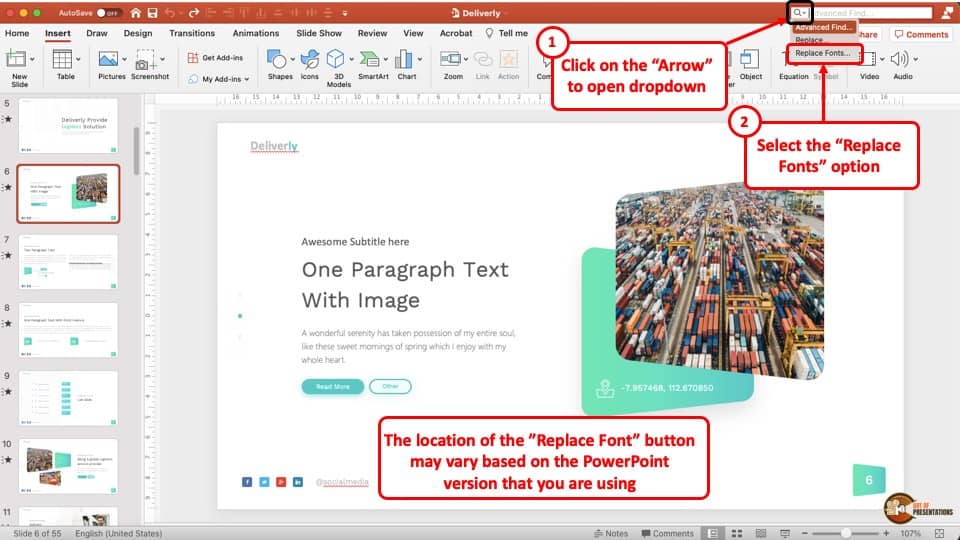
The first step is to click on the replace fonts button in PowerPoint.
The location of this replace button may vary based on the version of PowerPoint that you are using! If you are using PowerPoint 2007, 2010, 2013, and 2019, you can find the replace button on the “Home” tab. You will notice an arrow with a dropdown that provides the “Replace Font” option.
If you are using PowerPoint 2003, or 2016, you will find the “Replace Fonts” button on the “Format” tab.
Also, if you are using Office 365 version of PowerPoint (like me), then you need to click on the search function on top, and then click on the arrow to open up the dropdown (as shown in the image above)
Step 2 – Select the Font to Replace
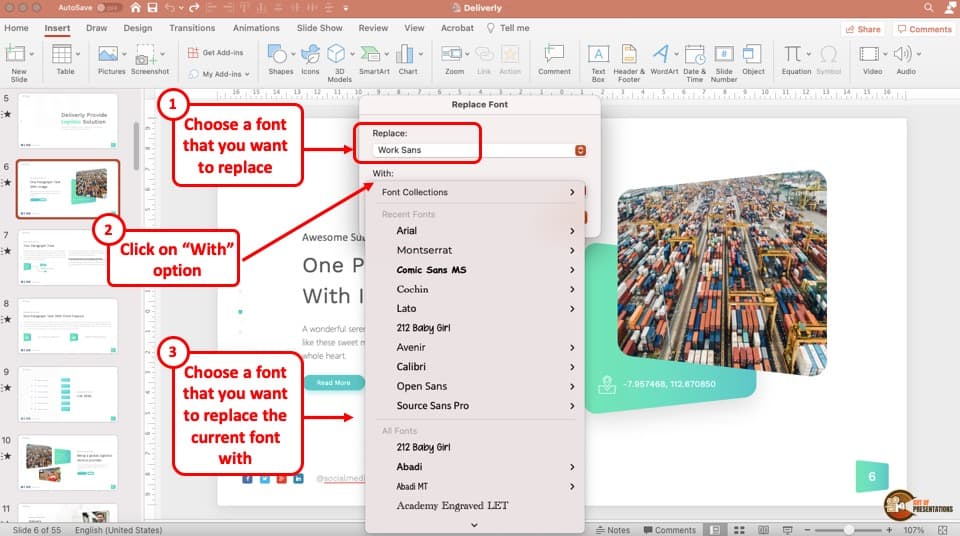
When you click on the replace fonts button, a new window will appear. From this window, first select the font that you want to replace. Then, under the “With” option, select the font that you want you replace the current font with.
Lastly, click on “Replace“.
How to Change Fonts for All Slides in PowerPoint at Once?
When you plan to format text in PowerPoint, it is super critical to ensure that all the fonts on the presentation are consistent!
If your presentation contains multiple slides, changing fonts on each slide individually can be quite cumbersome. To solve this problem, you can use one of the two methods described below –
Method 1 – Using the “Replace Fonts” button (for existing presentation)
I have already described this process in detail in the previous section.
When you choose to replace the fonts using the “Replace Fonts” button, PowerPoint will change the fonts across all your slides!
This includes fonts in the shapes, text boxes, notes section, slide master, tables or even SmartArt! However, if you have any charts present in your presentation, “Replace Fonts” option won’t replace the fonts used for chart labels. You will have to do that manually!
So, do keep that in mind.
Method 2 – Using the Slide Master (for a blank presentation)
A good way to fix the fonts on your presentation is to change them even before you have added any content. This can be achieved using the Slide Master in PowerPoint.
With slide master, you can apply changes to all slides at once. In fact, you can change the default fonts in PowerPoint using this method!
Step 1 – Open the “Slide Master” View

The first step is to open the slide master view. To do that, click on the “View” tab. Then, select the “Slide Master” option.
Step 2 – Select the Master Slide
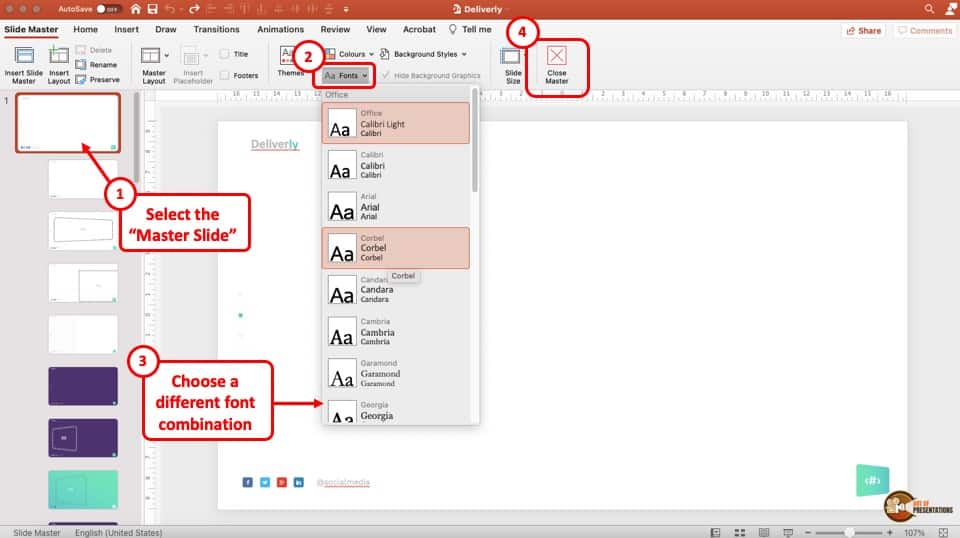
Select the first slide that has a larger thumbnail than the other slides. This is the parent slide or the “Master Slide“. The changes that you make to this slide will impact all the individual layouts or slides in the master.
Step 3 – Change the Fonts
Now, click on the “Fonts” and choose the font combination for your presentation. This will override the default fonts for this presentation going forward.
Step 4 – Exit Slide Master
The last step is to exit the slide master. To do that, simply click on “Close Master“.
This will change the font combination on all your slides. You can also go to each individual layout and adjust the fonts as per your requirement.
However, do keep in mind, this method will only work as long as a default text placeholder is used. If the user adds a text box separately, the text may be different from what you have chosen.
How to Change Font Size for All Slides in PowerPoint?
Changing the font size of all slides can be achieved through the slide master. Let’s take a look at the process –
Step 1 – Open the Slide Master View

As before, the first step begins with the opening of the “Slide Master View“.
Step 2 – Select a Particular Section of the Master Slide
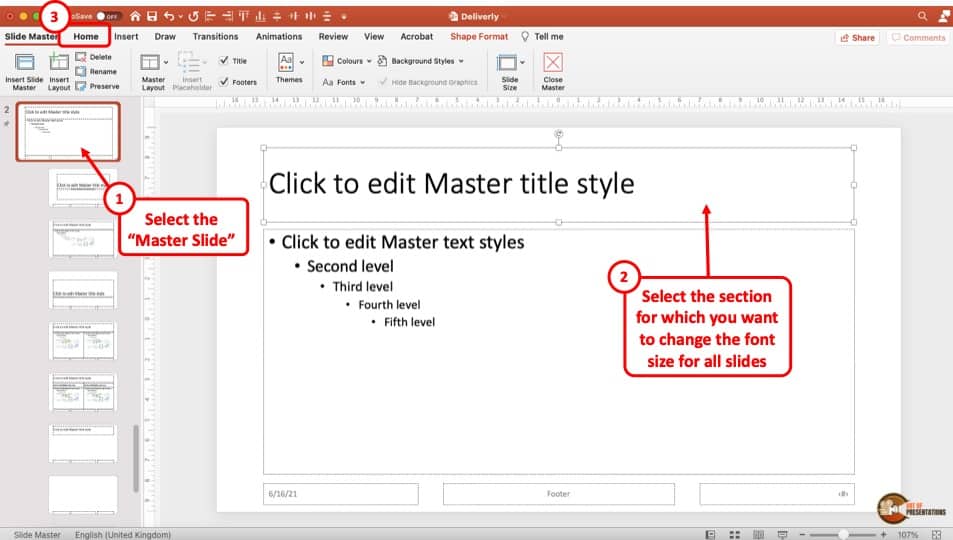
Open the master slide (which is the first slide with the thumbnail larger than other slides in the master). Making changes to the master slide will impact all the other slides in the layout as well.
On the master slide, select a particular section for which you want to change the slide size for. For this example, I will change the font size of slide heading. So, select the slide header.
Once the section is selected, head over to the “Home” tab.
Step 3 – Change the Font Size
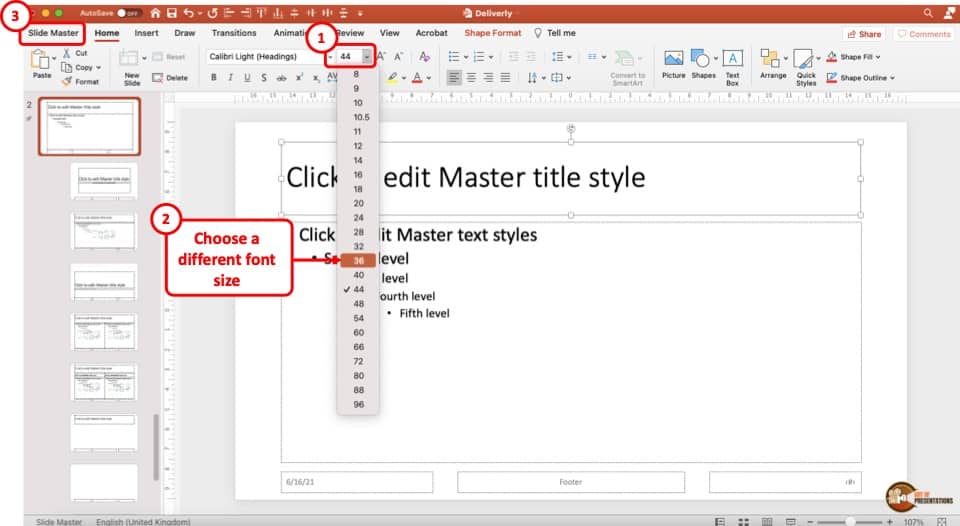
The next step involves changing the font size. Once you are on the “Home” section, you can change the size of the font or the text just as you would in the normal view. Notice that the slide mater view is still active (the layout thumbnails are visible on the left instead of the slide thumbnails).
Once the font size has been changed, click again on the “Slide Master” tab.
You will notice that the font size of the “title” on all the slides has been changed.
Step 4 – Exit the Slide Master
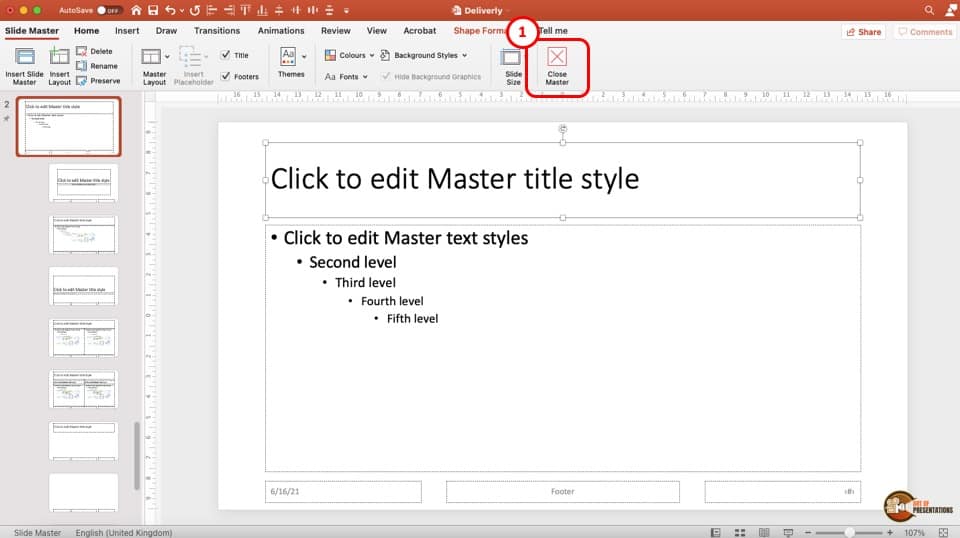
The only thing that is now left to do is to exit the slide master. To do that, click on the “Close Master” button. Remember to save your presentation after making the changes.
If you want to make changes to the font size to the body section (or any other section), simply repeat the steps mentioned with the body section selected instead of the title section in step 2.
How to Change Font Color for All Slides in PowerPoint?
You can also change the font color on all slides just the same way as that of changing the font size mentioned in the method above. For brevity, I’m only going to lay down the steps and not include the visual references.
- Open the “Slide Master View” in PowerPoint
- Select a “Title” section (if you want to change the color of font in other sections, then select that)
- Click on the “Home” tab
- Choose the “Font Color” as per your requirement
- Click on the “Slide Master” tab once again on the top left corner of the menu
- Exit the slide master by clicking on the “Close Master” button
If you want to change the text of the body section, follow the above steps but instead of selecting the “Title“, go with the “Body” section of the slide in step 2. (check the previous sections for visual references)
How to Change the Default Font in PowerPoint?
You can change the default fonts in PowerPoint by using the Slide Master. Head over to the “Slide Master View”. Then, click on “Fonts”. Choose the fonts from the dropdown. Then, exit the slide master by clicking on “Close Master”. Save the file as a template to change the default fonts forever.
The process of changing the default font is similar to what has been described in the previous sections. For brevity, I’ll just note down the steps below (for visual reference, please refer the previous sections) –
- Open the “Slide Master View” in PowerPoint
- Select the “Master Slide” (the first slide in the left section with a larger thumbnail)
- Click on the “Fonts” button from the menu
- Exit the slide master by clicking on the “Close Master” button
- You can save the file as a presentation template (.potx file) to ensure that your presentation always opens with the selected fonts
Install Fonts in PowerPoint
If you don’t like the font options available in PowerPoint or if you have specific custom fonts to be added in PowerPoint, you can also install the fonts in PowerPoint!
There are tons of fonts available online from third-party developers. Luckily you can use them in PowerPoint presentations. Microsoft doesn’t put any restrictions on using third-party fonts.
Here are the steps to install a font in PowerPoint:
- First, download your preferred font
- Install the font on your computer
- Open Control Panel and type ‘font’ in the search box
- Click on the fonts folder that appears
- Now just copy and paste the downloaded font in the “Fonts” folder
- Close the PowerPoint application and restart it
- Check if the installed font now appears in the fonts section on the “Home” ribbon
- If you still don’t see the fonts, perhaps restart your computer
If the fonts that you downloaded are not visible still, repeat steps 3 to 5 once again to make sure that the fonts get installed on your computer correctly. You can also check out my detailed guide on how to install fonts in PowerPoint where I’ve added the detailed step-by-step process with images.
How to Change Theme Fonts in PowerPoint?
If you like a theme but are not particularly fond of the font, you can change it to the font you like. Follow the steps below:
Step 1 – Select the Theme
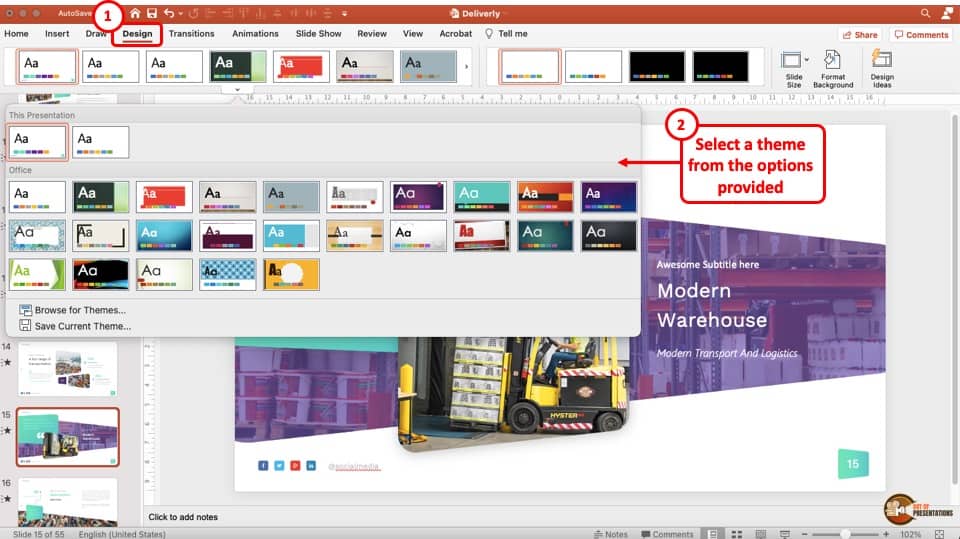
The first step is to make sure that you have selected the correct theme. Click on the “Design” tab, and from the “Themes” section, click on the dropdown and choose a theme.
Step 2 – Select a Different Font Pairing
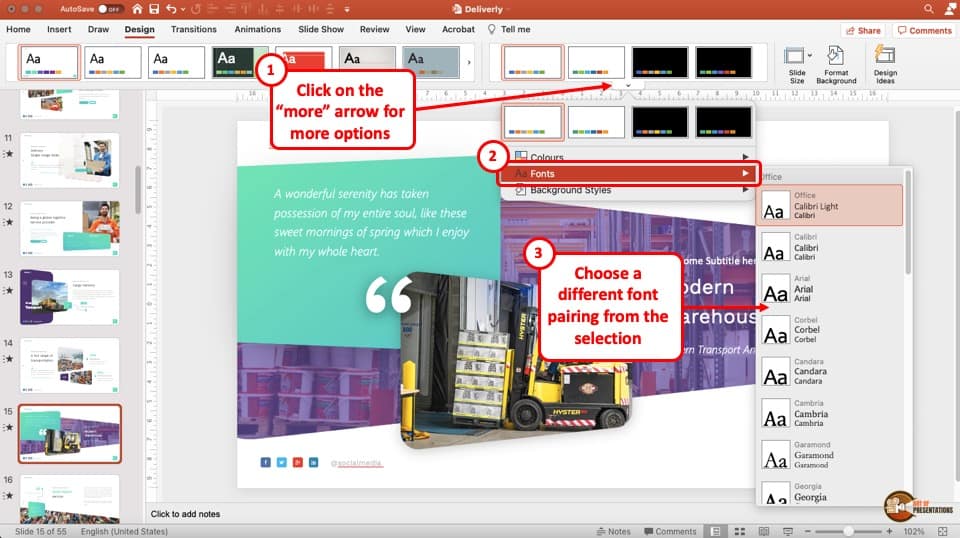
Next, click on the dropdown from the “Variants” section in the ribbon. Next, place the cursor on the “Fonts” in the menu. A dropdown menu will appear. Click and choose a different font pairing as per preference.
If you are on a PC, you can also customize the font pairing by selecting the “Customize Fonts” option from the bottom of the dropdown list.
Step 3 – Save the Theme (Optional)
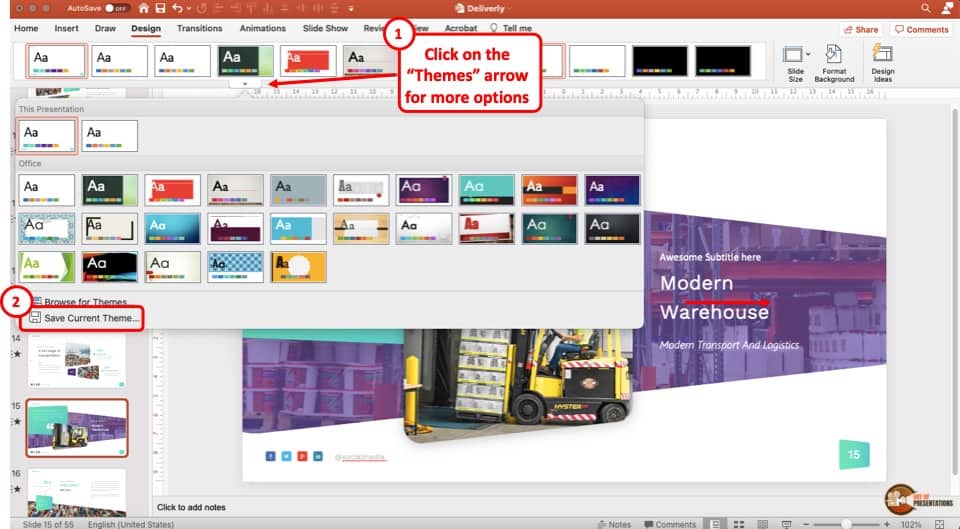
If you want to have the fonts that you just added as a part of the default theme permanently, then ensure that you save the theme file itself!
You can do so by clicking on the “Themes” section once again, and then choosing the “Save Current Theme” option. PowerPoint will open up a window and save a “.thmx” file.
The next time you want to use this theme, simply click on the “Browse for Themes” option under the “Themes” section, and open the theme by browsing to the folder where you just saved the theme!
Can You Change the Hyperlink Font in PowerPoint?
To change the hyperlink font in PowerPoint, select the hyperlink text. Then, click on the “Home” tab and choose a font from the “Fonts” section as you normally would for any other text in PowerPoint.
The only other thing that you need to know is that unlink changing the hyperlink color, hyperlink font can not be changed for all slides at once. So, you will perhaps need to manually change the hyperlink font every time. Then again, how many hyperlinks would a typical presentation contain? Not too many I reckon!
How to Change Footer Font in PowerPoint?
You can easily change the footer font in PowerPoint using the slides master.
Here’s how to change the footer fonts in PowerPoint:
- Click on the “View” tab and open the “Slide Master View” in PowerPoint
- Select the “Master Slide” (the first slide with a larger thumbnail in the the left panel)
- Select the footer text that you want to change the font for
- Next, click on the “Home” tab and select a different font from the “Fonts” section
- Click on the “Slide Master” tab on the top-left corner of the menu options to go back to the slide master
- Exit the slide master by clicking on “Close Master“
If you need pictorial references for the process, you can check out the previous sections of this article in the section “how to change the fonts on all slides” where I’ve explained a similar process in detail.
How to Change Fonts for Notes Section in PowerPoint?
You can change the fonts of the notes section by using the following method:
- Click on the “View” tab
- Select the “Notes Master” option (not the Notes View)
- Select the text in the notes section, and click on the “Home” tab
- Go to the “Fonts” option and choose a different font
- Click on the “Notes Master” tab once again from the menu
- Exit the notes master by clicking on “Close Master“
- Go back to the “View” tab and select “Normal View“
I highly recommend that you also check out my other article about Notes in PowerPoint that provides several ninja tips on using the notes section correctly!
Credit to drobotdean (on Freepik) for the featured image (further edited) of this article

![How to Change Fonts in PowerPoint? [Complete Guide!]](https://artofpresentations.com/wp-content/uploads/2021/06/Featured-Image-How-to-Change-Fonts-in-PowerPoint.jpg)