![How to Change Font Size in PowerPoint? [A Complete Guide!]](https://artofpresentations.com/wp-content/uploads/2022/02/Featured-Image-How-to-Change-Font-Size-of-Text-in-PowerPoint.webp)
Using the correct font size in your PowerPoint presentation is critical in making it legible! After all, you don’t want your audience squinting at the screen when you are presenting at an auditorium or even when reading it over an email. Thus, it is important to know how to change the font size in PowerPoint.
To change font size in PowerPoint, first, select the text. Then, click on the “Font Size Dropdown” option from the “Font” group on the “Home” tab in PowerPoint. Choose font size 16 or 18 for desktop presentations, and size 30 if your presentation will be seen on a big screen in an auditorium.
In this article, we shall understand how to change the font size in PowerPoint and what font size should you use. Plus, we will also learn how to change the font size of text across all slides within PowerPoint in one go. That, and much more!
So, let’s get started!
1. How to Change the Font Size in PowerPoint?
In Microsoft PowerPoint, you can add text to content placeholders on a slide or to an inserted text box. Once you select the text box or the placeholder, you can change the size of the text.
Besides, you can also change the font size of the slide layouts and the master slide that affects the entire presentation. You can do so by using the “Font” group in the “Home” tab in PowerPoint.
1a. Method 1 – Using the Font Size Dropdown
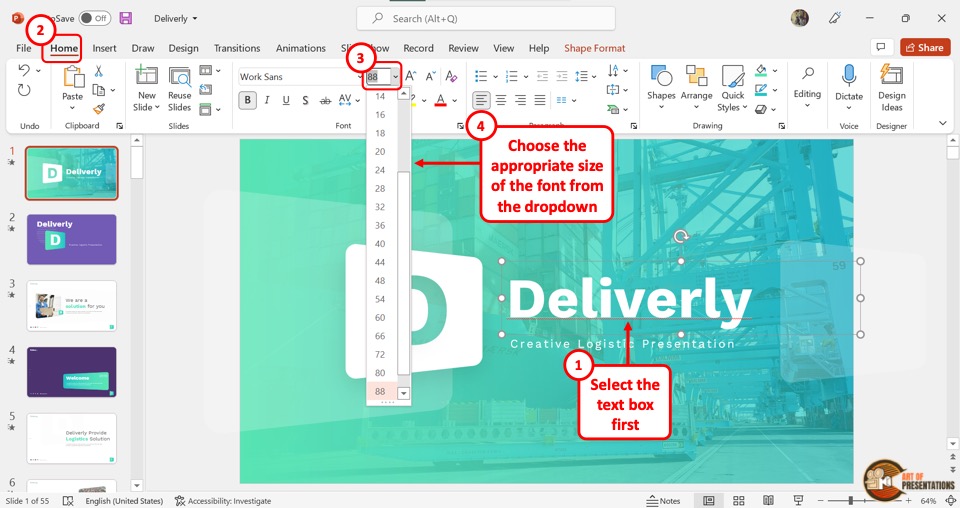
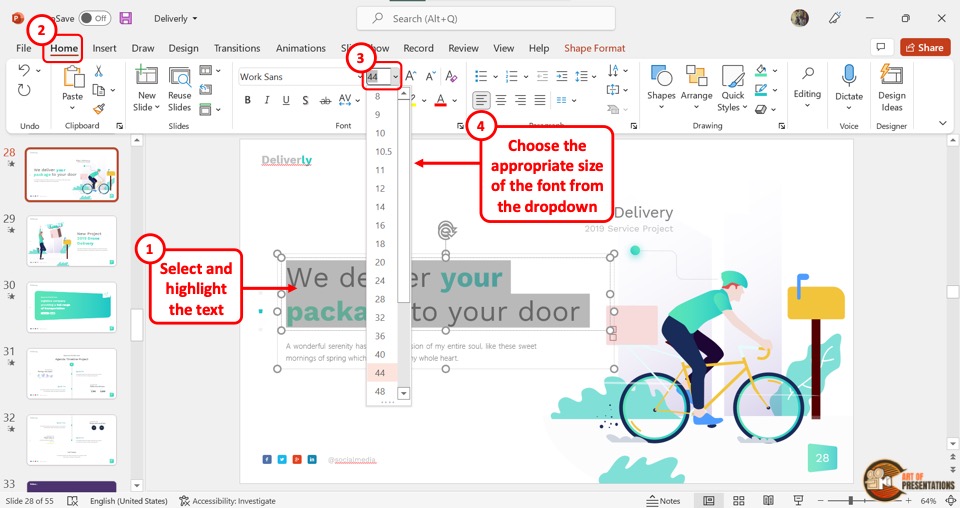
To change the font size, you have to first click on the text box in the slide. Then click on the “Font Size” box in the “Font” group of the “Home” menu.
You can click on your preferred font size from the dropdown list. You can also enter the font size directly in the “Font Size” box using your keyboard.
1b. Method 2 – Using the Increase or Decrease Font Size Buttons
You can also change the font size in PowerPoint slides by using the “Increase Font Size” and the “Decrease Font Size” buttons located at the right of the “Font Size” box.
“Increase Font Size”
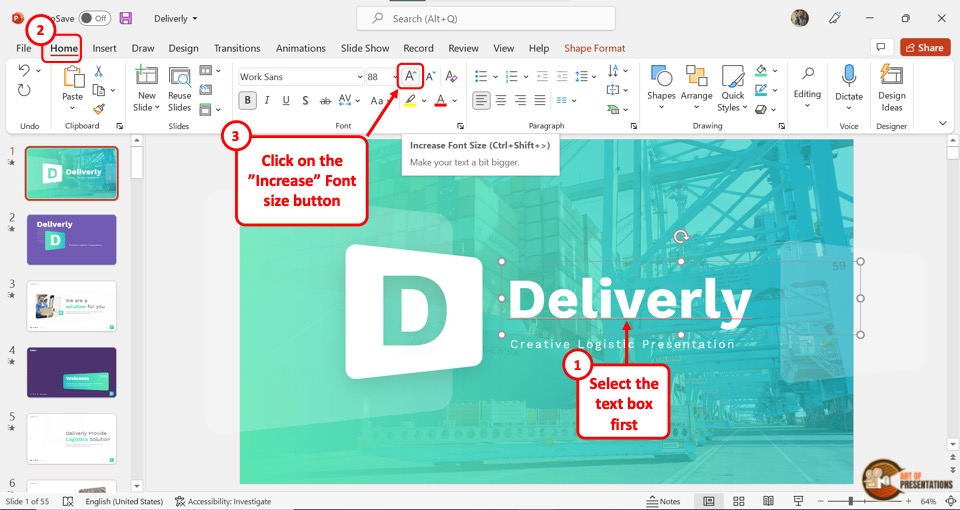
The “Increase Font Size” icon looks like the letter A with an upward arrow. Clicking on the button will increase the font size by 2 points.
Alternatively, you can press the “Ctrl+Shift+>” keys on your keyboard. You can repeatedly click on the button until the text reaches the preferred font size.
“Decrease Font Size”

The “Decrease Font Size” icon looks like the letter A with a downward arrow. The font size of the selected text will decrease by 2 points when you click on the icon.
Alternatively, you can press the “Ctrl+Shift+<” keys on your keyboard. You can repeat the process until the text decreases to your preferred font size.
2. How to Change the Font Size on All Slides in PowerPoint?
Changing the font size on a single slide is what you most need. However, sometimes, you also need to change the size of fonts across the complete presentation. In such a scenario, changing the font size on each slide can become really monotonous and time-consuming.
In order to change the font size on all slides in PowerPoint, you will need to use the “Slide Master” in PowerPoint.
Here are the steps that you need to follow in order to change the fonts on all slides of your presentation.
Step-1: Click on the “Slide Master” option
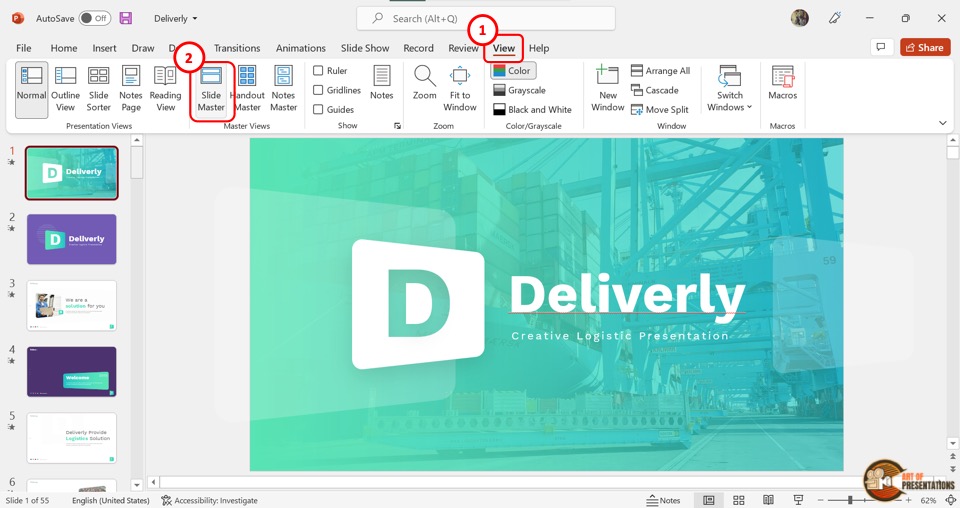
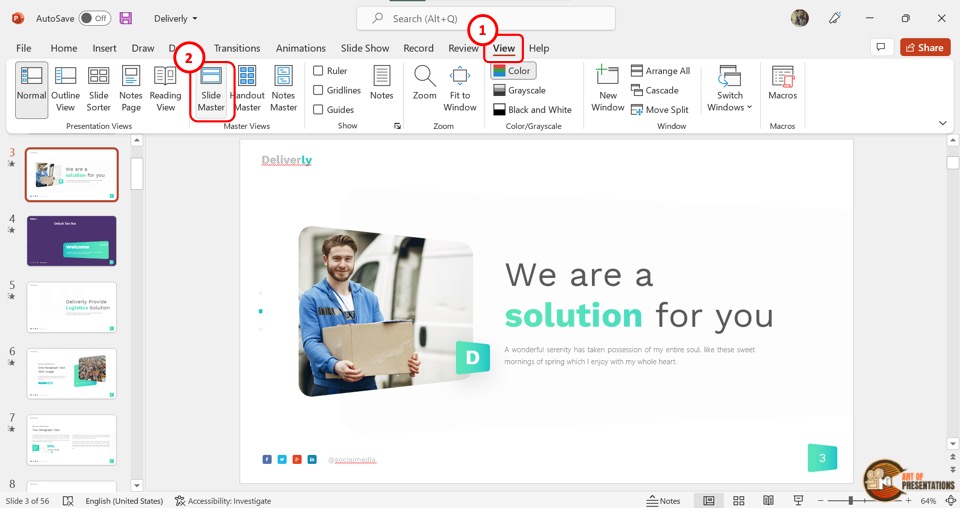
The first step is to open the “Slide Master” view. To do so, click on the “View” tab in the ribbon menu located at the top of the screen.
Then click on the “Slide Master” option in the “Master Views” group of the “View” menu.
Step-2: Click on the master slide

In the “Slide Master” view, click on the master slide. It is the top slide in the slide layout pane located on the left side of the screen.
In the master slide, highlight a bullet level or the entire text to change its font size.
Step-3: Click on the “Font Size” box
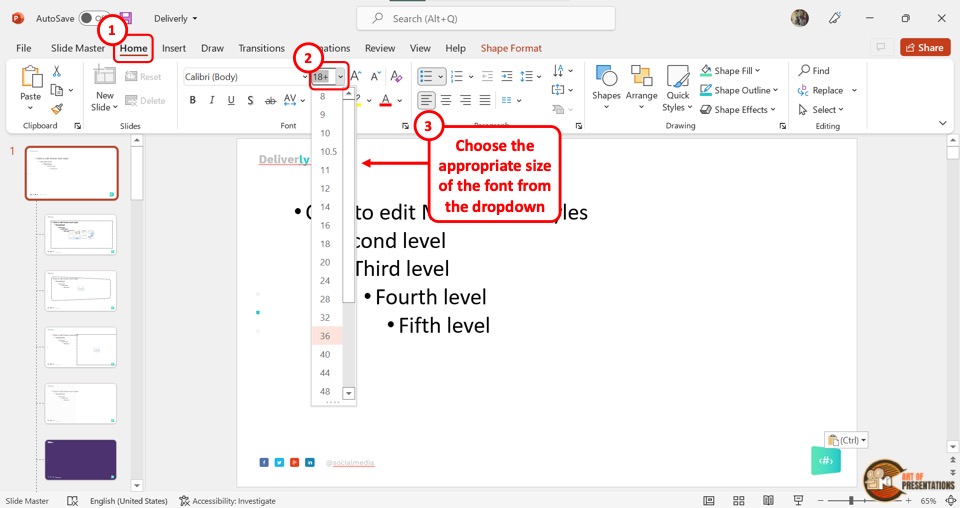
Now you have to click on the “Home” tab in the menu ribbon. In the “Font” group of the “Home” menu, click on the “Font Size” box to type in your preferred font size.
You can also select a font size from the dropdown list.
Step-4: Click on the “Close Master View” option
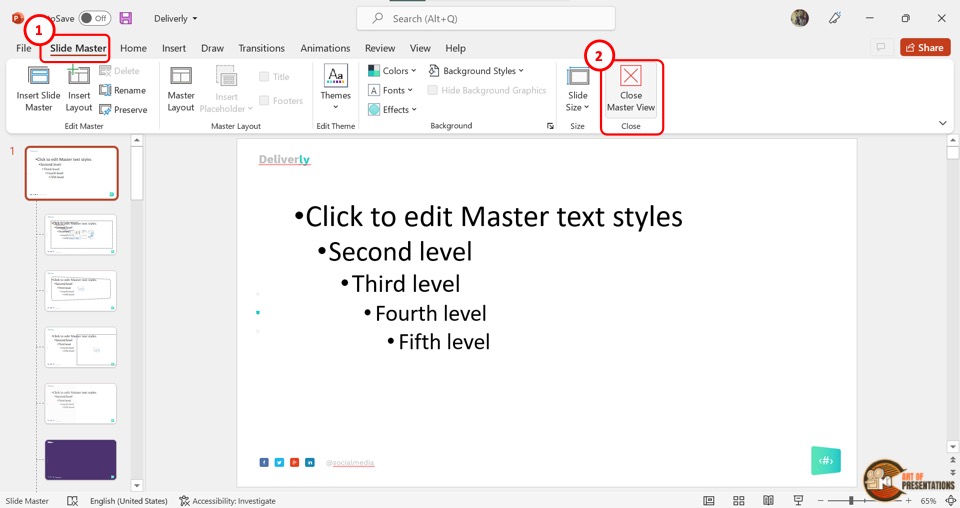
Now all you have to do is click on the “Slide Master” tab in the menu ribbon of the “Slide Master” view.
Then click on the “Close Master View” button to automatically save the changed font size for all texts in the presentation and return to the normal view.
3. How to Change the Default Font Size in PowerPoint?
Microsoft PowerPoint allows you to change the default font size for a presentation. This will affect all the texts in the open presentation file.
3a. Change Default Font Size of All Text in PowerPoint
In PowerPoint, you can add text to either a text box or a placeholder. To change the default font size of all the texts, you have to change the default font size of the placeholder and the text box separately.
To change the default font size of all the placeholders in a presentation, you have to access the “Slide Master” view. Refer to section 2 for the detailed steps of the process.
To change the default font size of all textboxes in the presentation, refer to the steps mentioned in the subsequent section 4.
3b. Change Font Size of Selected Text in PowerPoint
To change the font size of a selected text in PowerPoint, you have to first click on the “Home” tab in the menu ribbon. Then click on the “Font Size” box to select the preferred font size from the dropdown menu, or type in the number inside the box.
You can alternatively press the “Ctrl+Shift+>” keys on your keyboard to increase the font size and the “Ctrl+Shift+<” keys to decrease the font size.
4. How to Change Default Font Size of Text Box in PowerPoint?
In Microsoft PowerPoint, the default font size is 18 points for all text boxes. To change this default font size of the text box, follow the 2 quick steps.
Step-1: Click on the “Font Size” box
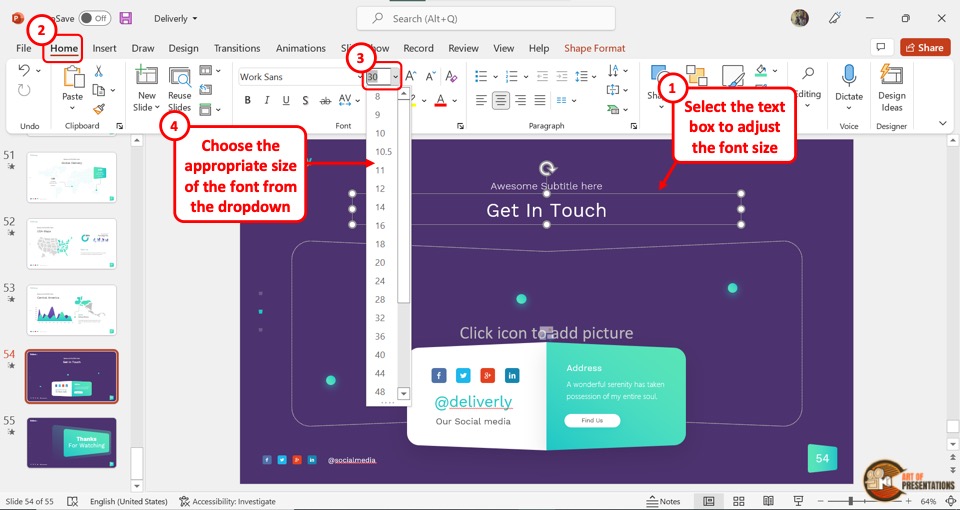
The first step is to click on any text box in the presentation. Then click on the “Font Size” box in the “Font” group of the “Home” tab. You can now select a font size from the dropdown list or type in the preferred font size inside the “Font Size” box.
Consider making any other changes to the text or formatting the text as per your requirement before moving on to the next step.
Step-2: Click on the “Set as Default Text Box” option
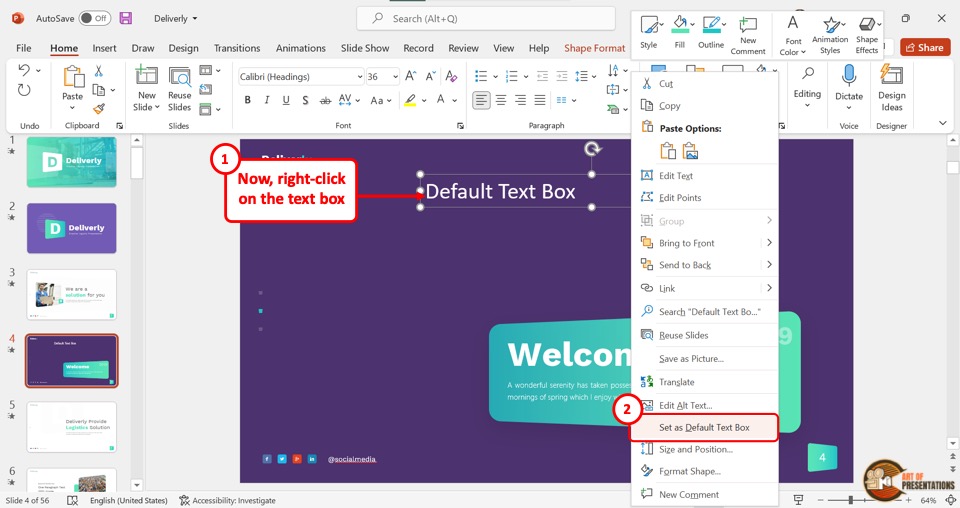
Now all you have to do is “Right-click” on the text box with the changed font size. In the right-click menu, click on the “Set as Default Text Box” option.
Now all new textboxes will have the changed font size as default.
One thing to note here is that the font size of the text in any existing text boxes will not change in your presentation. However, the changes will be visible the next time you add a text box on your slides in PowerPoint.
5. How to Change Font Size Automatically in a Text Box?
Microsoft PowerPoint offers the “Shrink text on overflow” feature using the autofit text options that automatically decreases the size of the text with the size of the text box. However, there is no feature to automatically increase the font size with the text box.
To enable the “Shrink text on overflow” feature, follow the 3 easy steps mentioned below
Step-1: Click on the “Format Shape” option
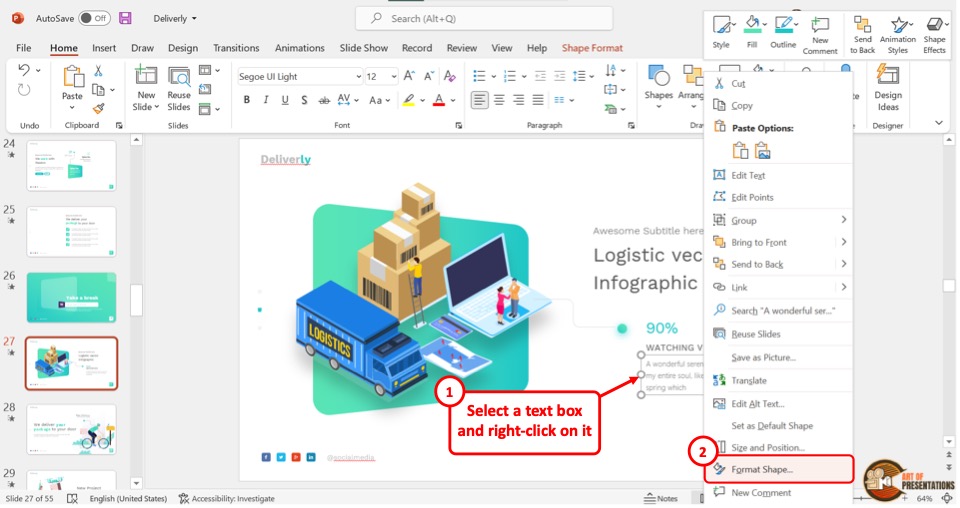
The first step is to “Right Click” on the text box. Then click on the “Format Shape” option from the right-click menu. This will open the “Format Shape” options in PowerPoint on the right side of the screen.
Step-2: Click on the “Text Options” tab
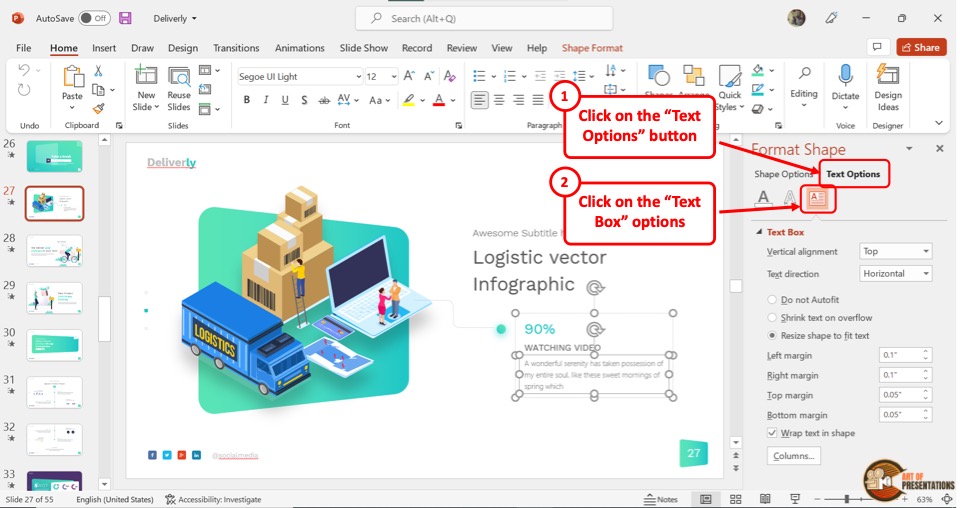
In the “Format Shape” sidebar, click on the “Text Options” tab. Under the “Text Options” tab, click on the “Text Box” option which is the last icon and looks like the letter A in a paragraph.
Step-3: Click on the “Shrink text on overflow” option
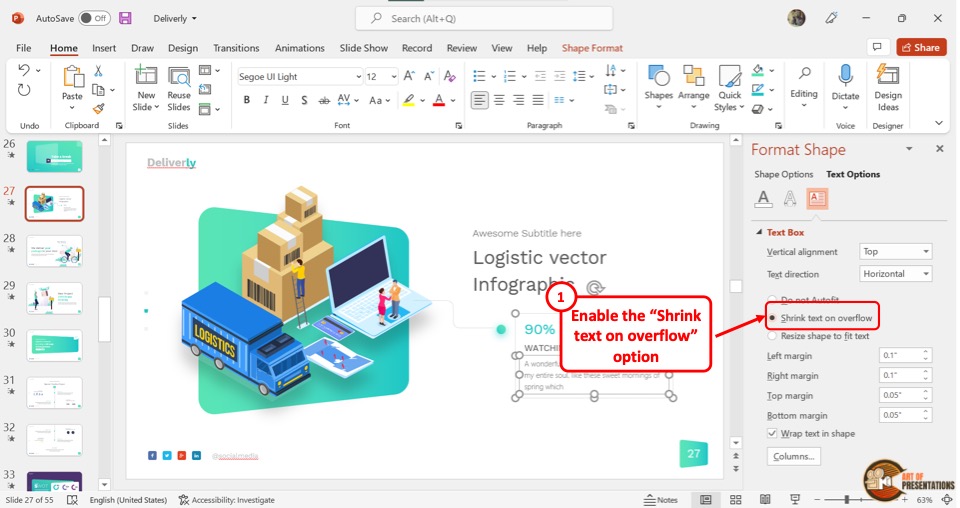
Now all you have to do is click on the “Shrink text on overflow” option in the “Format Shape” sidebar to enable the feature.
5a. How to Prevent Font Size From Changing Automatically?
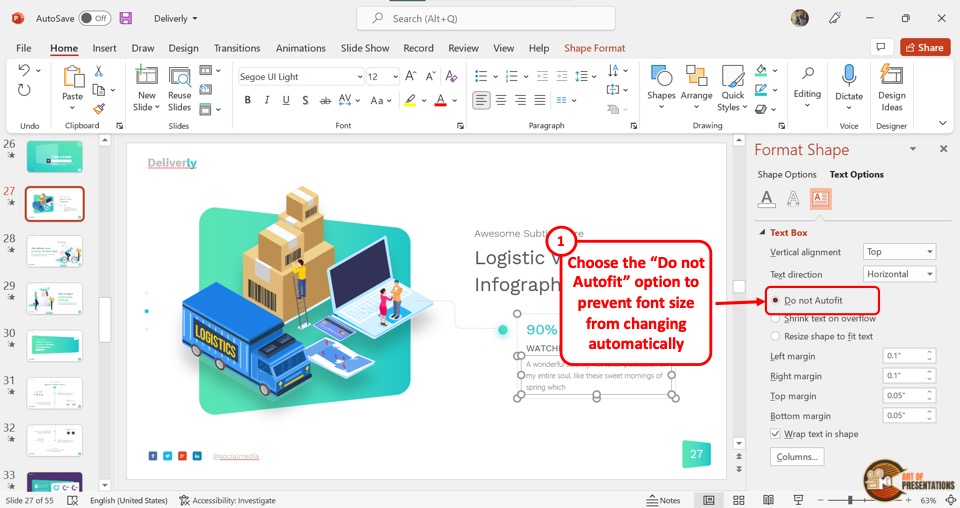
You can also stop the font size from changing automatically with the size of the text box. All you have to do is click on the “Do not Autofit” option in the “Format Shape” sidebar on the right side of the screen.
6. How to Change Font Size of Notes in PowerPoint?
The notes in Microsoft PowerPoint can be used as speaker notes, or even printed out for your audience. Using the “Notes Master” in PowerPoint , you can change the font size of the notes.
Here’s a quick overview of what you need to do –
Step-1: Click on the “Notes Master” option
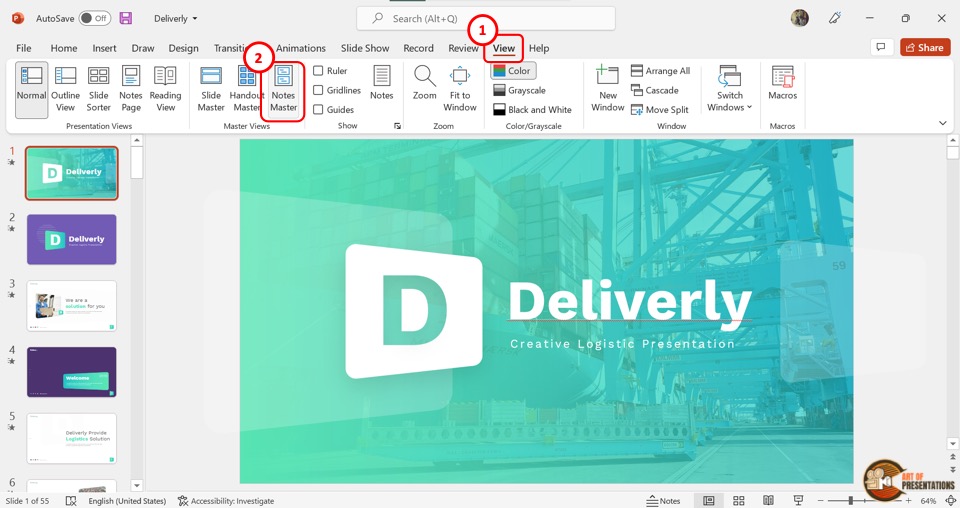
The first step is to click on the “View” tab to open the “View Options in PowerPoint”. Then click on the “Notes Master” option in the “Master Views” group of the “View” menu.
Step-2: Click on the “Home” tab
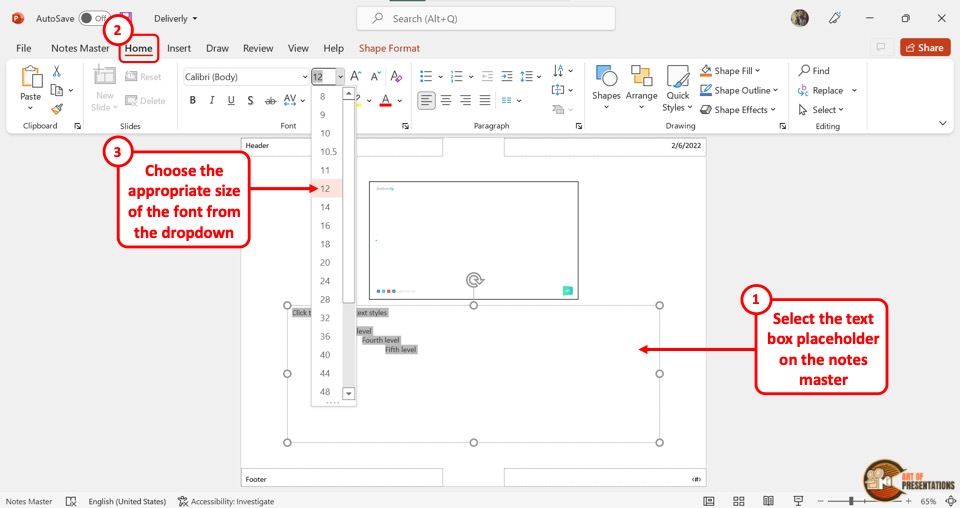
In the “Notes Master” screen, you have to now select the entire text or a bullet level in the placeholder to change its font size. Then click on the “Home” tab in the menu ribbon located at the top of the screen.
Step-3: Click on the “Font Size” box
In the “Font” group of the “Home” tab, click on the “Font Size” box. Then select a font size option from the dropdown menu or type a font size in the box (as shown in the image in step 2).
You can also click on the “Increase Font Size” button next to the “Font Size” box to increase the font size. Click on the “Decrease Font Size” button to decrease the font size of the notes.
Step-4: Click on the “Close Master View” button
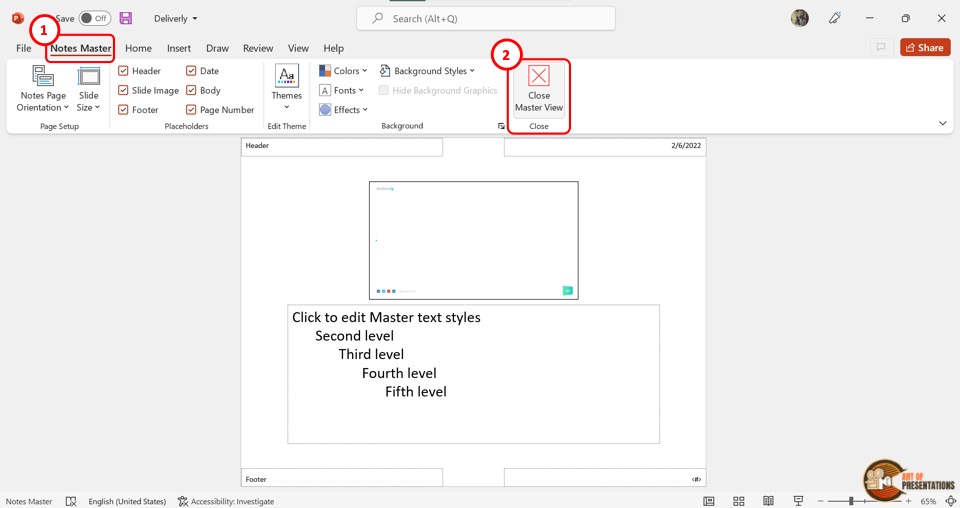
The final step is to click on the “Notes Master” tab in the ribbon menu located at the top of the screen.
Then click on the “Close Master View” button which is the last option in the “Notes Master” tab to save the changed font size for the presentation notes.
7. How to Change Font Size of Footer in PowerPoint?
In Microsoft PowerPoint, the footer present at the bottom of all slides in a presentation is editable in the master slide.
You can change the font size or even edit the footer in PowerPoint using the “Slide Master” view. Here’s what you need to do –
Step-1: Click on the “Slide Master” option
In the menu ribbon located at the top of the screen, you have to first click on the “View” tab. Then click on the “Slide Master” option in the “Master Views” group of the “View” menu. This will open the “Slide Master” view.
Step-2: Click on the footer
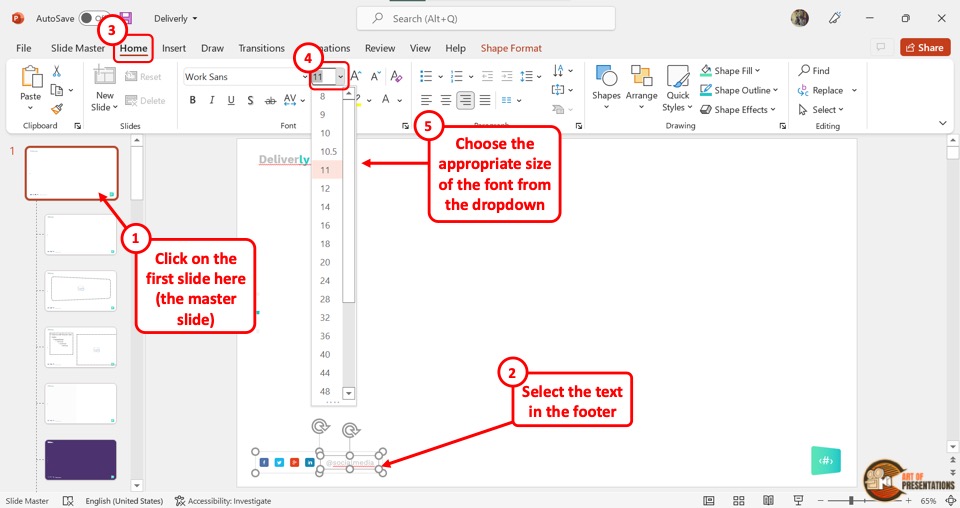
In the “Slide Master” view, click on the master slide which is the top slide in the slide layout pane on the left side of the screen.
Now you have to highlight the text in the footer section located at the bottom of the master slide.
Step-3: Click on the “Font Size” box
The next step is to click on the “Home” tab in the menu ribbon. In the “Font” group of the “Home” menu, click on the “Font Size” box.
You can now select a font size for the footer from the dropdown menu or type in your preferred number in the “Font Size” box (as shown in the image in step 2).
Step-4: Click on the “Close Master View” option
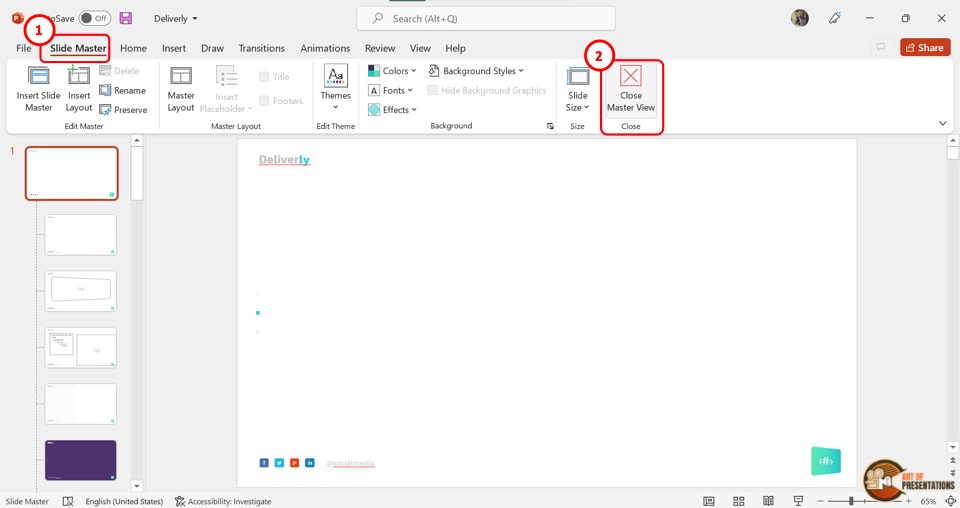
Finally, you have to click on the “Slide Master” tab in the menu ribbon of the “Slide Master” view. In the “Slide Master” tab, click on the “Close Master View” button to save changes to the font size of the footer and return to normal view.
8. Change Font Size of Data Label of a Chart in PowerPoint?
Sometimes, you also want to change the font size of data labels on a chart in PowerPoint. Well, you can do that too. You can change the font size of each label separately or for the entire chart at once. Here’s how –
8a. Change Font Size of a Single Label
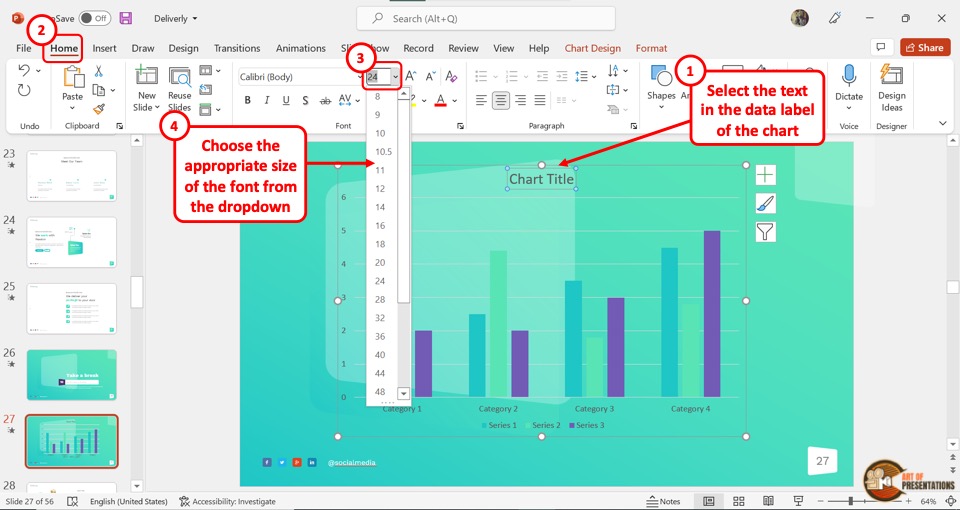
To change the font size of a single label in a PowerPoint chart, click on the label to select it separately. Then click on the “Font Size” box in the “Font” group of the “Home” menu to enter your preferred font size.
You can alternatively click on the “Increase Font Size” icon or the “Decrease Font Size” icon next to the “Font Size” box repeatedly until the label reaches your preferred font size.
8b. Change Font Size of All Labels
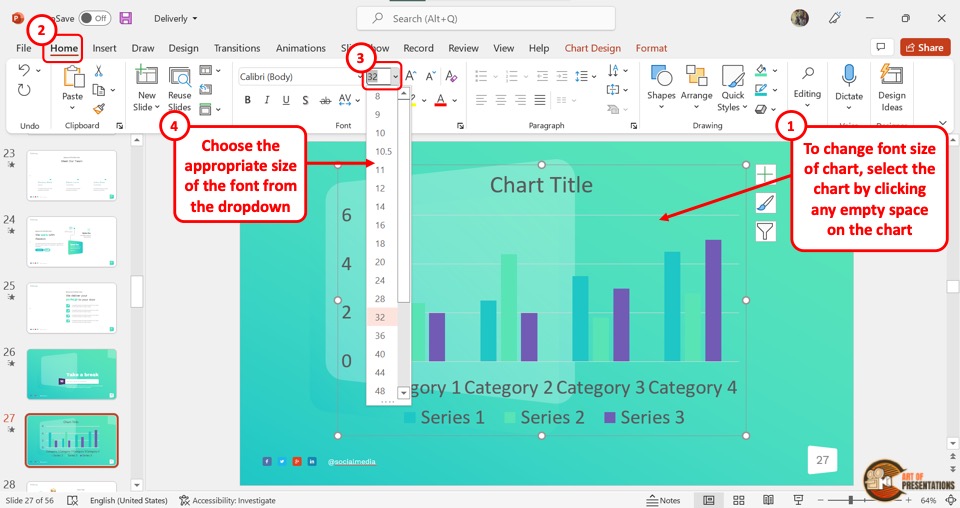
To change the font size of all the labels in a chart at once, click on an empty space inside the chart. This will select the entire chart on a slide.
Now all you have to do is enter your preferred font size in the “Font Size” box in the “Font” group of the “Home” tab in the menu ribbon. You can also select a font size from the dropdown list under the “Font Size” box.
9. What is the Minimum Possible Font Size in PowerPoint?
In Microsoft PowerPoint, the lowest possible font size is 1 point. You can click on the “Font Size” box in the “Font” section of the “Home” menu, and enter any number between 1 to 3600. However, the least possible font size available in the dropdown list under the “Font Size” box is 8 points.
10. Can’t Change Font Size in PowerPoint? Here’s What to Do!
If you cannot change the font size of a text box in PowerPoint, it is likely that the text box is inserted into the master slide or the slide layout.
In the “Slide Master” view, any inserted object except the placeholders is not editable in the normal view.
To be able to change the font size, you have to open the specific slide layout in the slide master view, select the text box, and change the font size of the text.
Step-1: Click on the “View” tab
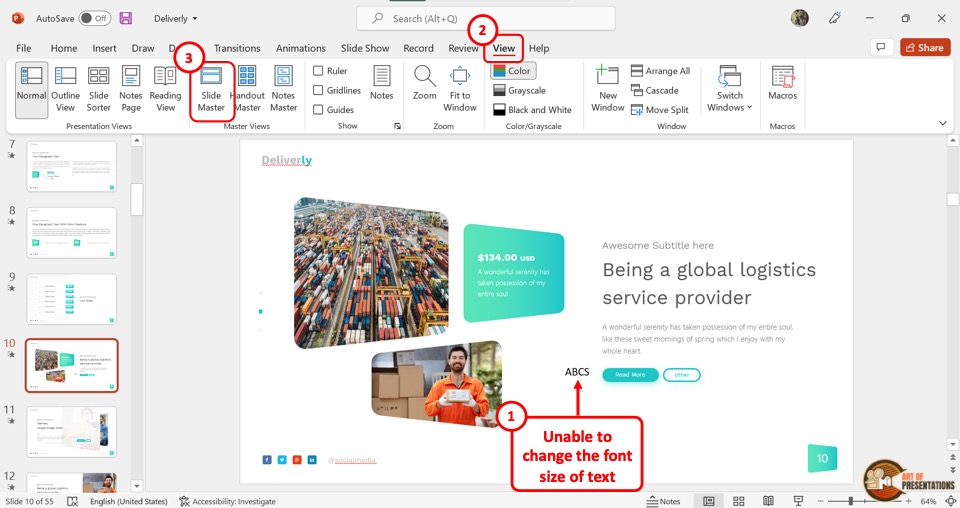
The first step is to click on the “View” tab in the menu ribbon located at the top of the screen. In the “View” menu, click on the “Slide Master” option.
Step-2: Click on the text box
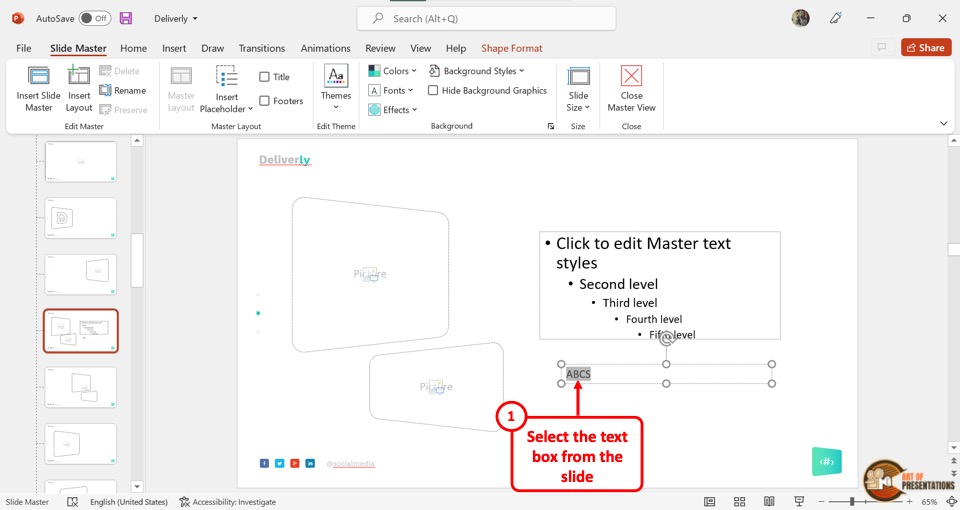
In the slide layout pane of the “Slide Master” view, click on the slide layout containing the uneditable text box. Then highlight the text inside the text box.
Step-3: Click on the “Font Size” box
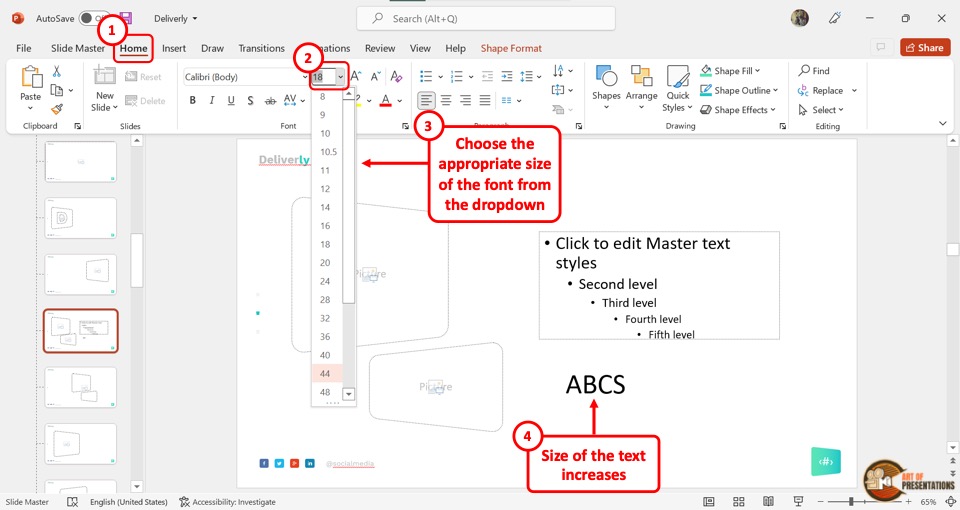
The next step is to click on the “Home” tab in the menu ribbon of the “Slide Master” view. In the “Font” group of the “Home” menu, click on the “Font Size” box. Now all you have to do is type in your preferred font size for the text.
Step-4: Click on the “Close Master View” option
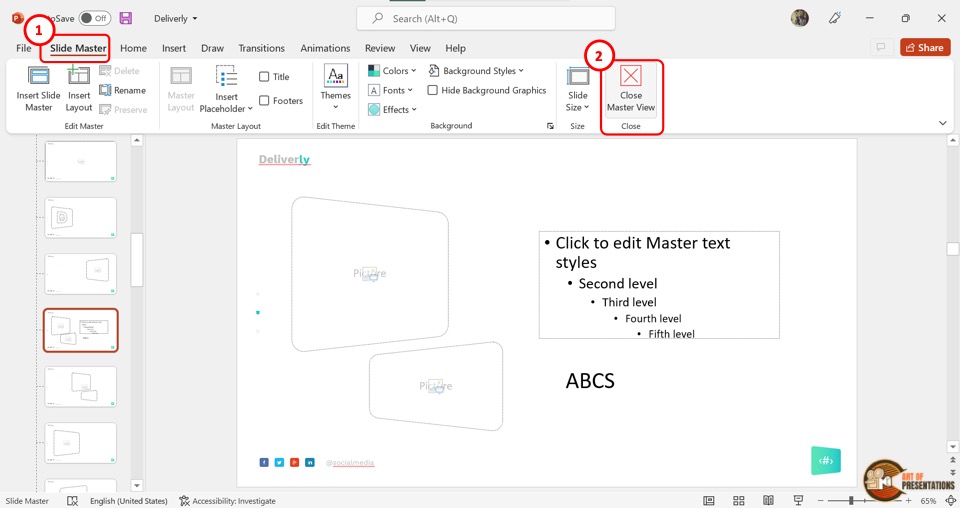
Finally, you can click on the “Slide Master” tab in the menu ribbon. In the “Slide Master” menu, click on the “Close Master View” option to save the changes to the font size of the text box.
Credit to pressahotkey (on Freepik) for the featured image of this article (further edited)