
PowerPoint is a hugely underrated design tool! It comes packed with pretty much all the basic features that are needed for a designer when using high-end design software! But, with all its abilities, can PowerPoint convert slide animations and transitions to GIF files?
You can easily convert Slide Animations to GIF files in PowerPoint. Simply, go to “File”, then click “Export”. Choose the quality of the GIF file, and the number of seconds to be spent on each slide. Finally, click “Export”.
While it is pretty straightforward to create animated GIFs using PowerPoint, there are a few things that one should keep in mind. Let’s learn more about it below.
How to Convert PowerPoint Slide Animation into GIF? (Step by Step)
Let me first share with you the detailed steps that are involved in creating a GIF file using PowerPoint. That way, you’ll find it easy to learn, and we both will be on the same level of understanding.
So, here are the steps that you need to take to convert a PowerPoint slide animation to GIF files –
Step 1 – Make Sure that Your Presentation is Complete
This is an easy step to miss out. It is important to first make sure that your presentation is complete. By doing so, you will surely avoid duplication of efforts and definitely save some time.
A quick way to check if your presentation is prepared to be converted to GIF is by putting your presentation in the slide show mode. This way, you get to check all the animations and transitions involved and whether they are functioning as planned.
If there is something amiss, now would be a good time to fix that. Once that’s done, repeat the check until you arrive at the final version of the presentation.
Step 2 – Select the Export Option
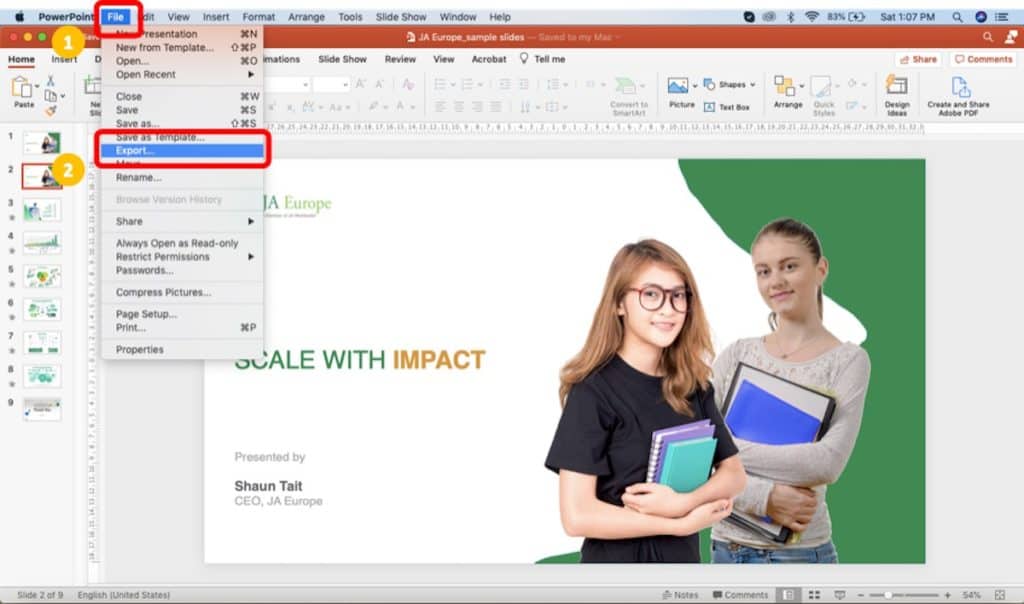
The next step in converting your presentation to a GIF file is to select the export option.
To do so, simply click on “File” button, and from the dropdown, select “Export“.
Step 3 – Choose “Animated GIF” File Type
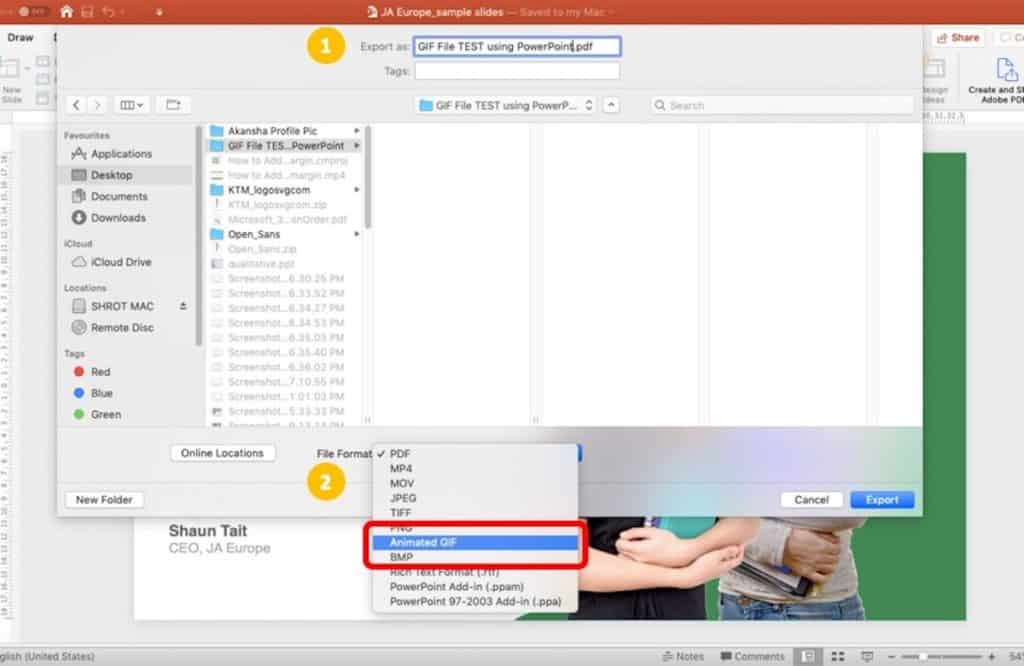
In the next step, make sure that you first select the folder location on your computer where you want to export the slides as GIF file.
Then, in the “File Format” option, click on the dropdown. You will notice that there is an option for “Animated GIF“. Make sure that you select that.
Step 4 – Adjust the Quality and then Export
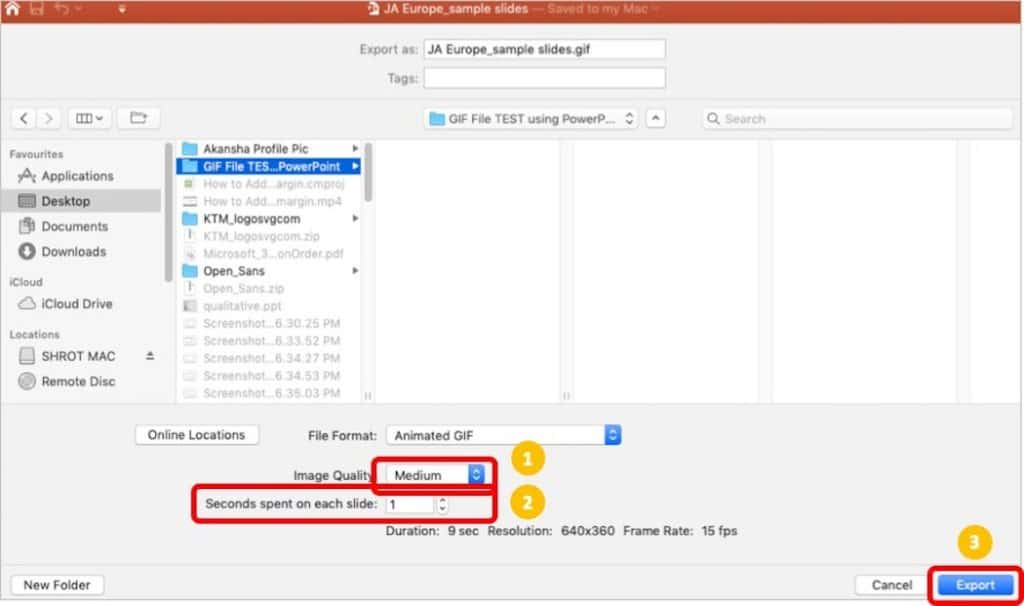
The last step is to tweak a few settings before clicking the export button.
Choose the quality of the GIF File that you would like. Medium quality is a good option for most purposes. Likewise, I would recommend to go with 1 seconds for each slide. But, you can change that to the way you like.
One thing to note is that if you set it to higher quality and more number of seconds for each slide, the size of your GIF files will increase. So, do keep that in mind.
Finally, once you’ve fine-tuned the settings, click “Export“.
Timing the PowerPoint Slides when Converting to GIF Files
When you convert your PowerPoint slides with animations and transitions into GIF files, you may notice that the final output has a longer duration than 1 second per slide!
What I mean by that is if you have 8 slides in your presentation with several animations and transitions , and you choose to go with “1 sec per slide” setting (as explained in step 4 above), then the output GIF file is not just 8 seconds long, but often much longer.
This is because any timings that are set for transitions between slides are not considered in the “Seconds Spent on Each Slide” setting. Furthermore, if animations on a particular slide are longer than 1 second, that particular slide will take more than 1 second even in the GIF file.
Simply put, if your presentation has animations that are longer than “Seconds Spent on Each Slide” setting, then the full length and timing of those animations are considered in the GIF file.
Furthermore, another issue that arises is when the slides are longer than 1 seconds, the transition looks snappy in the GIF files.
An easy way to fix this could be by looping your presentation first, and then exporting the presentation as “Animated GIF” file type.
We wrote a detailed article with step by step explanation on how to loop your presentation using PowerPoint. Make sure that you check it out!
Things to Remember when Exporting PowerPoint Slides into GIF
There are a few things that you should keep in mind when exporting all the animations and transitions on your PowerPoint slides into a GIF file. These are as follows –
1. Hidden Slides are Skipped Automatically
The GIF files that are produced from PowerPoint slides will skip through any slides that are hidden in your Presentation.
So, before you export your presentation, make sure that you have all the necessary slides visible and not hidden. Also, make sure that you only have the slides that you need to include in the GIF file as PowerPoint doesn’t allow you to select specific slides for your GIF file.
2. GIF file will Include all Animations, Transitions and Media
One thing that we need to note is that the GIF file that is produced by exporting PowerPoint is quite similar in nature to how a presentation would work in a slide show mode.
Any transitions, animations or even media including videos will be included in your GIF file. So, in case you don’t want specific videos to be included, you can use a screenshot of that video as a thumbnail before you export the presentation into GIF file format.
3. GIF files produced will be Continuous Looping Type
PowerPoint only has the capability to produce continuous looping GIF file types. So, keep that in mind when exporting your powerpoint slides as a GIF file.
Caveat to the Above Method
While the introduction of GIF files dates back to 1987, it is only recently that the GIF files gained massive popularity when Facebook and other major social media platform added support for animated GIF files.
Microsoft has also followed the trend. The ability to convert PowerPoint slides with animations and transitions is only limited to Microsoft Office 365 and later versions.
Thus, converting PowerPoint slides and animations into GIF files in the older versions of PowerPoint is a bit tricky, and not possible directly.
If you don’t have an Office 365 subscription yet, I highly recommend that you get one. It comes packed with several other advanced features that transform your presentation! Click on this link to get a 30-day FREE trial! (Hint – Make sure you scroll all the way down to the section just above FAQs, and you’ll find a link to “Try FREE for 1 month”. Alternatively, do a Ctrl+F and search for “Try FREE for 1 month” on the page).
How to Make GIFs using PowerPoint 2010 or Older?
If you are not having the latest version of Microsoft PowerPoint, don’t worry, there are ways you can make GIF files even though PowerPoint doesn’t allow it directly!
I’ll be sharing two of the easiest methods that you could use –
Method 1 – Using Online Tools
One of the easiest methods to convert your presentation to GIF files is by online tools.
There are several online tools that convert PPT to GIF for FREE. The ones that I would recommend are ZamZar and Online-Convert. While both function quite seamlessly, I noticed that online-convert showed results faster.
The process is quite simple, but for convenience, let me lay out it for you –
Step 1 – Open the URL in your Internet Browser
Simply click on the link that I’ve provided to you above and it will automatically open in a new tab.
Step 2 – Upload Your PowerPoint Presentation
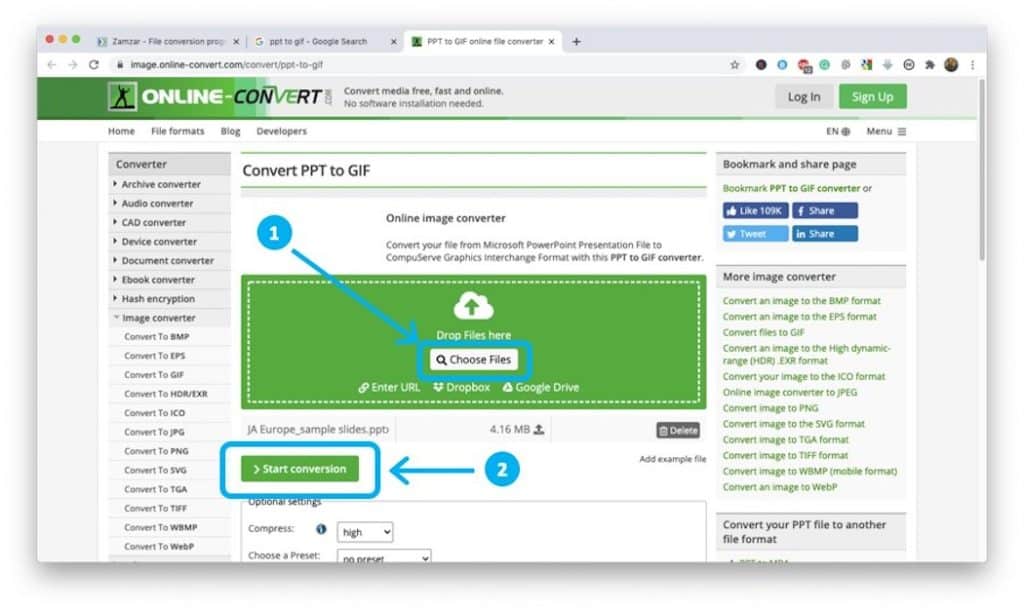
The next step is to upload your PowerPoint presentation that you need to convert to GIF file format.
You can either click on “Choose Files” or simply drag and drop from the folder in the green box directly.
Make sure you adjust the settings of the output format of the GIF file as per your desire below on the page on the same web page.
If you are not sure what settings to change, leave everything as it is.
Then, click on “Start Conversion”.
Step 3 – Download the GIF file
The website may take some time to convert the PPT file to GIF file. Be patient. If your presentation file was a bit too heavy, you may want to come back in a few minutes.
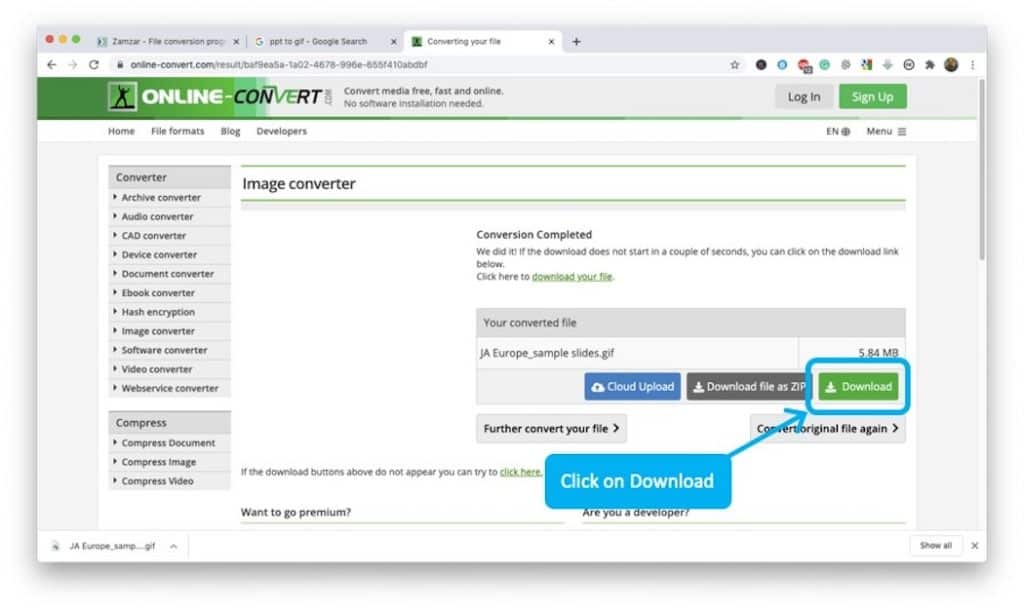
Once the file has been converted to GIF file format, you will see a screen as shown above.
Simply click on the “Download” button, and save it to the desired location on your computer.
One of the biggest drawbacks of this method is that most online tools that convert your PPT to GIF file format will not retain the animations and transitions!
So, this method works great when you want a GIF file and you don’t have any animations on your presentation.
If, however, you do have animations and transitions and you are using PowerPoint 2010 or older, you can make use of the next method.
Method 2 – Save PowerPoint Animation as Video
Another way to create GIF files version of your presentation is to save your presentation as a video.
This method does involve a few additional steps, but will definitely enable you to retain all the animations and transitions!
Here are the steps that you need to follow for this method –
Step 1 – Prepare to Export your Presentation
Click on “File” in the menu bar, then from the dropdown select “Export”.
Step 2 – Choose “MP4” File Format
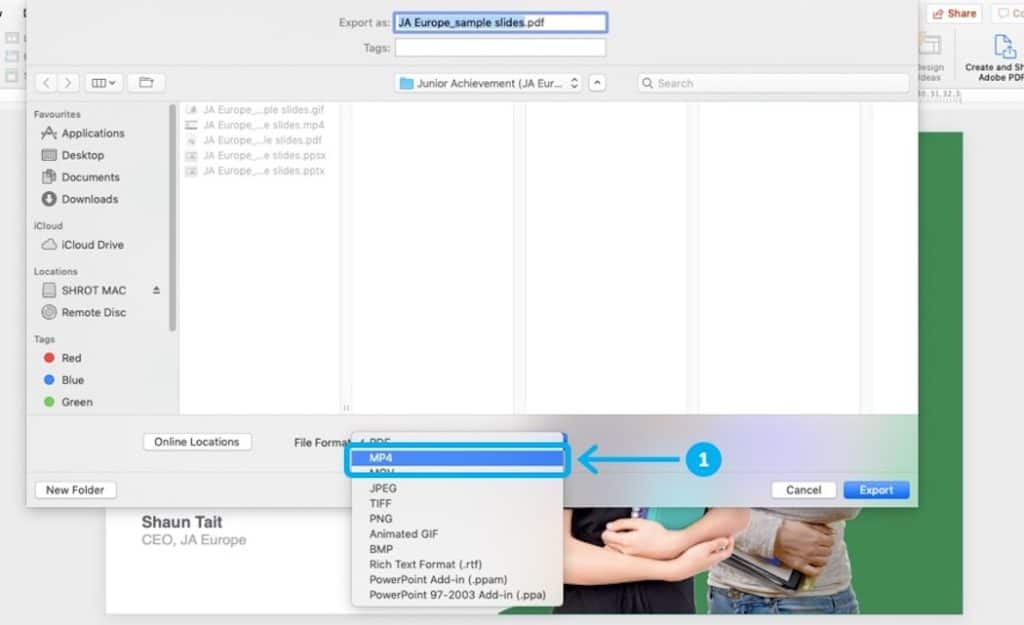
In the next step, make sure that you click on the dropdown option next to “File Format”, and the select “MP4”.
Step 3 – Adjust the Quality and then Export
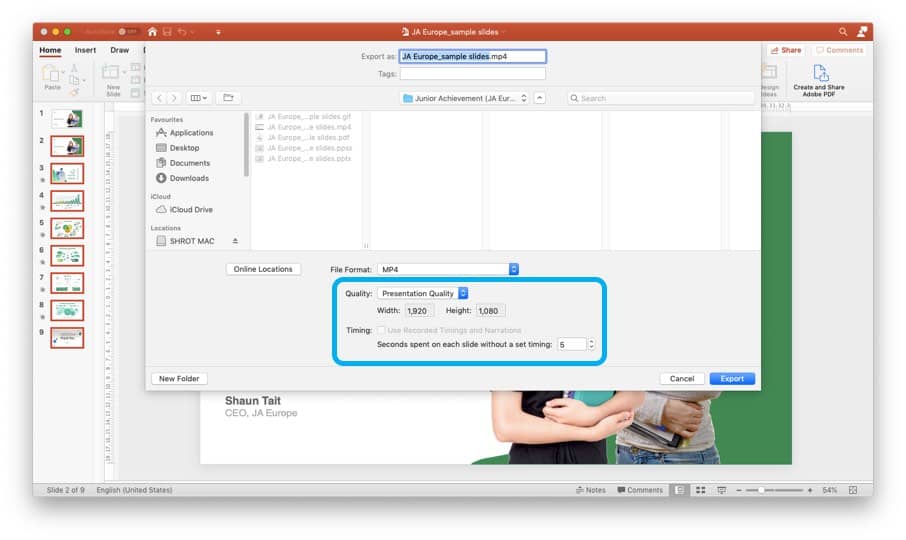
Now, make sure that you change the settings as required. Exporting it as “Presentation Quality” will produce the best result, but it will also produce a video with a big file size. So, make sure that you choose an option that works best for you.
Once you’ve changed the settings to adjust the quality, click on “Export“.
At this point, you have managed to successfully extract a video version of your PowerPoint presentation. Just make sure to double-check if all the animations and transitions are working as expected.
Once we’ve done that, we shall move on to the final step.
Step 4 – Convert Video to GIF File
The last step in the process is to convert the video that we just extracted from PowerPoint to a GIF file.
To do that, we shall take the help of an awesome FREE online tool called EZGIF.
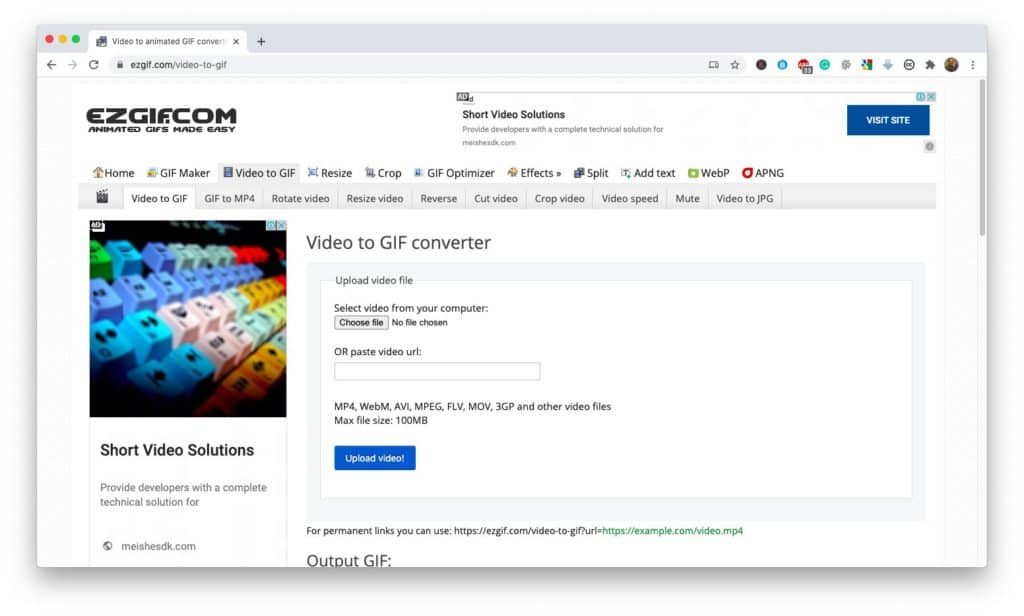
Click on the link shared above, and you’ll see an option to upload your file to convert it to GIF.
Once uploaded, you will get a few settings to control exactly how your video file gets converted to a GIF file.
If you are not sure what settings to choose, simply leave all the options as is, and then click convert.
Once your file is converted to a GIF file format, you’ll see a preview below on the same page. You’ll also see an option to download the GIF file.
Click on the Download button and save the GIF file in the desired location on your computer.
You now have successfully converted your PowerPoint presentation with animations into a GIF file!
How to Insert GIF Files into a PPT?
Now that you have learned how to convert your PowerPoint presentation with animations and transitions into a GIF file, you may want to know how exactly can you use this GIF file in another presentation.
Inserting GIF files into a PowerPoint Presentation is easy. Simply go to the “Insert” tab, then click “Pictures”. You will be prompted with a dropdown menu with a few options. Simply click “Pictures from File”. Browse to the location on your computer where the GIF file is saved, and click “Insert”.
The process is quite similar to how you would insert any other image from a local folder on your computer.
You can also copy (Ctrl+C) and paste (Ctrl+V) the GIF file directly on the slide.
Final Thoughts
We may often not realize the powerful capabilities of Microsoft PowerPoint especially when it comes to creating graphic designs. PowerPoint not only has the ability to create animations and transitions, but it also has the ability to convert these animations along with your content into a GIF file format.
The method is pretty straightforward, but it can be cumbersome especially if you don’t have the Office 365 version of PowerPoint.
We also looked at some of the other methods in which you can convert a presentation into GIF file format. These methods, although involve several steps, can be very useful especially if you don’t have the latest version of PowerPoint.
I hope you found the post helpful. Make sure to check out some of the other content on our site. Our goal is to make the process of creating presentations easier for you!