![How to Autoplay and Loop Google Slides? [Complete Guide!]](https://artofpresentations.com/wp-content/uploads/2021/03/Featured-Image-Loop-Your-Google-Slides-Presentation.jpg)
Making your presentation slides autoplay can be really helpful especially when you want to setup the presentation during an event! That way, you can completely focus on delivering a presentation rather than worrying about clicks to change the slide! But, you may wonder whether you can make Google Slides autoplay?
You can auto-advance slides in Google Slides by clicking on “Present” in the top right corner of your screen. Then, move your cursor and you will see a menu bar. Click on the “Gear” icon. Select “Auto-advance” and choose a time delay. You can also use the “publish to web” feature to Autoplay slides.
But, that’s just the crux of it. In this article, I am going to explain to you how you can set up autoplay in Google Slides in a complete step-by-step manner! Plus, I will also share with you tips on how you can loop videos using Google Slides!
So, without any further delay, let’s get started!
A Quick Note Before We Begin – if you want to make jaw-dropping presentations, I would recommend using one of these Presentation Designs. The best part is – it is only $16.5 a month, but you get to download and use as many presentation designs as you like! I personally use it from time-to-time, and it makes my task of making beautiful presentations really quick and easy!
How to Get Google Slides to Autoplay?
Google Slide is full of useful features that give users the ability to create professional-quality presentation slides. One of those features is “Autoplay.”
To know how to use this feature in Google Slides, follow the step-by-step guide given below:
Step 1: Open Publish to the Web Option
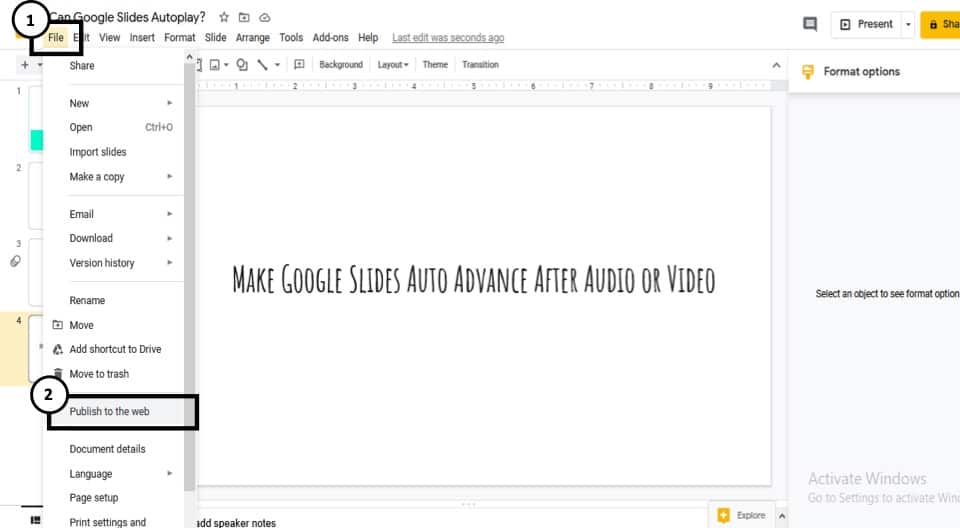
First, open the presentation slides file into Google Slides. Once the file is open, click on “File” located on the top left corner of the screen. From the dropdown menu, select the “Publish to the web” option.
Step 2: Click on Link
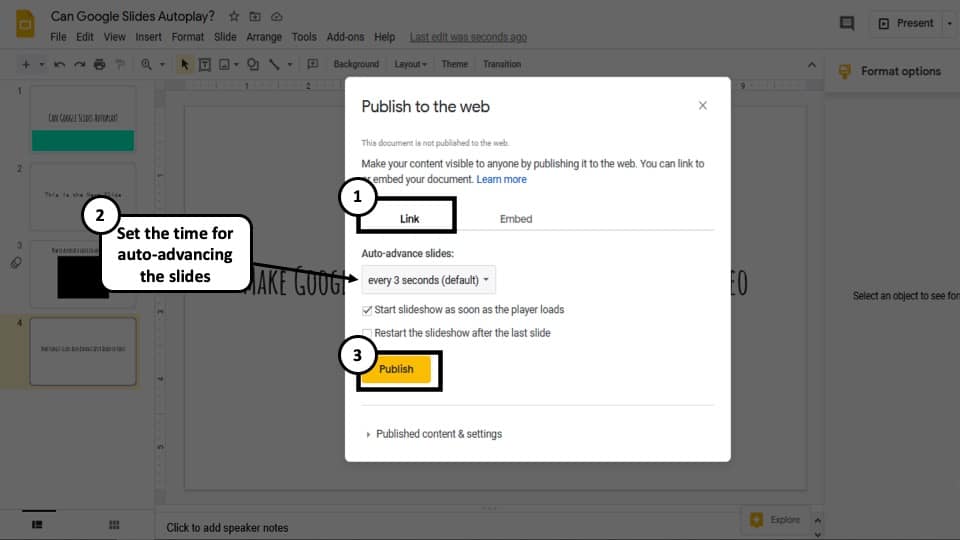
This will open a new dialogue box. From there, select “Link” or “Embed”. If you select the “Link”, it will only give you the option to set the time delay. By selecting “Embed” you will be able to set the slide size as well as the time delay between the slides.
Step 3: Set the Time for Auto Advancing Slides
Now select the time delay between each slide. You can set 1, 2, 3, 5, 10, 15, 30, or 60 seconds as time delay in Google Slides. Check the “Start your slideshow as soon as the presentation loads” option.
Step 4: Publish Your Presentation
Finally, click on “Publish.” This will give you a link to access your slide if you chose “Link” in step 2.
Step 5: Copy the Link and Share
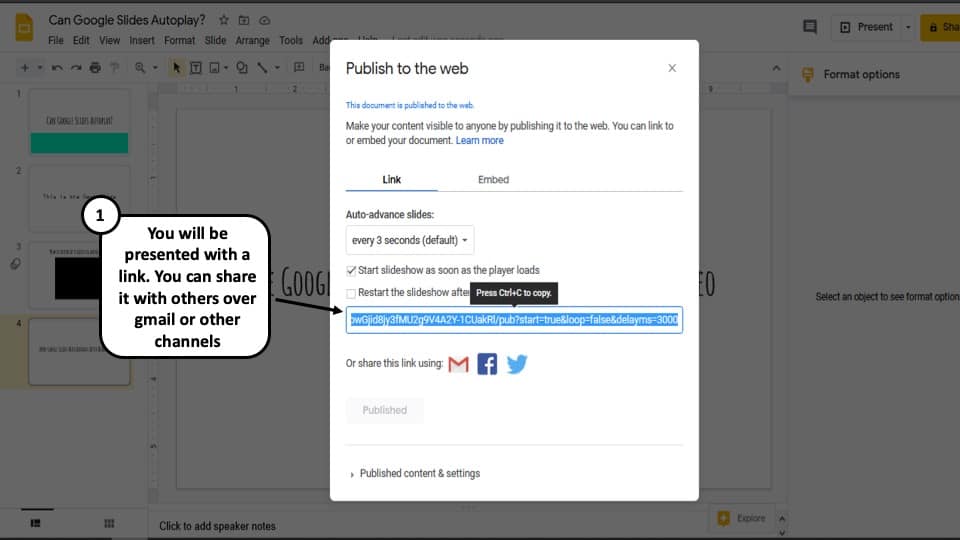
Just make sure to copy and share the link with your audience. Whenever someone uses this link to open your presentation slide, it will start playing as soon as they open it.
If you choose “Embed” in step 2, it will give you an embed code. This is useful if you want to publish your presentation on a website. Whenever someone visits that site, the presentation slides will start playing automatically.
But, what if you don’t want to share the Google Slides presentation with others and instead want to do this to your own presentation? Let’s learn how to do that in the next section.
How to Make Google Slides Auto-Advance without Publishing?
You can also make your google slides auto advance without publishing it to the web! Google added this feature recently to Google Slides.
Here’s how to auto-advance slides in Google Slides without publishing it to the web –
Step 1 – Enter the Presenter Mode in Google Slides

You need to first enter in the presenter mode in Google Slides. To do that, simply click on the “Present” option from the top-right corner of your Google Slides screen or press “Ctrl+F5“.
Step 2 – Set Your Slides to Auto Advance
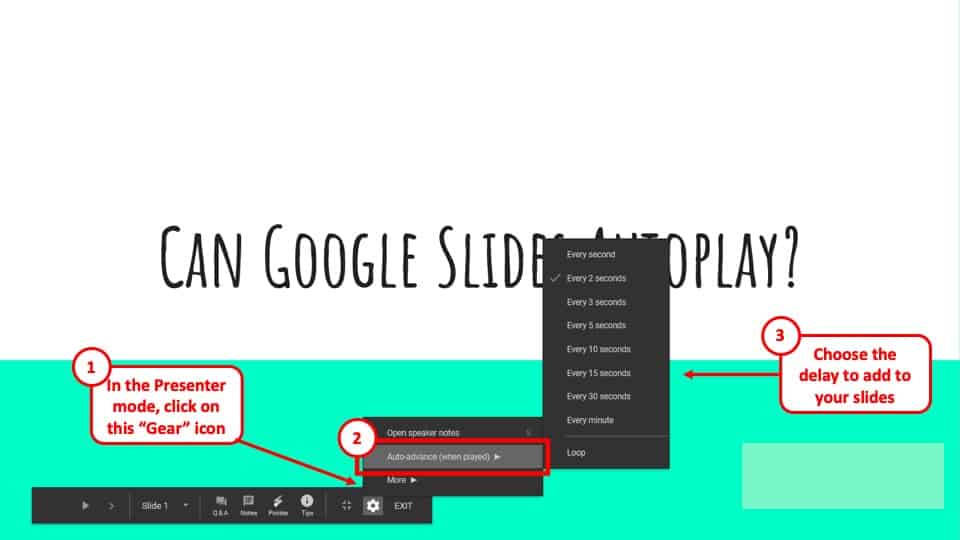
When your presentation enters the full-screen mode, simply click on the gear icon on the options menu at the bottom of the screen. A drop-down menu will pop open. Click on the “Auto-advance when played” option. Finally, choose the delay timing for each slide for auto-advance.
How to Loop Google Slides?
You can loop your Google Slides presentation while auto-advancing your slides in both the methods mentioned above.
Let’s look at the 1st method first (when publishing to the web)
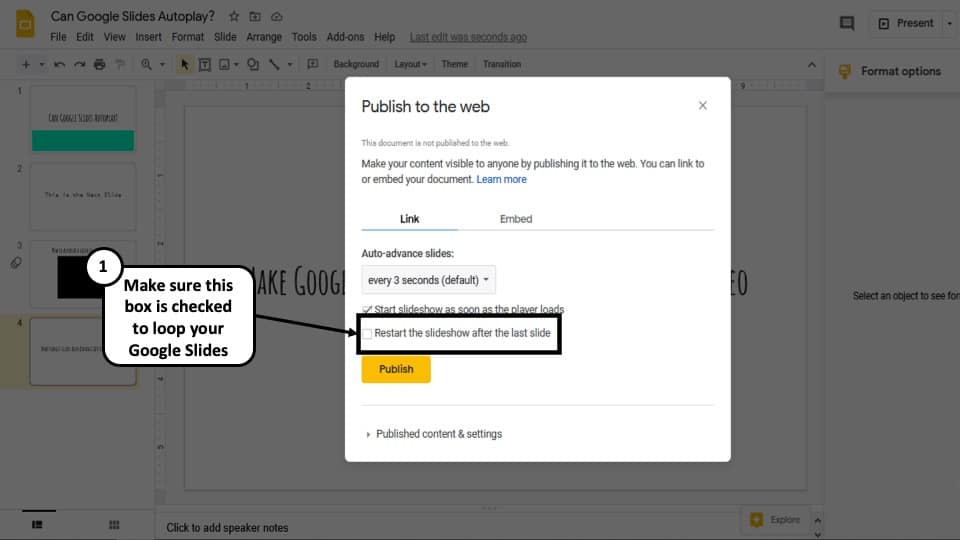
You will just have to check the “Restart the slideshow after the last slide” option as well while generating a link to publish to the web. The rest of the steps shall remain the same as before. By doing so, you will be able to loop your Google Slides.
Now, you can also loop your Google Slides presentation without publishing your presentation to the web. Here’s how to do this –

In the presenter mode, simply click on the “Gear” icon. Next, click on the “Auto-advance” option. In the next menu, click on “Loop“.
Both the above methods can help you loop your Google Slides presentation.
How to Autoplay a Video in Google Slides?
On top of auto-playing your Google Slides, you can also autoplay the videos that are embedded in the slide. To do that, follow the steps given below:
Step 1: Add a Video to Your Google Slides
Open the presentation slide file in “Normal View” in Google Slides. Add a video to your Google Slides presentation. If you are unsure of how to do that, then check out this guide on how to add a video to Google Slides.
Step 2: Open Format Options for the Video
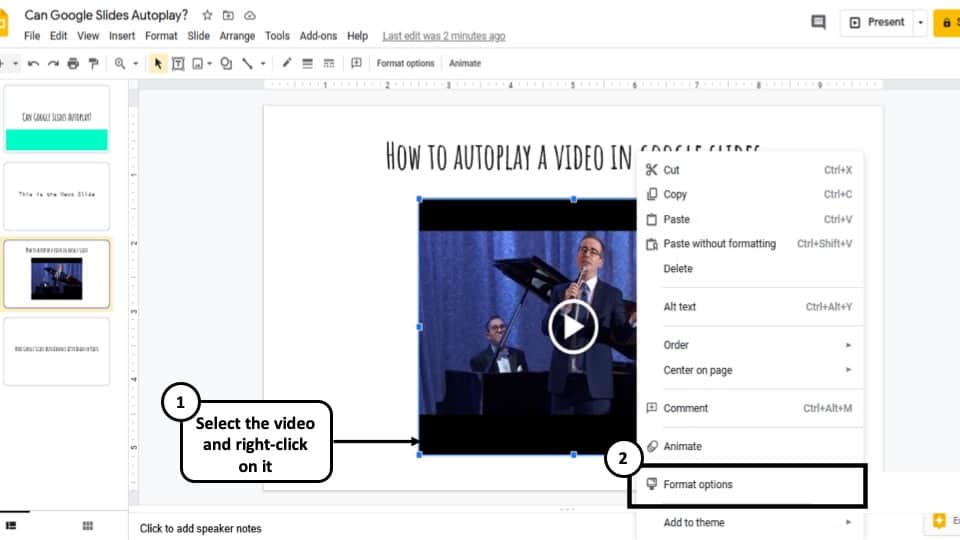
Now select the video, right-click on it and select “Format option”. Or you can also select “Format” from the menu bar located on the top of the screen. From the dropdown menu select “Format option”. This will open a new panel on the right side of the screen.
Step 3: Set Video Playback to Play Automatically
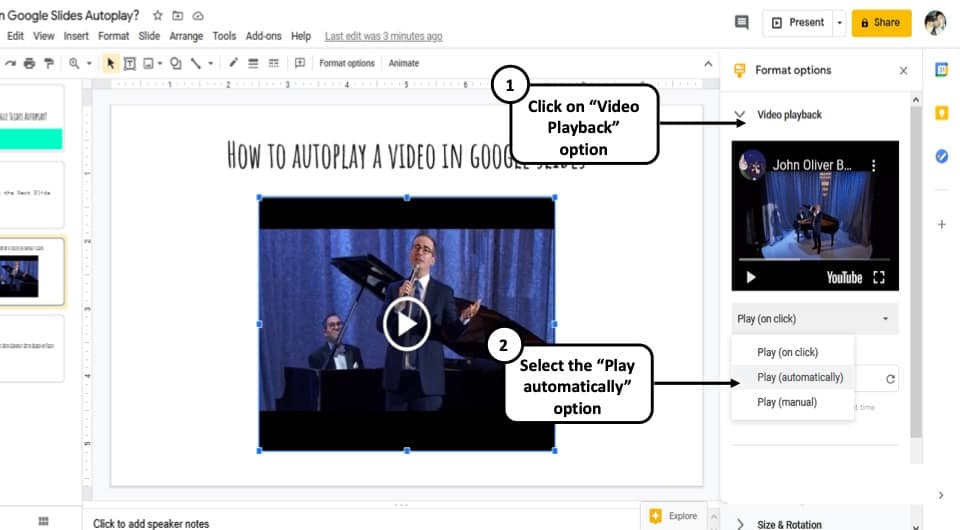
From the format options panel on the right of your screen, click on “Video playback” and select “Play (automatically)”.
That’s all you have to do. Now whenever you open this slide in the “Present” mode, the video will start playing automatically.
Can You Loop a Video in Google Slides?
Google Slides allows you to loop a video as well in addition to setting it to play automatically!
To loop a video on Google Slides, follow the steps given below:
Step 1: Open Presenter Mode in Google Slides
Open the slide into “Present” mode in Google Slides.
Step 2: Loop the Video
Right-click on the embedded video and select “Loop”. And that’s it.
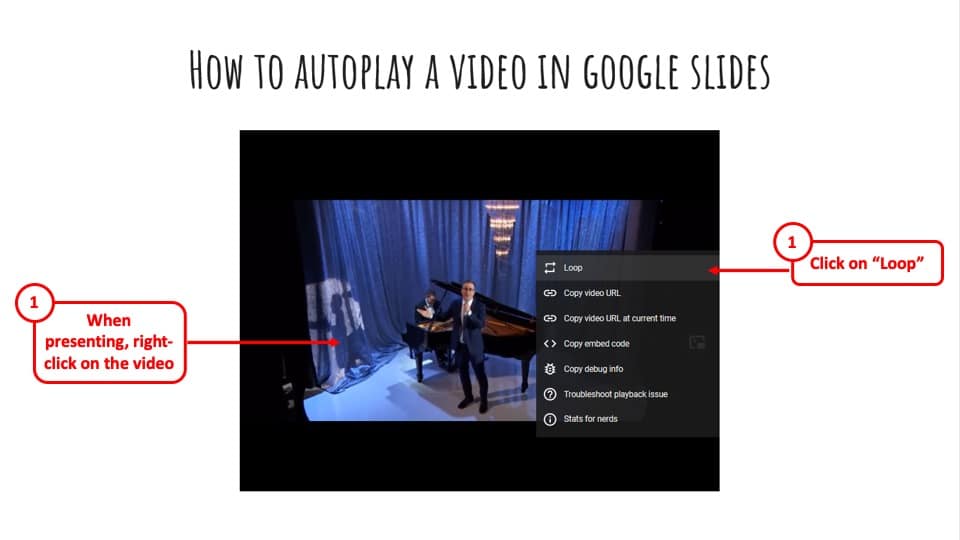
Note: This is more of a video player setting rather than a Google Slides feature. As a result, you will have to do it manually every time you want to play a video on loop. On top of that, it will not work on YouTube videos if you set it to show only a portion of the entire video. So, it’s not really useful for anyone.
Make Google Slides Auto Advance After Audio or Video
To make Google Slides move to the next slide automatically after playing audio or video, you can use the “Auto-advance” feature. To know how to use this feature in Google Slides, follow the step-by-step guide given below:
Step 1: Open the Presenter Mode in Google Slides
First, go to the “Present” mode in Google Slides. After opening the slide, click on the “Present” button located on the top right corner of the screen or press “Ctrl+F5”.This will open the slide in “Present” mode.
Step 2: Click on the Gear Icon
Once you are in the “Present” mode, click on the grey “⚙ (gear)” icon located at the bottom of the screen. This will open the settings menu.
Step 3: Select Auto-advance Option
From the settings menu, select “Auto-advance (when played)” and select a time that you think suitable for you.
Step 4: Add the Autoplay Time Delay
Once you are done setting up the autoplay time, press the play icon located at the bottom left corner of the screen. Now your slides will keep moving automatically after a video or audio is played.
Note – The only drawback to this method is that this process will activate auto-advance settings for all the slides in Google Slides and not just the slide that contains the video or audio. At the time of writing this article, there is no such option that exists yet.
How to Set a Time for Auto Advance in Google Slides?
You can set a specific time delay for auto-advance in Google Slides. You can do that by following the same steps that are used to make Google Slides auto-advance after playing a video or audio. Currently, the time increments in Google Slides include 1, 2, 3, 4, 10, 15, 30, or 60 seconds.
Remember – One thing to keep in mind, the time delay that you’ve set will be applied to all your slides. And this might not be enough for some slides as they will need a longer time to present.
In that case, you can duplicate those slides twice or as many times as you like depending on your needs. This will give you enough time to deliver your message to the audience properly.
How to Stop Google Slides from Auto Advancing?
It is really annoying when the slides automatically advance to the next one when you click by mistake while giving a presentation in the “Present Mode”. When the slides auto-advance (especially when you didn’t do it on purpose), it not only looks unprofessional but also breaks the flow of your presentation!
Although, there is no direct way in Google Slides that you can use to prevent that. But don’t worry, there is a way that you can use to stop your slides from auto-advancing. Take a look at the steps given below:
Step 1: Open the Google Slides Presentation
Open the slides in the “Normal” view.
Step 2: Insert a Rectangle Shape
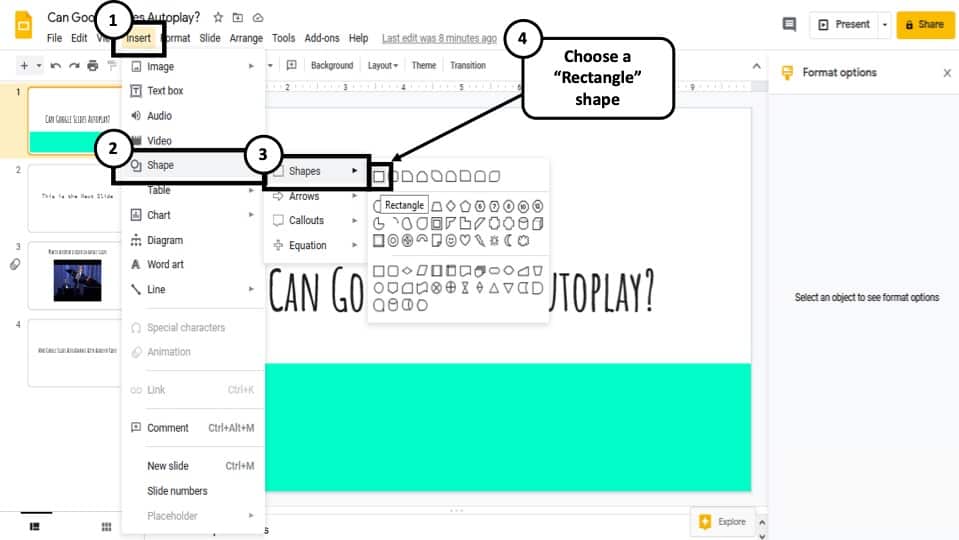
Now inset a box shape in the slide. To do that, click “insert>Shape>Shapes” and then select the box. Make the box as big as the size of the slide.
Step 3: Add a Link to the Rectangle Shape
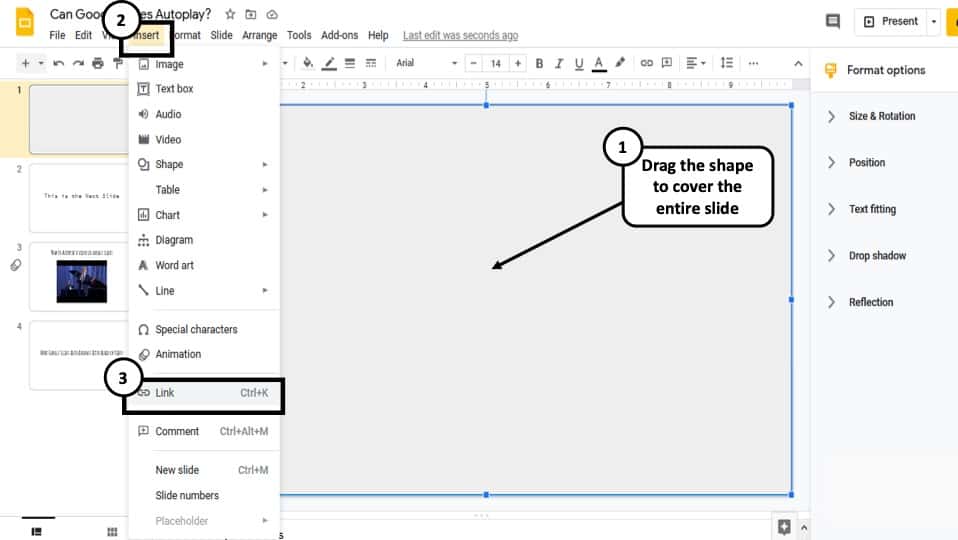
Link the box to the corresponding slide by selecting the box and then clicking “Insert>Link” from the main menu located on the top of the screen.
Step 4: Link the Shape to the Corresponding Slide
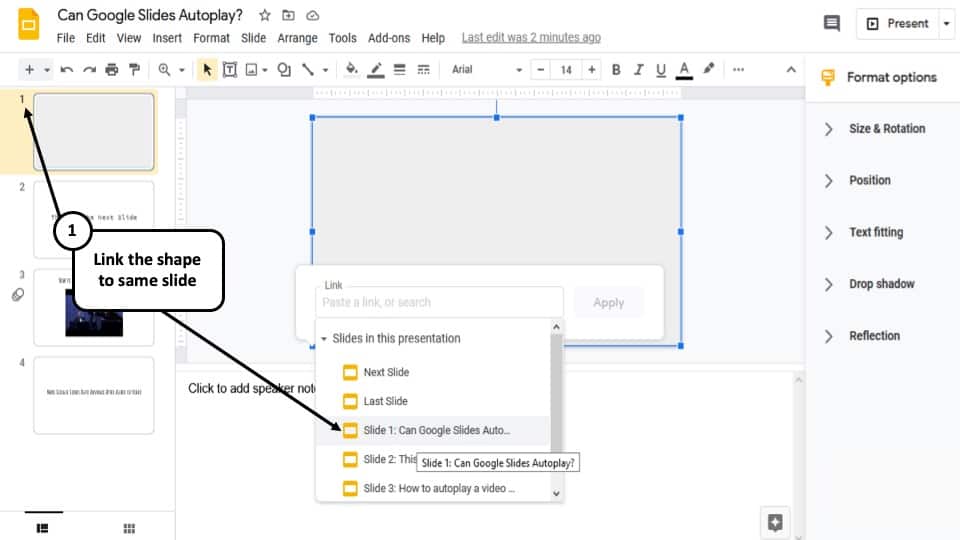
Now choose the slide you want to link it to and hit “Apply”. It will always have to be the slide that is containing the box. So, in the above example, the rectangle shape has been added to slide 1. Thus, the shape needs to be linked to slide 1.
Similarly, if you are adding a shape on the 2nd slide, then link it to slide 2, and so forth.
Interesting Fact:
Linking a rectangle to the same slide ensures that even if we click on the slide somewhere in the “Present” mode, Google Slides will reference it back to the same slide; thereby preventing auto-advance to the next slide by mistake.
Step 5: Send the Shape to Back
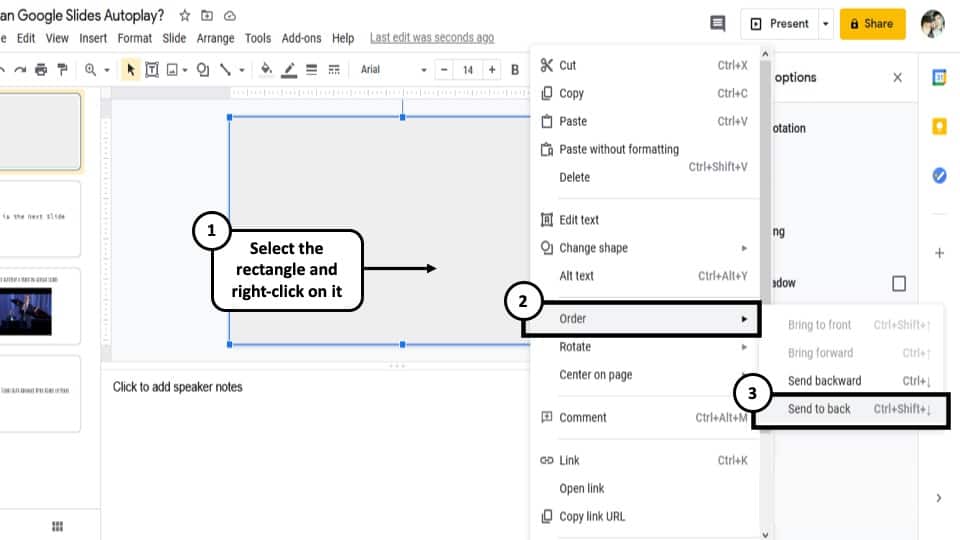
Select the box and right-click on it and select “Order”. Then, click on “Send to back.”
Step 6: Link all Other Elements to the Same Slide
Now select all other text boxes and elements present on that slide that are not working as buttons and link them to that corresponding slide just as we did in step 4.
Step 7: Change the Shape Fill Color to White
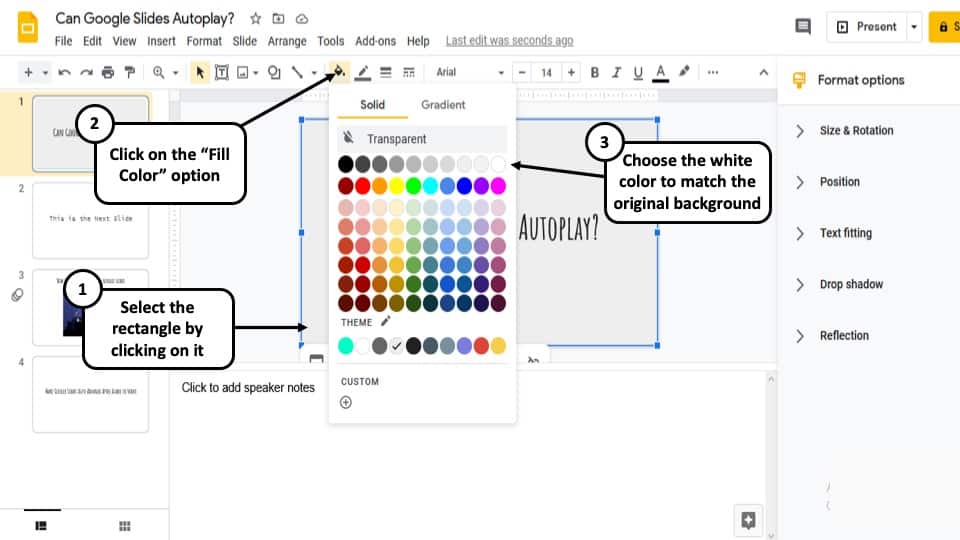
Now select the box again, select the “Fill color” option and click on transparent.
Step 8: Repeat the Procedure for All Your Slides!
Now repeat the procedures from step 2 to step 7 for all the remaining slides. Once, you are done, your slides will not auto-advance even if you click anywhere in the slide by mistake.
More Related Topics
- How to Fix Almost Anything on Google Slides! [A Comprehensive Troubleshooting Guide]
- Do Presentation Clickers Work with Google Slides? [Interesting Read!]
- How to Curve Text in Google Slides? Always Use THIS Trick!
- How to Use the Eyedropper Tool in Google Slides? [Even When This Tool Doesn’t Exist!]
- 17 Pros and Cons of Google Slides! [Should You Even Use it?]
- How to Give a Presentation on Zoom? [Step-by-Step Guide!]
Credit to Cookie_Studio for the Featured Image of this article