![How to Add Bullet Points in Google Slides? [An EASY Guide!]](https://artofpresentations.com/wp-content/uploads/2022/10/Featured-Images.jpg)
When creating your presentation, it is essential to keep it organized and comprehensive. Using lists to highlight the important points is a useful and attention-grabbing way that enhance the readability of your presentations.
To serve this purpose, you can add bullet points or numbered lists in Google Slides. Keep reading to learn how to add them to your Google Slides and make the key information stand out for your audience.
To add bullet points in Google Slides, first, click on the “Text Box”. Then, click on the “More” option in the toolbar. Next, click on the “Bulleted List” and choose a bullet style. You can also use the “Format” Option in the menu bar and choose “Bullets & Numbering” from the dropdown.
The shortcut to add or remove the bullet points is Pressing “Ctrl+Shift+8” on your keyboard.
Google Slides allows you to customize the bullet points of your choice as well as add sub-bullet points if you want to create a list format. This also goes the same with adding a Numbered List in Google Slides. You can easily add a multi-level numbered list, restart numbering or remove it if it does not look necessary.
Want to create an outstanding presentation with appropriate formatting? You should learn how to create a list format in Google Slides.
The following guide will explain the simplistic methods of adding bullet points using different options and more insight into the variety of bullet styles and features:
1. Add Bullet Points in Google Slides
The “Bullets and Numbering” feature in Google Slides includes various options to add and edit bullet points in a text box.
1.1 Method 1 – Using the Tool Bar
To add bullet points in Google Slides, you can use the “Bulleted list” available in the toolbar at the top of the screen. All you have to do is follow the 2 quick steps.
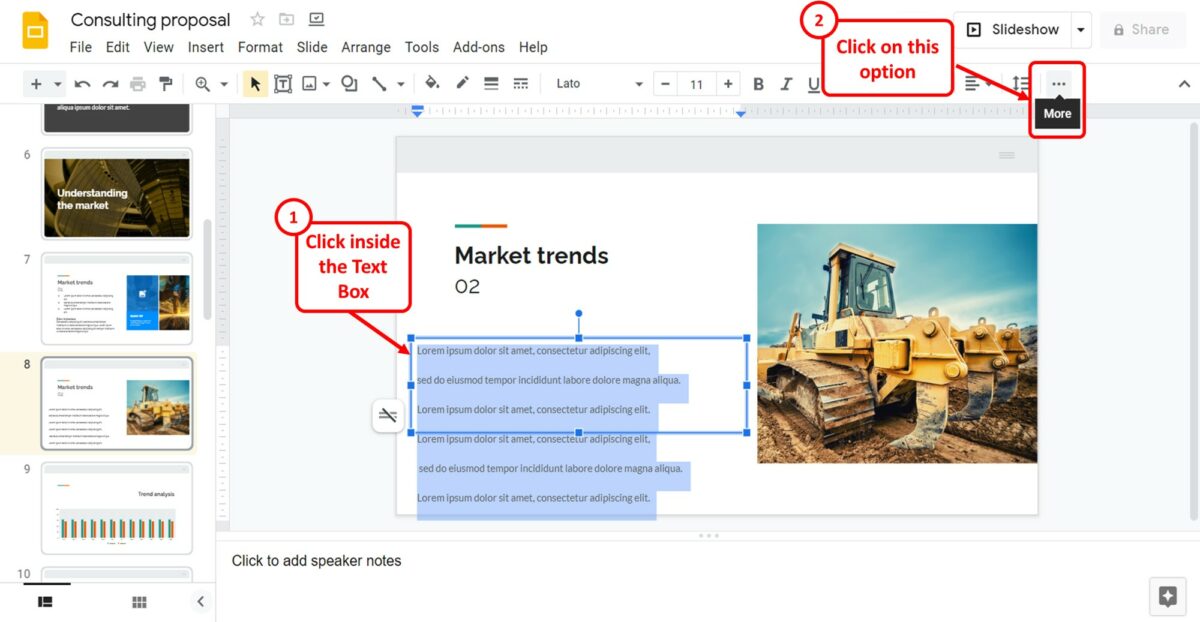
Step-1: Click on the “More” option
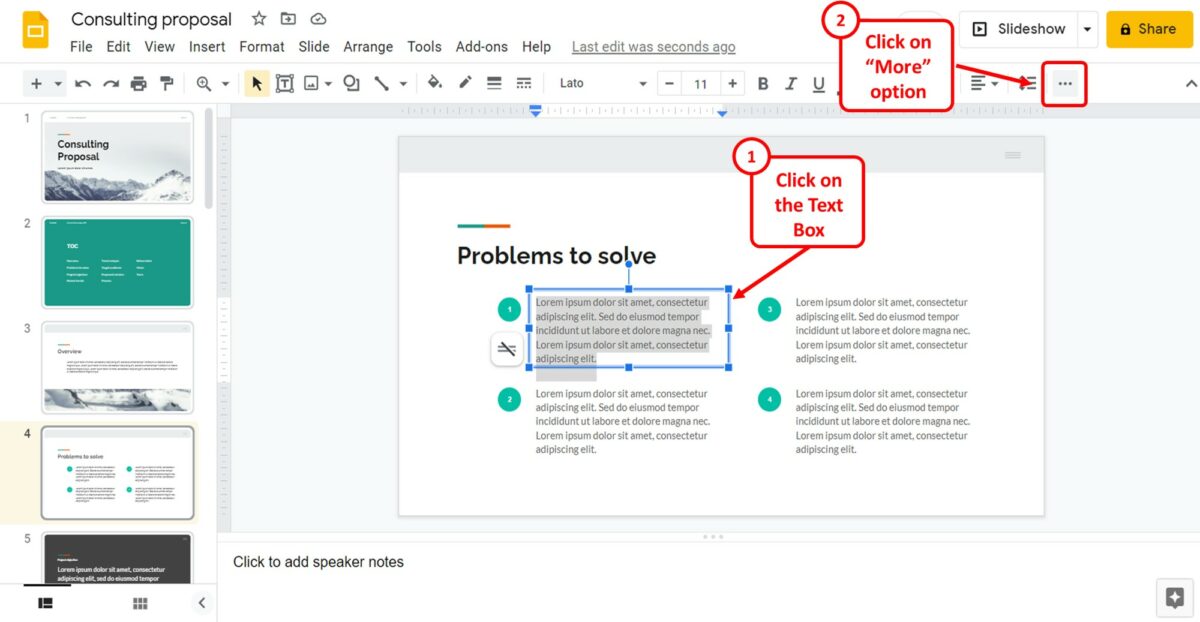
The first step is to click on the text box. In the toolbar located under the menu bar at the top of the screen, click on the “More” option.
Step-2: Click on the “Bulleted list” option
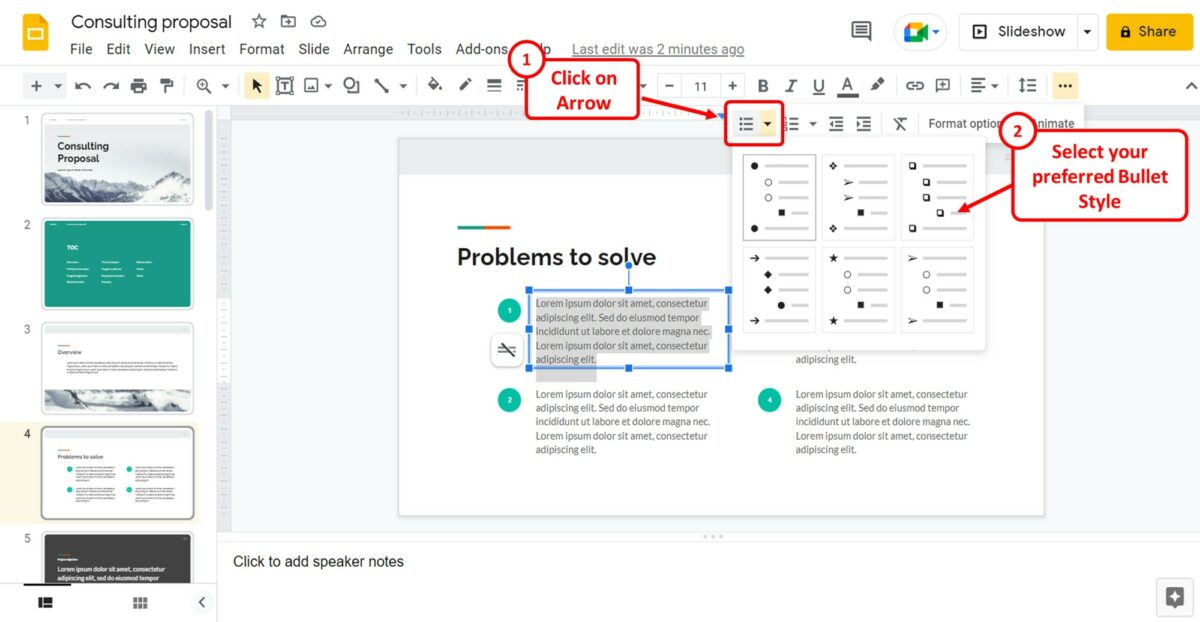
Under the “More” option, click on the arrow next to the “Bulleted list” option. It will open a dropdown list of the bullet styles available. You can now select your preferred bullet style for the bullet list.
1.2 Method 2 – Using the Format Tab
In Google Slides, you can find the “Bullets and Numbering” option in the “Format” menu. To add bullet points using the “Format” menu, follow the 2 easy steps.
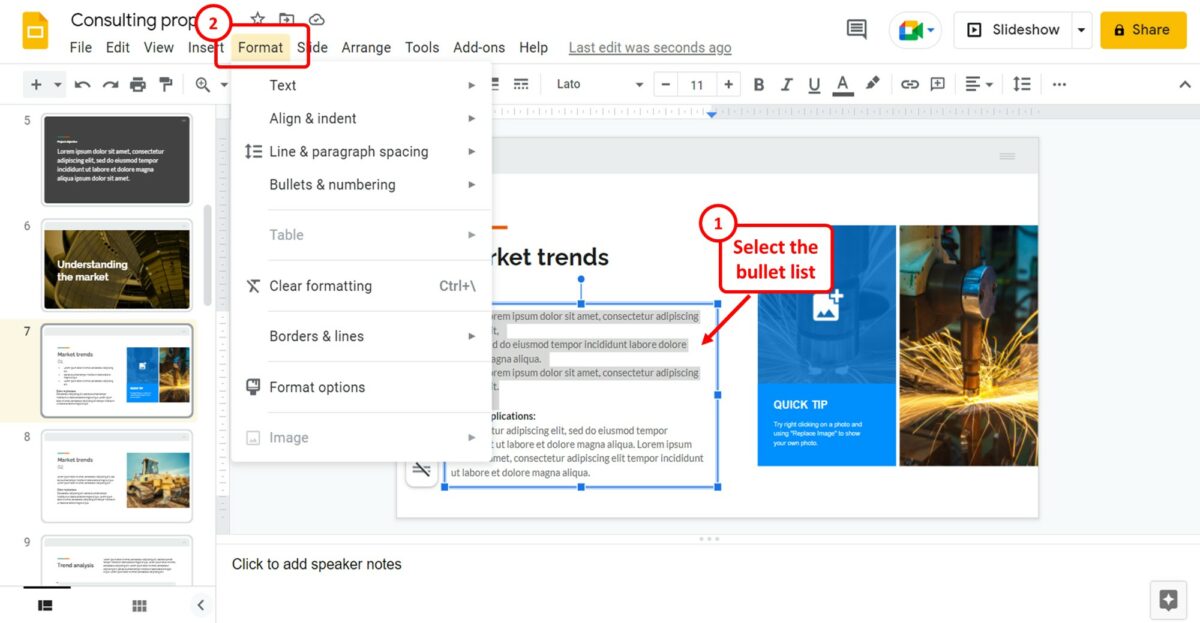
Step-1: Click on the “Format” option
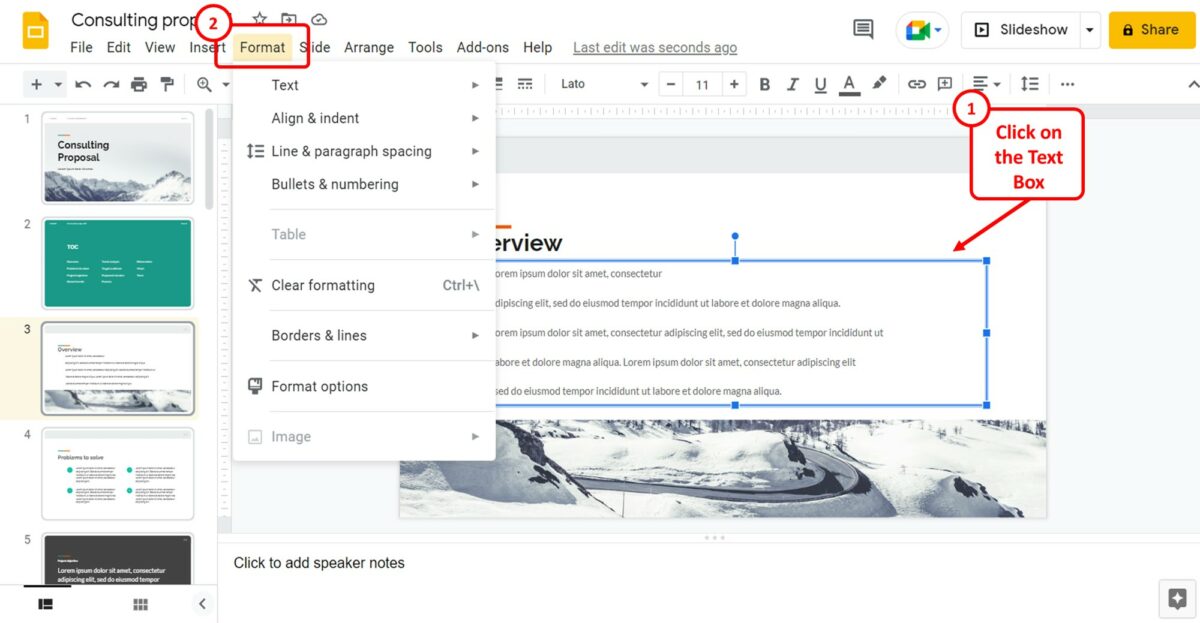
The first step is to select the text box where you want to add bullet points. Then click on the “Format” menu in the menu bar.
Step-2: Click on the “Bulleted list” option
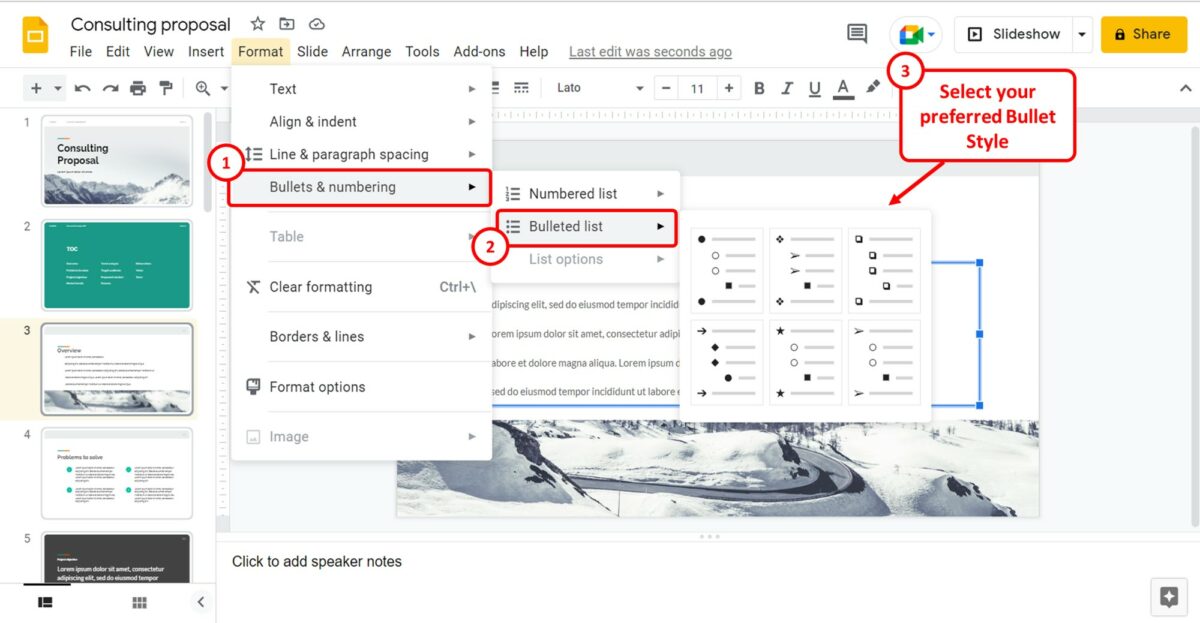
In the “Format” menu, click on the “Bullets and Numbering” option. Then click on the “Bulleted list” option in the dropdown menu that appears by the “Bullets and Numbering” option. You can now select a bullet style for the bullet list.
1.3 Shortcut to Add Bullet Points
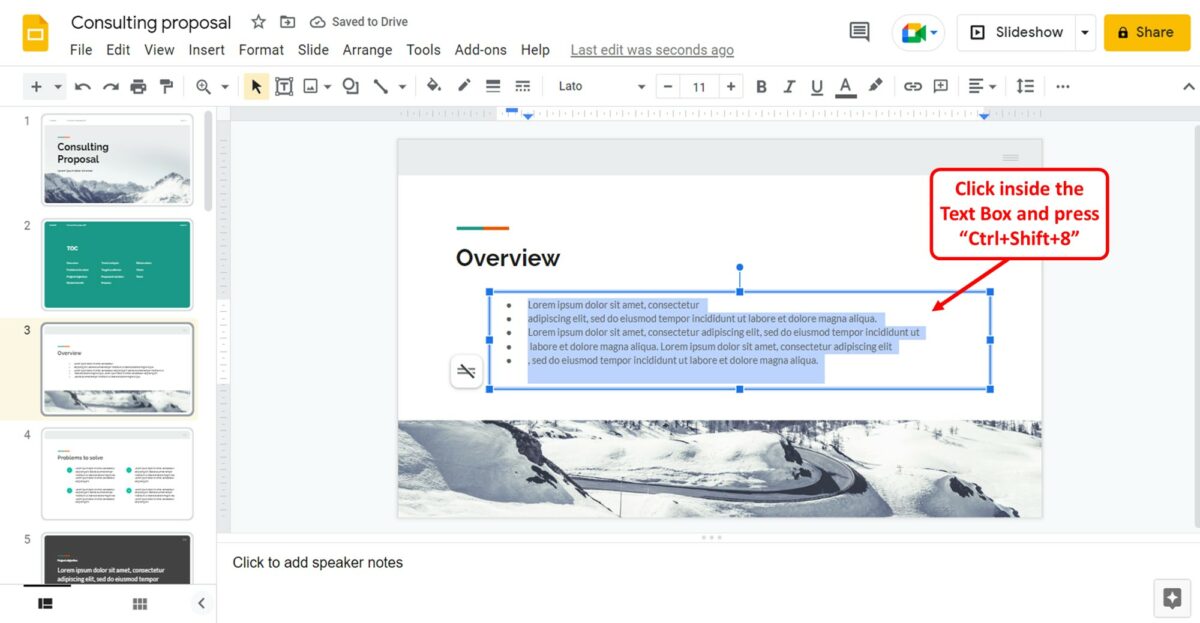
To quickly add bullet points to the text in a Google Slides slide, you have to first click inside the text box. Then all you have to do is press the “Ctrl+Shift+8” keys on your keyboard.
2. How to Add Sub Bullet Points in Google Slides?
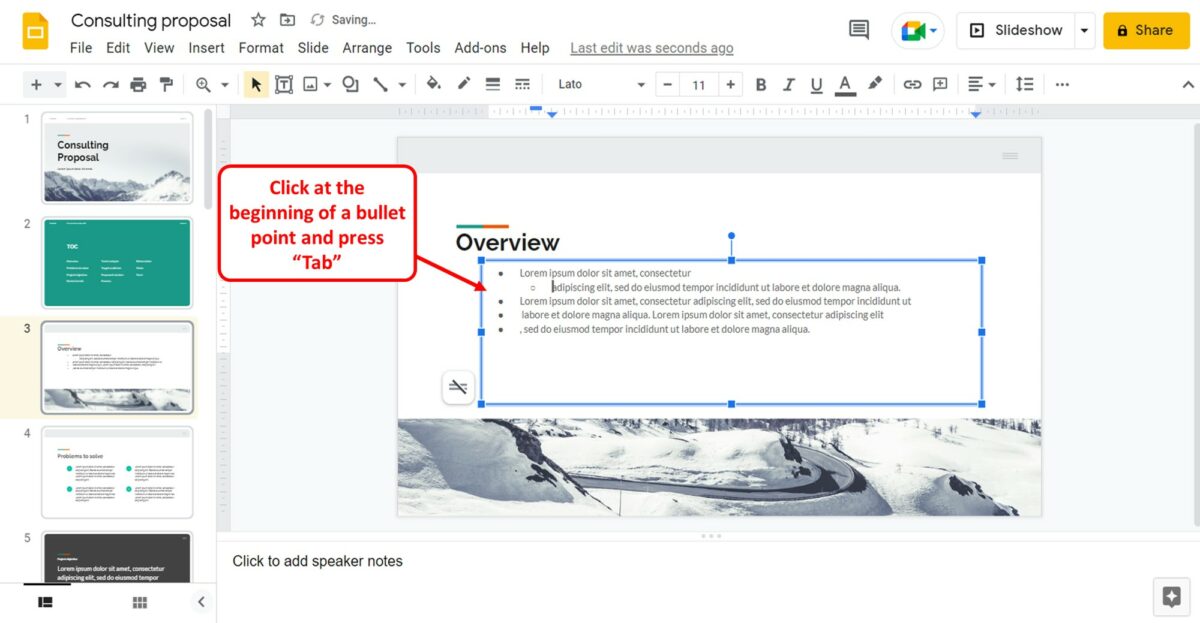
In Google Slides, there is no specific feature you need to use to add sub-bullets in a bullet list. All you have to do is click at the beginning of a bullet point. Then press the “Tab” key on your keyboard to turn the bullet point into a sub-bullet point.
3. How to Change a Bullet Points Style in Google Slides?
There are six styles available for bullet points in Google Slides. To change the style of the bullet point, follow the 2 simple steps.
Step-1: Click on the “Bulleted list” option
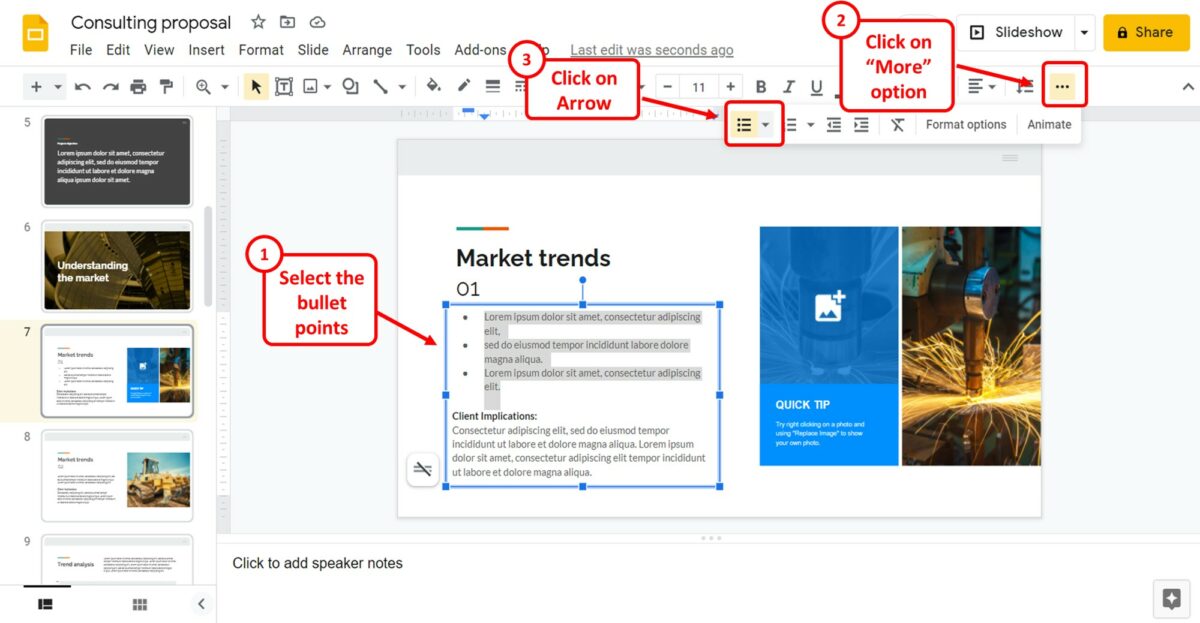
The first step is to select the bullet points in the textbox inside a slide. Then click on the “More” option on the right of the toolbar located at the top of the screen. Under the “More” option, click on the arrow by the “Bulleted list” option.
Step-2: Select a new bullet point style
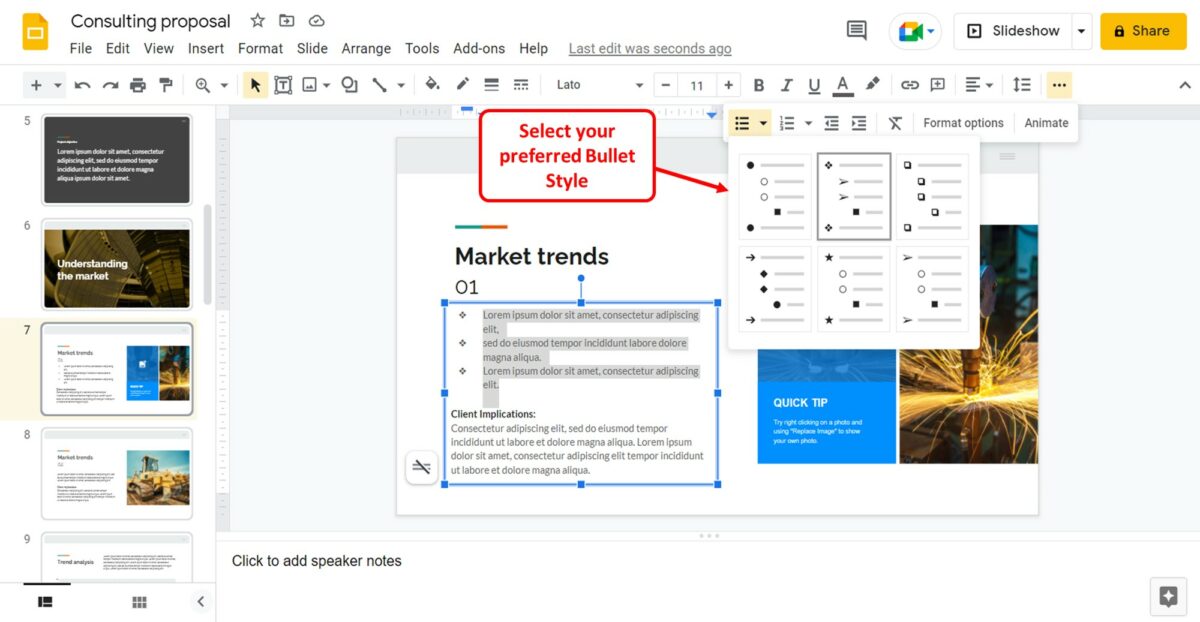
In the dropdown list under the “Bulleted list” option, you will find the six available bullet styles in Google Slides. You can now click on your preferred style to change the bullet style of the selected text on the slide.
4. How to Customize Bullet Points in Google Slides?
In Google Slides, you can also customize your own bullet style if you do not like the preformatted ones. To customize a bullet style, follow the 4 quick steps.
Step-1: Click on the “Format” menu
The first step is to select the bullet list on the slide. Then click on the “Format” menu at the top of the screen.
Step-2: Click on “List options”
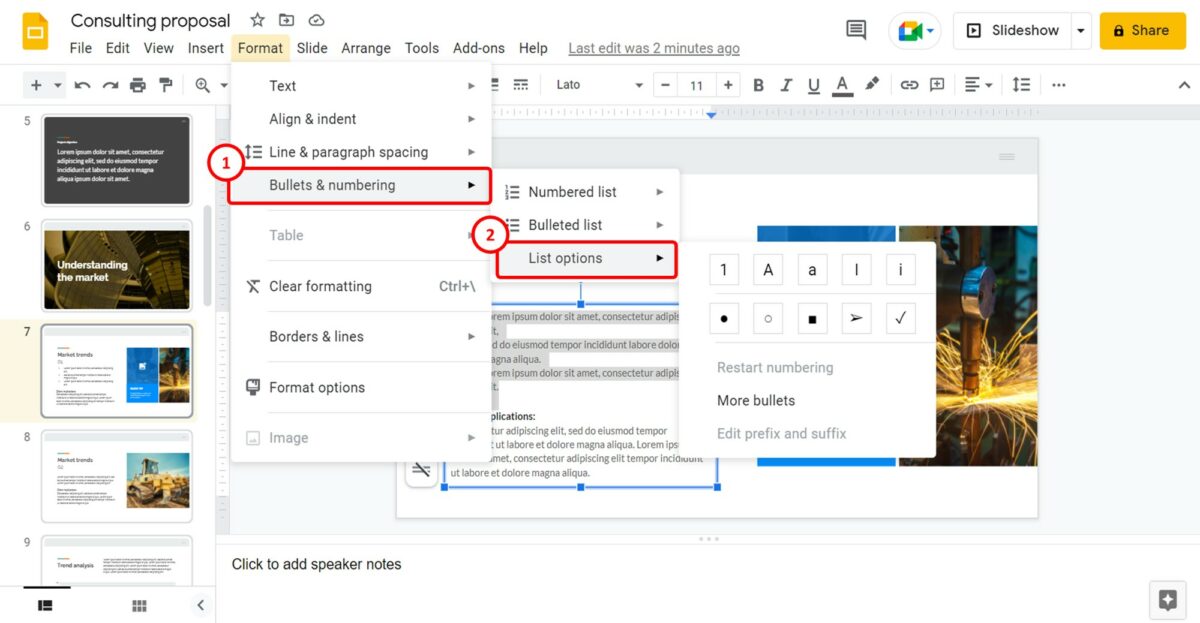
In the “Format” menu, click on the “Bullets and Numbering” option. Then click on “List options” in the dropdown menu by the “Bullets and Numbering” option.
Step-3: Click on the “More bullets” option
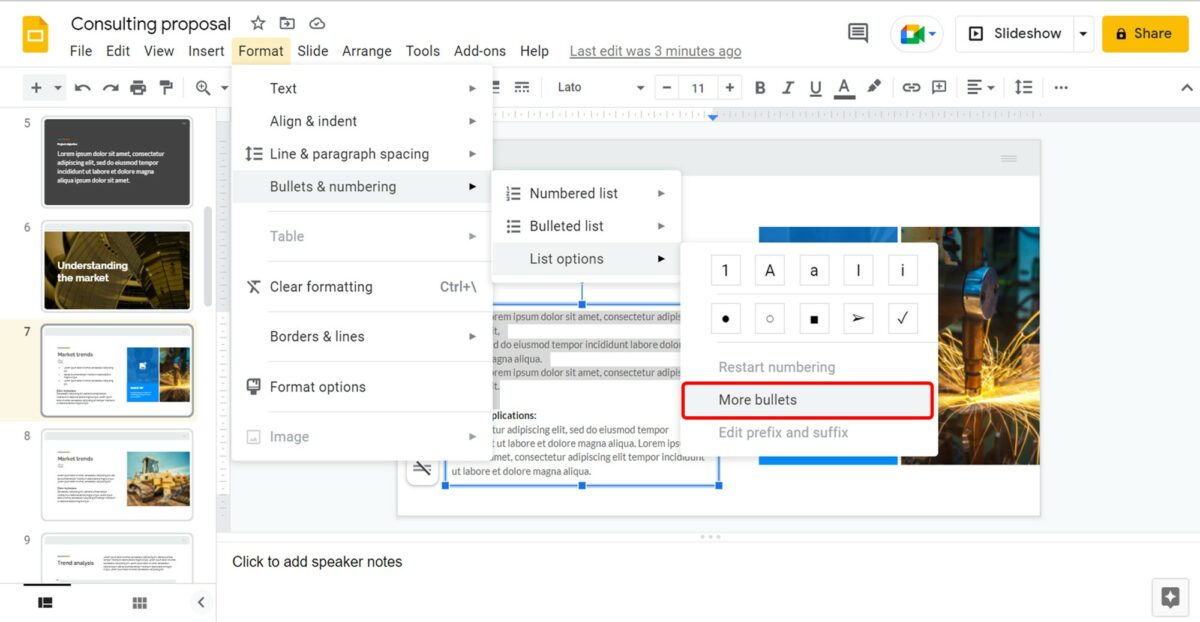
In the “List options” dropdown menu, click on the “More bullets” option. This will open the “Insert special characters” dialog box.
Step-4: Click on the preferred symbol
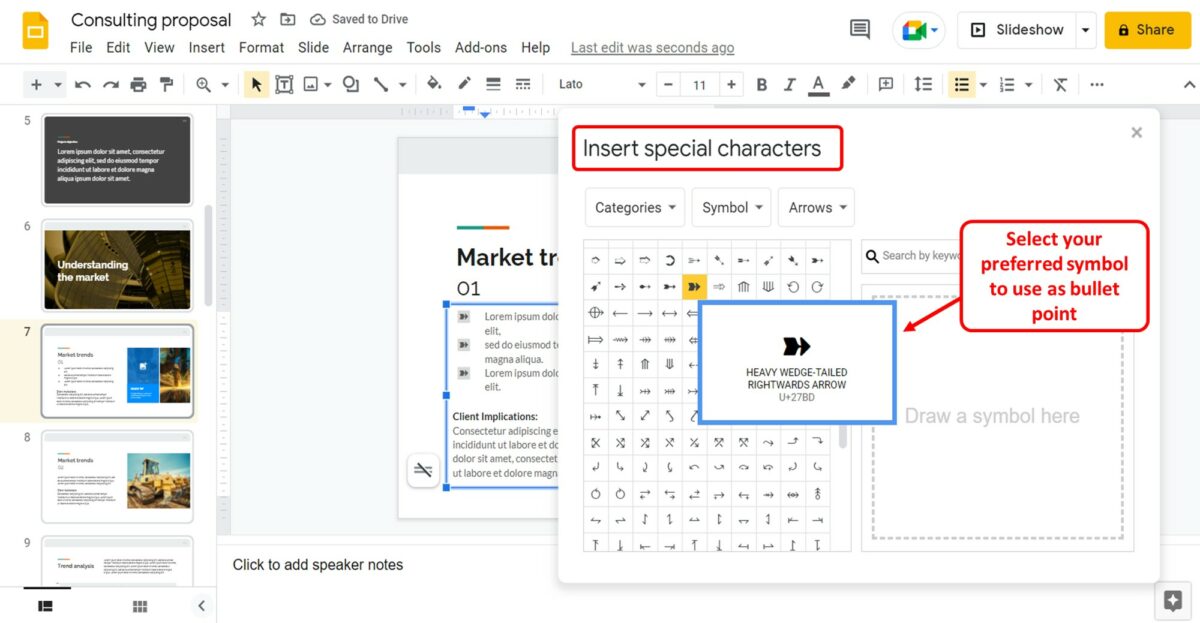
In the “Insert special characters” dialog box, you can now scroll through the available symbols. Click on your preferred symbol to use it as the bullet style.
5. How to Remove Bullet Points from Text in Google Slides?
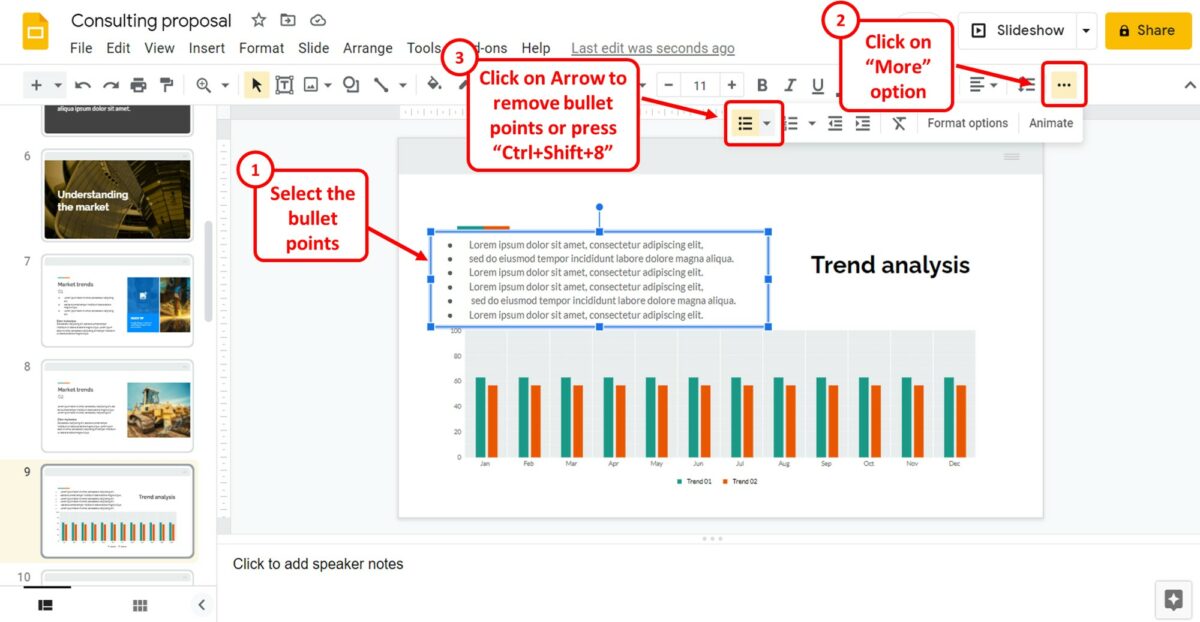
To remove bullet points from text in Google Slides, all you have to do is click on the bulleted list again. In the text box, select the bullet list. Then click on the “More” option in the toolbar. Under the “More” option, click on the “Bulleted list” option to remove the bullet points from the selected text.
Alternatively, you can press the “Ctrl+Shift+8” keys on your keyboard.
6. Creating a Numbered List in Google Slides
The “Bullets and Numbering” option in Google Slides allows you to create both bullet and numbered lists. To create a numbered list using the toolbar, follow the 2 simple steps.
Step-1: Click on the “More” option
To create a numbered list, you have to first click inside the textbox. Then click on the “More” option on the right of the toolbar located at the top of the screen.
Step-2: Click on the “Numbered list” option
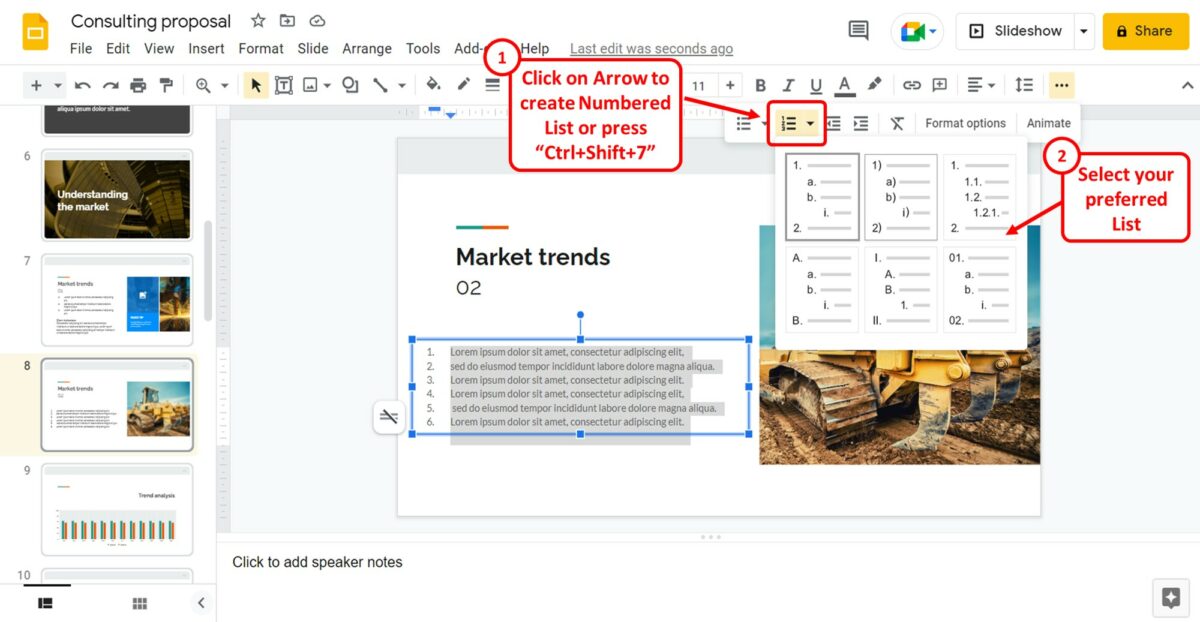
Under the “More” option, you have to now click on the arrow next to the “Numbered list” option. Then click on your preferred list style from the dropdown list.
Alternatively, you can press the “Ctrl+Shift+7” keys on your keyboard to create a numbered list.
7. How to Create a Multi-level Numbered List on Google Slides?
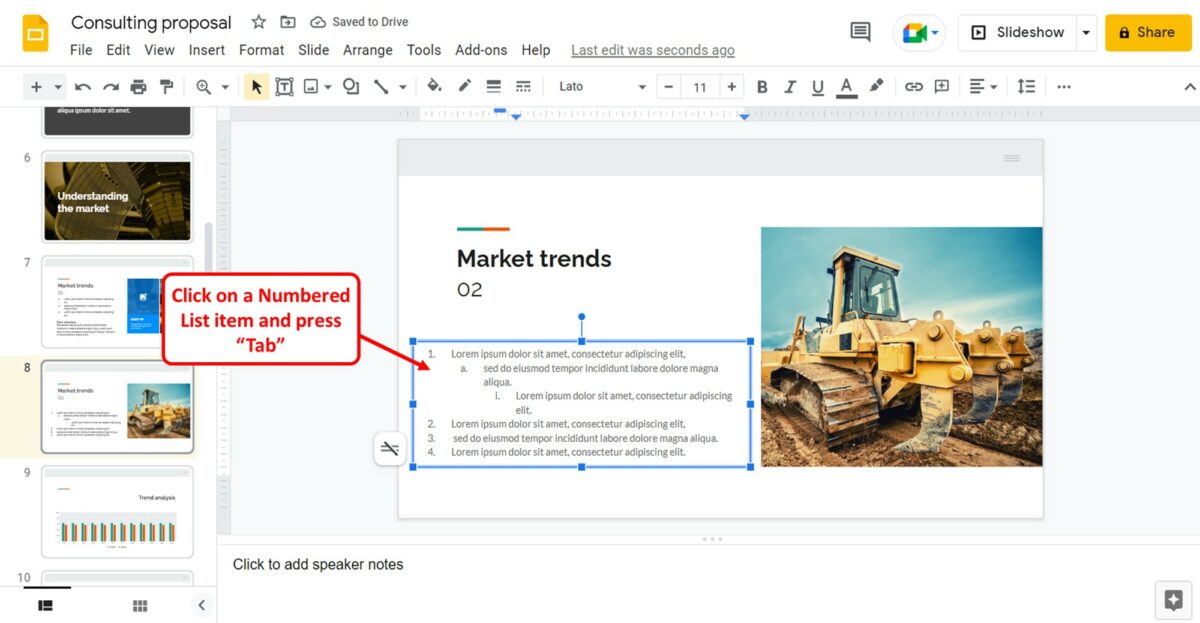
In Google Slides, you can quickly create a multilevel numbered list. All you have to do is click on a numbered list item and press the “Tab” key on your keyboard. To create more levels, you can press the “Tab” key as many times as you need.
8. How to Restart Numbering in Google Slides?
To restart a numbered list in Google Slides, you have to follow the 2 quick steps.
Step-1: Click on the “Bullets and Numbering” option

The first step is to click on the numbered list item where you want to restart numbering. Then click on the “Format” option in the menu bar at the top of the screen. In the “Format” menu, click on the “Bullets and Numbering” option.
Step-2: Click on the “Restart Numbering” option
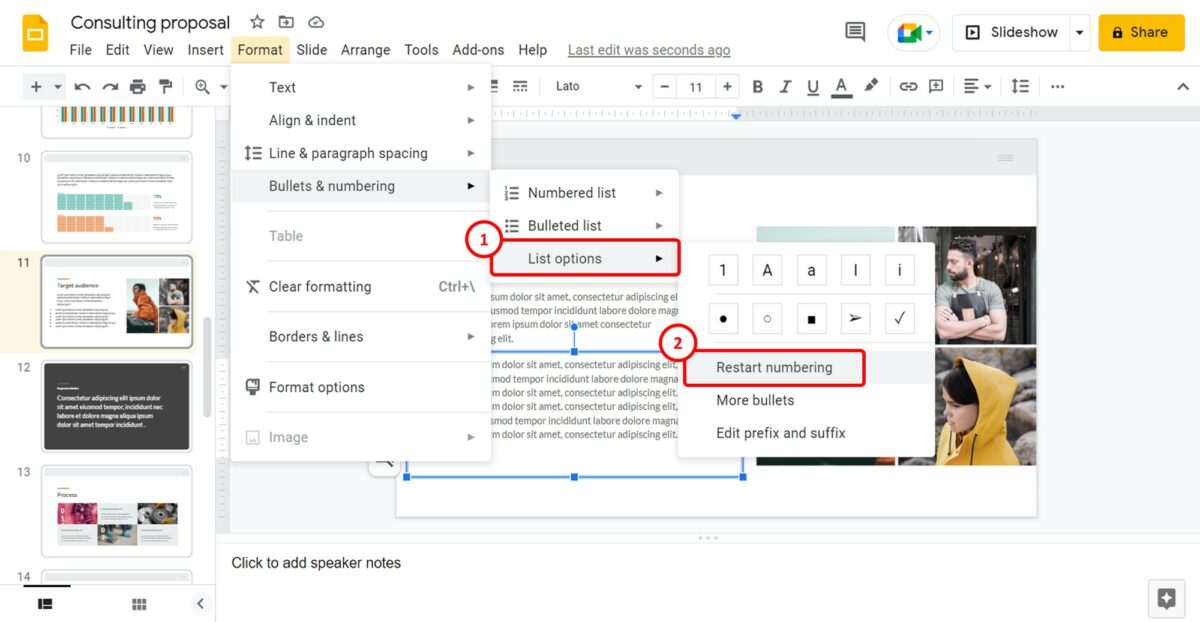
The next step is to click on the “List Options” option in the dropdown menu by the “Bullets and Numbering” option. In the dropdown menu under it, click on the “Restart numbering” option to restart the numbered list.
9. How to Remove a Numbered List in Google Slides?
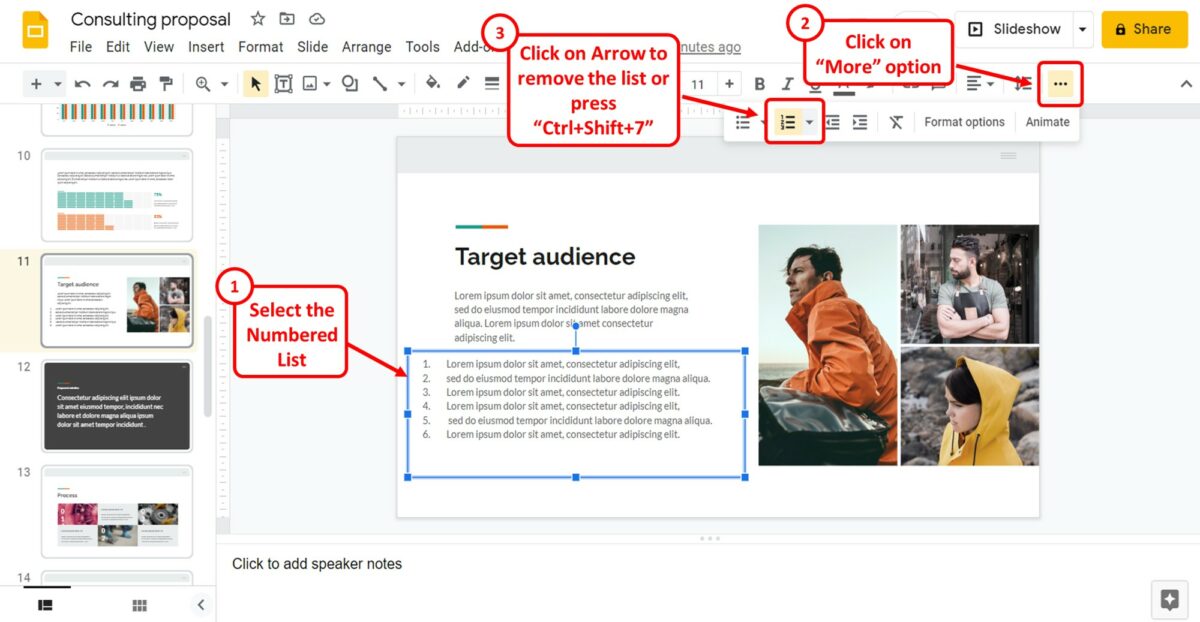
In Google Slides, you can remove a numbering using the “Numbered list” option.
You have to first select the numbered list in the text box on a slide. Then click on the “More” option in the toolbar. Under the “More” option click on the “Numbered list” option again to remove the numbered list.
Alternatively, you can press the “Ctrl+Shift+7” keys on your keyboard.