
For most, knowing how to use bold, italics, underline or strikethrough text in PowerPoint is a piece of common knowledge. However, if you are starting out your journey with presentations or if you have never used any of these text styles before, you may struggle to find these options!
To add bold, italics, underline, or strikethrough text effects in PowerPoint, first, select the text on the slide. Then, click on the “Home” tab. Choose the respective option from the “Fonts” section on the ribbon.
Although this piece of basic information may be common knowledge, what is not commonly known is that there are a lot of customizations available in PowerPoint even for these options!
In this article, I’ll walk you through the basics and a few advanced tricks on using bolds, italics, underline and strikethrough text options in PowerPoint. I’ll explain everything in a step-by-step manner with pictures to help you understand better.
Plus, in the end, I’ll also help troubleshoot some of the most common issues!
So, let’s get started!
1. Adding Bold Text in PowerPoint
Let’s get straight to the point. Let’s talk about adding bold text in PowerPoint.
The first thing that we need to understand is why and when should you use the “Bold” text formatting!
1.1 When Should You Use Bold Text in PowerPoint?
Use bold text when you want to grab the attention of the audience members. It is most effectively used to make certain words or phrases stand out on the slide. Bold text can also be used to establish a typographic hierarchy on the slide and guide the attention of the audience in a certain direction.
However, it is important to use bold text selectively. If you overuse the bold formatting on the slide, it defeats the purpose of using the bold formatting in the first place.
1.2 How to Bold Text in PowerPoint?
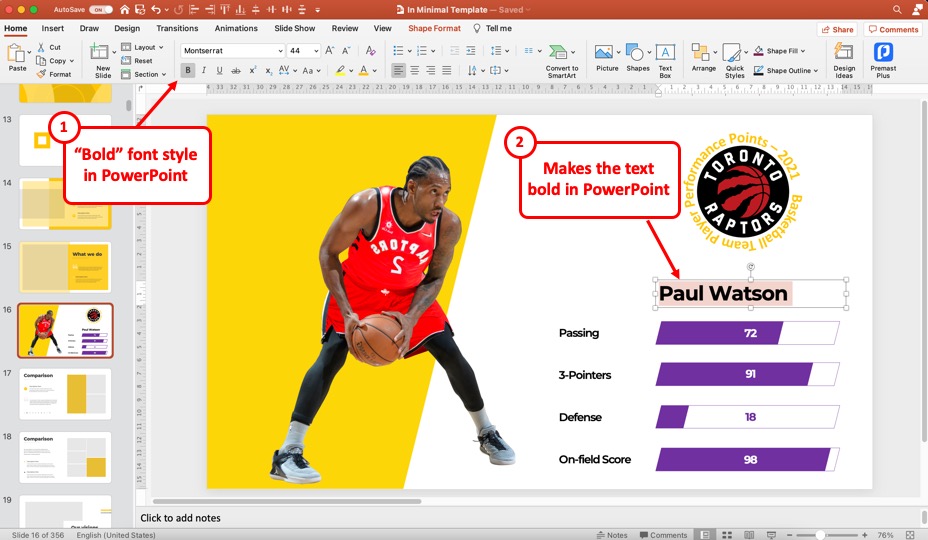
To bold text in PowerPoint, first, select the text that you wish to bold. Then, click on the “Home” tab. Next, click on the “B” icon under the “Fonts” section of the “Home Ribbon” to add bold formatting to the selected text. You can also use the keyboard shortcut “Ctrl+B”.
The option to “Bold” text is indicated by the letter “B” under the fonts section.
Remember to highlight the text before you click on the “Bold” option. Otherwise, the text will not become bold.
Another thing to remember is that you can also click on the “Text Box” containing the text instead and click on the “Bold” text formatting to make all the text inside the text bold in the “Bold” format.
However, if you want to make only specific text in bold format, only select that specific text and then apply the bold formatting.
One last thing to remember, if you toggle on the “Bold” formatting even before there is any text in the text box, remember to toggle it off by clicking on the “Bold” option from the home tab in PowerPoint.
Also, if you have a piece of text with just one word that is bolded. If you happen to click at the end of the word and continue typing, the new words that you type will also retain the bold formatting. Make sure to toggle off the bold formatting either before you start typing or by selecting the text once you’ve added it to the slide.
1.3 How to Unbold Text in PowerPoint?
You can just as easily unbold the text in PowerPoint. First, select the text that you wish to unbold. Then, click on the “Home” tab and click on the “Bold” option (represented by the letter “B”) in the “Fonts” section in PowerPoint.
One thing to remember is that to remove the bold formatting or unbold the text in PowerPoint, the selected text should already have the bold formatting first.
If you select a group of text that is partly bolded and partly unbolded, PowerPoint will first unbold all the text. Clicking on the “Bold” option once again will bold all the text.
1.4 Shortcut Keys to Bold Text in PowerPoint
You can use the “Ctrl+B” shortcut keys (or hotkeys) to bold text in PowerPoint if you are using PowerPoint on Windows. If you are using Mac, then use the “Command+B” key combination to bold text in PowerPoint.
1.5 How to Make Bold Text Thicker?
Sometimes, even once you have added the bold formatting, the text is just not thick enough to grab the attention of your audience. The thickness of the bold text also varies from one font to another.
However, in case you want to make the bold text thicker, there are two ways to do it.
Here’s what you could do –
Method 1 – Choose a Font With More Weight
One way is to choose a font that has an option to add more weight and make it extra thick. The default fonts like Calibri or Ariel usually don’t come with this option.
To get a font in PowerPoint that has more weight, you will need to install a font in your PowerPoint. Check out my full step-by-step guide to installing an external font in PowerPoint.
Then, follow the steps mentioned below –
Step 1 – Select a Font with More Weight
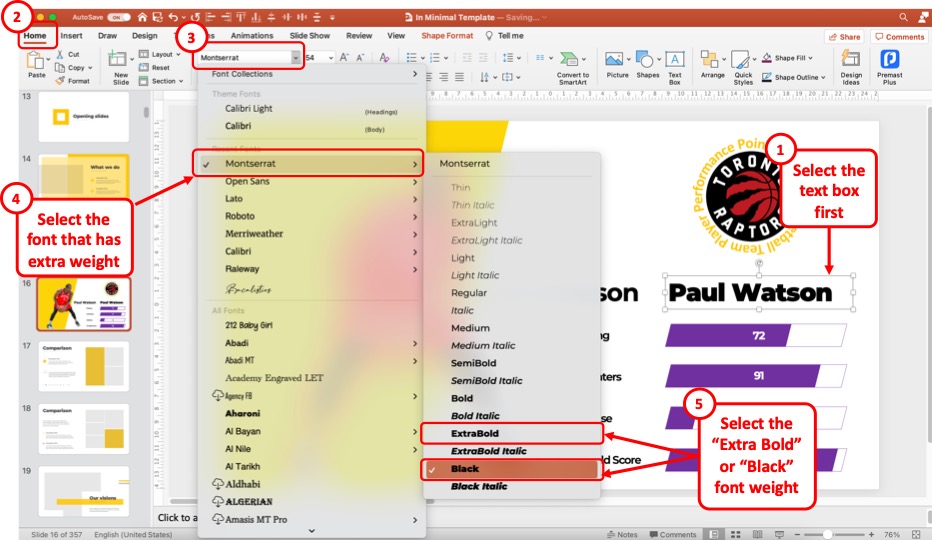
Once you have installed a font that provides thicker font options within the font family (such as a font like Montserrat), apply the thick font to the text to make the text look thicker.
To apply a different font weight, first, select the text. Then, click on the “Home” tab. Next, from the “Fonts” section, click on the font to choose a different one. A dropdown will appear. Browse to locate the font that you just installed that has more weight and click on it to apply the font.
Be sure to check the image above for the visual reference of the steps.
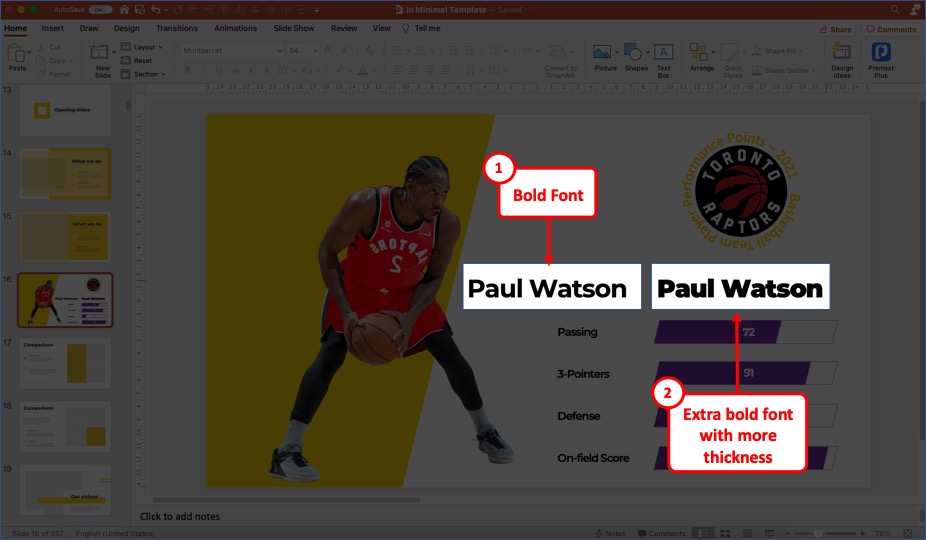
Here’s a quick comparison of the “Bold” font (on the left) and the same font with more weight applied to it (on the right).
You might feel that suddenly the “Bold” text doesn’t look as thick in comparison to the “Extra Bold” text.
Method 2 – Using the Text Outline Option
You can also add an outline to the text and increase the weight of the outline to make the text look thicker. This method is quite unique and not commonly known by most people.
Nevertheless, let’s take a look at the step involved in this process –
Step 1 – Add Outline to the Text
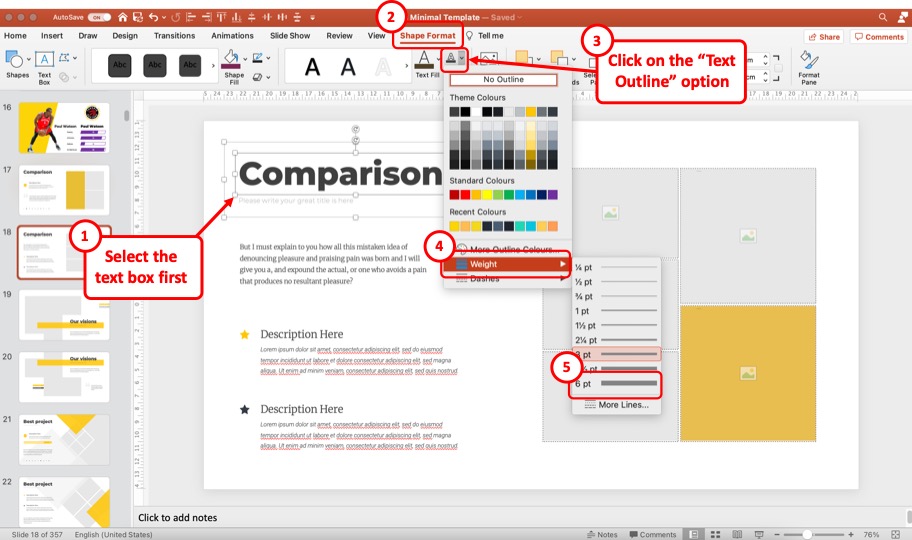
To add an outline to the text in PowerPoint, first, select the text. Then, click on the “Shape Format” tab. Next, click on the “Text Outline” option. From the dropdown, click on “Weight”, and choose an appropriate weight of the outline for the text.
Check the image above for a visual reference of the steps that I just mentioned.
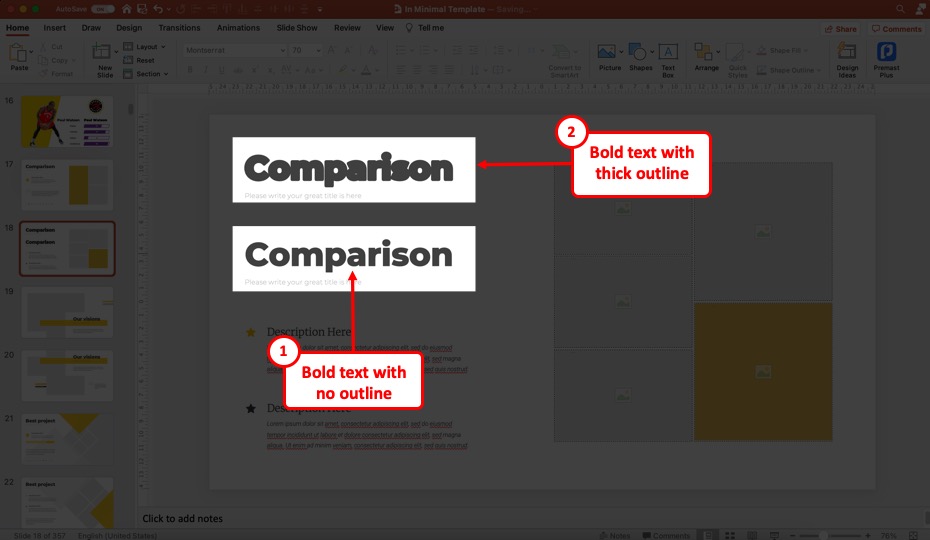
A quick comparison of the text with and without the outline in the above image reveals the difference in the thickness levels of the text.
One thing to note is that as you increase the weight of the outline of the text, the alphabets in the text will smudge into each other. So, be careful to not increase the weight of the text outline too much.
2. Adding Italics Text in PowerPoint
You can also italicize text in PowerPoint
To add italics to text in PowerPoint, first, select the text on the slide. Then, click on the “Home” tab. Next, click on the “I” icon from the “Fonts” section in the “Home Ribbon” to italicize the text. You can also use the “Ctrl+I” keyboard shortcut to toggle “Italics” on or off.
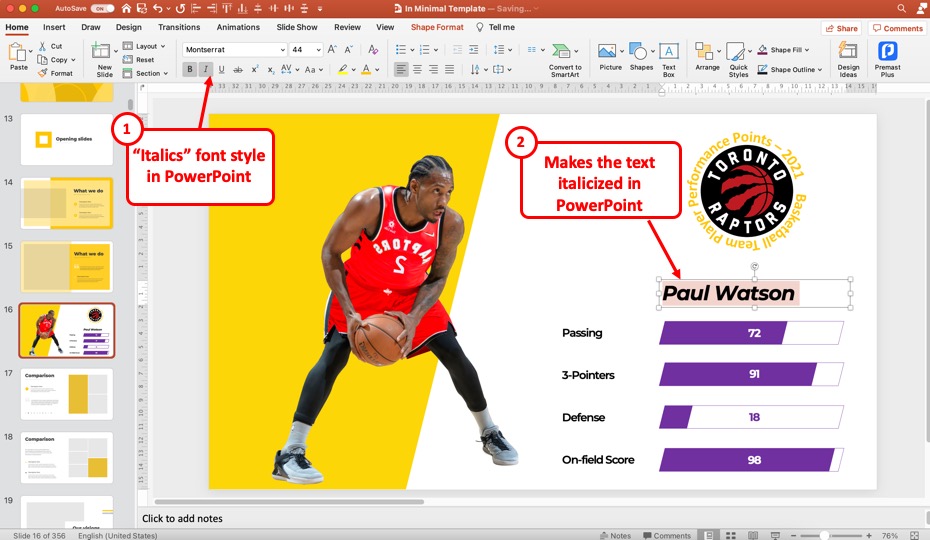
One thing to remember is that you need to select the text before clicking on the “Italics” option. You can also click on the “Text Box” to italicize all the text within a text box.
However, if you want to simply add italics to a certain part of the text, make sure that you highlight only that part of the text before clicking on the “Italics” option (check image for visual reference).
2.1 How to Remove Italics from Text in PowerPoint?
To remove italics from the text in PowerPoint, first, select the text. Then, click on the “Home” tab and click on the “Italics” button (represented by the letter “i”) from the fonts section on the “Home Ribbon”.
Before you remove the italics from the text, make sure that the selected text is already italicized.
2.2 Shortcut to Italicize Text in PowerPoint
You can use the “Ctrl+I” shortcut keys (or hotkeys) to italicize text in PowerPoint on Windows. If you are using Mac, then use the “Command+I” key combination to add italics to text in PowerPoint.
3. Underline Text in PowerPoint
Underlining text in PowerPoint is perhaps not as commonly used as bold or italics, but it can be just as effective in grabbing the attention of your audience when used in combination with different font colors.
In this next section, we shall understand how to underline text in PowerPoint.
3.1 How to Underline Text in PowerPoint?
To underline text in PowerPoint, first, select the text that you wish to underline. Then, click on the “Home” tab. From the “Fonts” section in the “Home Ribbon”, click on the “Underline” option (represented by the letter “U”) to underline the selected text.
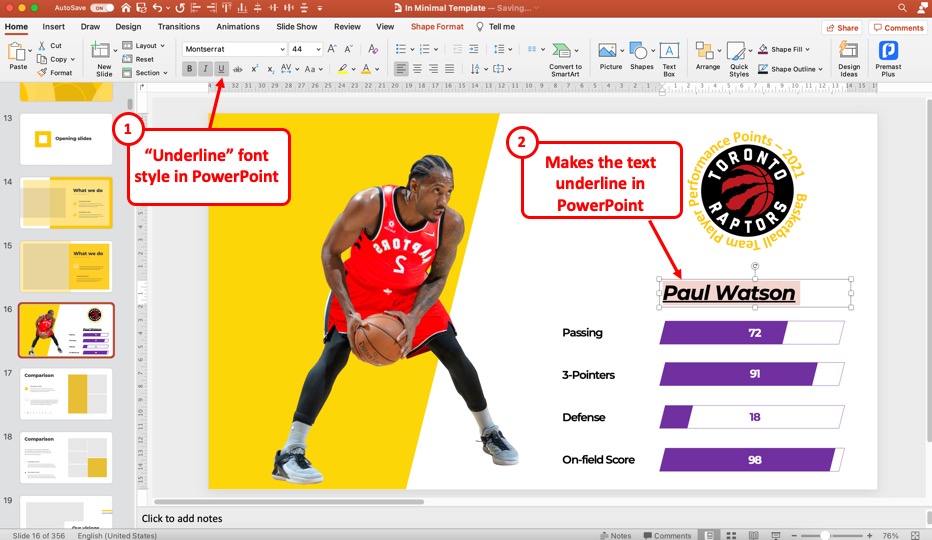
Just as before, make sure to select the text before you click on the “Underline” option. You can also apply the “Underline” format style along with the other styles such as bold and italics.
Refer to the image above for a visual reference of the steps described for underlining the text in PowerPoint.
3.2 How to Double-Underline Text in PowerPoint?
If you want to add extra emphasis to the text that you underline in PowerPoint, you can use the “Doube-Underline” option in PowerPoint!
Again, not a lot of people know about this secret tip!
Let’s take a look at how to add a “Double-Underline” to text in PowerPoint –
Step 1 – Open the “Fonts Dialog Box”

The first step is to open the “Fonts Dialog Box”.
To open the fonts dialog box in PowerPoint, press the “Control+T” shortcut keys on your keyboard. You can also press the “Ctrl+Shift+F” keys on your keyboard.
Alternatively, you can also click on the small downward-facing arrow in the “Fonts” section on the ribbon on the “Home” tab. However, this option is not available in PowerPoint on Mac.
To open the “Fonts Dialog Box” in PowerPoint on Mac, simply press the “Cmd+T” key on your keyboard.
Step 2 – Select the “Double Underline” Style
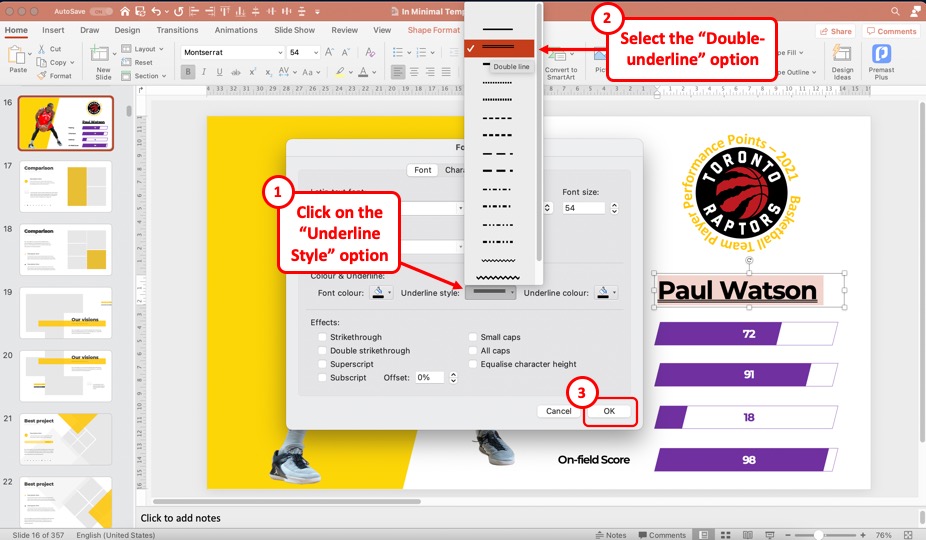
In the next step, click on the “Underline Style“. From the dropdown that appears, locate and click on the “double underline” style option.
Then, click on “OK” to apply the “Double Underline” format to the text.
3.3 How to Change Underline Text Formatting Options
Apart from going with double underline style for the text, there are a few other underline formatting options that are also available in PowerPoint.
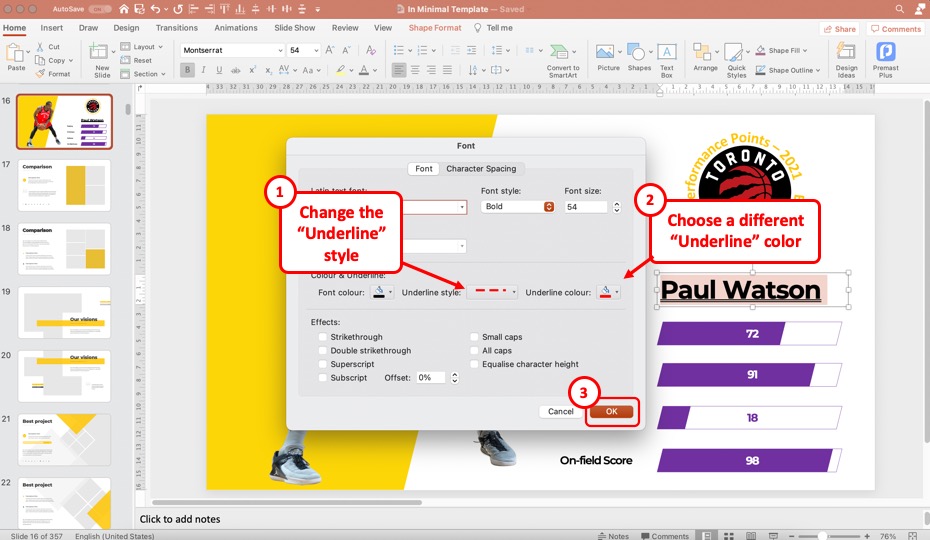
First, open the “fonts dialog box” in PowerPoint.
Then, click on the “Underline Style” format and choose any other underline style. You can also click on the “Underline Color” options to change the color of the underline under the text.
If you are using PowerPoint on Windows PC, you may also get some additional options to underline just the text or underline only the spaces between the text.
Once you have changed the underline format, click on “OK” to apply the format and close the fonts dialog box.
3.4 How to Remove Text Underline in PowerPoint?
To remove the text underline in PowerPoint, first, select the text that contains the underline formatting. Then, click on the “Home” tab. Next, on the “Home Ribbon”, click on the “Underline” option in the “Fonts” section to remove the underline from text in PowerPoint.
One thing to remember is that sometimes the space before the text is also underlined along with the text. However, when removing the text underline, you may miss out on selecting the space before the text.
In such as scenario, sometimes, the underline text may continue to appear when you add new text in the location.
3.5 Shortcut to Underline Text in PowerPoint
Use the “Control+U” keys as a shortcut to underline text in PowerPoint on Windows. If you are using PowerPoint on Mac, use the “Command+U” keys to underline text. The same shortcut keys can be used to remove the underline format.
4. Strikethrough Text in PowerPoint
You can also strikethrough text in PowerPoint. This option is typically used when you want to share feedback with other members of the team and instead of deleting the word just provide an indication that you wish to remove a certain word on the slide.
Let’s take a look at how to strikethrough text in PowerPoint –
4.1 How to Strikethrough Text in PowerPoint?
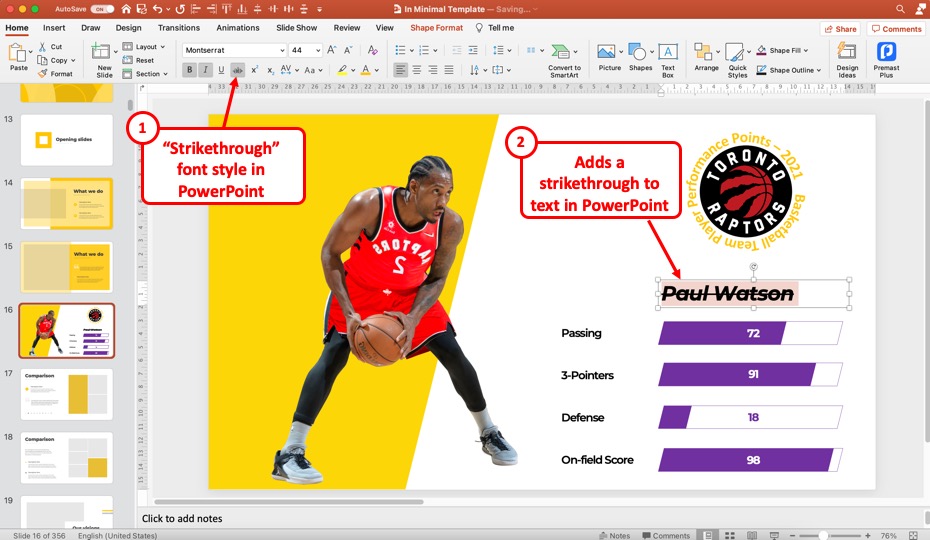
To strikethrough text in PowerPoint, first, select the text on the slide. Then, click on the “Home” tab. From the “Home Ribbon”, click on the “Strikethrough Text” option (represented by the “ABC” letters with a strikethrough) in the “Fonts” section.
You can also strikethrough text in PowerPoint through the fonts dialog box.
Check the image above for visual reference of the steps.
4.2 How to Add Double-Strikethrough to Text in PowerPoint?
To add a double-strikethrough to text in PowerPoint, you will need to first open the font dialog box using the “Ctrl+T” keyboard shortcuts (or Cmd+T on Mac).
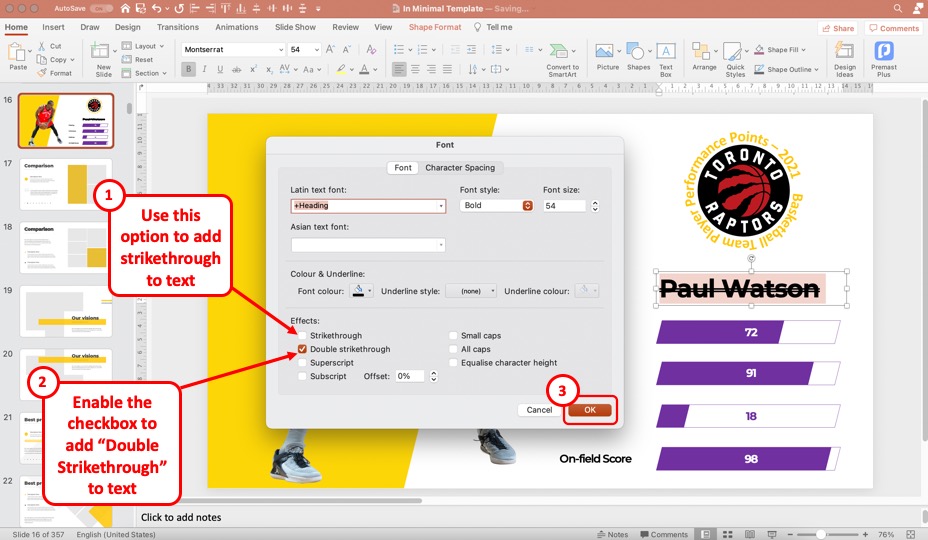
Once the fonts dialog box is open, enable the checkmark next to the “Double Strikethrough” option. Uncheck it to remove the double strikethrough on text.
Then, click on “OK” to apply the setting and close the fonts dialog box.
4.3 How to Remove Strikethrough Text Formatting in PowerPoint?
You can just as easily remove the strikethrough text formatting in PowerPoint. Simply click on the “Strikethrough” text option in the “Fonts” section on the “Home” tab to toggle it on or off.
You can also open the fonts dialog box and check or uncheck the box next to the “Strikethrough” option to enable or disable strikethrough text in PowerPoint.
5. How to Clear Formatting in PowerPoint?
After you have tried multiple options to format the text in PowerPoint, there are chances that you may not like the end result and perhaps you may want to start from scratch.
You can do so by using the clear formatting option in PowerPoint!
To clear text formatting in PowerPoint, first, select the text. Then, click on the “Home” tab. From the “Fonts” section, click on the “Clear Text Formatting” button (as shown in the image above). This button is represented by the letter “A” along with an eraser.
Troubleshooting Problems with Bold Text
While the formatting of text in PowerPoint is quite straightforward, there can be times when you face some issues with the bold or some other text format options.
Let’s take a look at some of the most common issues faced by users –
1. PowerPoint Text Doesn’t Bold
If the text doesn’t become bold even when you click on the “Bold” button as showcased earlier in the article, then make sure that you first select the text before making it bold.
If the option to bold itself is disabled, then there may be some issue with the PowerPoint on your computer.
Try to restart the computer to see if the problem has been fixed. If not, you may need to open the PowerPoint application in “Safe Mode”.
2. Text is Stuck in Bold in PowerPoint, It Doesn’t Unbold!
In certain rare situations, you can face a situation where your text is stuck in the bold format and it doesn’t unbold.
Even when you highlight the text and toggle the “Bold” button on or off, it still won’t unbold.
If you are faced with such as situation, there is most likely a bug in your application.
If you are in a hurry and don’t have much time, then you can copy the text in a Word document, unbold the text and paste it back to the PowerPoint presentation. This should fix the issue temporarily.
However, it is not a long-term solution.
To fix this issue permanently, you will have to start your computer in safe mode and troubleshoot the problem. See if the problem occurs when using PowerPoint in safe mode. If it doesn’t, the issue will be fixed.
However, if the issue continues to exist even after checking it in the safe mode, you will have to uninstall and reinstall PowerPoint. You may even need to update your PowerPoint application.
Credit to stockking (on Freepik) for the featured image of this article (further edited)