Animations are the most creative part of any presentation. It literally brings the elements of a presentation to life and makes it more interesting to follow. Almost all parts of PowerPoint presentations can be animated including tables.
To animate tables in PowerPoint, add rectangular text boxes on top of the respective cells and then animate those text boxes.
These key hacks to animate tables can be very useful for all types of presentations. So let’s get on to it right away.
1. How to Animate a Table in PowerPoint
Microsoft PowerPoint treats the tables inside the presentation slides as a single object. So when you animate a table, you can only apply a single animation style to the entire table. However, you can use some hacks to animate each cell, row, or column separately in a PowerPoint table.
1.1 Method 1 – Using Rectangle and Exit Animation
The “Shapes” feature in PowerPoint allows you to add rectangle shapes over each cell, row, or column of your table. You can then animate these shapes to make them appear as if the table were animated. To use the rectangle and exit animation, follow the 5 simple steps.
Step-1: Click on the “Shapes” option
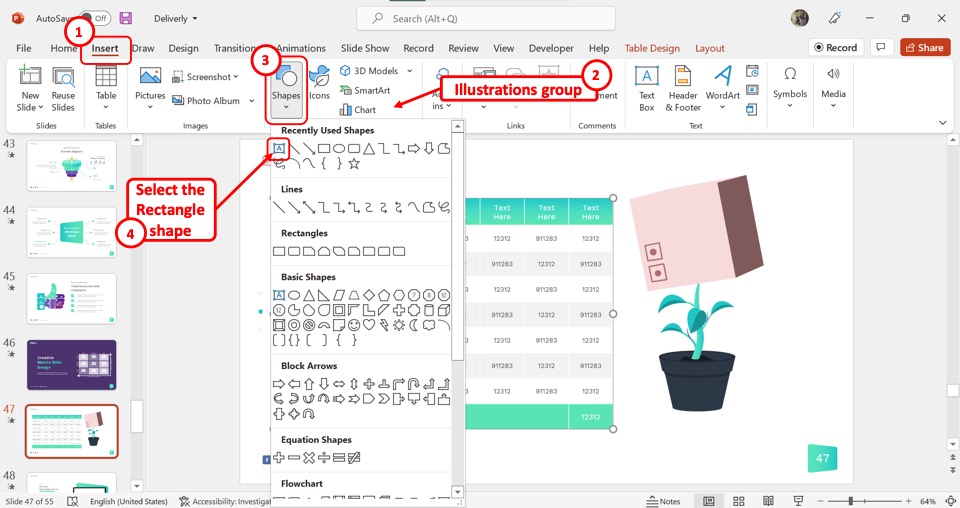
In the menu ribbon located at the top of the screen, click on the “Insert” tab. In the “Illustrations” group of the “Insert” menu, click on the “Shapes” option. Then select the rectangle shape from the dropdown menu.
Step-2: Draw the shape
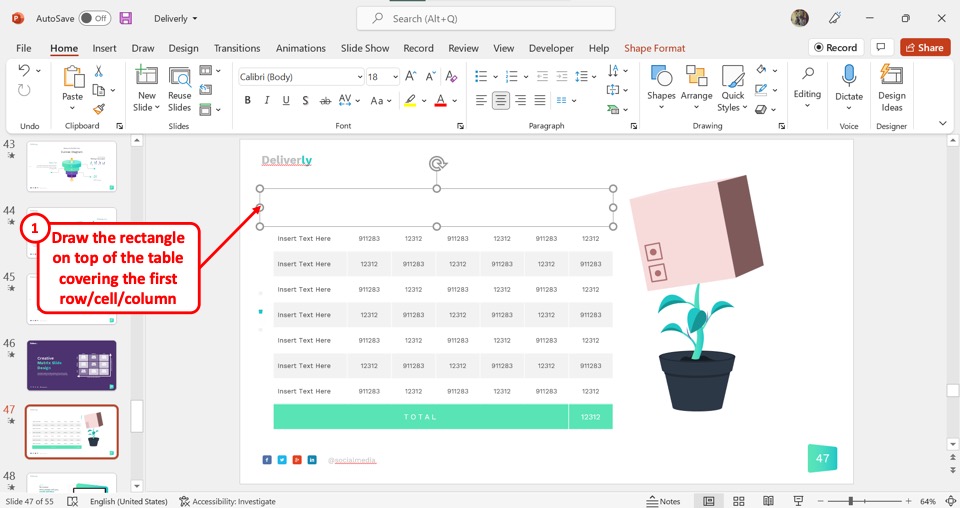
The next step is to draw the rectangle over the table. Drag the cursor in a way that the first cell, row, or column of the table is hidden under the rectangle shape.
Step-3: Repeat the process
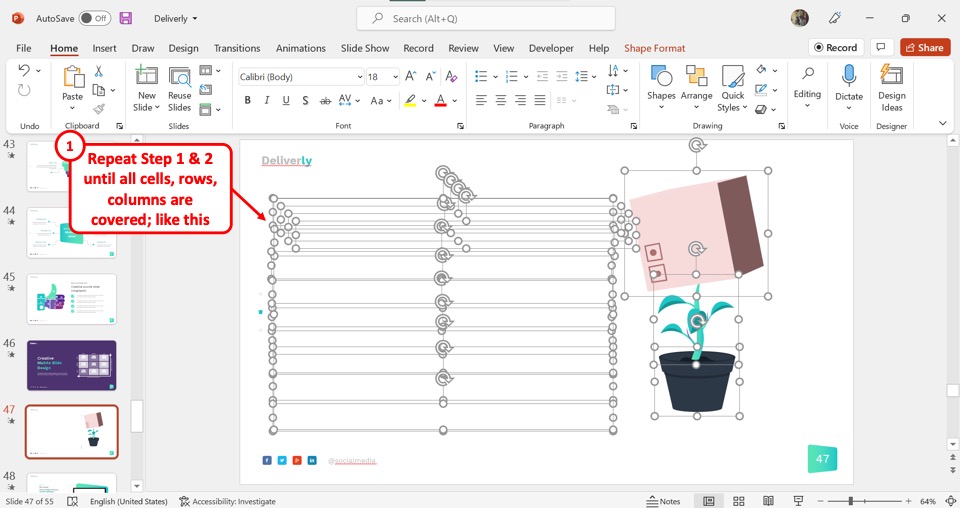
Now you have to repeat the first two steps for each cell, column, or row of the PowerPoint table. Insert a shape over each table entry until the entire table is hidden.
Step-4: Click on the “Animations” tab
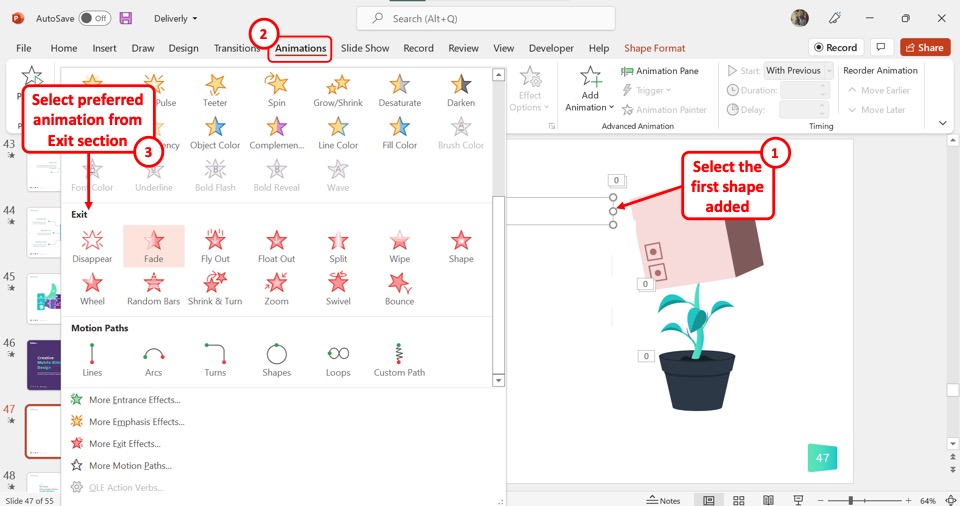
The step is to animate the shapes. You have to select the first shape and then click on the “Animations” tab. Click on the “Animation” gallery and select your preferred animation style from the “Exit” section of the dropdown list.
Step-5: Animate each shape
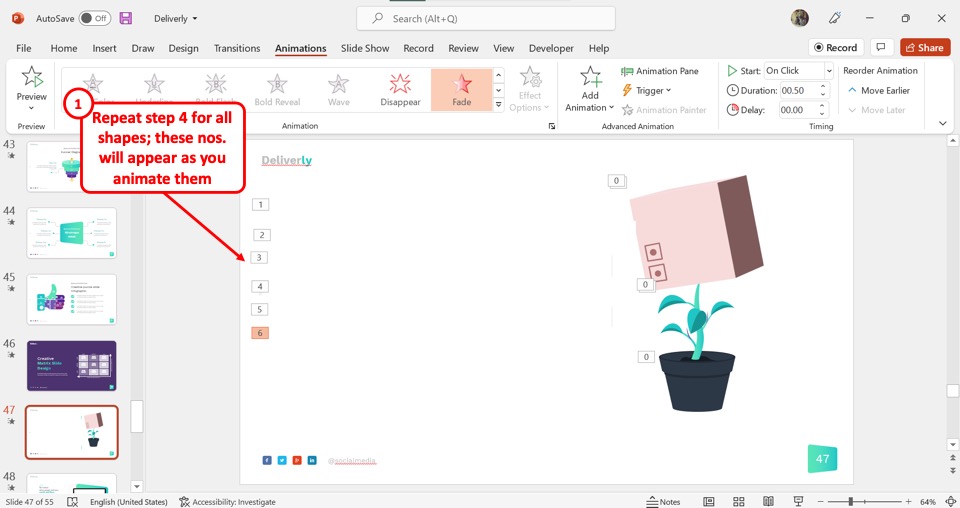
Finally, you have to repeat the fourth step for each shape successively. You will see the numbers appearing by each shape to indicate when the animation will appear during the presentation. The shapes will disappear giving the appearance as if the table elements are appearing one by one.
1.2 Method 2 – Ungroup the Table
Although the PowerPoint table is treated as a single object, you can ungroup the table elements using the “Paste Special” feature. To animate a table by ungrouping it, follow the 6 easy steps.
Step-1: Cut the table
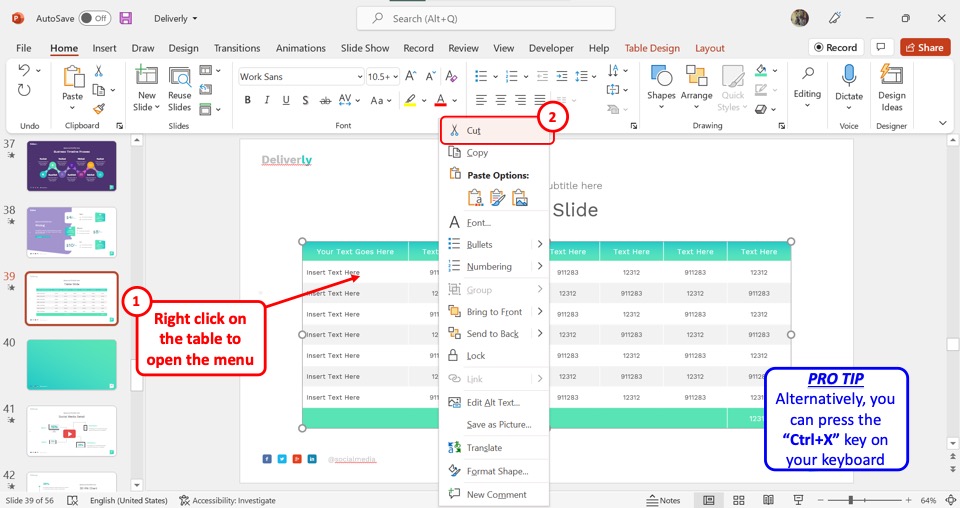
In the open slide, the first step is to cut the table. “Right Click” on the table and select the “Cut” option. Alternatively, you can press the “Ctrl+X” keys on your keyboard to cut the table.
Step-2: Click on the “Paste Special” option
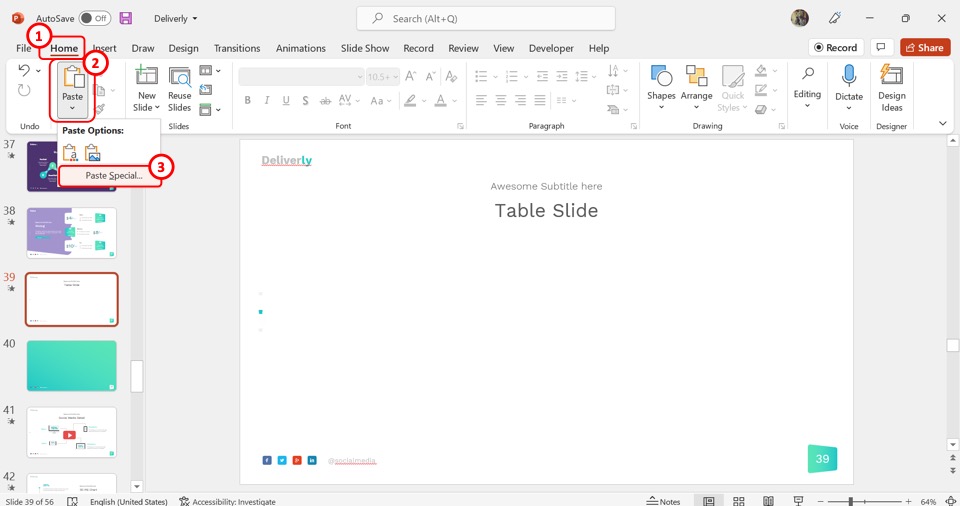
The next step is to paste the table back into the slide. To do so, click on the down arrow under the “Paste” option in the “Clipboard” group of the “Home” menu. In the dropdown menu, click on the “Paste Special” option.
Step-3: Click on the “Picture (Windows Metafile)” option
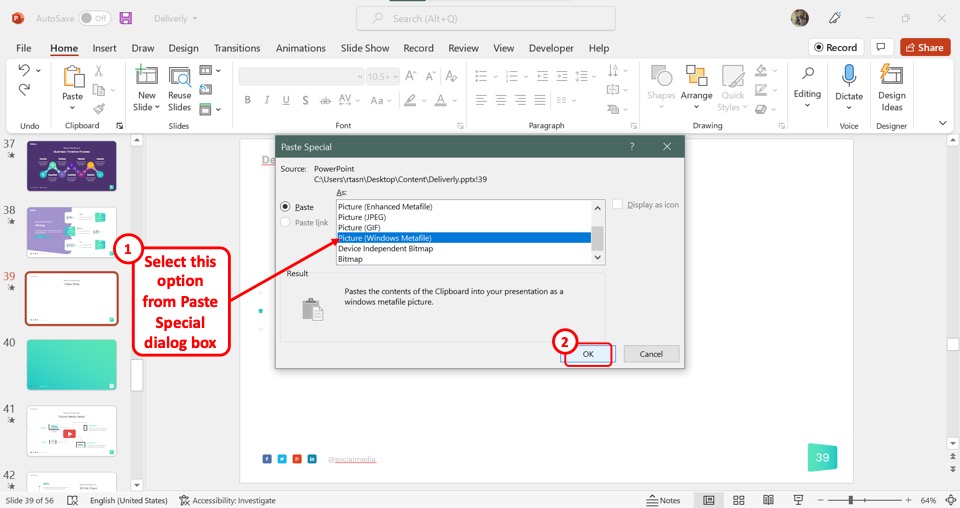
In the “Paste Special” dialog box, click on the “Picture (Windows Metafile)” option. Then all you have to do is click on the “OK” button at the bottom of the dialog box to paste the table.
Step-4: Click on the “Picture Format” tab
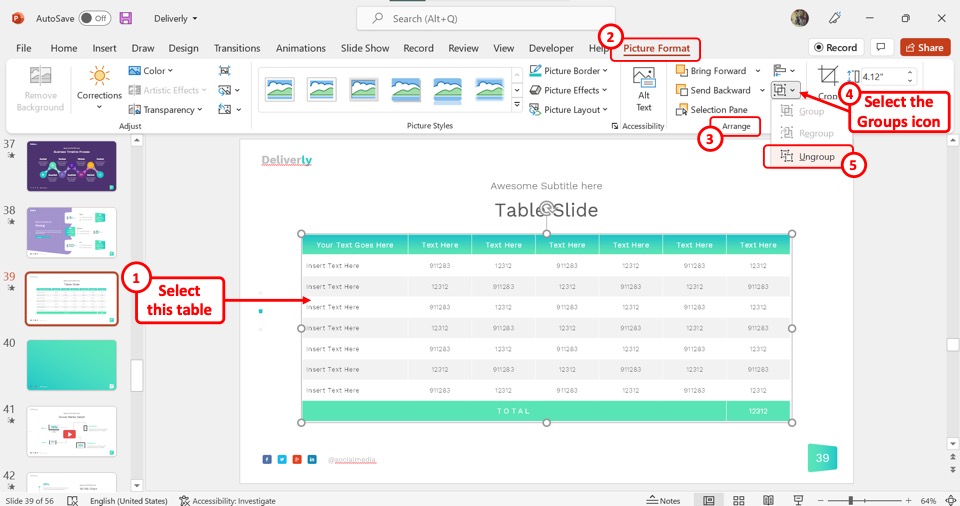
The next step is to select the table. Then click on the “Picture Format” tab from the menu ribbon located at the top of the screen.
Step-5: Click on the “Ungroup” option
In the “Arrange” group of the “Picture Format” tab, click on the “Groups” icon. In the dialog box under the “Groups” icon, click on the “Ungroup” option. This will ungroup each of the table entries as separate objects (shown above).
Step-6: Click on the “Animations” tab
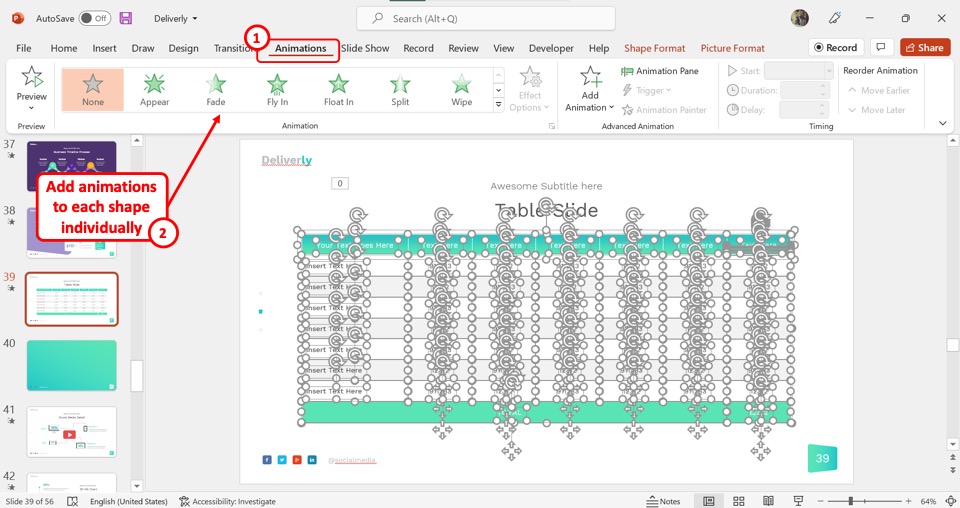
Finally, all you have to do is click on the “Animations” tab from the menu ribbon. Then add animations to each of the table entries separately to animate the PowerPoint table.
1.3 Method 3 – Using Text Box Instead of Tables
In Microsoft PowerPoint, you can add text boxes inside cells in tables. This will make each table entry a separate object that you can animate rather than the table itself. To animate a table using text boxes, follow the 5 quick steps.
Step-1: Click on the “Table” option
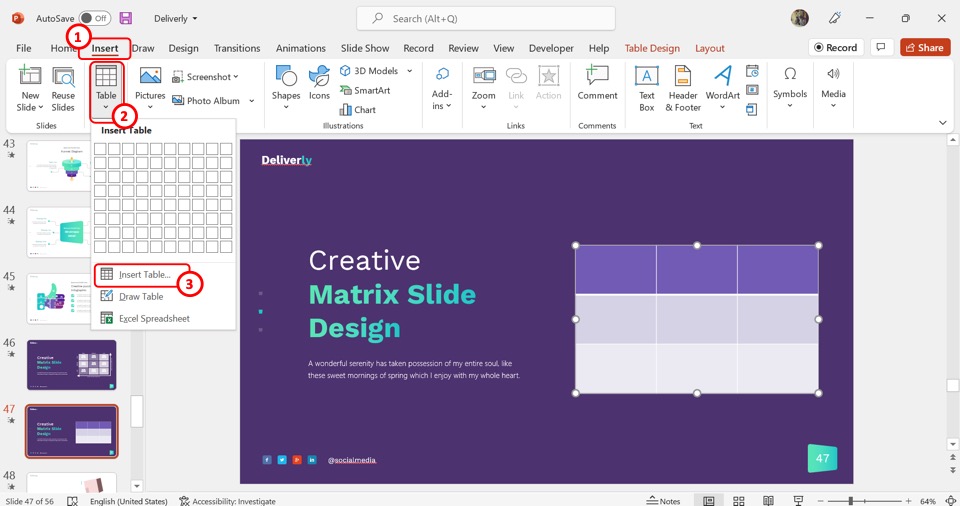
The first step is to insert the table. In the menu ribbon located at the top of the screen, click on the “Insert” tab. Then click on the “Table” option to insert the table into the slide.
Step-2: Click on the “Text Box” option
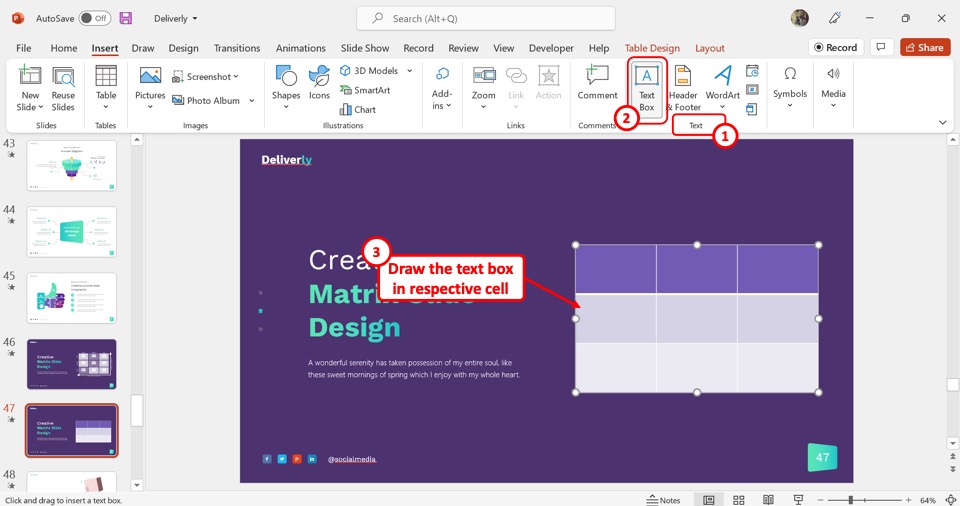
The next step is to click on the “Text Box” option in the “Text” group of the “Insert” menu. Then draw the text box in the preferred cell of the table.
Step-3: Insert text boxes in each cell
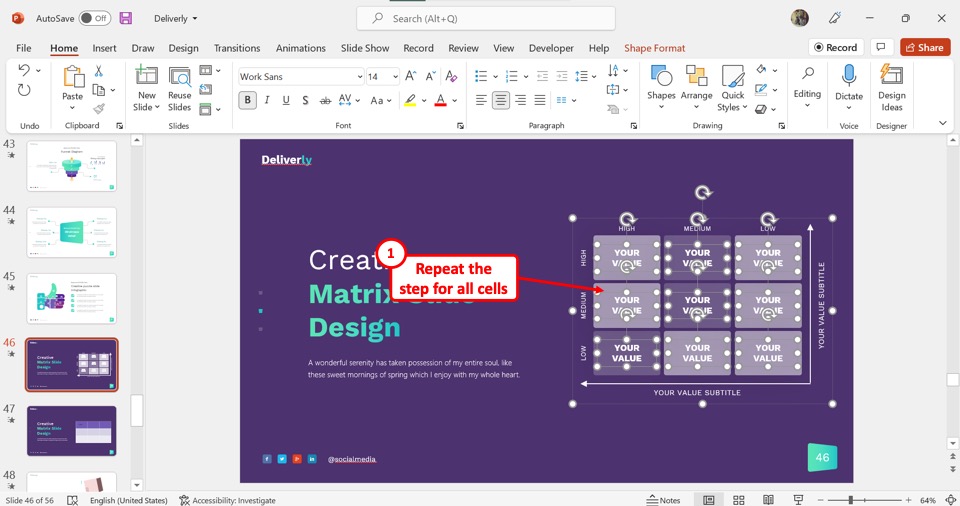
Now all you have to do is repeat the step for each data entry in the table. This will allow you to add text as a separate object in the table.
Step-4: Click on the “Animations” tab
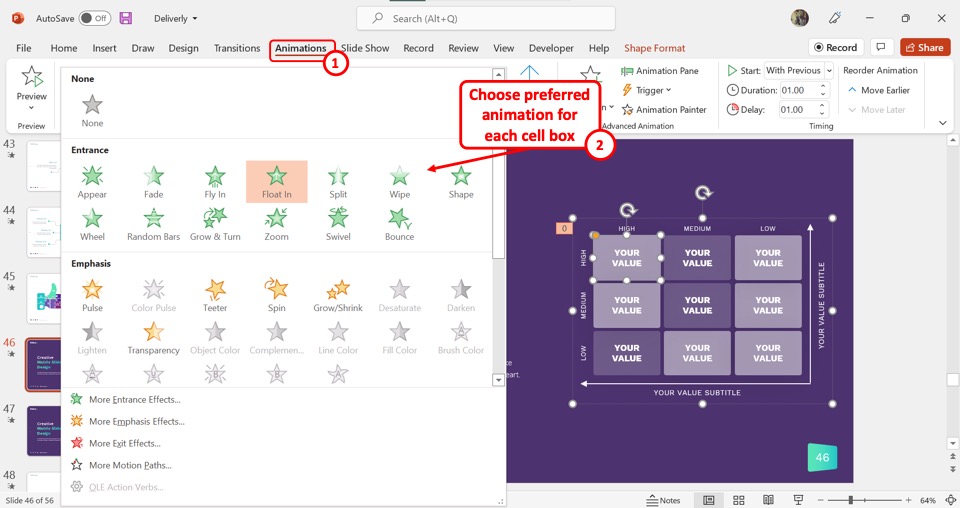
Now you have to click on the “Animations” tab in the menu ribbon located at the top of the screen. Click on the “Animation” gallery to select your preferred animation style for the selected text box.
Step-5: Animate each text box
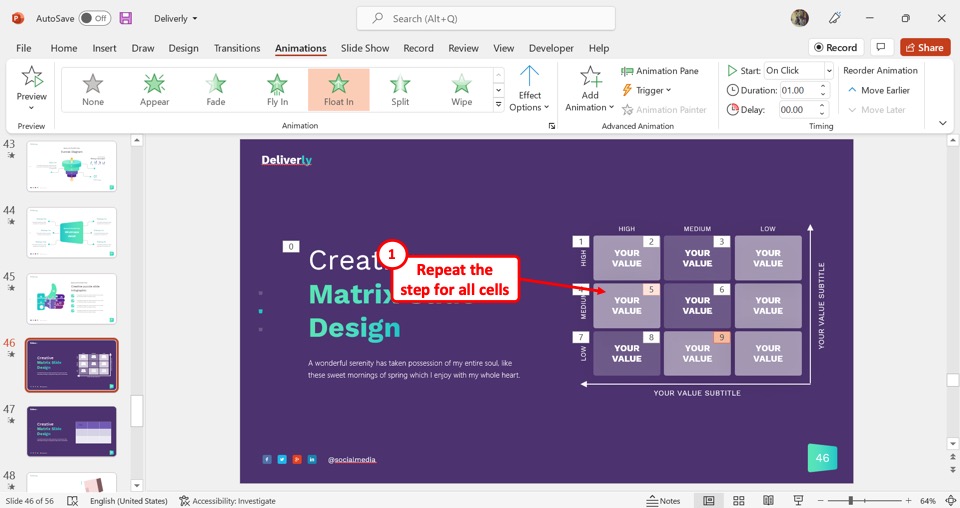
Finally, repeat the step to animate each single text box in the table cells. This will make the table entries appear one by one during the presentation.
1.4 Method 4 – Using Multiple Copies of the Table
Another way to animate tables in Microsoft PowerPoint is to create multiple copies of the table. To do so, follow the 5 easy steps.
Step-1: Click on the “Insert” tab
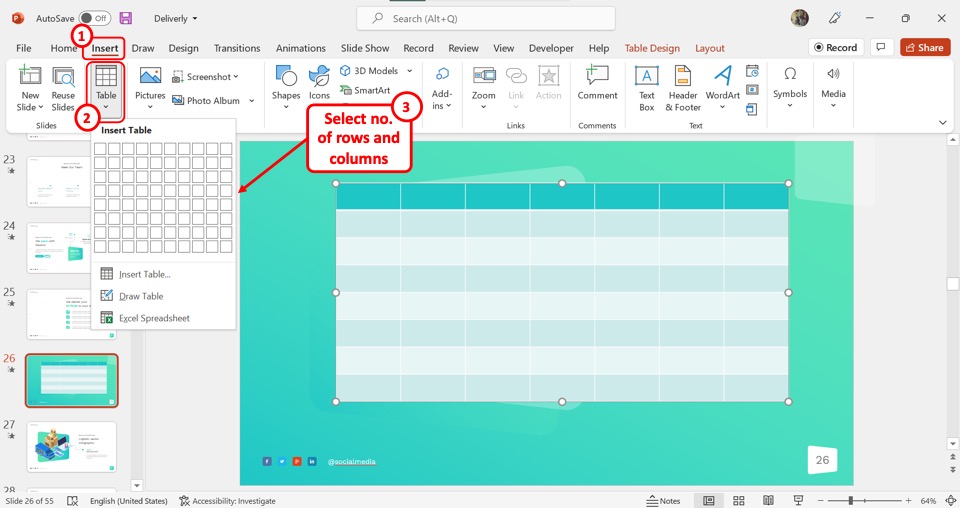
In the menu ribbon located at the top of the screen, click on the “Insert” tab. In the “Insert” menu, click on the “Table” option and select your preferred number of rows and columns for the table.
Step-2: Click on the “Animations” tab
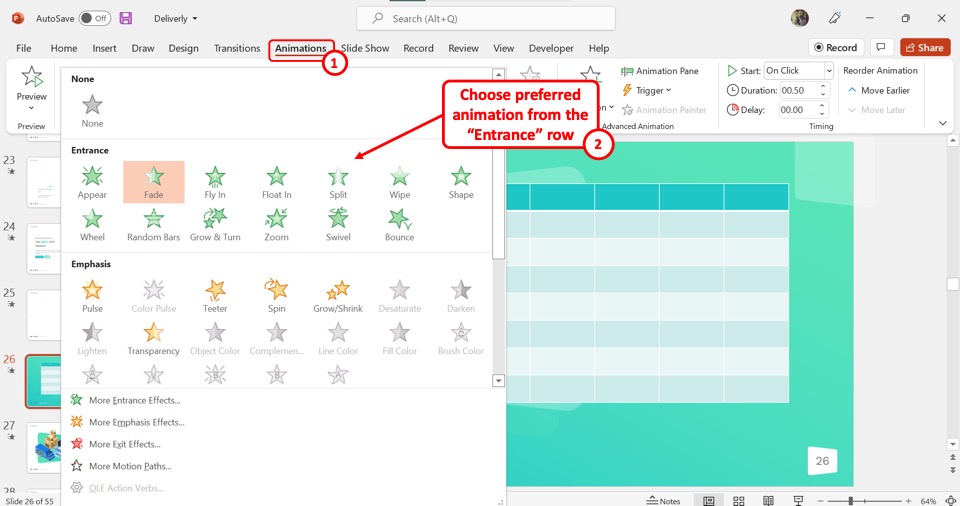
The next step is to click on the “Animations” tab. Then click on the down arrow beside the “Animation” gallery to open a dropdown list. Now all you have to do is click on your preferred animation style for the table from the “Entrance” section.
Step-3: Add content to the first cell
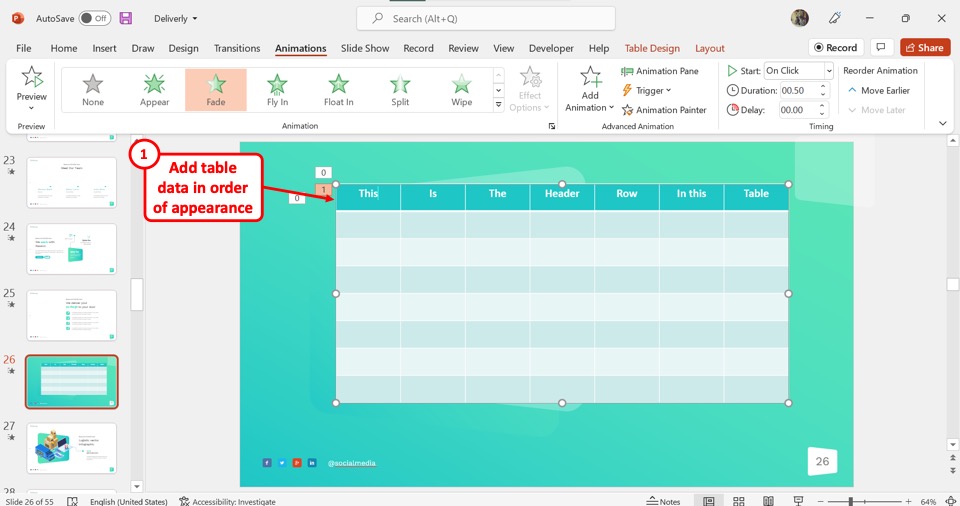
You can now add text or table data in the first cell, row, or column depending on which part of the table should appear first during the presentation.
Step-4: Copy the table
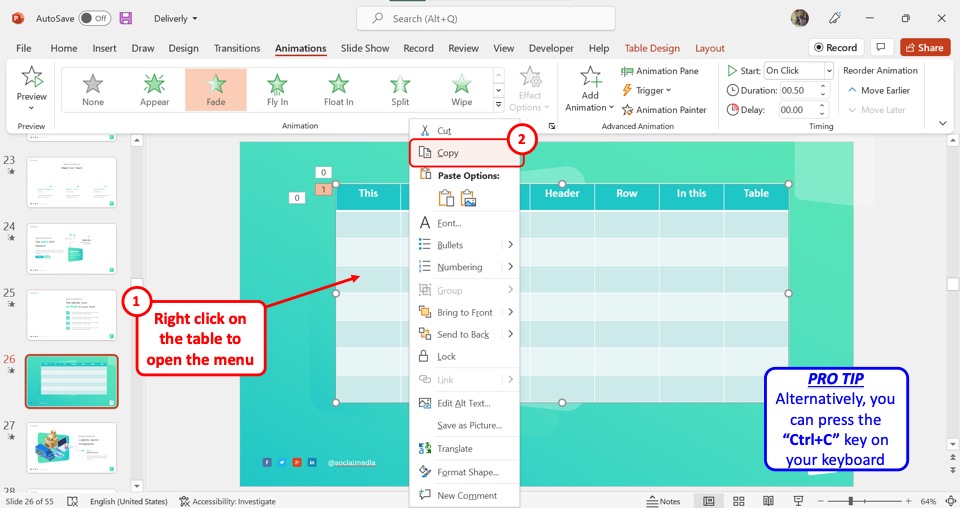
“Right Click” on the animated table and click on the “Copy” option. You can alternatively press the “Ctrl+C” keys on your keyboard to copy the table.
Step-5: Paste the table
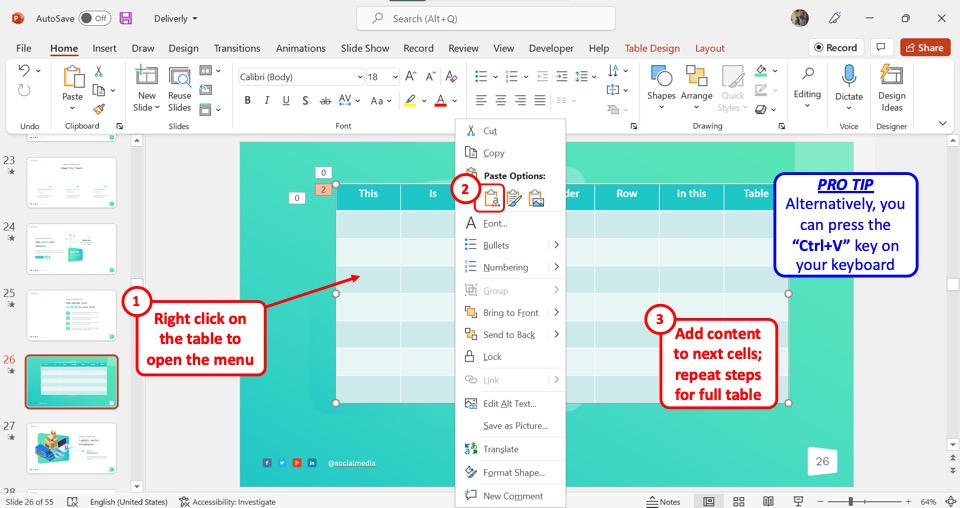
The final step is to “Right Click” on the same slide and click on the “Use Destination Theme” option under “Paste Options”. You can alternatively press the “Ctrl+V” keys on your keyboard to paste the animated table over the first one. Then add content to the second cell, row, or column. Repeat the steps for the rest of the table.
2. How to Animate Individual Cells in a Table in PowerPoint?
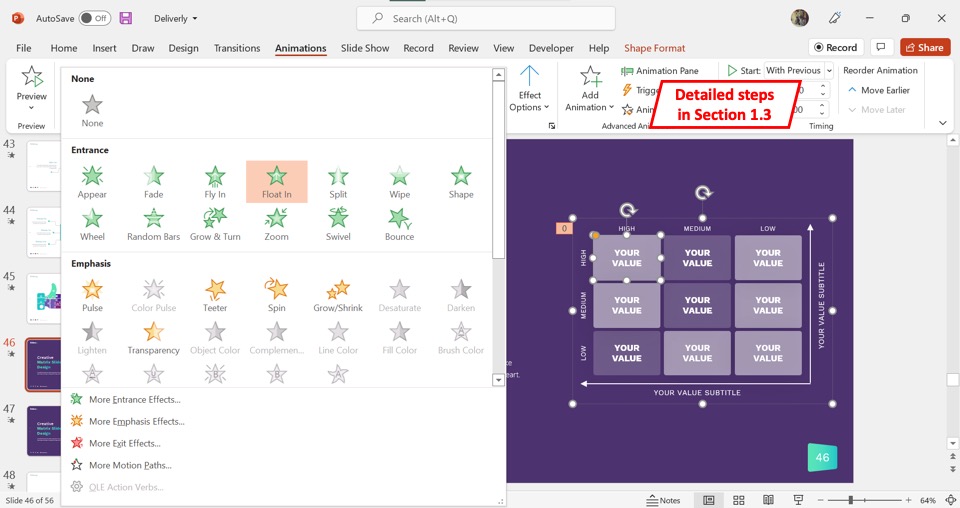
Microsoft PowerPoint does not allow you to animate individual cells in a table. However, you can add a text box inside the cell to animate it. Follow the steps detailed in section 1.3 to animate an individual cell in a PowerPoint table using text boxes.
3. How to Animate Rows in a Table in PowerPoint?
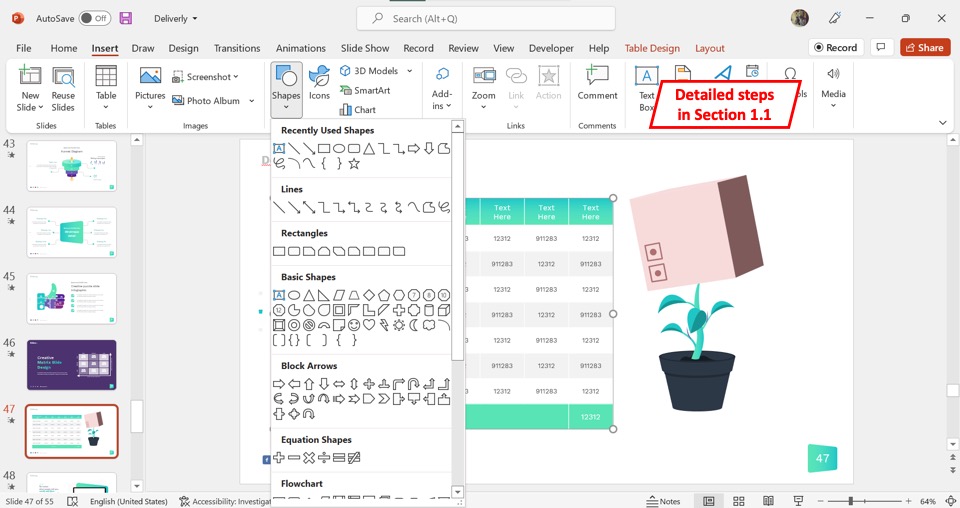
To animate rows in a table in Microsoft PowerPoint, the easiest method is to use rectangle shapes and the “Exit” animation from the “Animations” tab in the menu ribbon. To do so, follow the steps in section 1.1. of this article.
4. How to Animate Columns in a Table in PowerPoint?
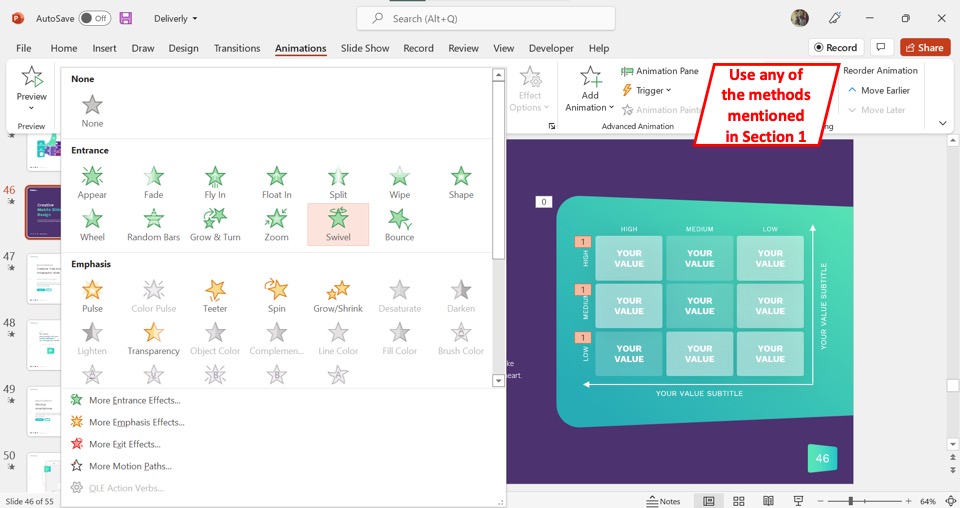
In Microsoft PowerPoint, you cannot animate table columns. However, you can add other objects like text boxes and shapes that you can animate. You can also use other easy methods discussed in section 1 to animate the columns in a PowerPoint table.
More Related Articles
- How to Add Tables in PowerPoint? [Complete Guide!]
- How to Move or Resize a Table in PowerPoint? [An EASY Way!]
- How to Transpose a Table in PowerPoint? [A Simple Solution!]
- Pivot Table in PowerPoint? Here’s How to do It! [With Slicers!]
- How to Format a Table in PowerPoint? [The ULTIMATE Guide!]
Credit to drobotdean (on Freepik) for the featured image of this article (further edited).

![4 Ways to Animate Table in PowerPoint [The ULTIMATE Guide!]](https://artofpresentations.com/wp-content/uploads/2022/06/Featured-image-4-ways-to-animate-table-in-Powerpoint.webp)