![How to Adjust Kerning in Google Slides? [Guide!]](https://artofpresentations.com/wp-content/uploads/2022/11/Featured-Image-How-to-Adjest-Kerning-in-Google-Slides.webp)
Kerning is an essential feature in any string of text and especially when it is represented on a presentation. It can make the text and pictures look neater and legible. It is always preferred to read a well-spaced and formatted piece of text, especially when it is a quick read.
However, you may be wondering how to adjust kerning in Google Slides?
Google Slides does not provide an option to adjust the kerning or letter spacing. However, you can adjust the line spacing, or spacing before and after the paragraph by clicking on the “Format” menu. Then, click on the “Line & Paragraph” spacing option. Choose a default option or set a custom spacing setting.
In the rest of the article, I’ll help you understand how you can increase the spacing of your text on your presentation to make it look neater.
1. What is Kerning in a Text Box?
Kerning is a process where you can adjust the spacing between characters in a string of text. In simple words, Kerning is the spacing between individual letters or characters.
To ensure better readability, Kerning is essential to understand and utilize properly. As all letters are created with unequal curves and shapes, you might need to increase or decrease the distance between one letter and another to create more legible text.
However, Google Slides doesn’t provide an option to adjust “Kerning” in a presentation. That said, you can make adjustments to line spacing and spacing before or after a paragraph of text within a text box.
Let’s learn how to do that.
2. How to Adjust Line Spacing in Google Slides?
In Google Slides, you can easily adjust the line spacing using the “Format” menu. All you have to do is follow these 2 steps.
Step-1: Click on the “Format” menu
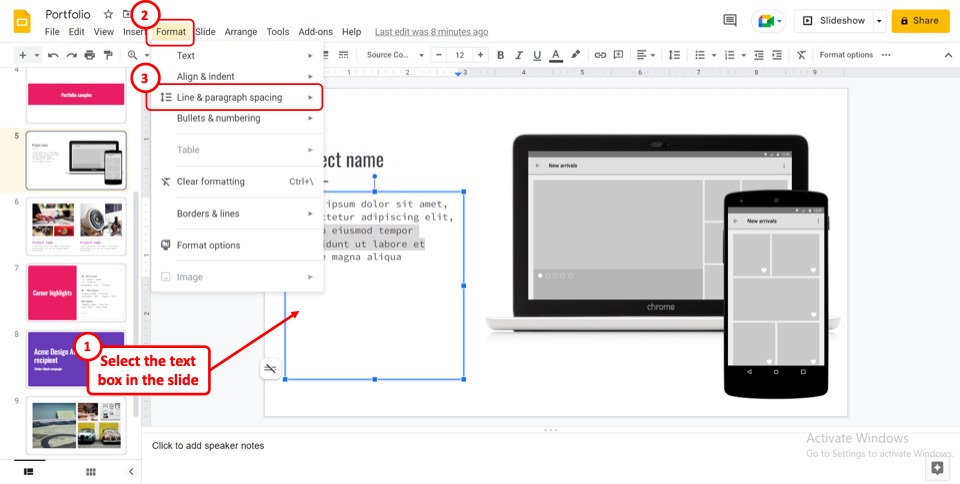
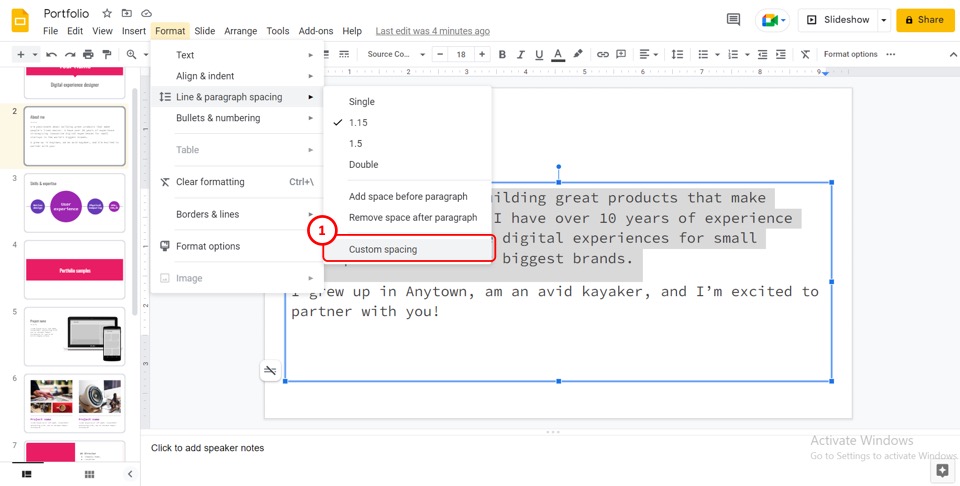
The first step is to select the paragraph in a text box. In the menu bar at the top of the screen, click on the “Format” tab. In the “Format” dropdown menu, click on the “Line & paragraph spacing” option.
Step-2: Click on your preferred paragraph spacing option
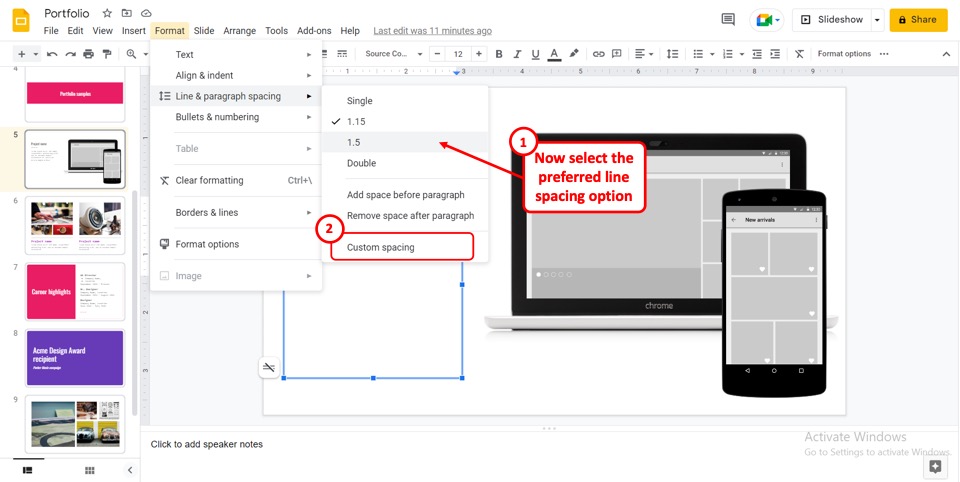
In the second dropdown menu by the “Line & paragraph spacing” option, you can click on your preferred option for the selected paragraph. Alternately, to customize the line spacing, click on the “Custom Spacing” option in the second dropdown menu and type in the preferred spacing in the dialog box.
2.1 Shortcut to Adjust Line Spacing in Google Slides
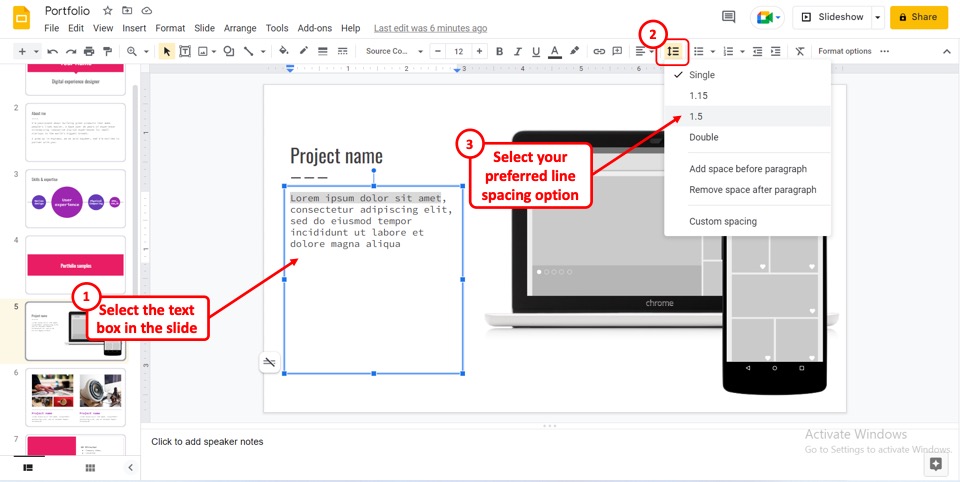
In the toolbar under the menu bar at the top of the screen, you can find the “Line & paragraph spacing” option. It is the icon that looks like three horizontal lines with a vertical arrow on the left. To adjust line spacing, you have first to select the line from the text box.
Then click on the “Line & paragraph spacing” icon in the toolbar. Select your preferred option from the dropdown menu. You can customize the line spacing using this shortcut method as well.
3. How to Adjust Paragraph Spacing in Google Slides?
In Google Slides, you can use the “Custom spacing” feature to change the paragraph spacing between two or more paragraphs in a text box. To do so, follow the 4 quick steps.
Step-1: Click on the “Format” menu
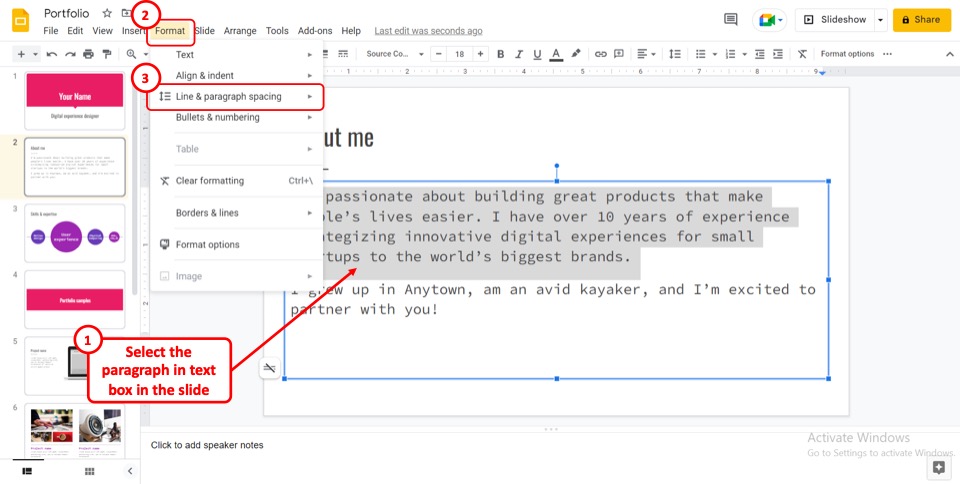
To adjust the paragraph spacing, you have to first select the paragraphs in the text box. In the menu bar at the top of the screen, click on the “Format” tab. In the “Format” dropdown menu, click on the “Line & paragraph spacing” option.
Step 2: Click on the “Custom spacing” option
The next step is to click on the “Custom spacing” option at the bottom of the pop-up menu by the “Line & paragraph spacing” option. This will open a dialog box.
Step-3: Adjust preferred paragraph spacing
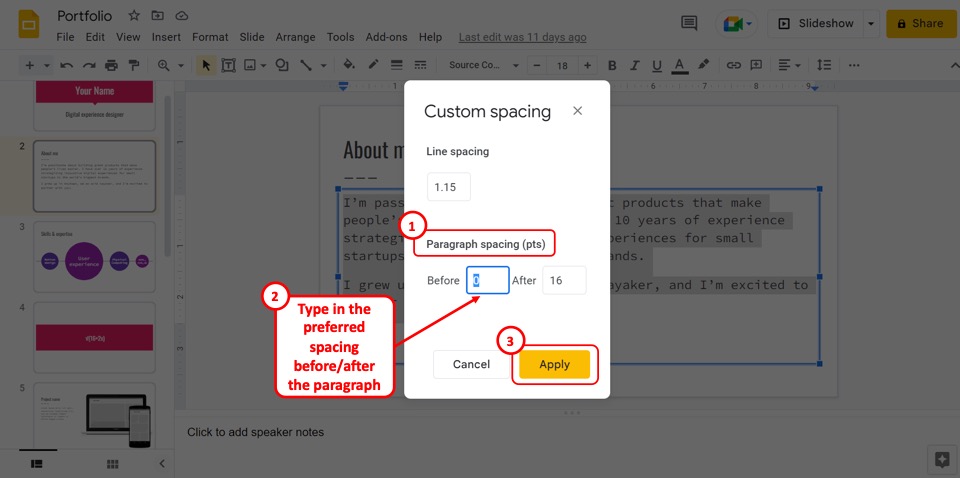
In the “Custom Spacing” dialog box, click on the “Before” box under the “Paragraph spacing (pts)” section. Then type in your preferred spacing before the start of a paragraph. Similarly, type in the preferred spacing at the end of the paragraph in the “After” box.
Step-4: Click on the “Apply” button
Now all you have to do is click on the “Apply” button at the bottom of the “Custom spacing” dialog box to customize the paragraph spacing (shown above).
3.1 Shortcut to Adjust Paragraph Spacing in Google Slides
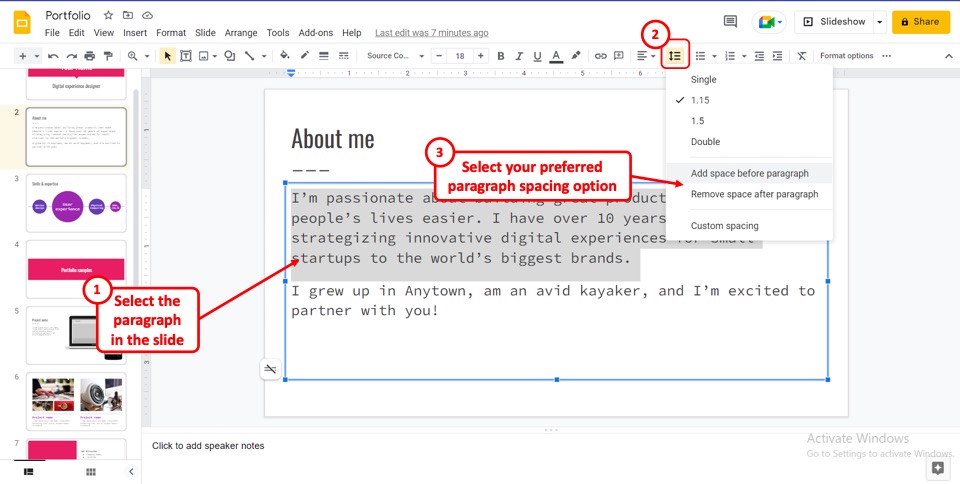
Using the toolbar under the menu bar at the top of the screen, you can quickly adjust the paragraph spacing. All you have to do is click on the “Line & paragraph spacing” icon.
Then, all you have to do is select your preferred option in the dropdown menu under the “Line & paragraph spacing” icon. The available options are “Add space before paragraph” and “Remove spacing before paragraph”.
4. How to Adjust Letter Spacing in Google Slides?
Unfortunately, you can not adjust letter spacing in Google Slides since there is no option in Google Slides to change or adjust letter spacing.
Since you cannot change the kerning in Google Slides, you can try adjusting other things like customizing the fonts to create bigger fonts, adding space between lines, etc. to fix readability issues.
5. How to Remove Double Spacing in Google Slides?
To remove double spacing in Google Slides, you have first to select that paragraph inside the text box. Then, in the menu bar at the top of the screen, click on the “Format” tab. In the “Format” dropdown menu, click on the “Clear formatting” option to remove the double spacing format.
You can also remove double spacing by pressing the “Ctrl+\” keys on your keyboard.
5.2 Shortcut to Remove Double Spacing in Google Slides
To remove double spacing, you have first to select the text from the text box. Then click on the “Clear formatting” icon in the toolbar. The “Clear formatting” icon looks like the letter “T” with a diagonal strike through it.
6. How to Change Spacing Between Bullet Points in Google Slides?
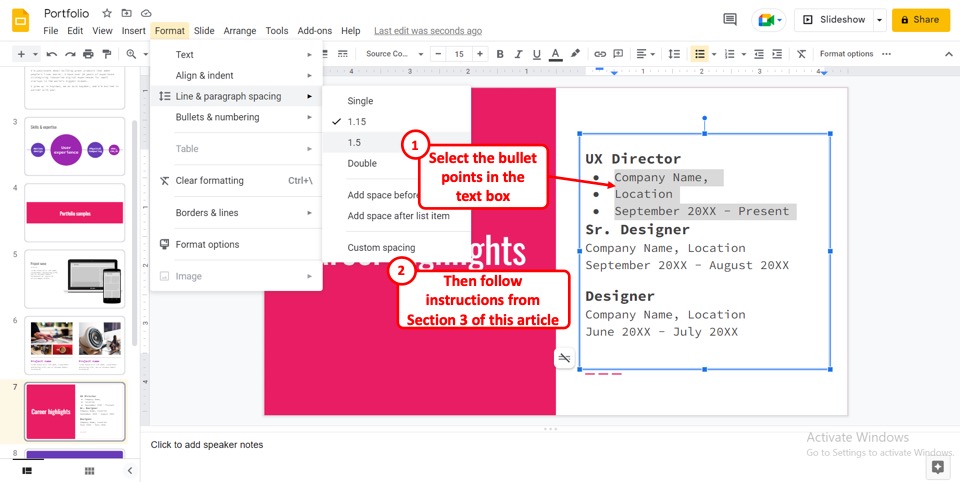
In Google Slides, each bullet point is treated as a separate paragraph. To change the spacing between the bullet points in Google Slides, you have to follow the same steps as adjusting paragraph spacing in the text box.
First, you will have to select the bullet point paragraph. Then follow the steps detailed in section 3 to change the spacing between bullet points.
7. How to Adjust Indentation in Google Slides?
To adjust the indentation in Google Slides, you have first to select that paragraph inside the text box. Then follow the 2 quick steps.
Step-1: Click on the “Format” menu
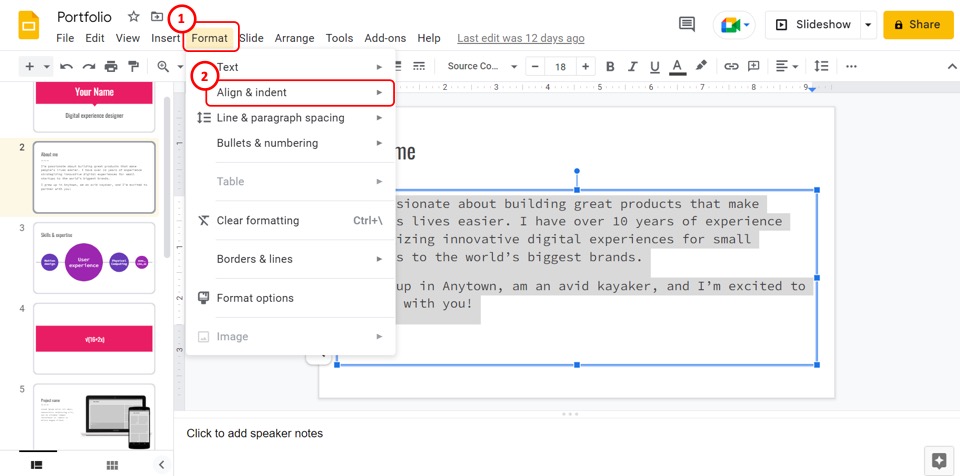
In the menu bar at the top of the screen, click on the “Format” tab. In the “Format” dropdown menu, click on the “Align & indent” option.
Step-2: Click on your preferred indent option
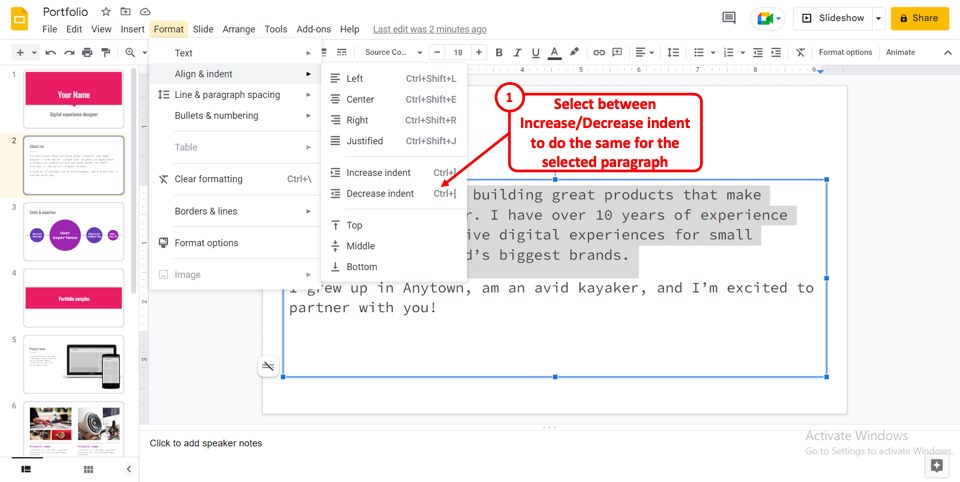
In the second dropdown menu by the “Align & indent” option, click on the “Decrease indent” or “Increase Indent”option to decrease or increase the indentation respectively.
7.1 Shortcut to Adjust Indentation in Google Slides
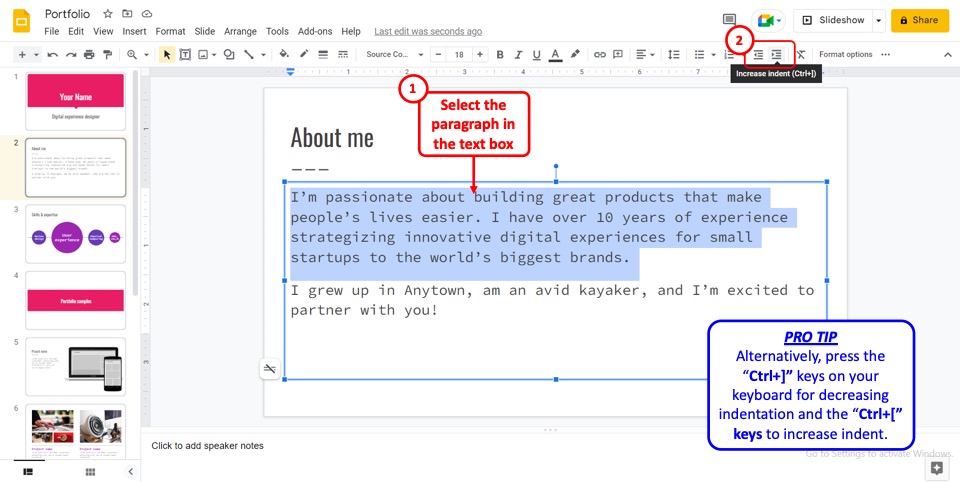
In the toolbar, under the menu bar at the top of the screen, you will find the two indentation options for decreasing and increasing indent side by side.
To adjust indentation, you have to first select the text. Then click on either the “Increase Indentation” or “Decrease Indentation” icon in the toolbar.
You can also adjust the indentation using the keyboard. Select the paragraph where you want to add indentation. Then press the “Ctrl+]” keys on your keyboard for decreasing indentation and the “Ctrl+]” keys to increase indent.
Credit to benzoix (on Freepik) for the featured image of this article (further edited).