![How to Add Tables in PowerPoint? [Complete Guide!]](https://artofpresentations.com/wp-content/uploads/2022/05/Featured-Image-Add-table-in-Powerpoint.jpg)
Do you have unorganized data that is giving you a tough time? Well, tables allow you to represent this data in a systematic manner so you can make valuable sense of it. But how do you create such easy-to-understand tables in PowerPoint?
Here’s how to add a table in PowerPoint –
- Click on the “Insert” Tab
- Click on the “Table” option from the ribbon.
- Select the “Insert Table” option from the dropdown
- Choose the number of rows and columns and click “OK”
Adding a table is just the start. If you really want to use “Tables in PowerPoint”, you will need to know a heck of a lot more like how to add columns and rows, how to edit a table, how to move or resize a table, and so on!
In this article, you will get to learn each of these things step by step and more! So, without further adieu, let’s get started!
1. How to Create a Table in PowerPoint?
A table in a PowerPoint presentation slide is a grid of cells arranged in rows and columns for quick data representation. To create a table in PowerPoint, follow these 3 steps.
Step-1: Click on the “Insert” tab
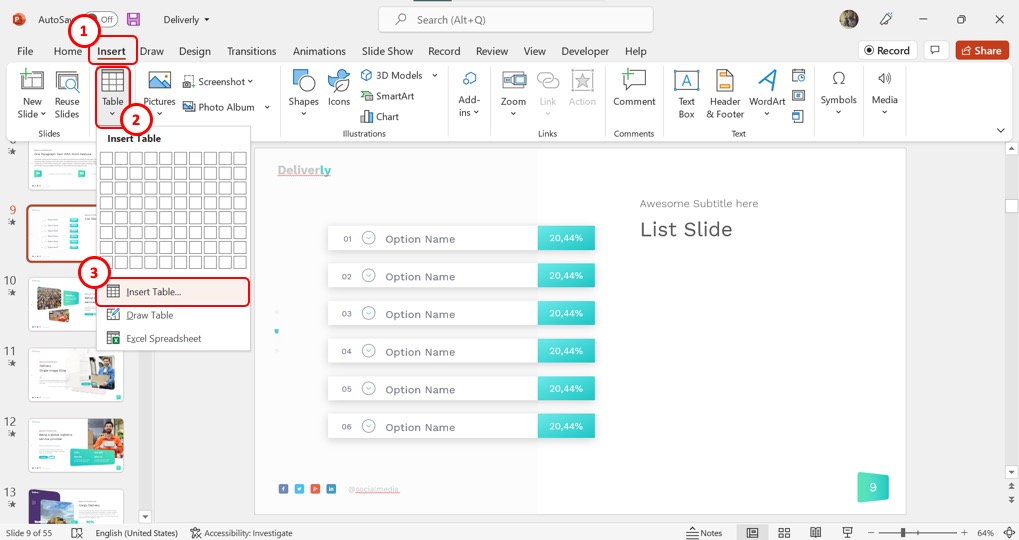
In the menu ribbon located at the top of the screen, click on the “Insert” tab. Then click on the “Table” option in the “Insert” menu. In the dropdown menu under the “Table” option, click on the “Insert Table” option to launch a dialog box.
Step-2: Set the number of columns and rows
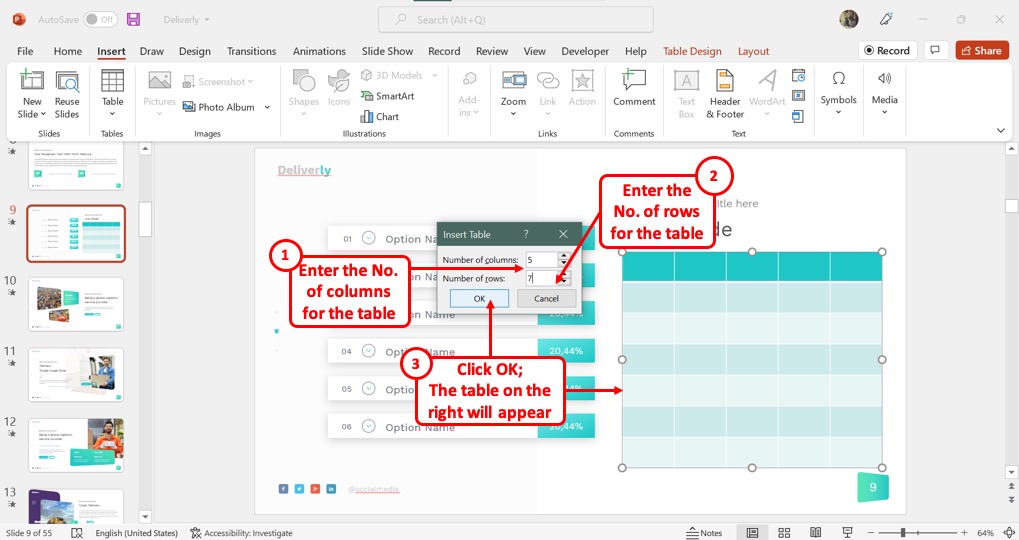
In the “Insert Table” dialog box, click on the “Number of columns” box. Then type in the number of columns you want to add to the table. Similarly, click on the “Number of rows” box to type in the preferred number of rows for the table.
Step-3: Click on the “OK” button
The final step is to click on the “OK” button at the bottom of the “Insert Table” dialog box to insert the table into a PowerPoint slide (see above).
2. How to Add Content to the Table in PowerPoint?

In Microsoft PowerPoint, you can add content to a table by just clicking on it. Click on the cell where you want to add text and start typing. You can also add various objects in a cell using the “Insert” tab.
3. How to Insert a New Row to a Table in PowerPoint?
In Microsoft PowerPoint, you can change the number of rows in a table even after creating it. The feature is available in the “Rows and Columns” group of the “Layout” tab in PowerPoint.
3.1 Insert a Row Above
To insert a row above the selected row in a table in PowerPoint, follow these steps: (as illustrated below)
Step-1: Click on the “Layout” tab
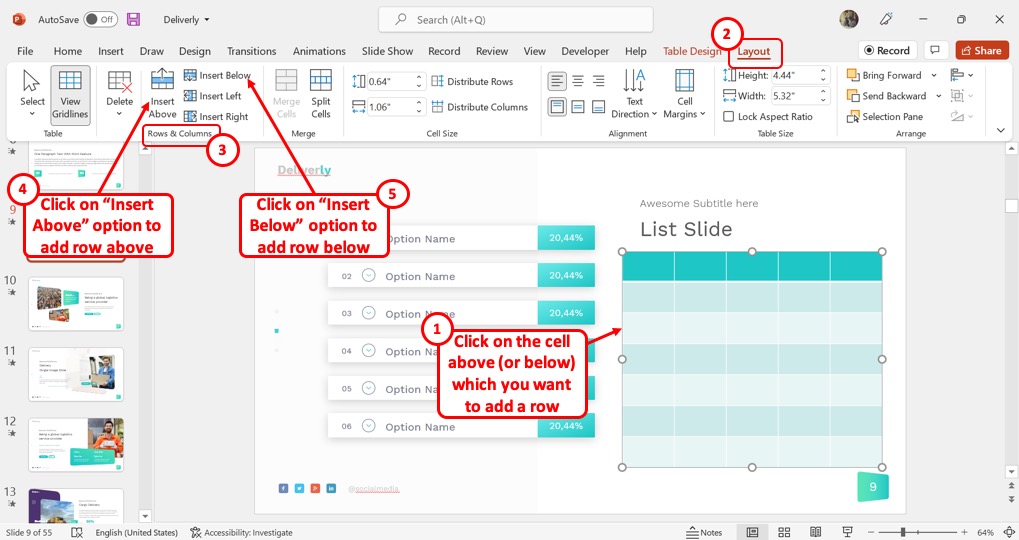
The first step is to click on the table cell above which you want to add a new row. Then click on the “Layout” tab in the menu ribbon.
Step-2: Click on the “Insert Above” option
In the “Rows and Columns” group of the “Layout” tab, click on the “Insert Above” option to add a new row above the selected row.
3.2 Insert a Row Below
To insert a row below the selected cell in a table, click on the “Layout” tab in the menu ribbon. Then all you have to do is click on the “Insert Below” option in the “Rows and Columns” group of the “Layout” menu (shown in the previous illustration)
4. How to Insert a New Column to a Table in PowerPoint?
Using the “Rows and Columns” group in Microsoft PowerPoint, you can add new columns to an already inserted table in a slide.
4.1 Insert a Column to the Left
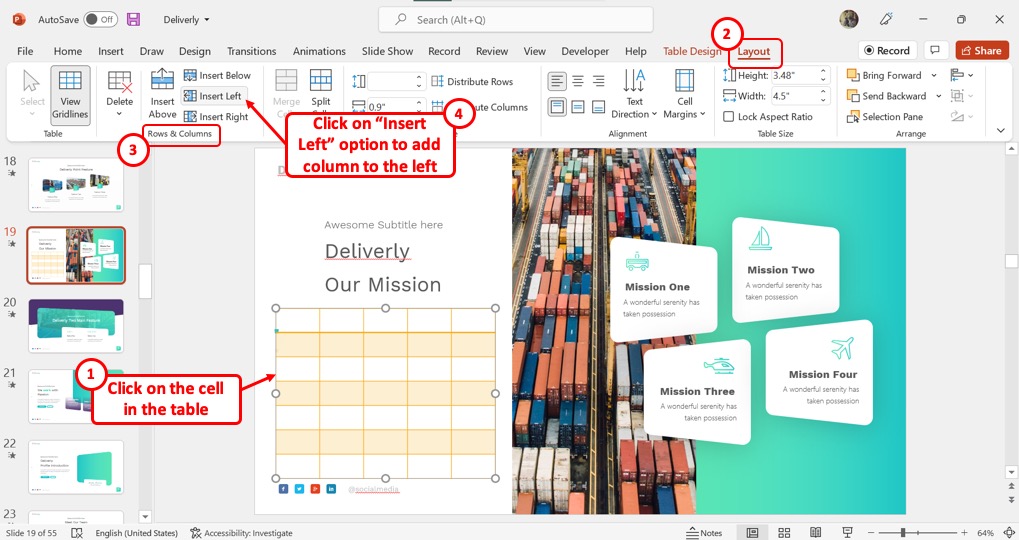
To insert a column to the left, you have to first click on the cell in the table. Then click on the “Layout” tab from the menu ribbon located at the top of the screen. In the “Rows and Columns” group of the “Layout” tab, click on the “Insert Left” option.
4.2 Insert a Column to the Right
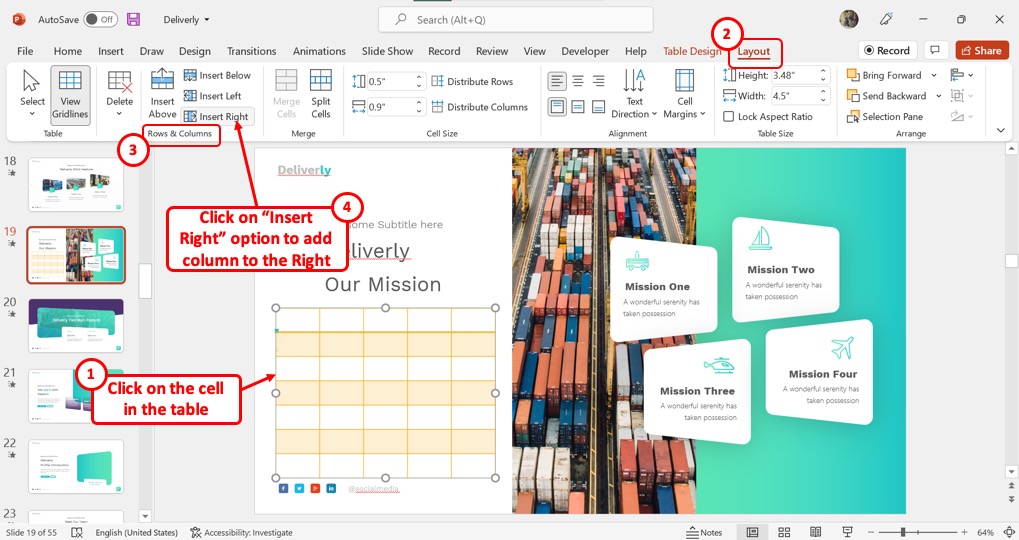
In Microsoft PowerPoint, you can insert a column to the right of a selected column in a table. All you have to do is click on the “Layout” tab in the menu ribbon. In the “Layout” tab, click on the “Insert Right” option to insert the column.
5. How to Delete Rows and Columns in a Table in PowerPoint?
Microsoft PowerPoint has a “Delete” feature that allows you to delete an entire row or column or even an entire table. The feature is available in the “Layout” tab.
5.1 Deleting a Cell
Unlike in the table feature of Microsoft Word, there is no “Delete Cell” option in PowerPoint tables. In Microsoft PowerPoint, you simply cannot delete a single cell from a table in the opened slide. However, you can delete entire rows and columns.
5.2 Deleting an Entire Row or Column
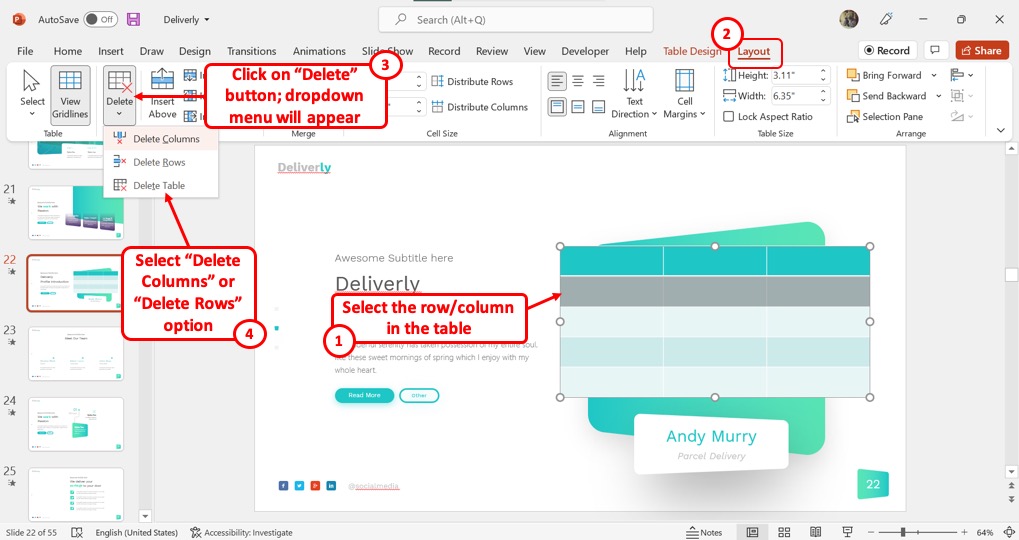
To delete an entire row or column in a table, you have to first select that row or column. Then click on the “Layout” tab in the menu ribbon. In the “Layout” menu, click on the “Delete” button and select the “Delete Columns” or “Delete Rows” option from the dropdown menu. This will delete the selected row or column from the table.
6. How to Format a Table in PowerPoint?
You can easily format a table using the contextual tabs, “Layout” and “Table Design”. I’ve actually written a detailed article on how to format a table in PowerPoint. Make sure you check it out to learn all the detailed tricks and tips!
To access the contextual tabs, you have to first click on the table in the slide. Follow the steps below to access the tabs:
Step-1: Click on the “Layout” tab
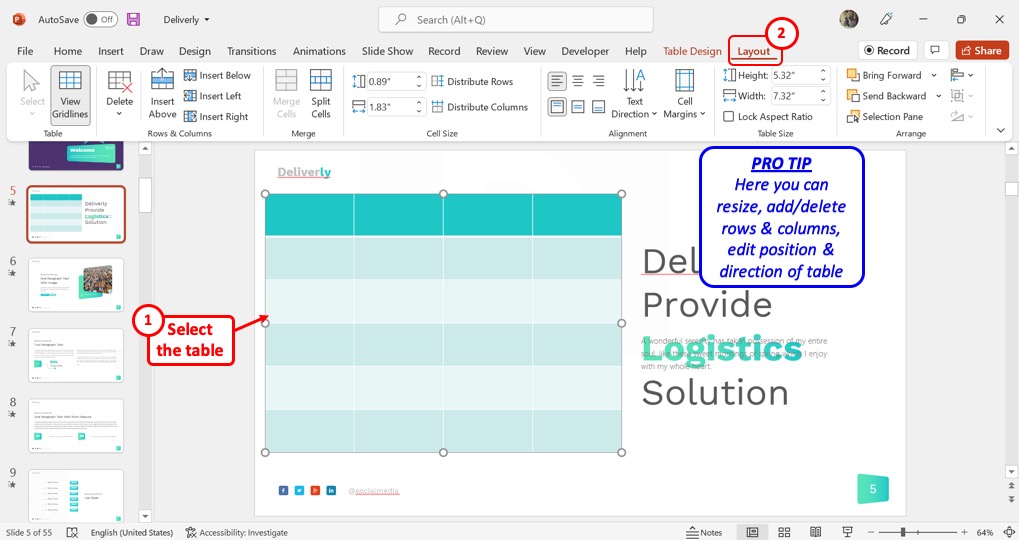
In the menu ribbon located at the top of the screen, you can click on the “Layout” tab to edit the table size and alignment. This includes the size of the table, individual rows and columns, and the cells. You can also edit the position and direction of the table as well as the contents inside it.
Step-2: Click on the “Table Design” tab
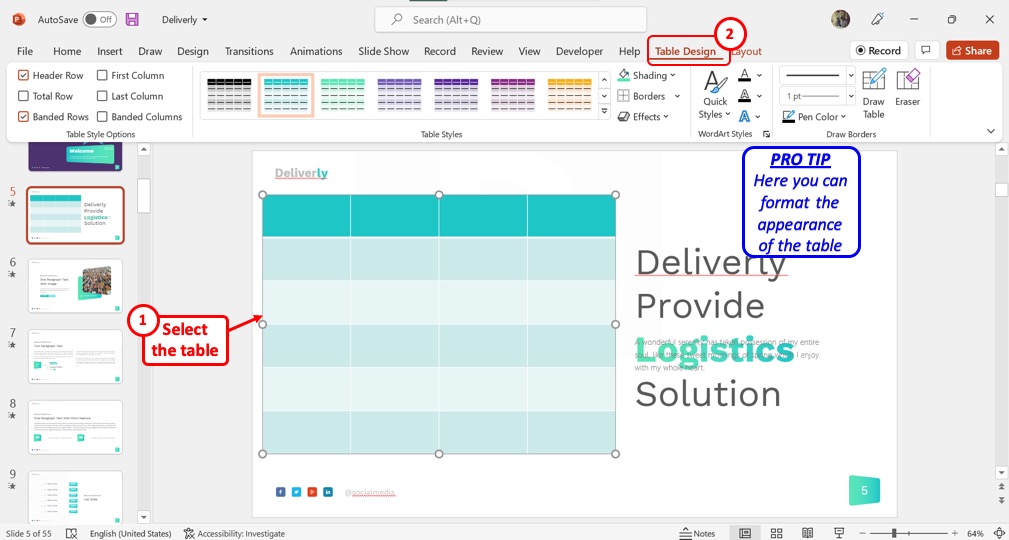
You can click on the “Table Design” tab to format the appearance of the table. This includes the color, design, and theme of the table as well the text within the table.
7. How to Insert Table from Excel in PowerPoint?
The “Paste Special” option in PowerPoint allows you to add an Excel table to your presentation slide. Do make sure to check out my other article that goes in-depth into the topic of inserting a table in PowerPoint from Excel!
Meanwhile, here’s some brief information about adding a table in PowerPoint from Excel.
First, make sure that you copy the table from PowerPoint using the “Ctrl+C” shortcut. Then, follow the steps mentioned below –
Step-1: Click on “Paste Special”
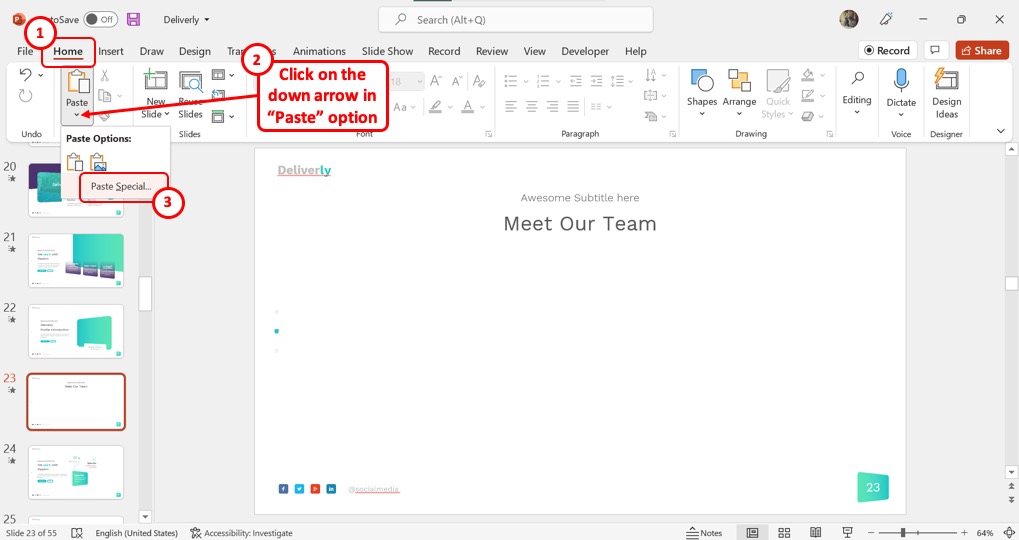
In the menu ribbon located at the top of the screen, click on the “Home” tab. Then click on the down arrow under the “Paste” option and select the “Paste Special” option from the dropdown menu.
Step-2: Click on “Microsoft Excel Worksheet Object”
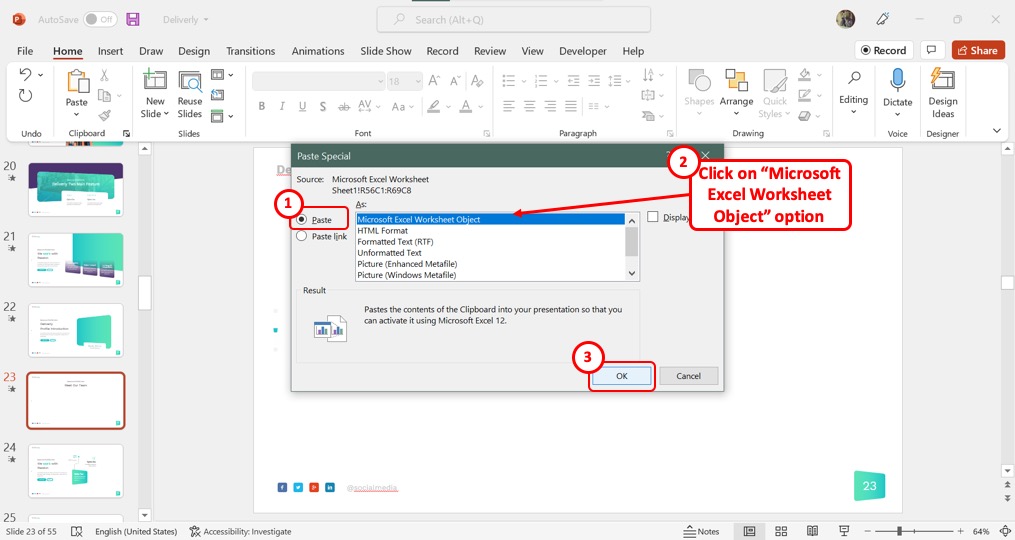
In the “Paste Special” dialog box, click on the “Microsoft Excel Worksheet Object” option from the list of file types. Then all you have to do is click on the “OK” button to add the Excel table to the slide.
8. How to Move or Resize Table in PowerPoint
In Microsoft PowerPoint, you can easily resize a table after inserting it into a slide. You can also drag the table within the slide to move it to your preferred spot.
I’ve written a dedicated article on how to move or resize a table in PowerPoint where I provide pro tips! Do make sure you check out the article!
8.1 How to Move a Table?
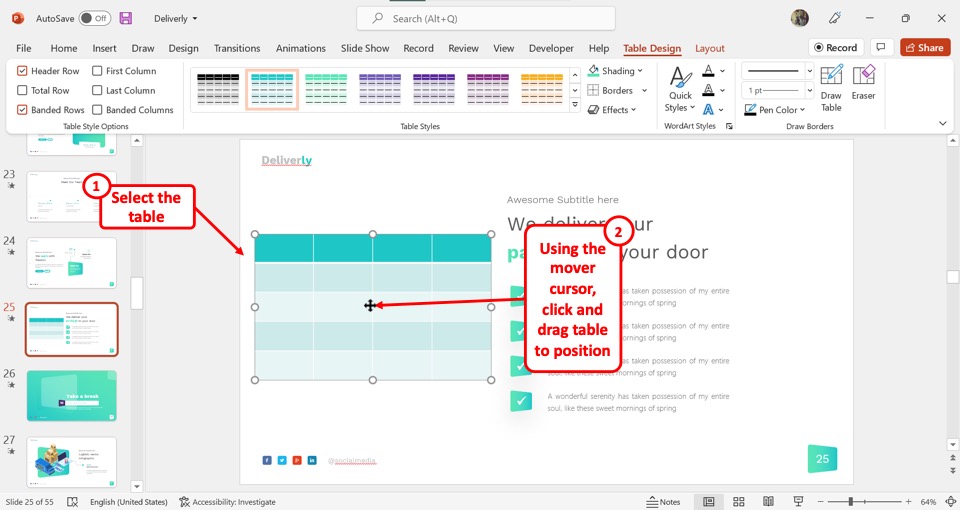
To move a table inside a slide, all you have to do is click on the edge of the table. When the mover cursor appears on the screen, all you have to do is click and drag the pointer which will move the table along with it.
8.2 How to Resize a Table?
Using the “Layout” tab in PowerPoint, you can resize a table. To resize a table, follow the 2 steps below
Step-1: Click on the “Layout” tab
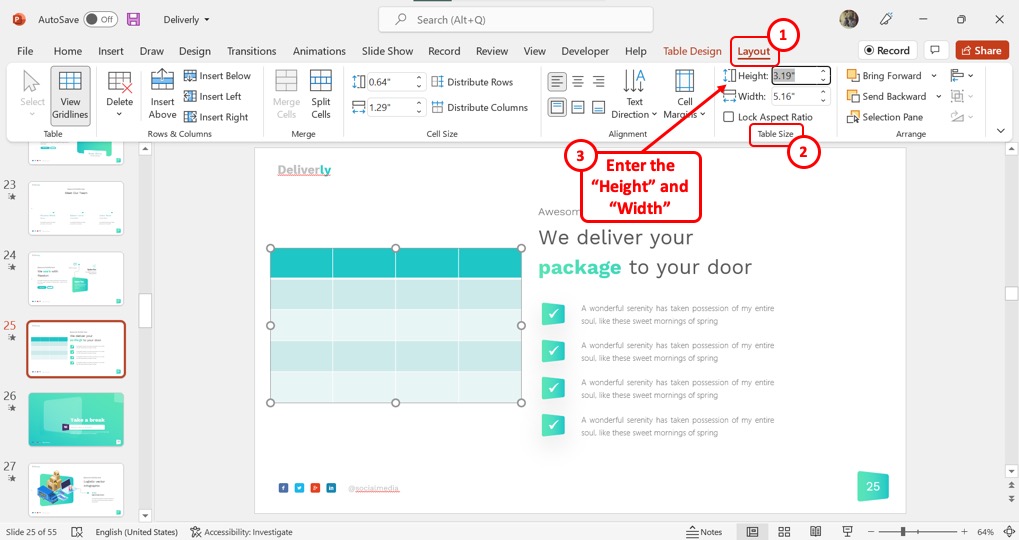
In the slide, click on the table that you want to resize. Then click on the “Layout” contextual tab in the menu ribbon.
Step-2: Click on the “Table Size” group
In the “Layout” tab, look for the “Table Size” group which is the sixth group. In the “Table Size” group, you can enter your preferred size in the “Height” and “Width” boxes to resize the table (shown above).
9. How to Delete a Table in PowerPoint?
Microsoft PowerPoint allows you to quickly delete an entire table from the slide. All you have to do is follow the 2 simple steps.
Step-1: Click on the “Layout” tab
The first step is to click on the table that you want to delete from the PowerPoint slide. Then click on the “Layout” tab which is the last tab in the menu ribbon located at the top of the screen.
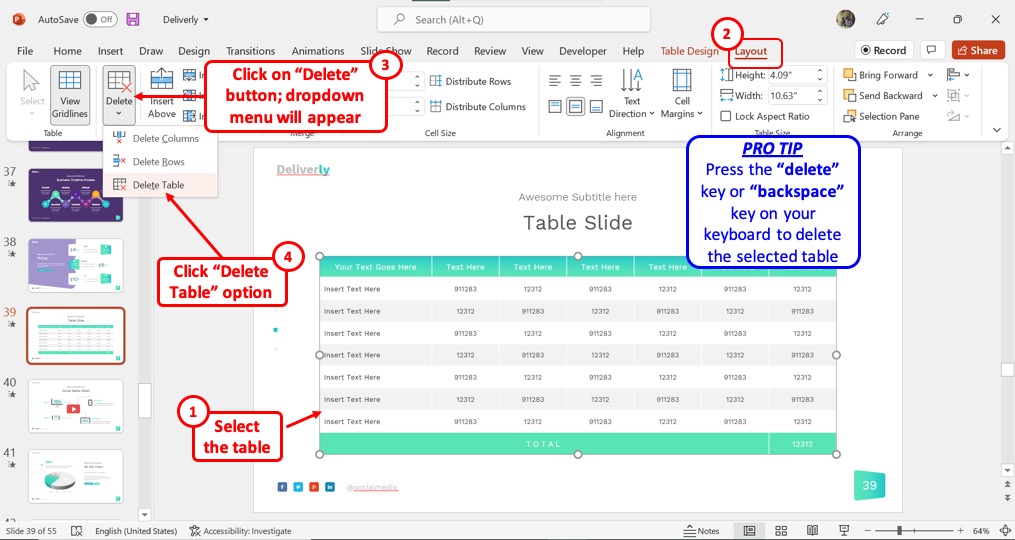
Step-2: Click on the “Delete Table” option
In the “Layout” tab, click on the “Delete” option. Then click on the “Delete Table” option in the dropdown menu under the “Delete” option. Alternatively, you can press the “delete” key or the “backspace” key on your keyboard to delete the selected table.