![Add Bullet Points in PowerPoint [A Complete Tutorial!]](https://artofpresentations.com/wp-content/uploads/2022/02/Featured-Image-How-to-Add-Bullet-Points-in-PowerPoint.webp)
Bullet points are critical to most presentations as they clearly and succinctly put across the key points of a particular slide. Thus, knowing how to add bullet points in PowerPoint is quite important to create clear, minimalistic presentations!
To add bullet points to text in PowerPoint, first, select the text (or the text box). Then, click on the “Home” tab. Next, click on the “Bullets” command from the “Paragraph” group. This will apply the bullet points to the selected text in PowerPoint.
In this article, we shall understand everything there is to know about bullet points. We will take a look at how to add bullet points in PowerPoint, how to customize them, how to add indent and adjust the bullet points, and much more!
So, let’s get started!
1. How to Add Bullet Points in PowerPoint?
Adding bullet points to your PowerPoint presentation can make the text on the slides easy to read. Furthermore, it is quite easy to add bullet points in PowerPoint!
Here’s what you need to do to add bullet points in PowerPoint
Step-1: Select the Text or the Text Box
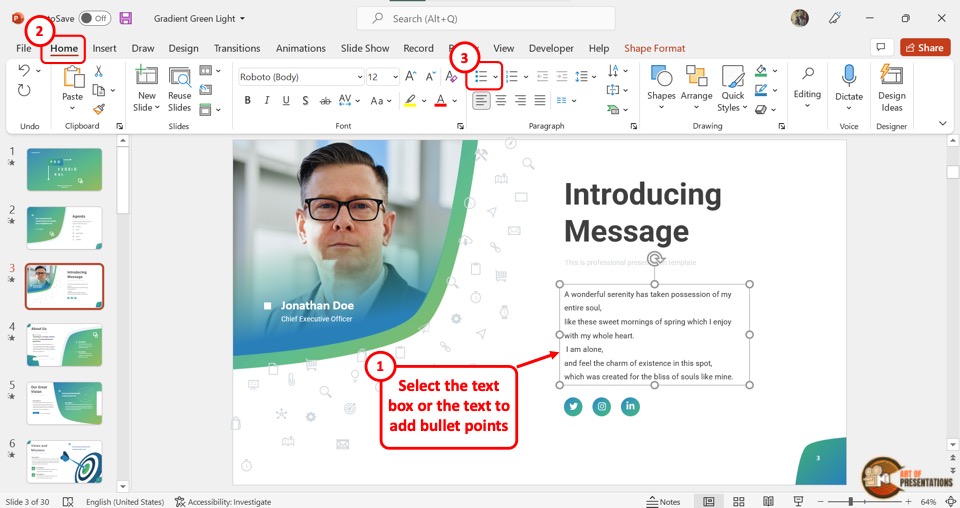
It is important to note that you can only add bullet points to text or a text box present on your PowerPoint slide as long as you first select it. So the first step is to click on the text box to select it.
If you don’t want to add bullet points to all the text within the text box, then simply select and highlight the specific text that you want to add bullet points.
Then, click on the “Home” tab in PowerPoint and click on the “Bullets” icon. The “Bullets” icon is the first icon in the first row and the first column of the “Paragraph” group on the “Home” tab and looks like a list.
Step-2: Click on the “Bullets” Command
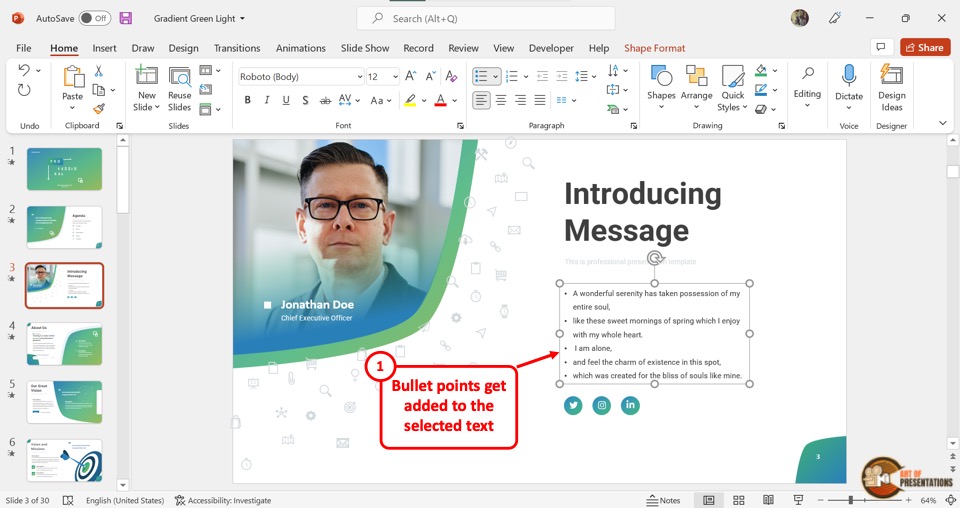
Clicking on the “Bullets” icon will add a bullet point before each paragraph in the text box as shown in the image above.
2. How to Add Second-Level Bullets (Sub-Bullets) in PowerPoint?
A second-level bullet or a sub-bullet allows you to move text one level down in the bullet points in PowerPoint. A second level bullet can help represent multiple pieces of information that is part of the main bullet point.
You can add second-level bullets to a text box in two different ways.
Method-1: Using the “Increase List Level” option
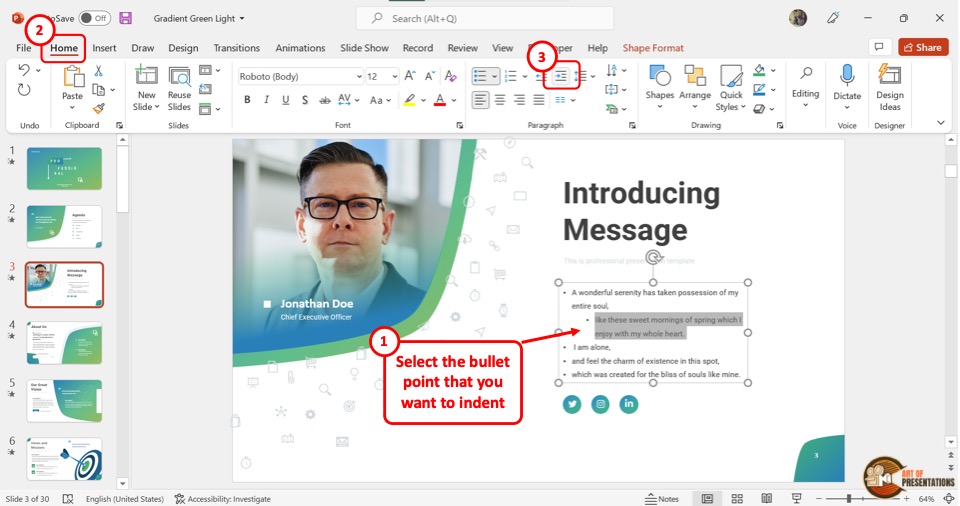
In the text box with a bullet list, select the bullet item which you want to convert to a sub-bullet. Then click on the “Increase Indent Level” icon.
It is usually the fourth icon in the first row of the “Paragraph” section in the “Home” menu. This will turn the selected text into a sub-bullet point.
Method-2: Using the keyboard shortcut
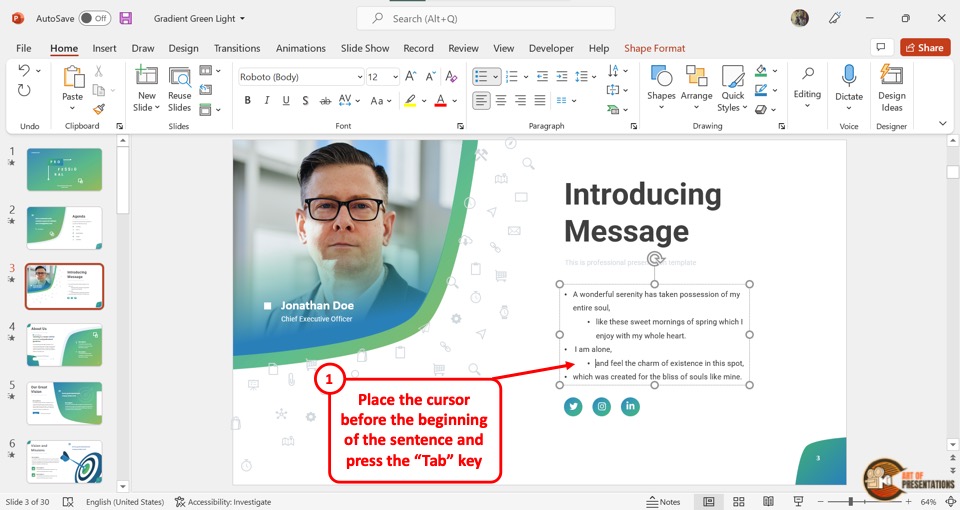
To use the keyboard shortcut, you have to first click on the main bullet point that you want to convert to a second-level bullet. Then all you have to do is press the “Tab” key on your keyboard.
Using both the aforementioned methods, you can keep adding more levels to the bullet points as per your requirement.
2.1 How to Convert a Sub-Bullet to a Main Bullet?
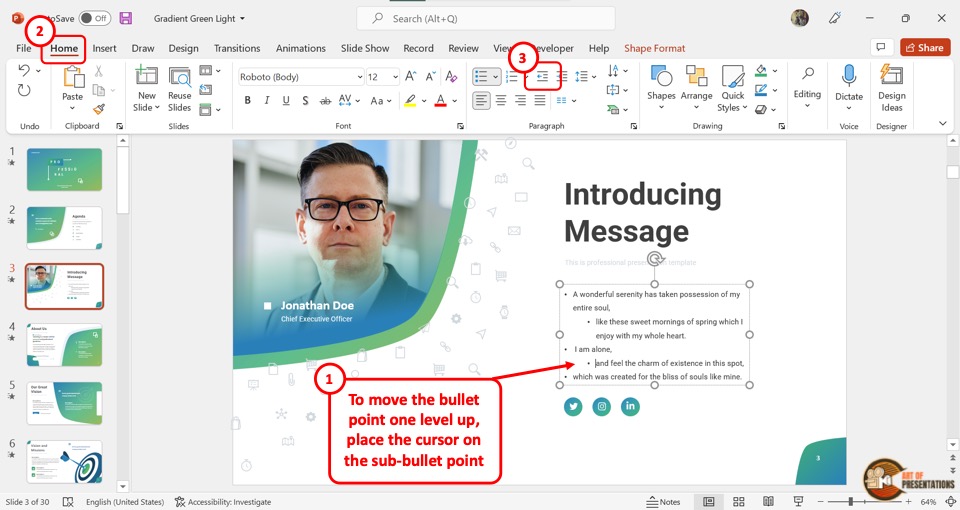
Sometimes, you may want to move the second-level bullet point one level up and make it the main bullet point.
To convert a sub-bullet to the main bullet, you have to first click on the sub-bullet item. Then click on the “Decrease List Level” icon which is the third icon in the first row of the “Paragraph” section in the “Home” menu.
You can alternatively press the “Shift+Tab” keys on your keyboard. This will turn the sub-bullet into the main bullet.
3. How to Customize Bullet Points in PowerPoint?
You can also choose to customize the bullet points in PowerPoint the way you want. Meaning, you can choose to change the way your bullet points look. You can go with a different design, adjust the size, color, or even use a picture as a bullet point!
Let’s take a look at these options to customize the bullet points in PowerPoint below –
Step-1: Click on the text box
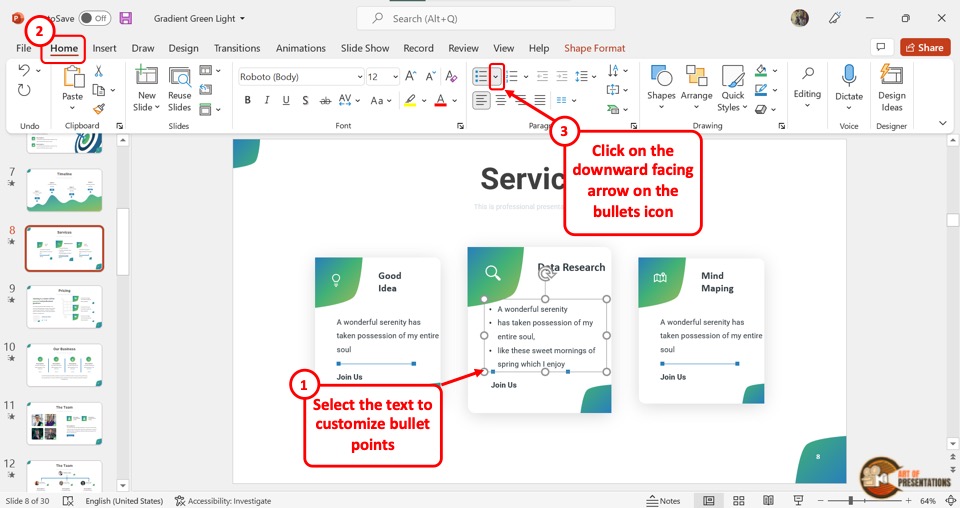
In the open PowerPoint slide, the first step is to click on the text box containing the bullet points. Then click on the “Home” tab in the menu ribbon.
Step-2: Click on the “Bullets and Numbering” option
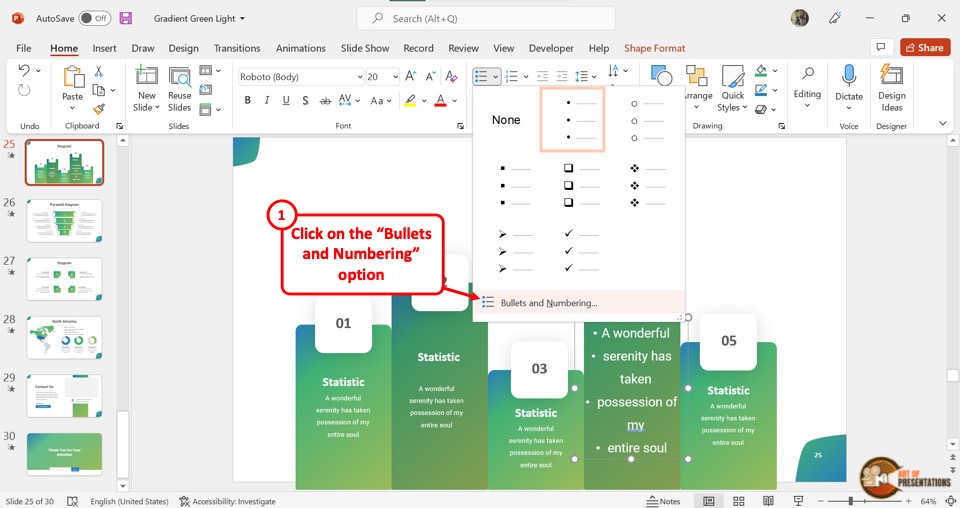
In the “Paragraph” group of the “Home” tab, click on the arrow next to the “Bullets” icon. This will open a dropdown menu where you have to click on the “Bullets and Numbering” option.
Step-3: Select your preferred design
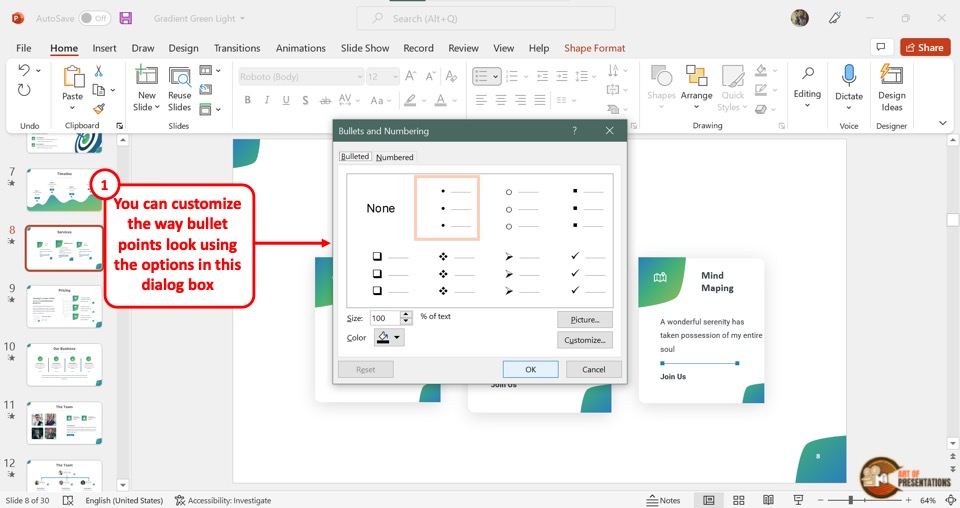
In the “Bullets and Numbering” dialog box, click on the “Bullet” option. You can now click on the “Size” option, “Color” option, and the “Picture” option to customize the bullet point.
Then click on the “OK” button at the bottom of the dialog box to save the custom bullet points.
“Color”
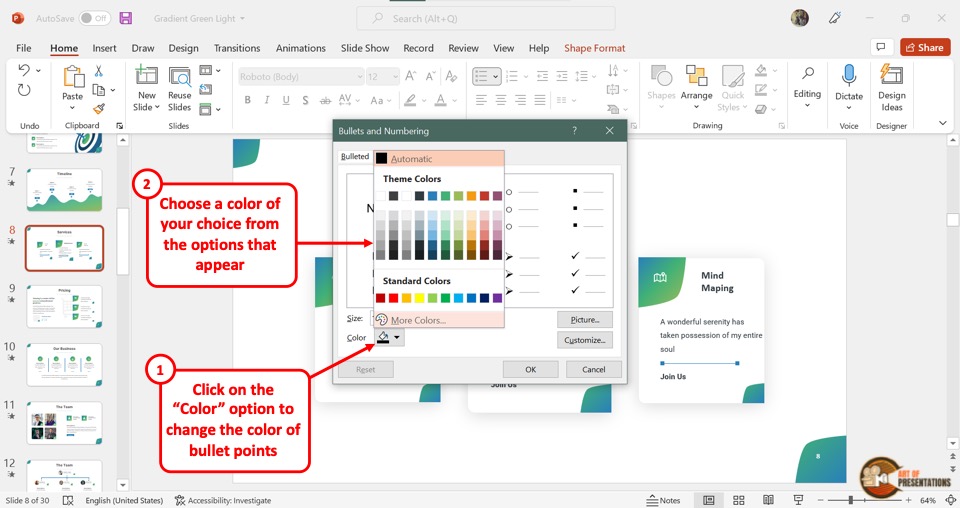
You can customize the color of the bullet point by clicking on the “Colors” option in the “Bullets and Numbering” dialog box. In the pop-up menu, click on your preferred color.
You can also click on the “More Colors” option if you want to pick a color that is not available under “Theme Colors”.
If you can’t see the color that you wish to use in the options provided, you can even use the “Eyedropper Tool” in PowerPoint to match any color on your screen.
“Size”
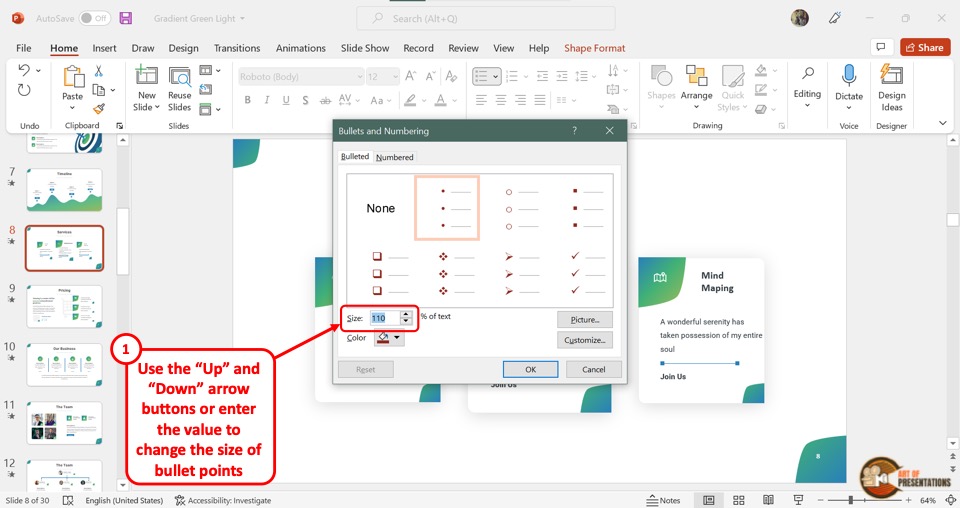
By clicking on the “Size” box, you can change the size of the bullet point. Type in a number in the “Size” box which will show the size of the bullet point proportional to the size of the text.
“Picture”
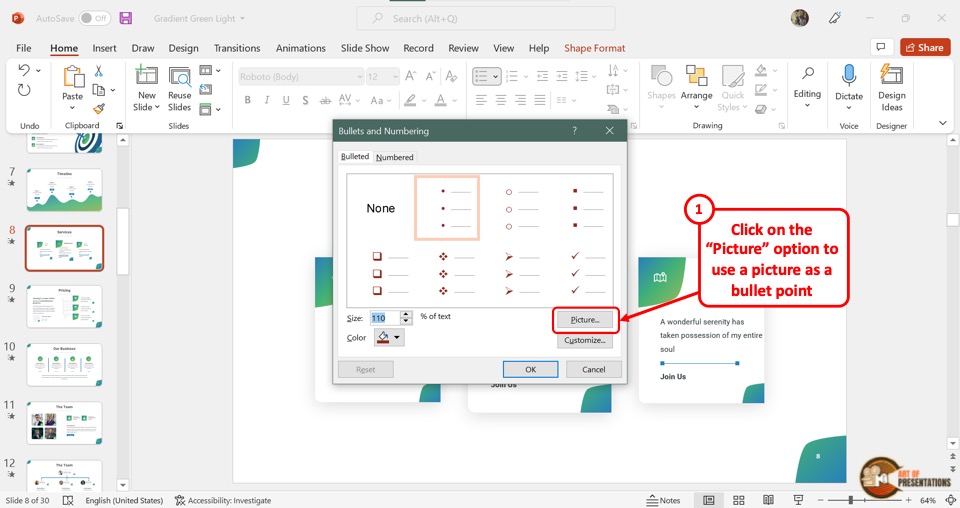
By clicking on the picture option, you can change the bullet points into pictures.
Step-1: Click on the “From a File” option
When you click on the “Pictures” option, it will open a dialog box. Click on the “From a File” option from the dialog box.
Step-2: Click on the “Insert” button
Now all you have to do is click on the picture that you want to add as the bullet point from the “Insert Picture” dialog box.
Then click on the “Insert” button at the bottom of the dialog box. This will replace the bullet points with the selected picture.
Using picture as a bullet point is an idea that works in very rare, well thought out situations. Thus, I’d recommend avoid using this option unless you know what you are doing!
4. How to Increase or Decrease Indent of Bullet Points?
In a text box in a Microsoft PowerPoint presentation, the indent of bullet points shows the list level. By increasing the indent, the bullet item is sent to a lower position in the list hierarchy.
Similarly, you can increase the hierarchy position by decreasing the indent of a bullet point.
Increasing and decreasing the indent also helps you to move a bullet point up or down a level in PowerPoint (as we saw earlier in the article).
4a. Increasing Indent of Bullet Points
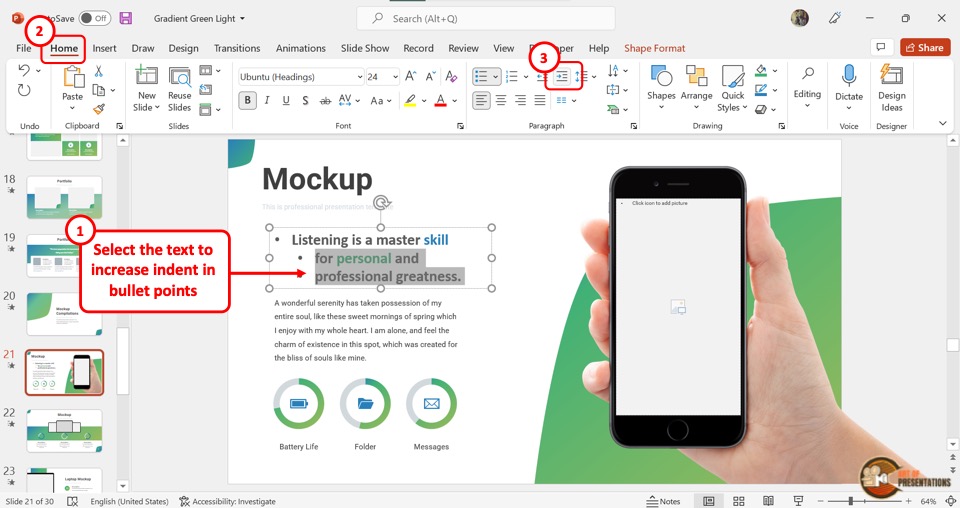
To increase the indent of the bullet point, select the bullet item or multiple bullets. Then click on the “Increase List Level” option in the “Paragraph” section of the “Home” menu.
The “Increase List Level” icon looks like a paragraph with an arrow pointed to the right. Alternatively, you can press the “Tab” key on your keyboard.
4b. Decreasing Indent of Bullet Points

You can only decrease the indent of a sub-bullet point but not the main bullet. To do so, select one or more sub-bullet items. In the “Paragraph” section of the “Home” menu, click on the “Decrease List Level” icon that looks like a paragraph with an arrow facing leftward.
Alternatively, you can press the “Shift+Tab” keys on your keyboard to decrease the indent of the bullet point.
5. How to Change the Style of Bullet Points in PowerPoint?
In addition to changing the color, size and using picture as a bullet point, you can also change the style of bullet point in PowerPoint.
Just as before, first, click on the arrow next to the “Bullets” option and select the “Bullets and Numbering” option from the dropdown menu.
Change bullet symbol
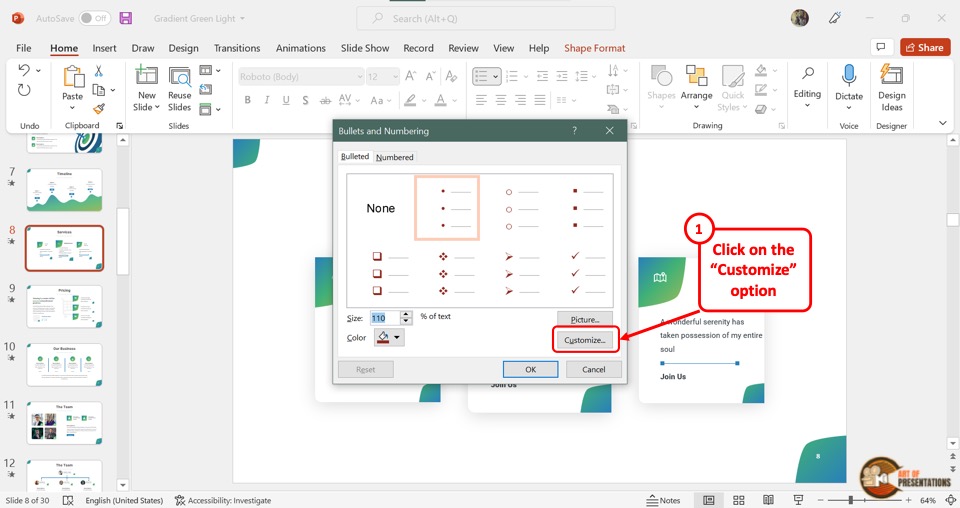
To change the bullet symbol, click on the “Customize” button in the “Bullets and Numbering” dialog box. This will open the “Symbol” dialog box.
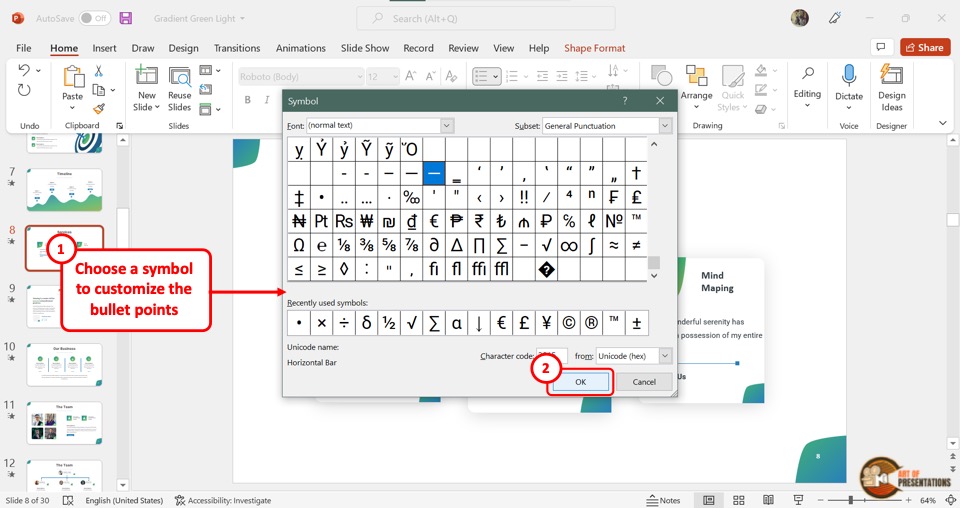
All you have to do is select your preferred symbol and then click on the “OK” button at the bottom.
Change bullet icon

To change the bullet icon, click on the “Pictures” option in the “Bullets and Numbering” dialog box. This will open the “Insert Picture” dialog box.
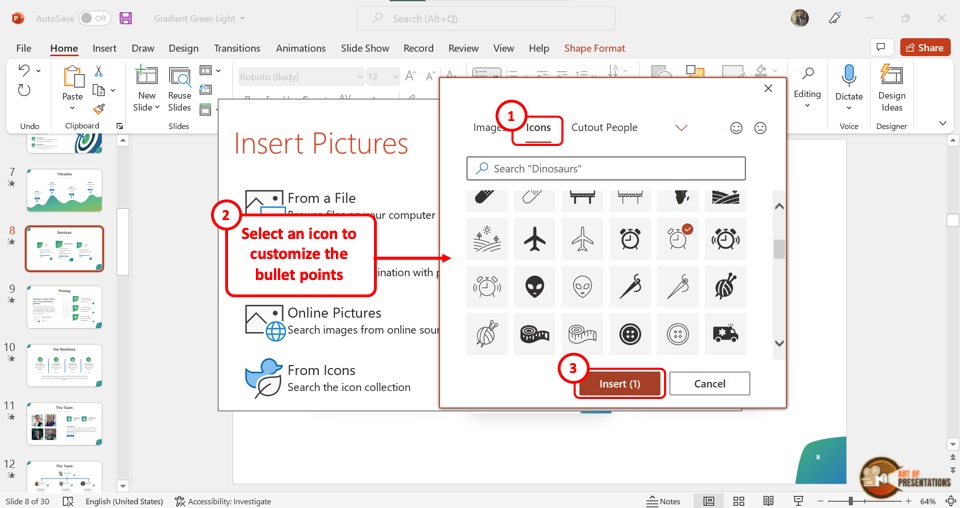
Click on the “From Icons” option and then select your preferred icon. Finally, click on the “Insert” button to change bullet point styles into icons.
6. How to Align Bullet Points Perfectly to the Left?
Within a text box in a PowerPoint slide, each paragraph can have different alignments. Thus, you can end up with bullet points that are not perfectly aligned. To align the bullet points to the left, follow the 2 quick steps.
Step-1: Select the text
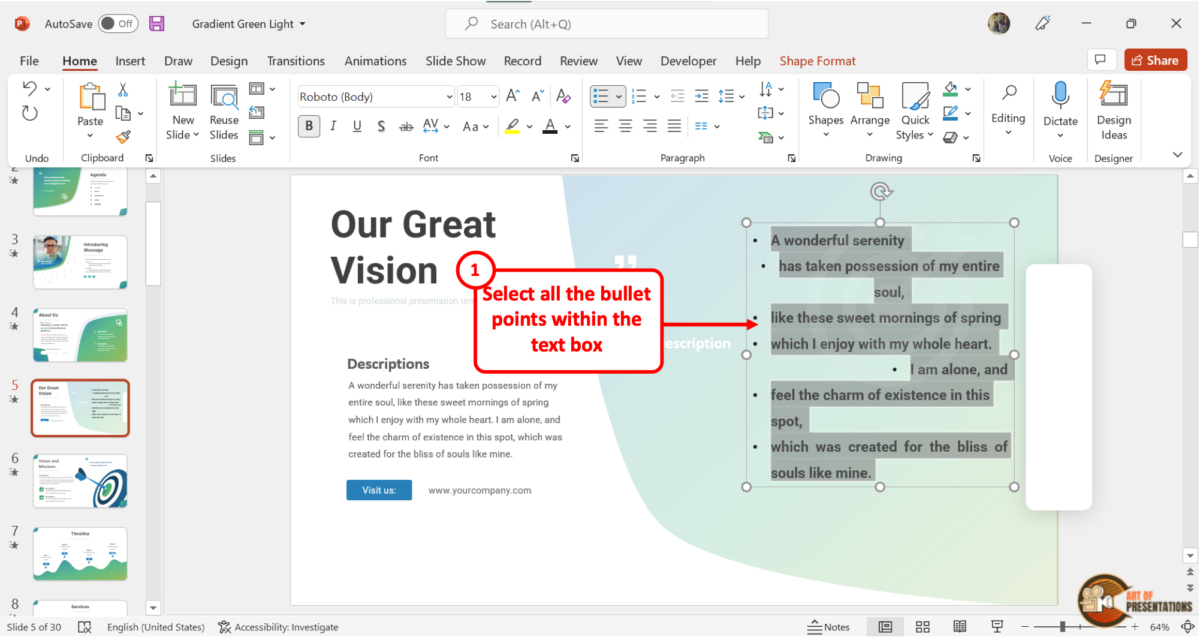
Since each bullet point is a separate paragraph, you have to select all the points in a text box to align them together. Click on the text box and then highlight all the bullet items inside the text box.
Step-2: Click on the “Align Left” option

The next step is to click on the “Align Left” option. The “Align Left” icon is the first icon in the second row of the “Paragraph” section in the “Home” menu.
Alternatively, you can press the “Ctrl+L” keys on your keyboard. This will align all the bullet points perfectly to the left.
7. How to Increase or Decrease Space between Bullet Points and Text?
In the Microsoft PowerPoint text box, there is no “Adjust List Indent” feature that is available in other Microsoft applications. So you cannot adjust the space between the bullet points by default.
However, you can use the “Ruler” to Indent Text in PowerPoint. This will allow you to increase or decrease the space between the bullet point and the text.
You may be tempted to use the space bar to create some space between the text and the bullet point. However, this is not the correct way to do it.
8. How to Animate Bullet Points?
You can easily add animation effects to bullet points in Microsoft PowerPoint.
All you have to do is select the text box and click on the “Animations” tab in the menu ribbon which is located at the top of the screen. Then select your preferred animation effect from the “Animations” menu.
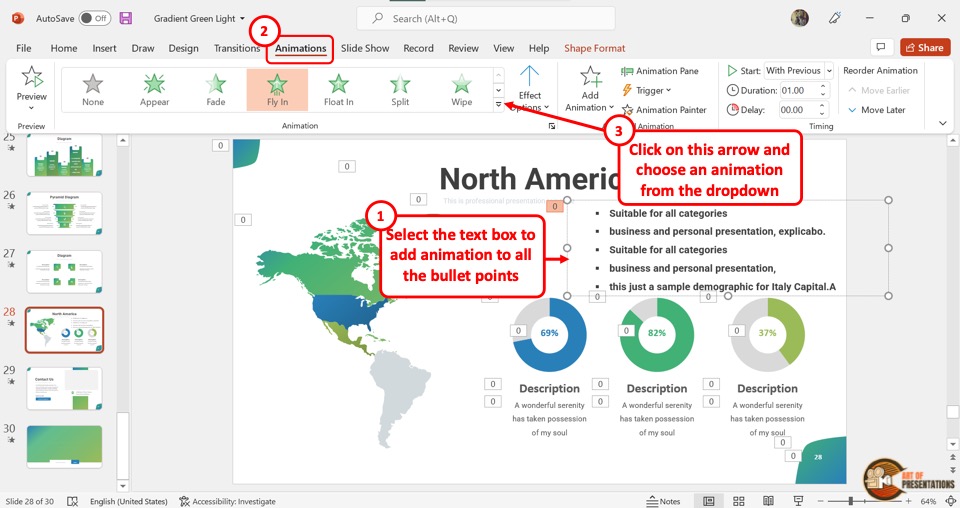
8.1 How to Animate Bullet Points to Appear One-by-One?
To make bullet points appear one-by-one in PowerPoint, first, select the text box. Then, click on the “Animations” tab and apply any entrance animation. Next, click on the “Effect Options” button and select the “By Paragraph” option from the dropdown.
The detailed steps that you need to follow are mentioned below –
Step-1: Click on the text box
The first step is to click on the text box with the bullet points. Then click on the “Animations” tab in the menu ribbon.
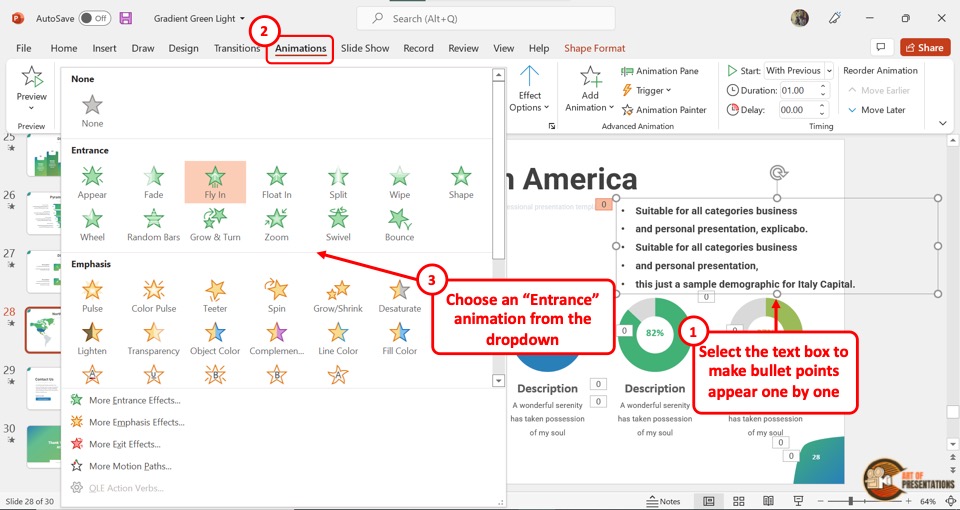
Step-2: Click on your preferred “Entrance” effect
In the “Animations” menu, click on the “More” option to open a dropdown menu. Under the “Entrance” option, click on your preferred animation effect (as shown in image in step 1).
Step-3: Choose the “By Paragraph” Option

The next step is to click on the “Effect Options” button in the “Animations” menu. Then click on the “By Paragraph” option from the dropdown menu. This will make the bullet points within the text box appear one by one.
9. How to Remove Bullet Points from Text in PowerPoint?
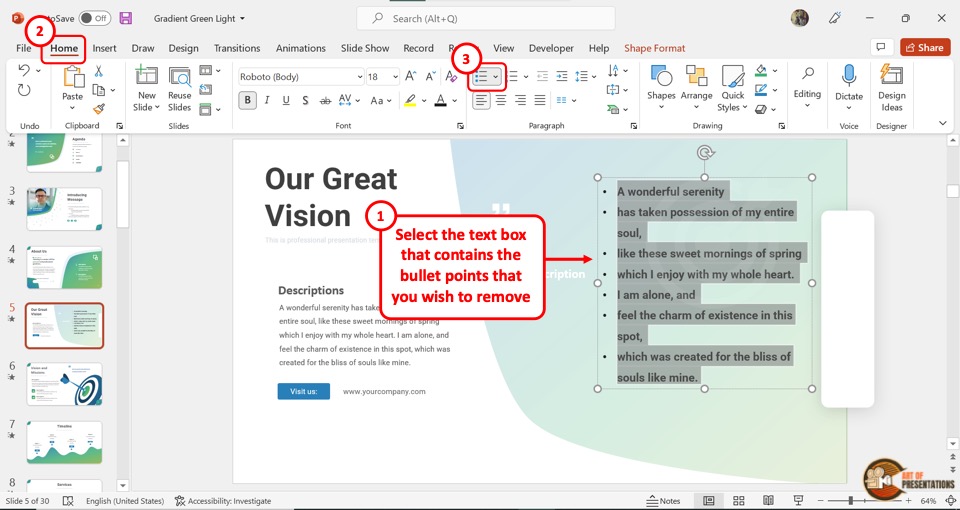
To remove bullet points from a text box in PowerPoint, first, select the text box by clicking on it. Then click on the “Bullets” option from the “Paragraph” section of the “Home” menu. This will unselect the “Bullets” option and remove the bullet points from the text box.
10. Can You Put Bullet Points on the Right of the Text?
In the Microsoft PowerPoint toolbar, there is no option to put the bullet points on the right side of the text. However, you can customize the menu ribbon to add this option. Follow the 7 quick steps.
Step-1: Click on the “Customize the Ribbon” option
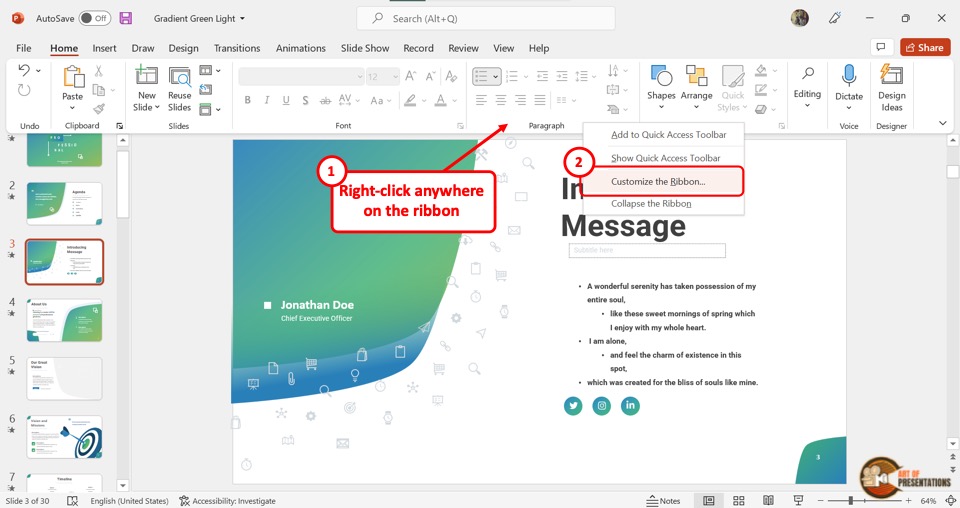
In order to put the bullets on the right of the text, we will need to customize the ribbon in PowerPoint!
In the quick access toolbar, “Right Click” to open the context menu. Then click on the “Customize the Ribbon” option from the menu. This will open a dialog box.
Step-2: Click on “All Commands”
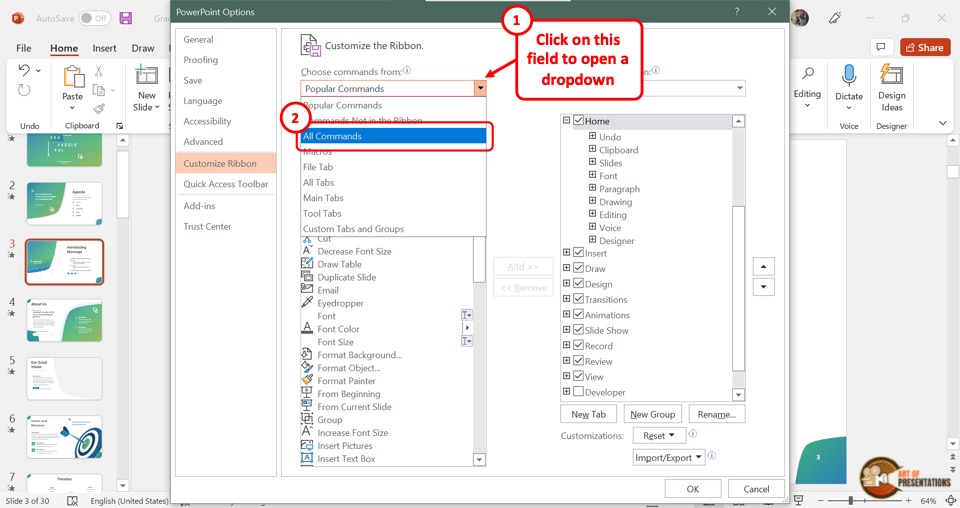
In the “PowerPoint Options” dialog box, click on the “Choose commands from” option which is on the left side. Then click on the “All Commands” option from the dropdown menu.
Step-3: Click on the “Right-to-Left” option
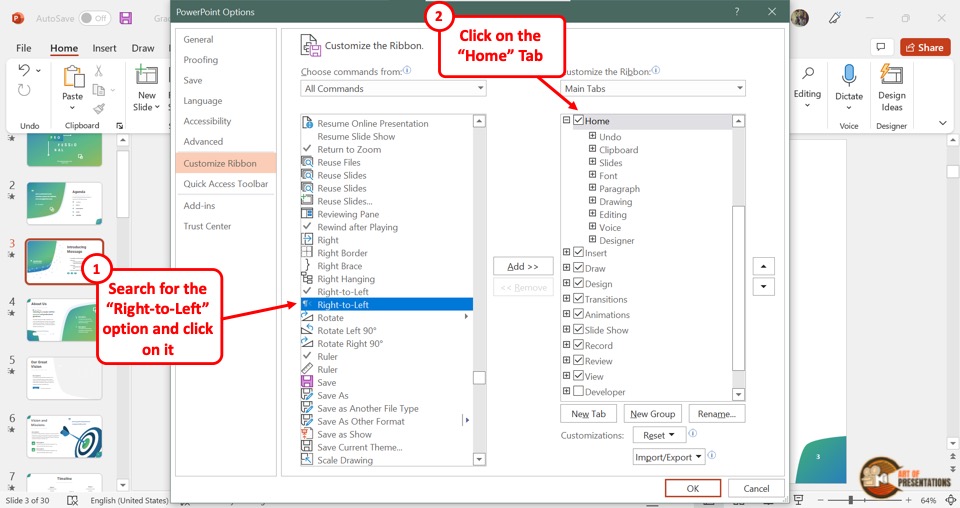
In the alphabetized list under “All Commands”, scroll down and click on the “Right-to-Left” option for text directions. It is the second “Right-to-Left” option with a paragraph icon beside it.
Step-4: Click on the “New Group” button
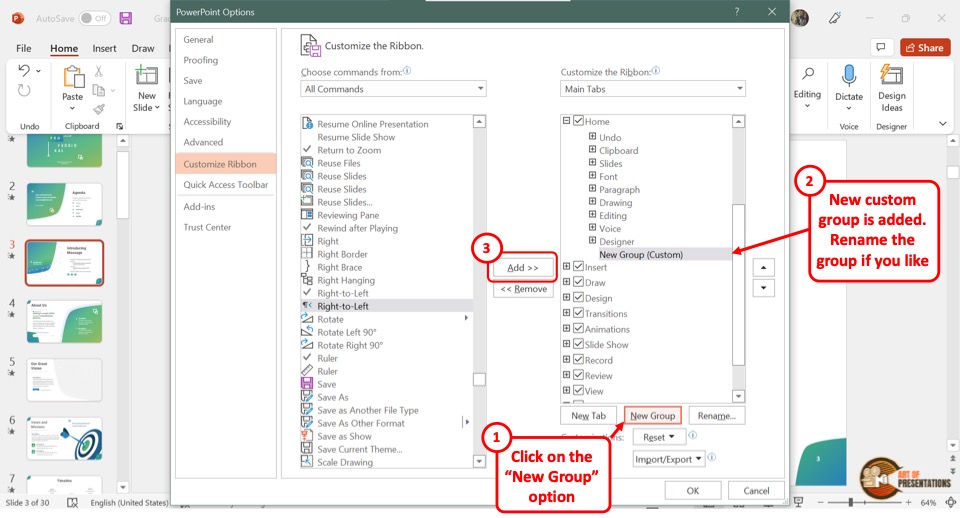
On the right side of the “PowerPoint Options” dialog box, click on the “Home” option under “Main Tabs”. Then click on the “New Group” button at the bottom to add a new group to the “Home” tab of the menu ribbon.
Step-5: Click on the “Add” button
Now you have to click on the “Add” button between the two columns in the “PowerPoint Options” dialog box (as shown in the image in the previous step).
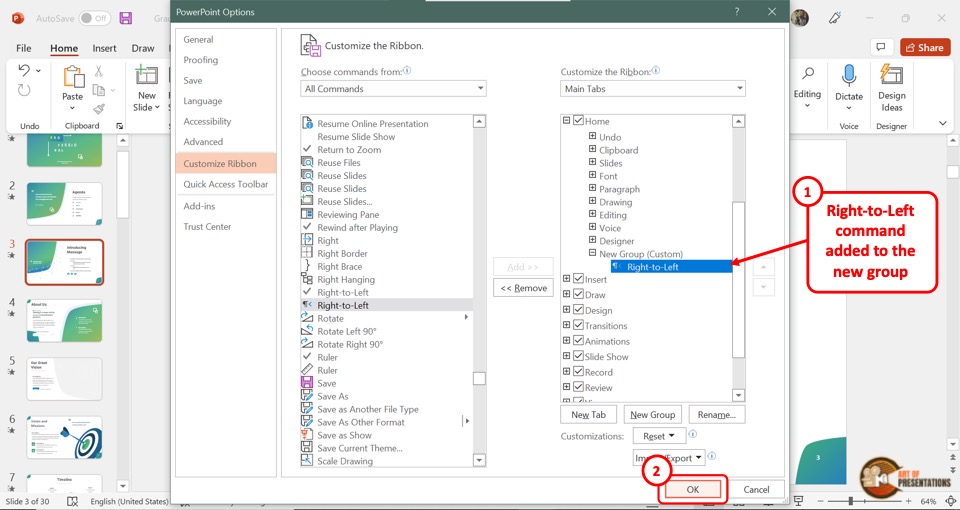
You will see the “Right-to-Left” option appear under the “New Group(Custom)” in the right column.
Step-6: Click on “OK”
Click on the “OK” button at the bottom of the dialog box. The “Right-to-Left” option will now be available in the quick access toolbar under the “Home” tab.
Step-7: Click on “Right-to-Left”
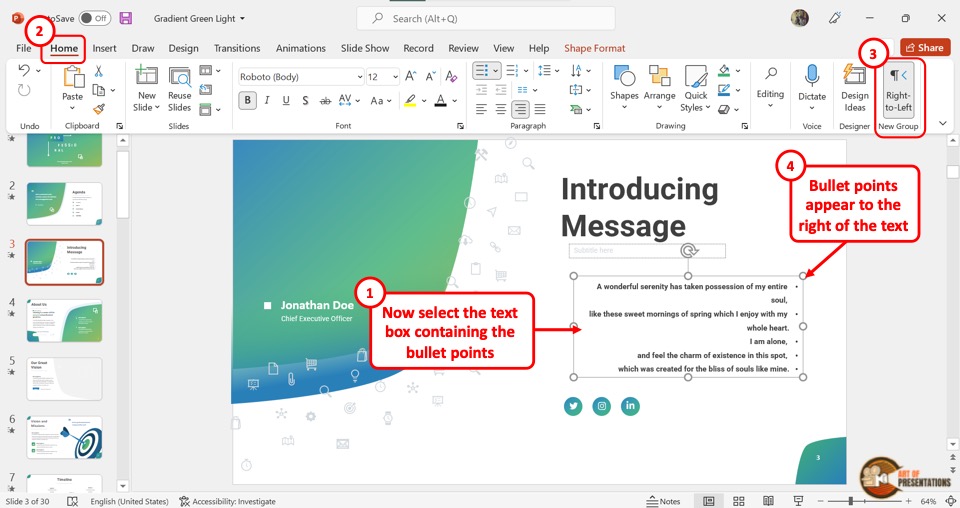
Now all you have to do is select the text box with the bullet points and then click on the “Right-to-Left” option in the “Home” menu. The bullet points will shift to the right side of the text.
11. Bullets Not Working in PowerPoint? Here’s What to Do!
In Microsoft PowerPoint, the “Bullets” feature may quit working if the slide layouts conflict with the master slide formats. This is likely to happen when you import a slide from a different presentation.
To fix this issue, follow the simple steps mentioned below –
Step-1: Click on the “Slide Master” option
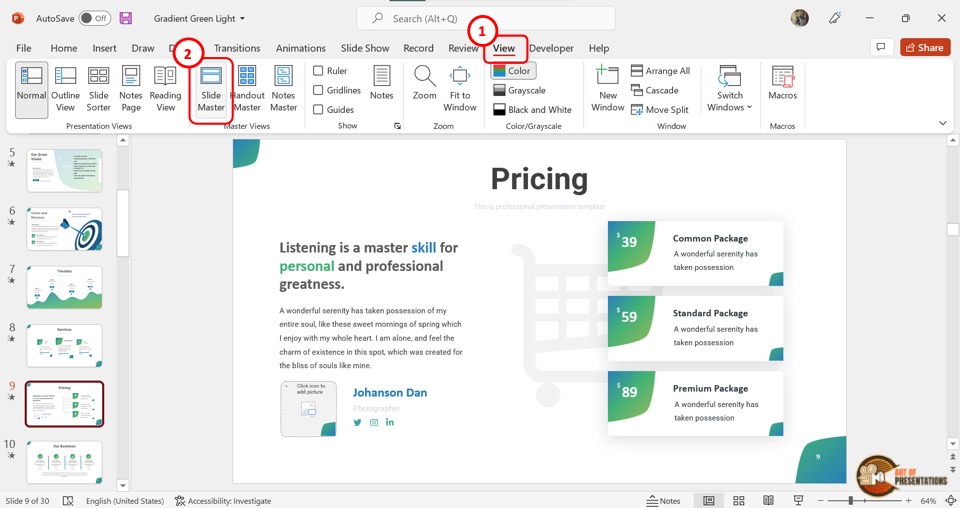
To fix the bullet points, you have to fix the bullet format in the master slide. First, click on the “View” tab in the menu ribbon which is located at the top of the screen.
Then click on the “Slide Master” option in the “Master Views” section of the “View” menu.
Step-2: Click on the “Home” tab
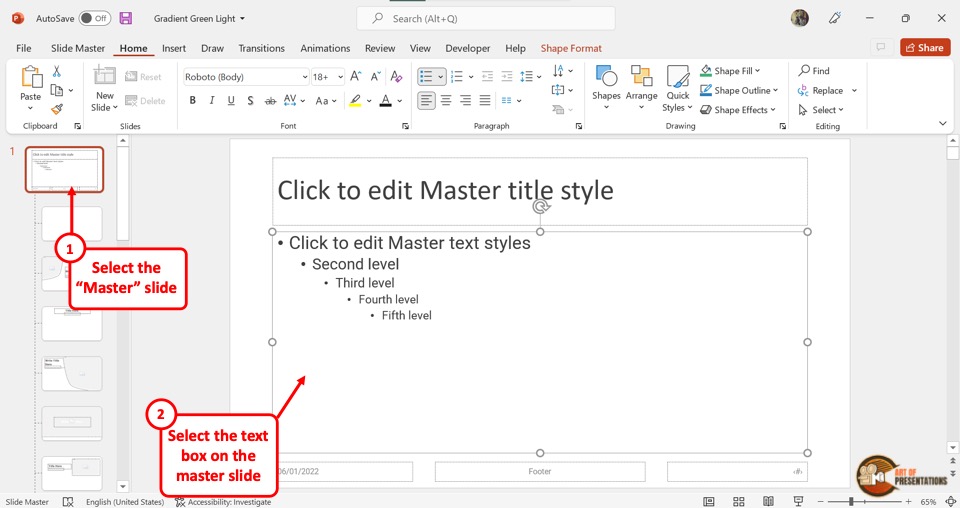
In the “Slide Master” view, click on the master slide. It is the first slide in the slide layout pane on the left side of the screen. In the master slide, click on the content placeholder that contains the body text.
Then click on the “Home” tab from the menu ribbon.
Step-3: Click on the “Bullets and Numbering” option
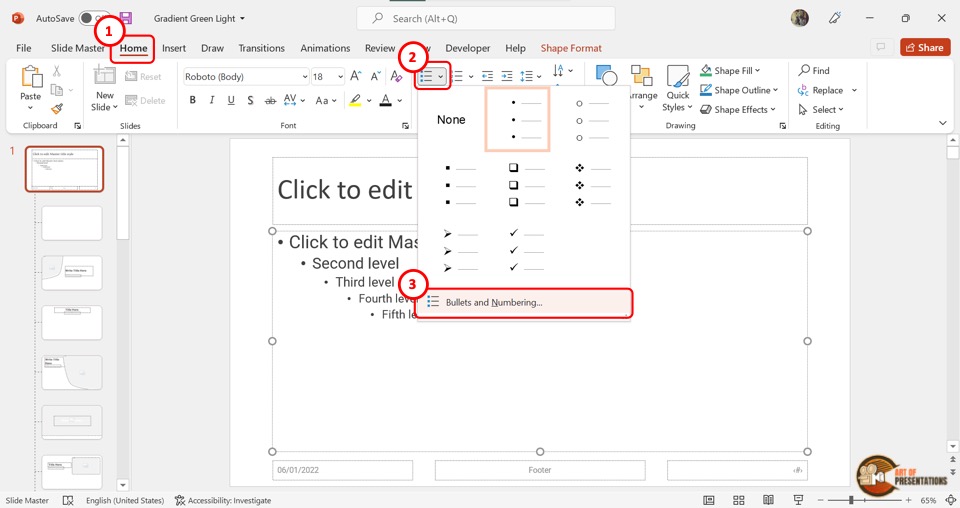
In the “Paragraph” section of the “Home” menu, click on the “Bullets” icon. Then click on the “Bullets and Numbering” option in the dropdown menu under the “Bullets” icon. This will open a dialog box.
Step-4: Customize the bullet point
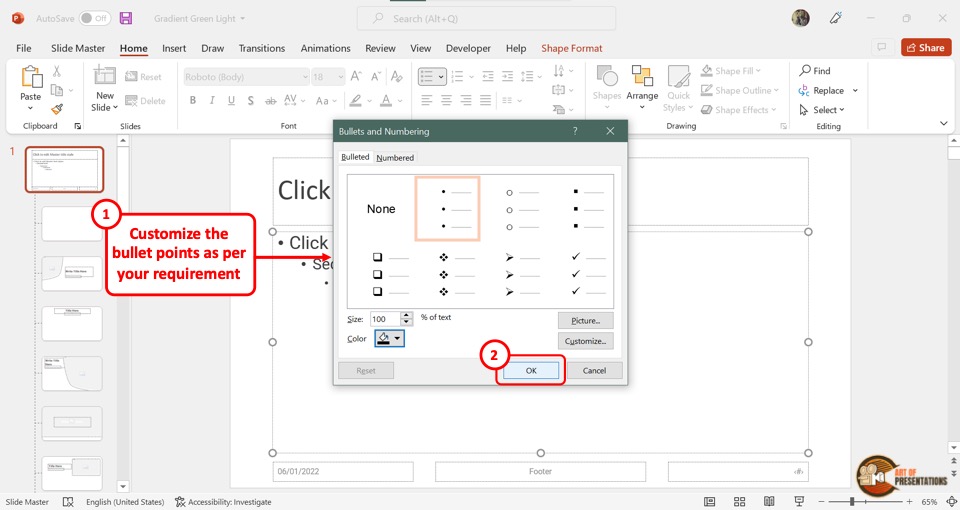
In the “Bullets and Numbering” dialog box, you can customize the bullets and change the bullet styles. Follow the steps mentioned in section 3 and section 5 of this article to change the style of bullets and customize them.
Then click on the “OK” button at the bottom of the dialog box.
Step-5: Click on the “Close Master View” button

To save the bullet formatting in the master slide, all you have to do is click on the “Slide Master” tab. Then click on the “Close Master View” button. This will return the presentation to the “Normal” view.
Step-6: Select All the Slides in the Presentation
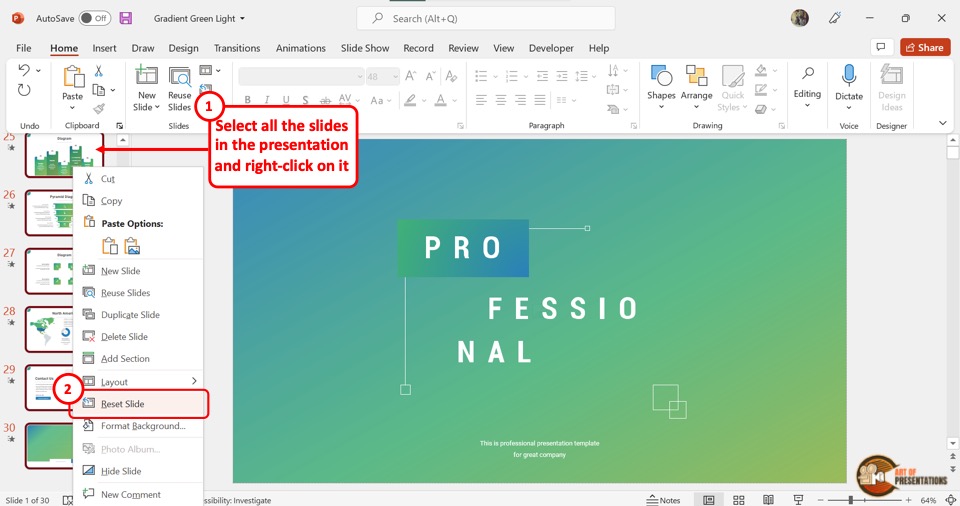
In the “Normal” view, you have to apply the changes in the master slide to all the slides in the presentation.
To do so, you have to first click anywhere in the slide thumbnail pane on the left side of the screen. Then press the “Ctrl+A” keys on your keyboard to select all the slides.
Step-7: Click on the “Reset Slide” option
Now all you have to do is “Right Click” in the slide thumbnail pane to open the context menu. Click on the “Reset Slide” option in the context menu (as shown in the image in the previous step).
This will apply the bullet format from the master slide to all the slides. The “Bullets” feature will now work perfectly.
Credit to drobotdean (on Freepik) for the featured image of this article (further edited).