![How to Add a Border in Google Slides? [Complete Guide!]](https://artofpresentations.com/wp-content/uploads/2023/02/Featured-Image-1-4.jpg)
Establishing lines, hierarchies and shapes is a perfect way of having an organized layout in your slides, and borders are what give slides the final touch. The borders in your Google presentations can draw attention to anything you want your audience to focus on.
To add a border in Google Slides, you can select your preferred border style from the dropdown list of the “Border dash” option. Its icon looks like three horizontal dashed lines. Customize the border thickness or its color by clicking on the parallel icons of “Border Weight” and ” Border Color”.
This article is a complete guide for you to add a border in Google Slides. Let’s try experimenting with different border styles and colors to find the one that works best for your presentation!
1. Adding Border in Google Slides
In Google Slides, the “Borders and lines” option allows you to add borders to any object on a slide. To quickly add a border, you can also use the three border options available in the toolbar: “Border Dash”, “Border Weight” and “Border Color”.
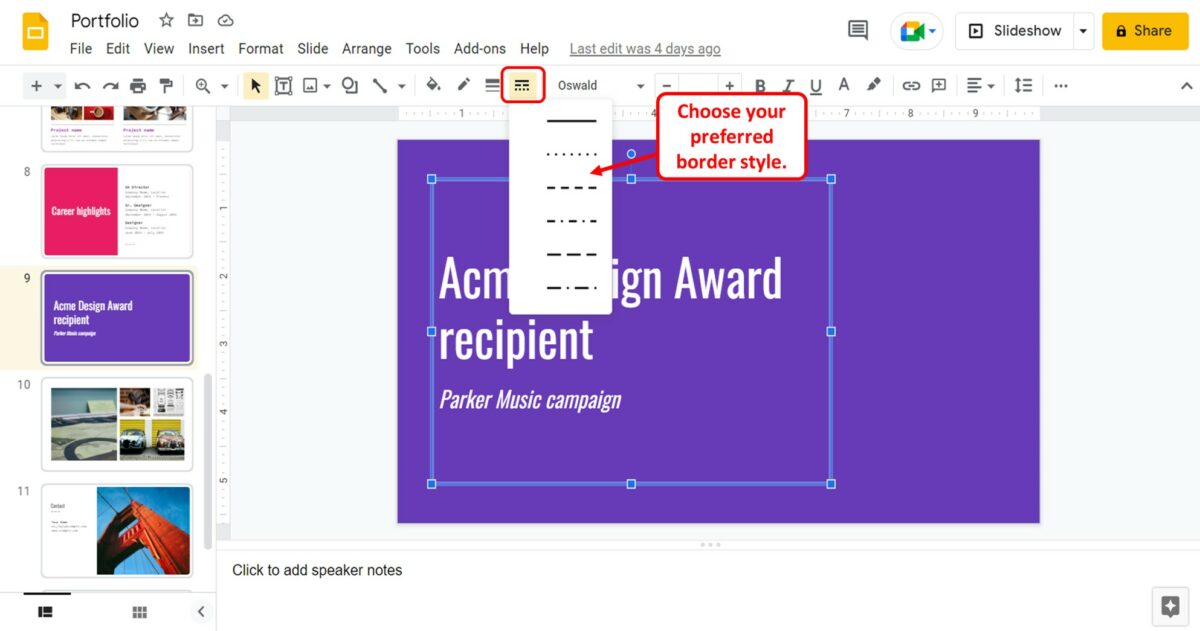
1.1 Border Line Type (Border Dash)
The “Border dash” option allows you to select the borderline type. The icon looks like three horizontal dashed lines. In the dropdown list under the “Border dash” option, you can select your preferred border style.
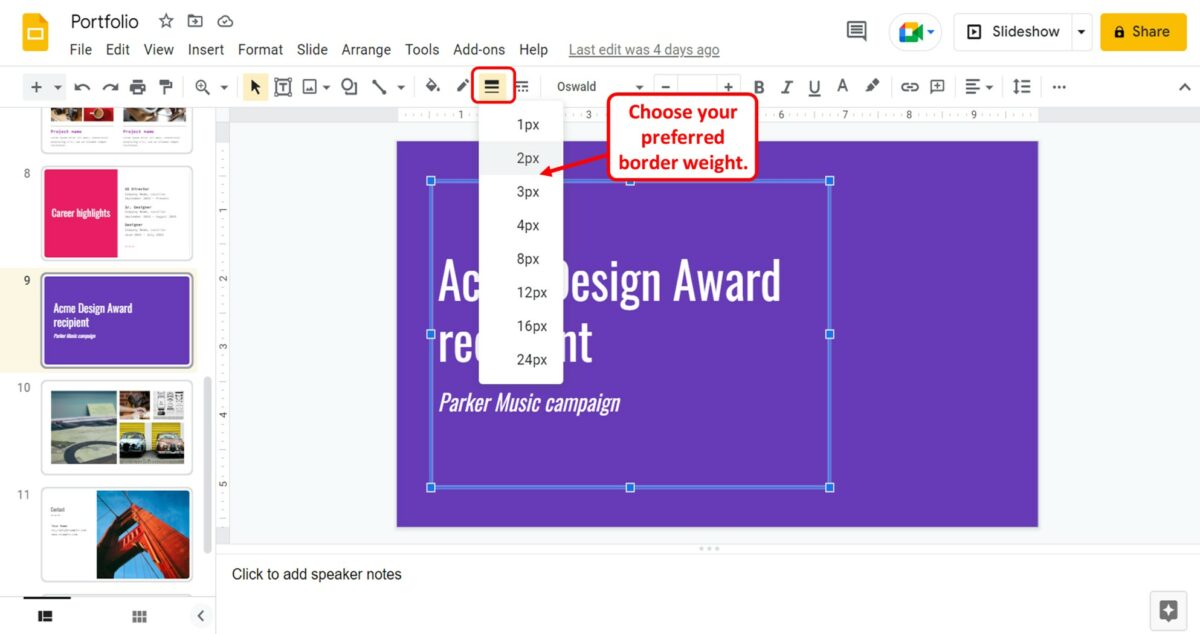
1.2 Border Weight (Thickness)
The “Border weight” option contains a dropdown list of preset border thickness. You can select your preferred thickness for the border. The “Border weight” option is the icon that looks like three horizontal thick lines and is located on the left of the “Border dash” icon in the toolbar.
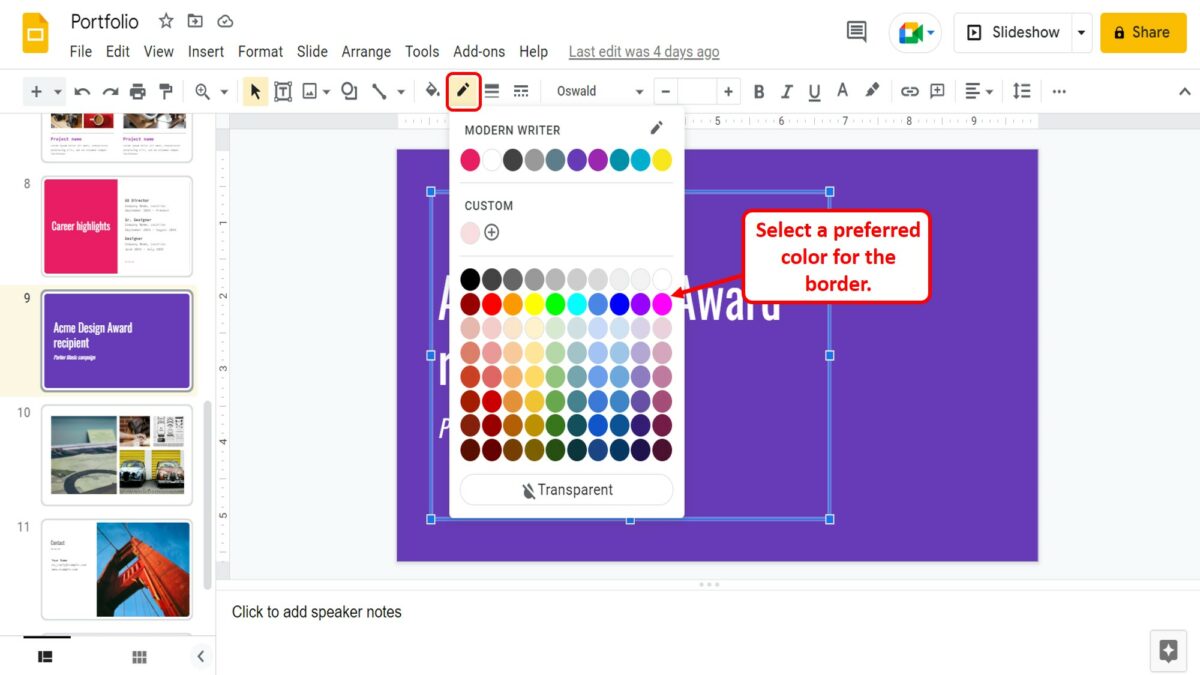
1.3 Border Color
The “Border color” option is located to the left of the “Border weight” option in the toolbar. In the dropdown menu under the “Border color” option, you can select a preferred color for the border.
2. How to Remove Border in Google Slides?
In Google Slides, you can easily remove a border by turning the border color transparent. To do so, follow the 2 quick steps.
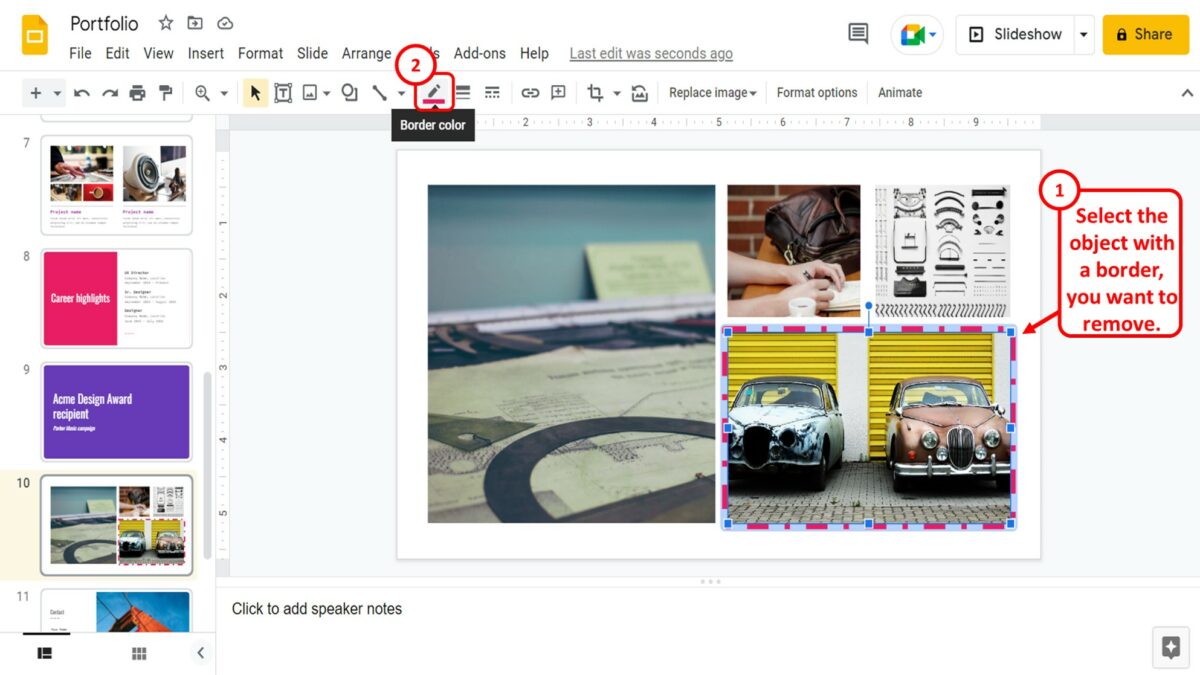
Step-1: Click on the “Border color” option
The first step is to select the object with a border that you want to remove. Then click on the “Border color” option in the toolbar.
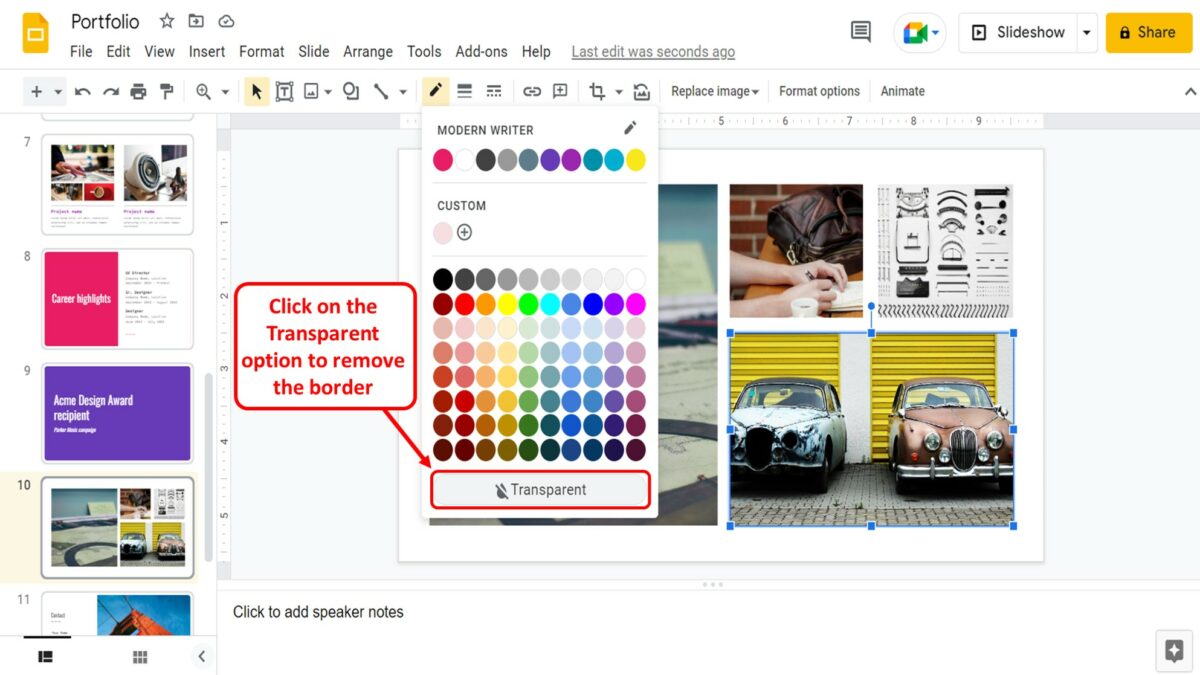
Step-2: Click on the “Transparent” option
Now all you have to do is click on the “Transparent” option at the bottom of the dropdown menu under the “Border color” option to remove the border.
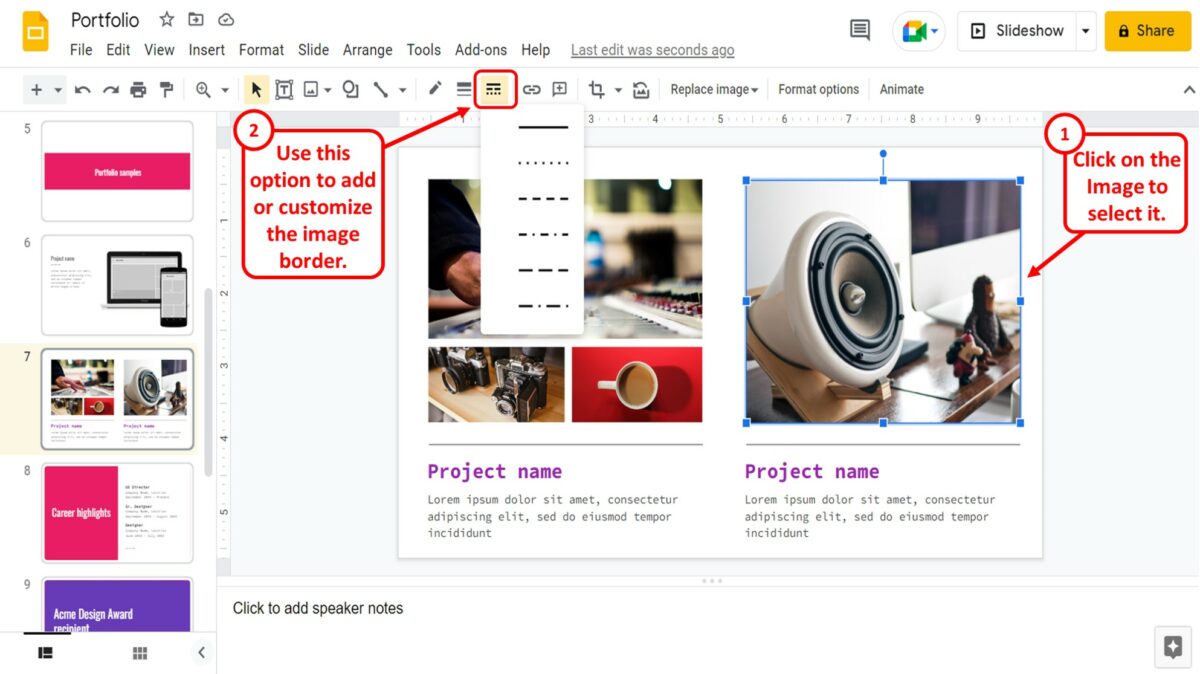
3. How to Add a Border to Images in Google Slides?
To add a border to an image in Google Slides, you have to first click on the image to select it. Then all you have to do is use the three border options in the toolbar discussed in section 1 to add and customize the image border.
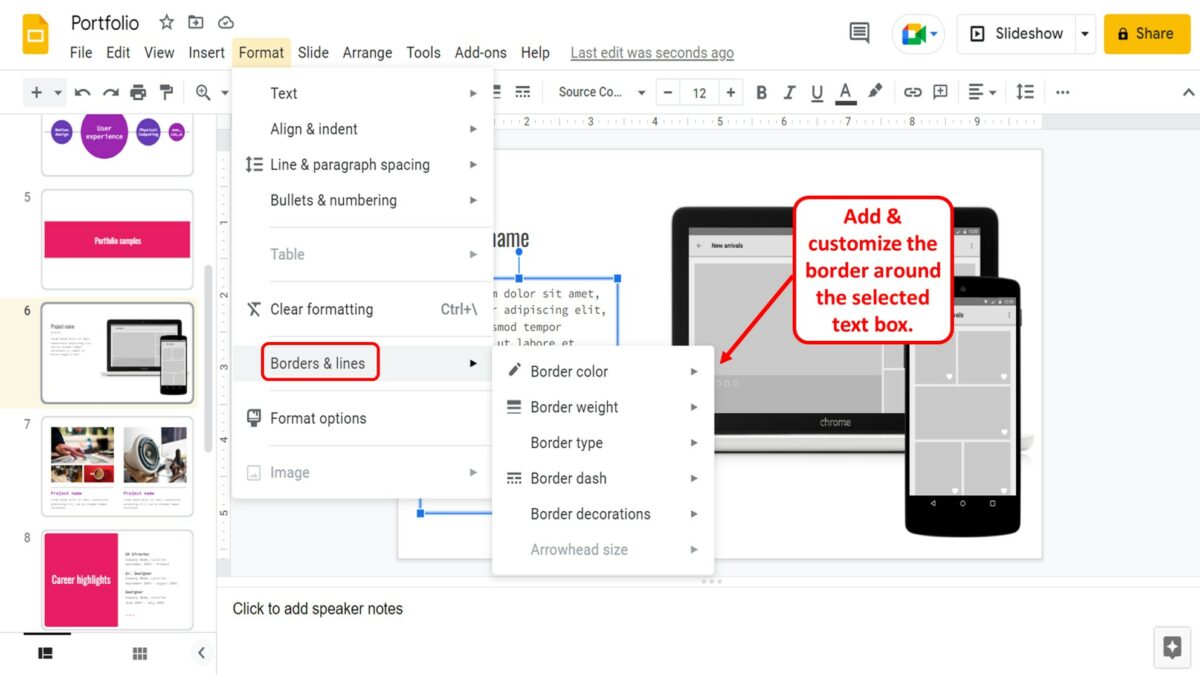
4. How to Put a Border Around Text in Google Slides?
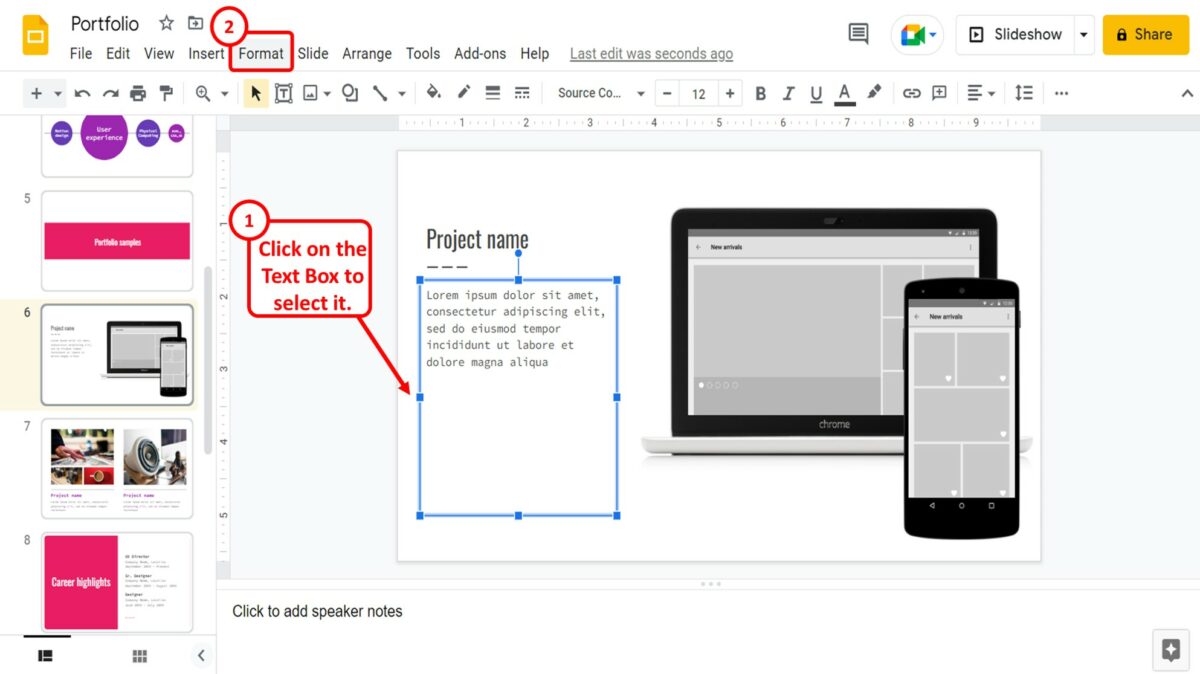
The “Format” menu in Google Slides allows you to add and customize borders for any object including text boxes. To add a border around a text box, follow the 2 easy steps.
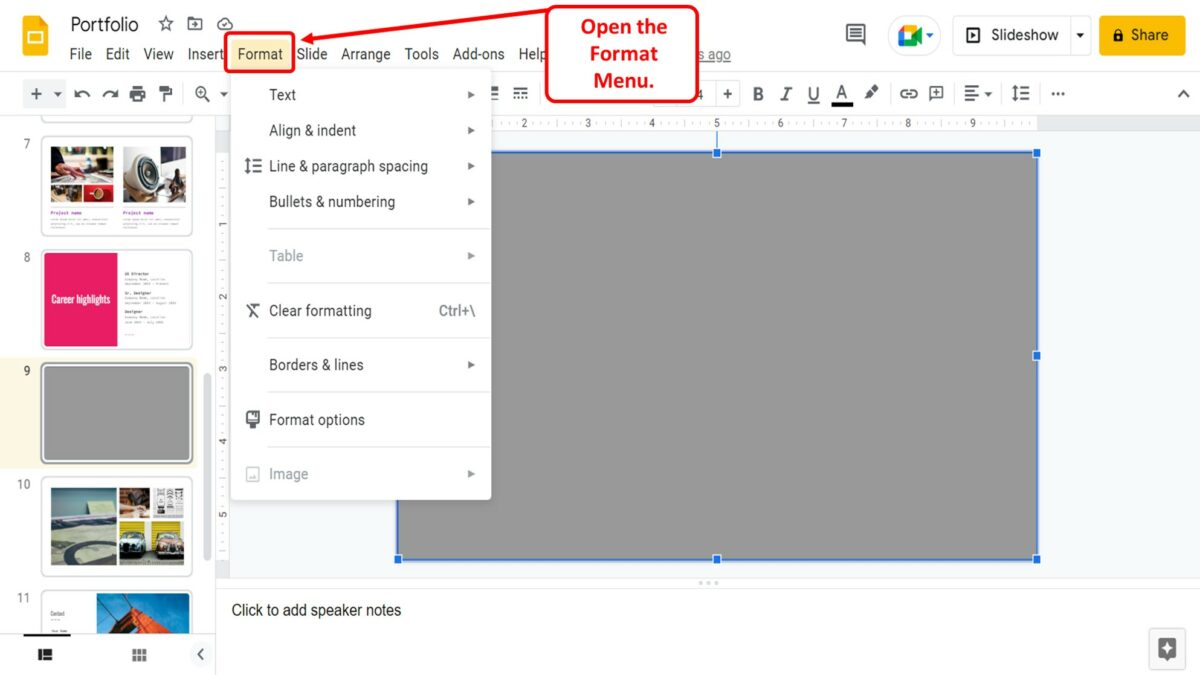
Step-1: Click on the “Format” menu
In the open slide, you have to first click on the text box to select it. Then click on the “Format” menu in the menu bar at the top of the screen.
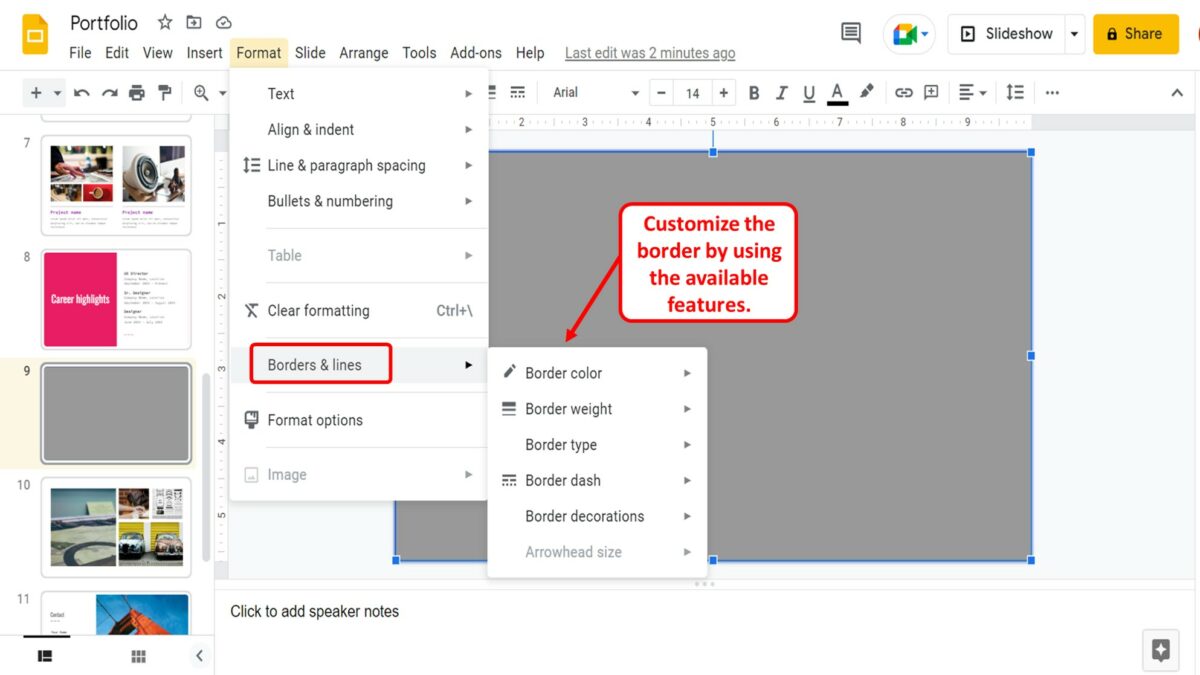
Step-2: Click on the “Borders and lines” option
In the “Format” menu, click on the “Borders and lines” option. This will open another pop-up menu containing a list of customization options to add and customize the border around the selected text box.
5. How to Add a Table Border in Google Slides?
To add borders to a table in Google Slides, click on the table to select it. Then you can click on the “Border dash” option in the toolbar to add the border to the table. Note that the border will be added to all the cells in the table.

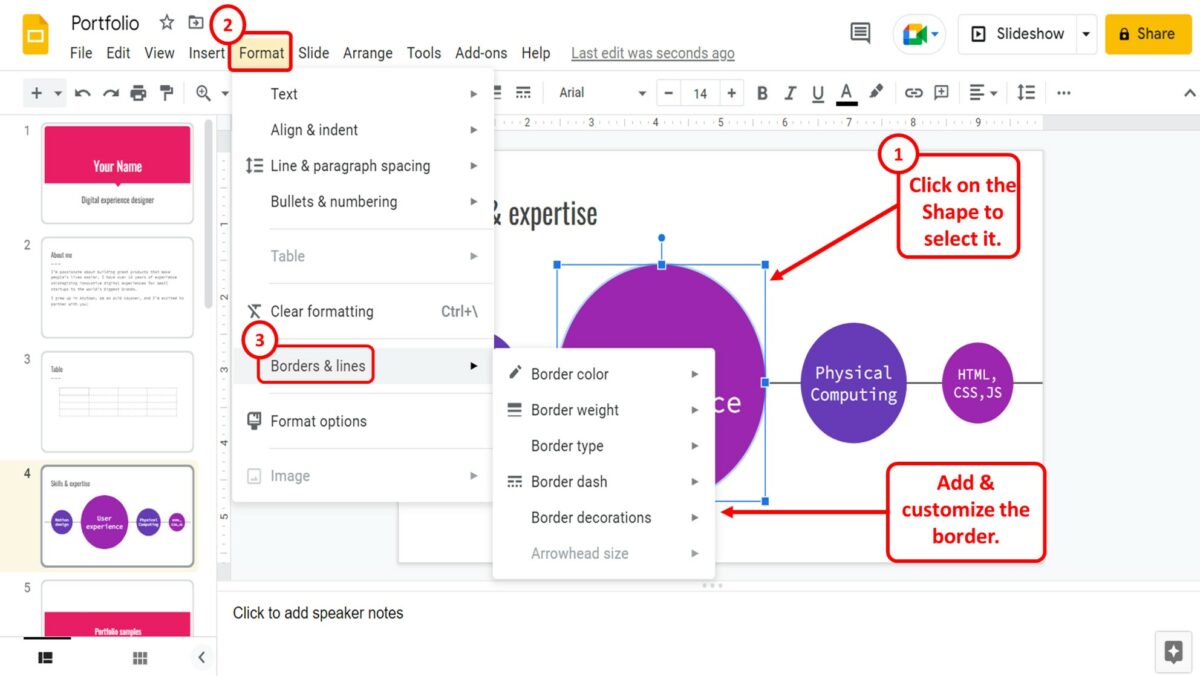
6. How to Add Border to a Shape in Google Slides?
Using the “Format” menu in Google Slides, you can easily add a border to a shape. First, click on the shape to select it. Then click on the “Format” menu in the menu bar at the top of the screen. In the “Format” menu, click on the “Borders and lines” option. Now all you have to do is add and customize the border using the options in the pop-up menu by the “Borders and lines” option.
7. How to Add Border to a Slide in Google Slides?
In Google Slides, you can only add a border to an object in a slide. There is no feature available to add a border to an entire slide, However, you can use the “Shape” option to add a border to a slide. All you have to do is follow the 7 simple steps.
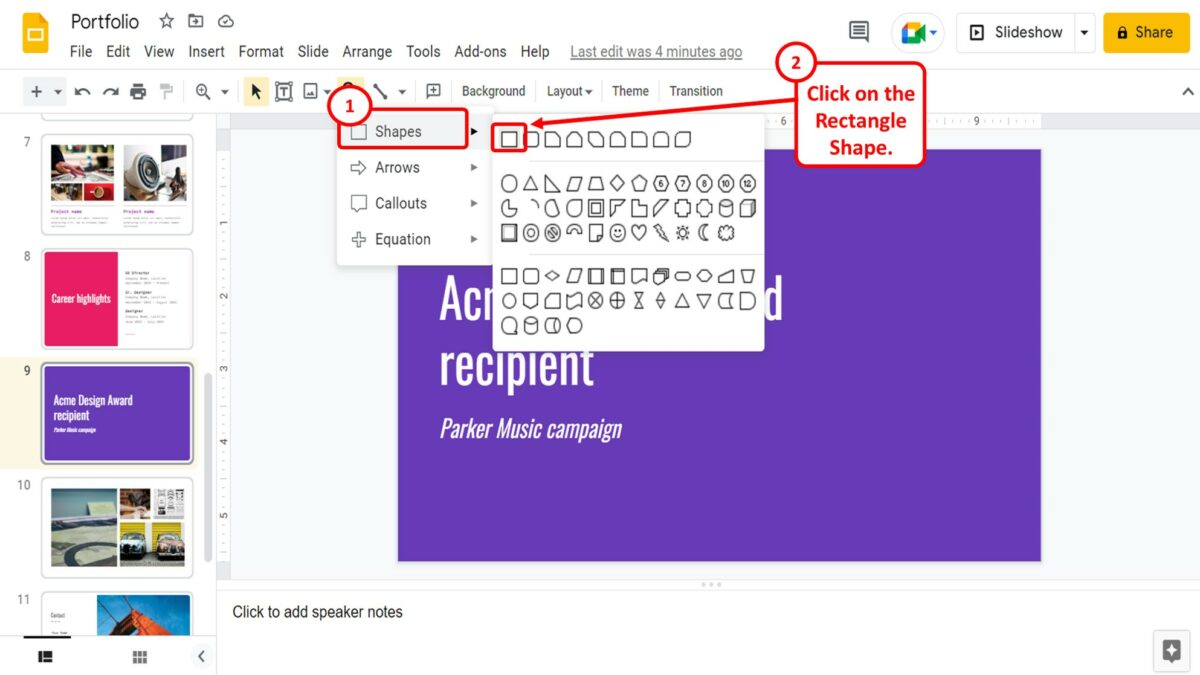
Step-1: Click on the “Shape” option
The first step is to open the slide where you want to add the border. In the toolbar under the menu bar located at the top of the screen, click on the “Shape” icon.

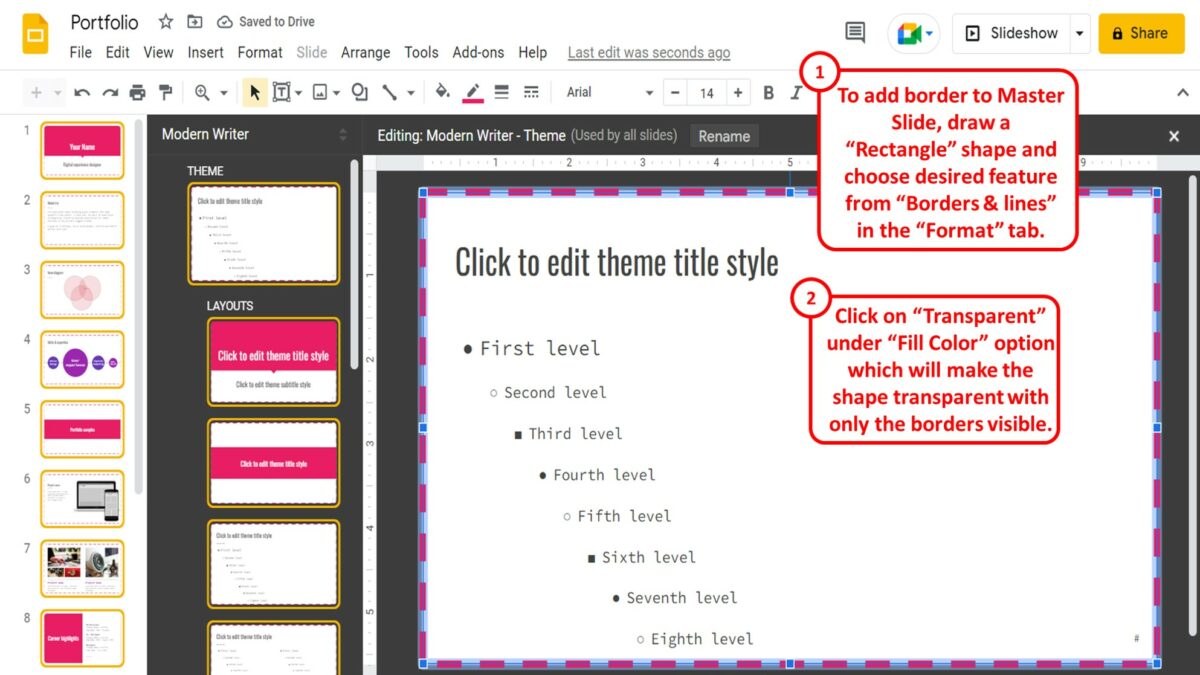
Step-2: Select the “Rectangle” shape
In the dropdown menu under the “Shape” icon, click on the “Shapes” option. Click on the “Rectangle” shape from the list of shapes.
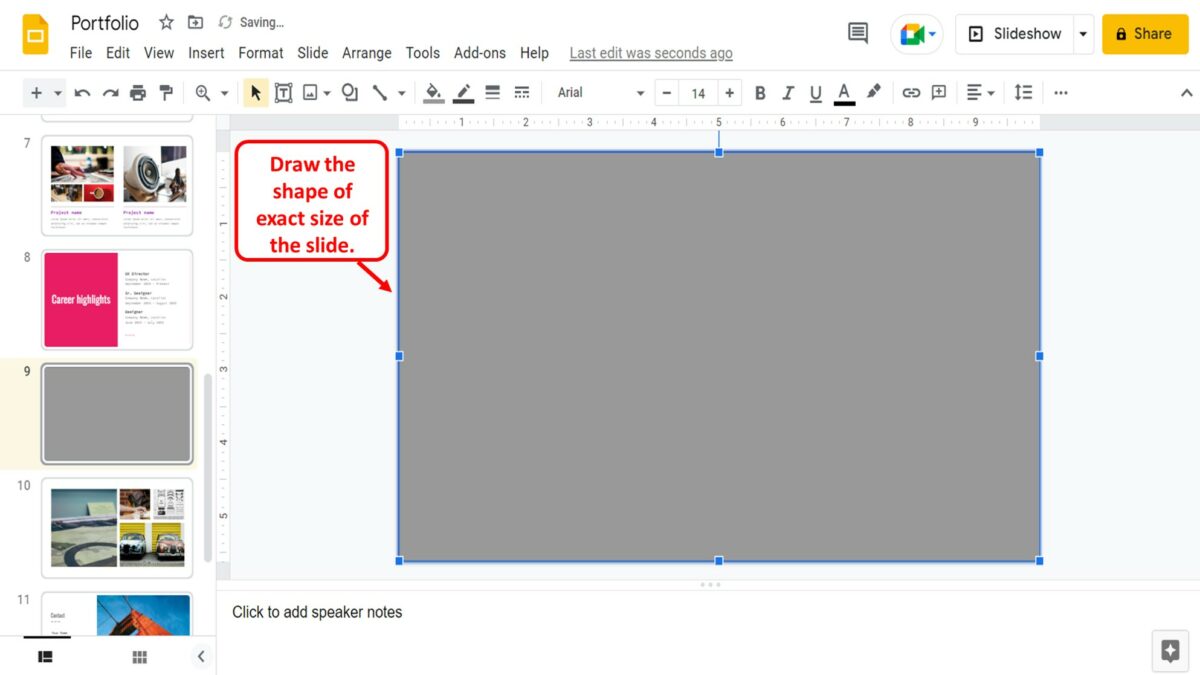
Step-3: Draw the shape
The next step is to draw the shape over the slide. Make sure the shape is exactly the size of the slide.
Step-4: Click on the “Format” menu
In the menu bar, you have to now click on the “Format” option. It will open the dropdown “Format” menu.
Step-5: Click on the “Borders and lines” option
In the “Format” menu, click on the “Borders and lines” option. It will open a pop-up menu by the “Borders and lines” option. Using the features available in the pop-up menu, you can customize the border.
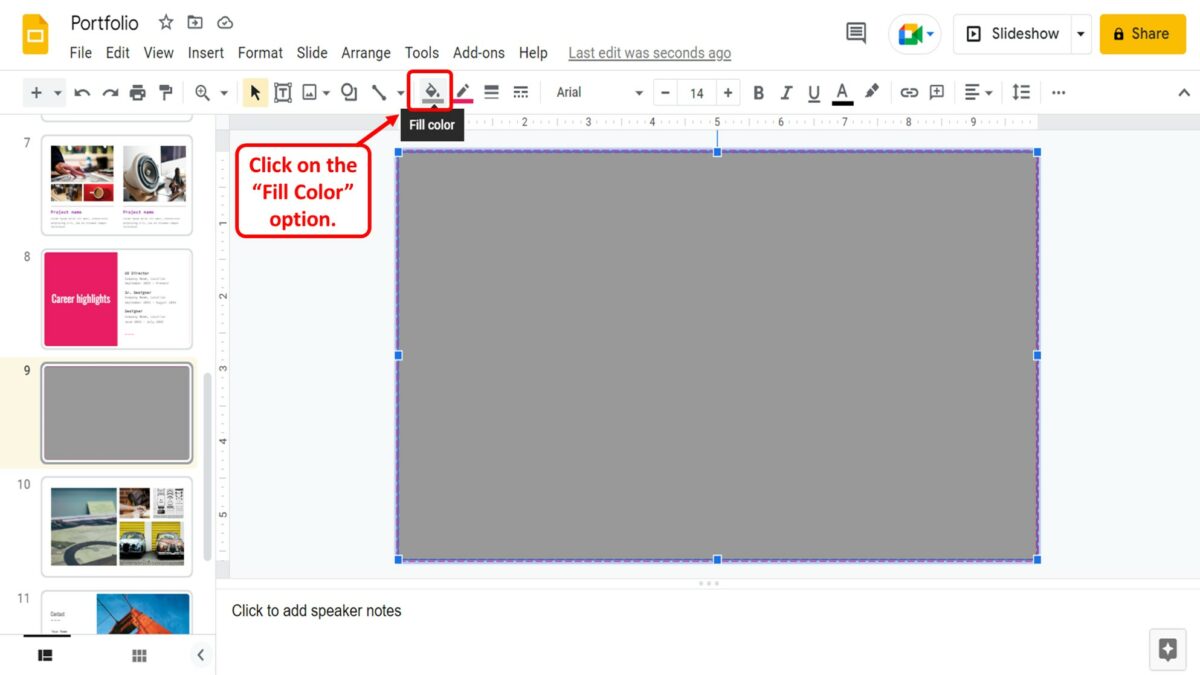
Step-6: Click on the “Fill color” option
The next step is to click on the “Fill color” option. It is the paint bucket icon in the toolbar.
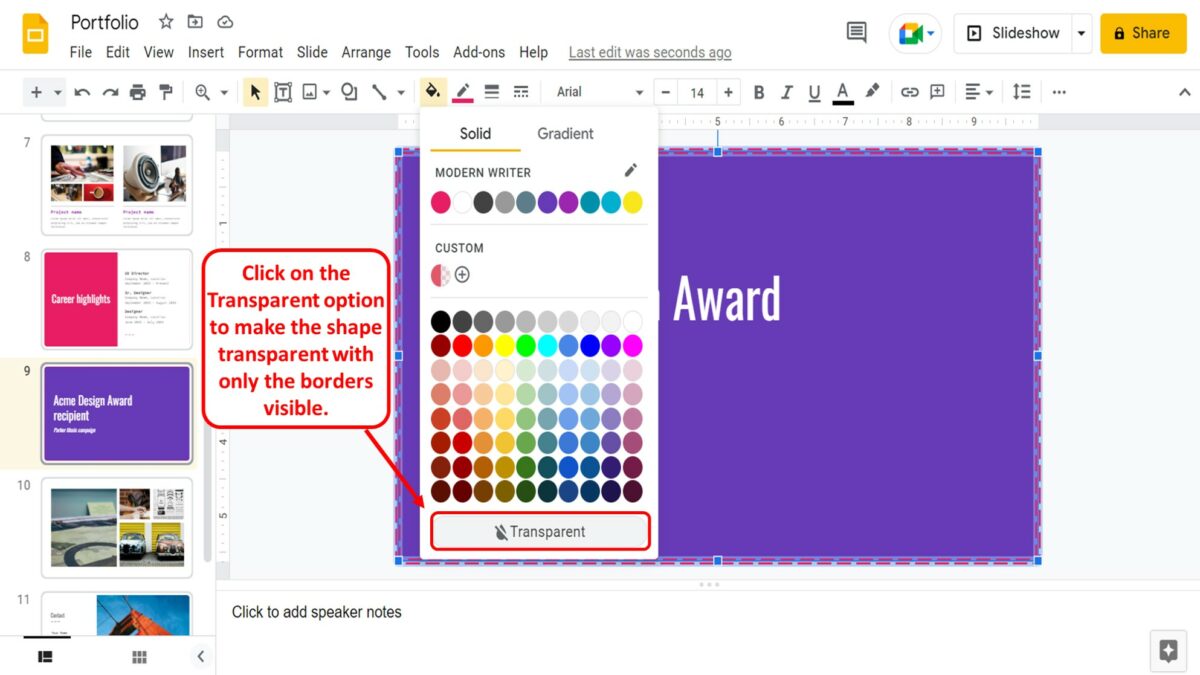
Step-7: Click on the “Transparent” option
In the dropdown menu under the “Fill color” option, click on the “Transparent” option. This will make the shape transparent with only the borders visible.
7.1 How to Add Border to Every Slide in Google Slides?
To add borders to all the slides in a Google Slides presentation, you have to add a border to the master slide. All you have to do is follow the 5 easy steps.
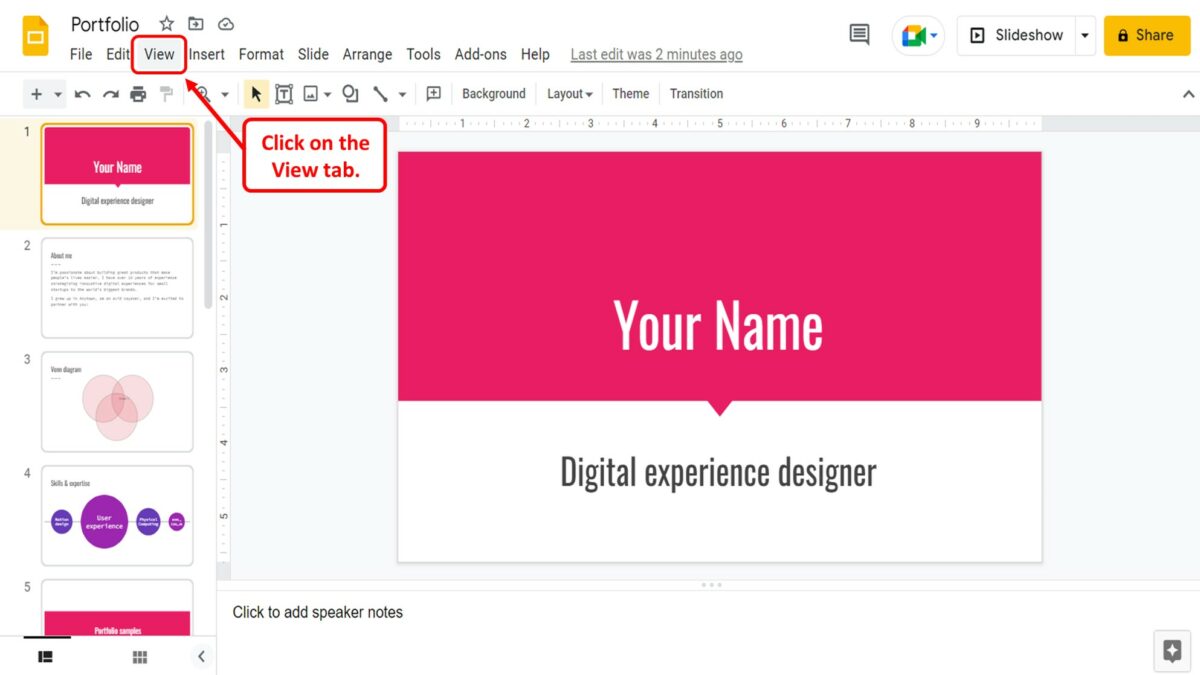
Step-1: Click on the “View” menu
The first step is to open the master slide. To do so, click on the “View” tab in the menu bar located at the top of the screen.
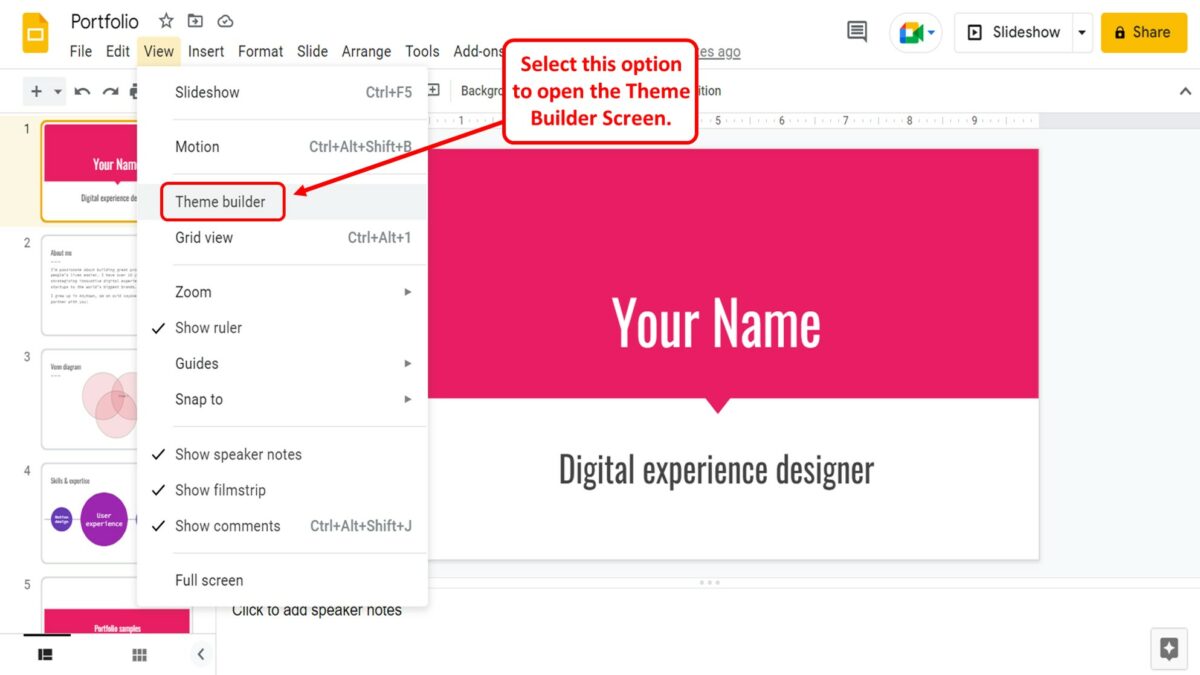
Step-2: Click on the “Theme builder” option
In the “View” menu, click on the “Theme builder” option. This will open the “Theme Builder” screen.
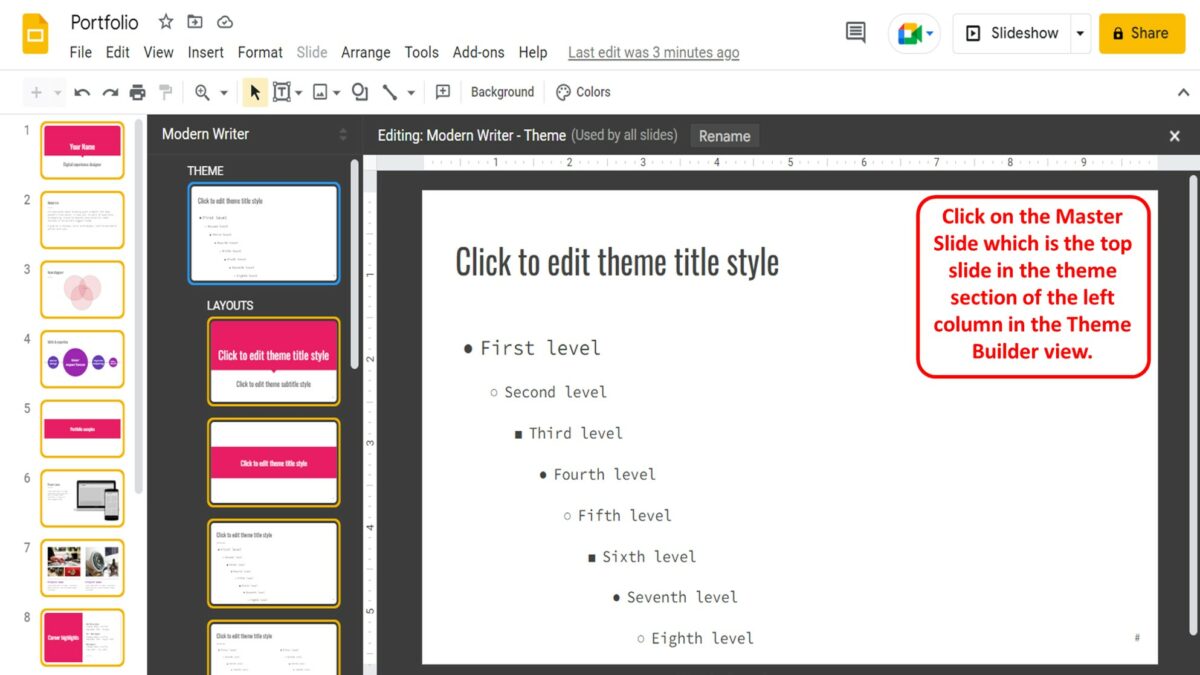
Step-3: Click on the master slide
Now you have to click on the master slide. It is the top slide in the “Theme” section of the left column in the “Theme builder” view.
Step-4: Add the border
In the master slide, you can now add the border. The process of adding a border to the master slide is the same as adding a border to any slide. All you have to do is follow the 7 steps detailed in section 7.
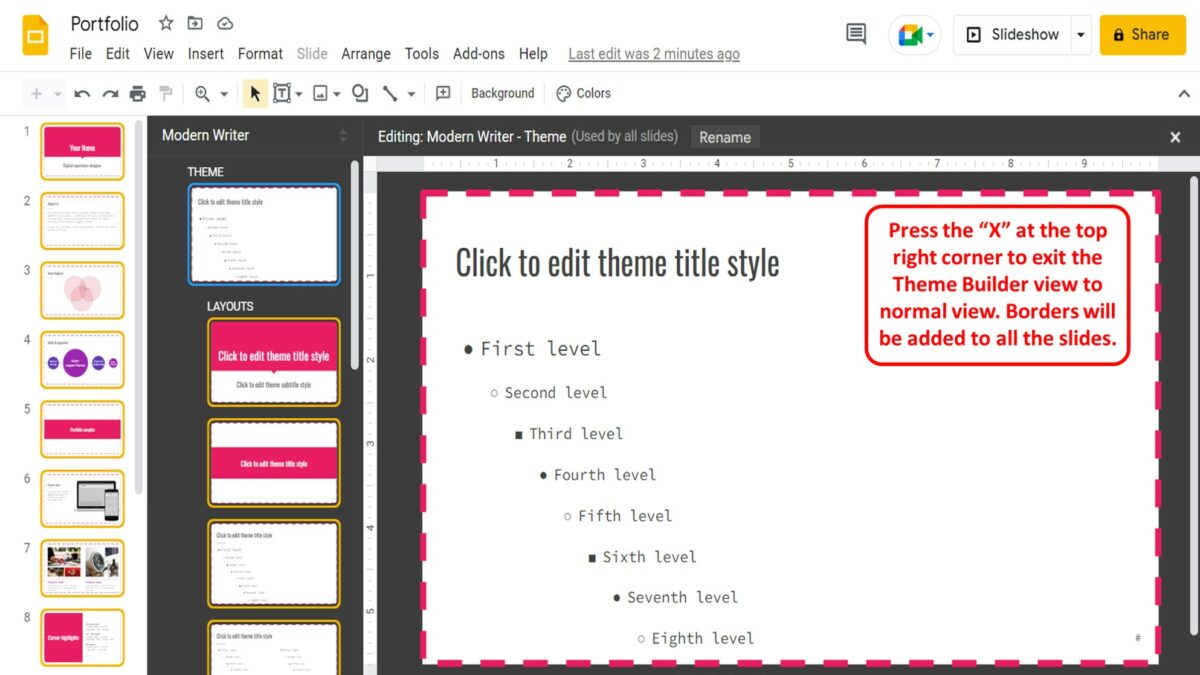
Step-5: Click on the “Close” option
Finally, you can press the “X” icon at the top right corner of the “Theme Builder” screen to close the “Theme builder” view and return to the normal view. The border will be added to all the slides.